Note
Access to this page requires authorization. You can try signing in or changing directories.
Access to this page requires authorization. You can try changing directories.
Saving and sharing versions of code with a team are the most common things done when using version control. Git has an easy three-step workflow for these tasks:
- Create a new branch for work
- Commit changes
- Push the branch to share it with the team
Git makes it easy to manage work using branches. Every bugfix, new feature, added test, and updated configuration starts with a new branch. Branches are lightweight and local to the development machine, so you don't have to worry about using resources or coordinating changes with others until it's time to push the branch.
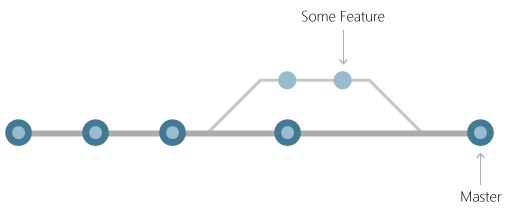
Branches enable you to code in isolation from other changes in development. Once everything's working, the branch and its changes are shared with your team. Others can experiment with the code in their own copy of the branch without it affecting work in progress in their own branches.
Create a branch
Create a branch based off the code in a current branch, such as main, when starting new work. It's a
good practice to check which branch is selected using git status before creating a new branch.
Create branches in Git using the git branch command:
> git branch <branchname>
The command to swap between branches in the repo is git checkout. After creating the branch, switch to
it before saving changes.
> git checkout <branchname>
Git has a shorthand command to both create the branch and switch to it at the same time:
> git checkout -b <branchname>
Learn more about working with Git branches in GitHub or Azure DevOps.
Save changes
Git doesn't automatically snapshot code as edits are made. Git must be told exactly which changes to add to the next snapshot. This is called staging. After staging your changes, create a commit to save the snapshot permanently.
Stage changes
Git tracks file changes made in the repo as they happen. It separates these changes into three categories:
- Unmodified files haven't been changed since the last commit.
- Modified files have changes since the last commit, but haven't been staged for the next commit.
- Staged files have changes that will be added to the next commit.
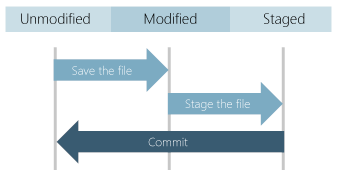
When you create a commit, only the staged changes and unchanged files are used for the snapshot. Unstaged changes are kept on the filesystem, but the commit uses the unmodified file in its snapshot.
Commit changes
Save changes in Git by creating a commit. Each commit stores the full file contents of the repo in each commit, not just individual file changes. This behavior is different than other version control systems that store the file-level differences from the last version of the code. Full file histories let Git make better decisions when merging changes and it makes switching between branches of code lightning fast.
Stage changes with git add to add changed files, git rm to remove files, and git mv to move
files. Then, use git commit command to create the commit.
Usually, developers want to stage all changed files in the repo:
> git add –all
Then, commit the changes with a short description:
> git commit -m "Short description of changes."
Every commit has a message that describes its changes. A good commit message helps the developer remember the changes they made in a commit. Good commit messages also makes it easier for others to review the commit.
Learn more about staging files and committing changes in Visual Studio or Visual Studio Code.
Share changes
Whether working on a team or just wanting to back up their own code, developers need to share commits
with a repo on another computer. Use the git push command to take commits from the local repo and
write them into a remote repo. Git is set up in cloned repos to connect to the source of the clone,
also known as origin. Run git push to write the local commits on your current branch to another
branch (branchname) on this origin repository. Git creates branchname on the remote repo if
it doesn't exist.
> git push origin
If working in a repo created on the local system with git init, you'll need to set up a connection
to the team's Git server before changes can be pushed. Learn more about setting up remotes and pushing
changes in Visual Studio or
Visual Studio Code.
Share branches
Pushing a local branch to the team's shared repo makes its changes accessible to the rest of the
team. The first time git push is run, adding the -u option tells Git to start tracking the
local branch to branchname from the origin repo. After this one-time setup of tracking information,
team members can use git push directly to share updates quickly and easily.
> git push origin <branchname>
Next steps
Learn more about branches in GitHub or Azure DevOps.
Learn more about pushing commits and branches in Visual Studio or Visual Studio Code.