Note
Access to this page requires authorization. You can try signing in or changing directories.
Access to this page requires authorization. You can try changing directories.
The Azure Developer CLI (azd) has been extended to support deploying .NET Aspire projects. Use this guide to walk through the process of creating and deploying a .NET Aspire project to Azure Container Apps using the Azure Developer CLI. In this tutorial, you'll learn the following concepts:
- Explore how
azdintegration works with .NET Aspire projects - Provision and deploy resources on Azure for a .NET Aspire project using
azd - Generate Bicep infrastructure and other template files using
azd
Prerequisites
To work with .NET Aspire, you need the following installed locally:
- .NET 8.0 or .NET 9.0
- An OCI compliant container runtime, such as:
- Docker Desktop or Podman. For more information, see Container runtime.
- An Integrated Developer Environment (IDE) or code editor, such as:
- Visual Studio 2022 version 17.9 or higher (Optional)
- Visual Studio Code (Optional)
- C# Dev Kit: Extension (Optional)
- JetBrains Rider with .NET Aspire plugin (Optional)
For more information, see .NET Aspire setup and tooling, and .NET Aspire SDK.
You will also need to have the Azure Developer CLI installed locally. Common install options include the following:
How Azure Developer CLI integration works
The azd init workflow provides customized support for .NET Aspire projects. The following diagram illustrates how this flow works conceptually and how azd and .NET Aspire are integrated:
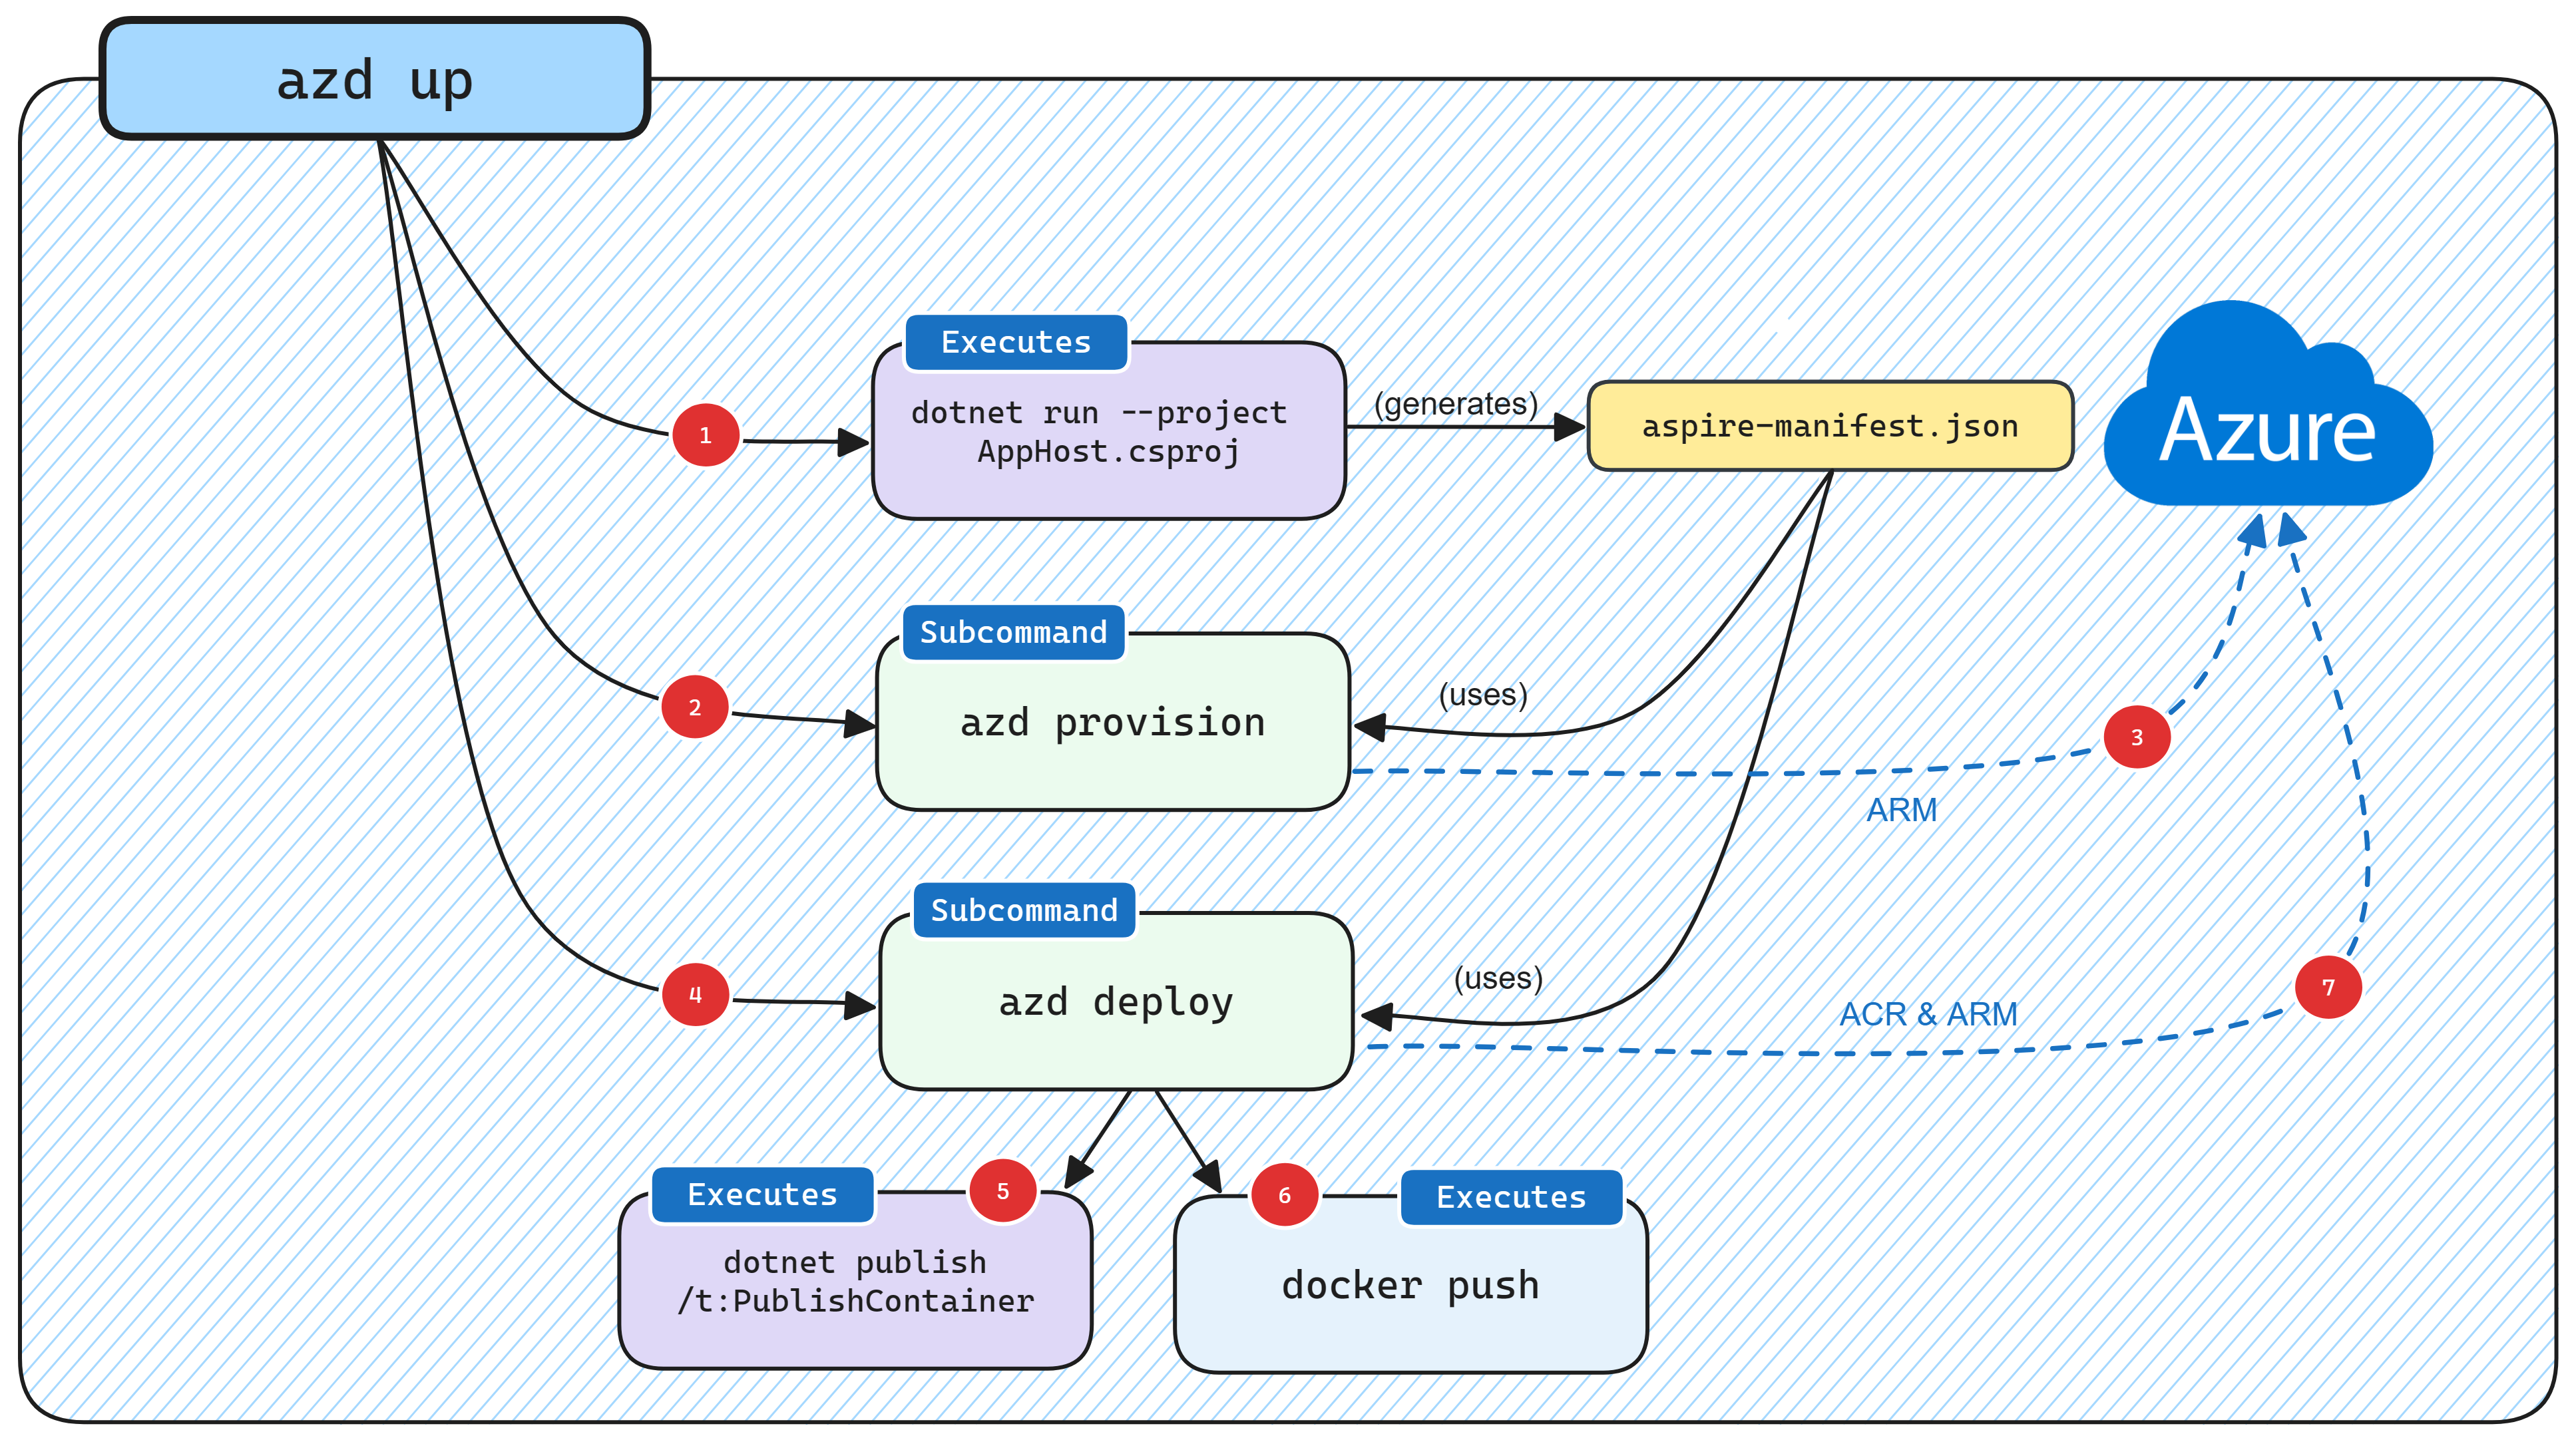
- When
azdtargets a .NET Aspire project it starts the AppHost with a special command (dotnet run --project AppHost.csproj --output-path manifest.json --publisher manifest), which produces the Aspire manifest file. - The manifest file is interrogated by the
azd provisionsub-command logic to generate Bicep files in-memory only (by default). - After generating the Bicep files, a deployment is triggered using Azure's ARM APIs targeting the subscription and resource group provided earlier.
- Once the underlying Azure resources are configured, the
azd deploysub-command logic is executed which uses the same Aspire manifest file. - As part of deployment
azdmakes a call todotnet publishusing .NET's built in container publishing support to generate container images. - Once
azdhas built the container images it pushes them to the ACR registry that was created during the provisioning phase. - Finally, once the container image is in ACR,
azdupdates the resource using ARM to start using the new version of the container image.
Note
azd also enables you to output the generated Bicep to an infra folder in your project, which you can read more about in the Generating Bicep from .NET Aspire app model section.
Provision and deploy a .NET Aspire starter app
The steps in this section demonstrate how to create a .NET Aspire start app and handle provisioning and deploying the app resources to Azure using azd.
Create the .NET Aspire starter app
Create a new .NET Aspire project using the dotnet new command. You can also create the project using Visual Studio.
dotnet new aspire-starter --use-redis-cache -o AspireSample
cd AspireSample
dotnet run --project AspireSample.AppHost\AspireSample.AppHost.csproj
The previous commands create a new .NET Aspire project based on the aspire-starter template which includes a dependency on Redis cache. It runs the .NET Aspire project which verifies that everything is working correctly.
Initialize the template
Open a new terminal window and
cdinto the directory of your .NET Aspire solution.Execute the
azd initcommand to initialize your project withazd, which will inspect the local directory structure and determine the type of app.azd initFor more information on the
azd initcommand, see azd init.Select Use code in the current directory when
azdprompts you with three app initialization options.? How do you want to initialize your app? [Use arrows to move, type to filter] > Use code in the current directory Select a template Create a minimal projectAfter scanning the directory,
azdprompts you to confirm that it found the correct .NET Aspire AppHost project. Select the Confirm and continue initializing my app option.Detected services: .NET (Aspire) Detected in: D:\source\repos\AspireSample\AspireSample.AppHost\AspireSample.AppHost.csproj azd will generate the files necessary to host your app on Azure using Azure Container Apps. ? Select an option [Use arrows to move, type to filter] > Confirm and continue initializing my app Cancel and exitEnter an environment name, which is used to name provisioned resources in Azure and managing different environments such as
devandprod.Generating files to run your app on Azure: (✓) Done: Generating ./azure.yaml (✓) Done: Generating ./next-steps.md SUCCESS: Your app is ready for the cloud! You can provision and deploy your app to Azure by running the azd up command in this directory. For more information on configuring your app, see ./next-steps.md
azd generates a number of files and places them into the working directory. These files are:
- azure.yaml: Describes the services of the app, such as .NET Aspire AppHost project, and maps them to Azure resources.
- .azure/config.json: Configuration file that informs
azdwhat the current active environment is. - .azure/aspireazddev/.env: Contains environment specific overrides.
The azure.yaml file has the following contents:
# yaml-language-server: $schema=https://raw.githubusercontent.com/Azure/azure-dev/main/schemas/v1.0/azure.yaml.json

name: AspireSample
services:
  app:
    language: dotnet
    project: .\AspireSample.AppHost\AspireSample.AppHost.csproj
    host: containerapp
Resource naming
When you create new Azure resources, it's important to follow the naming requirements. For Azure Container Apps, the name must be 2-32 characters long and consist of lowercase letters, numbers, and hyphens. The name must start with a letter and end with an alphanumeric character.
For more information, see Naming rules and restrictions for Azure resources.
Initial deployment
In order to deploy the .NET Aspire project, authenticate to Azure AD to call the Azure resource management APIs.
azd auth loginThe previous command will launch a browser to authenticate the command-line session.
Once authenticated, run the following command from the AppHost project directory to provision and deploy the application.
azd upImportant
To push container images to the Azure Container Registry (ACR), you need to have
Microsoft.Authorization/roleAssignments/writeaccess. This can be achieved by enabling an Admin user on the registry. Open the Azure Portal, navigate to the ACR resource / Settings / Access keys, and then select the Admin user checkbox. For more information, see Enable admin user.When prompted, select the subscription and location the resources should be deployed to. Once these options are selected the .NET Aspire project will be deployed.
By default, a service can only be reached from inside the Azure Container Apps environment it is running in. Selecting a service here will also allow it to be reached from the Internet.
? Select which services to expose to the Internet webfrontend
? Select an Azure Subscription to use:  1. <YOUR SUBSCRIPTION>
? Select an Azure location to use: 1. <YOUR LOCATION>

Packaging services (azd package)


Provisioning Azure resources (azd provision)
Provisioning Azure resources can take some time.

Subscription: <YOUR SUBSCRIPTION>
Location: <YOUR LOCATION>

  You can view detailed progress in the Azure Portal:
  <LINK TO DEPLOYMENT>

  (✓) Done: Resource group: <YOUR RESOURCE GROUP>
  (✓) Done: Container Registry: <ID>
  (✓) Done: Log Analytics workspace: <ID>
  (✓) Done: Container Apps Environment: <ID>

SUCCESS: Your application was provisioned in Azure in 1 minute 13 seconds.
You can view the resources created under the resource group <YOUR RESOURCE GROUP> in Azure Portal:
<LINK TO RESOURCE GROUP OVERVIEW>

Deploying services (azd deploy)

  (✓) Done: Deploying service apiservice
  - Endpoint: <YOUR UNIQUE apiservice APP>.azurecontainerapps.io/

  (✓) Done: Deploying service webfrontend
  - Endpoint: <YOUR UNIQUE webfrontend APP>.azurecontainerapps.io/

Aspire Dashboard: <LINK TO DEPLOYED .NET ASPIRE DASHBOARD>

SUCCESS: Your up workflow to provision and deploy to Azure completed in 3 minutes 50 seconds.
The final line of output from the
azdcommand is a link to the Azure Portal that shows all of the Azure resources that were deployed: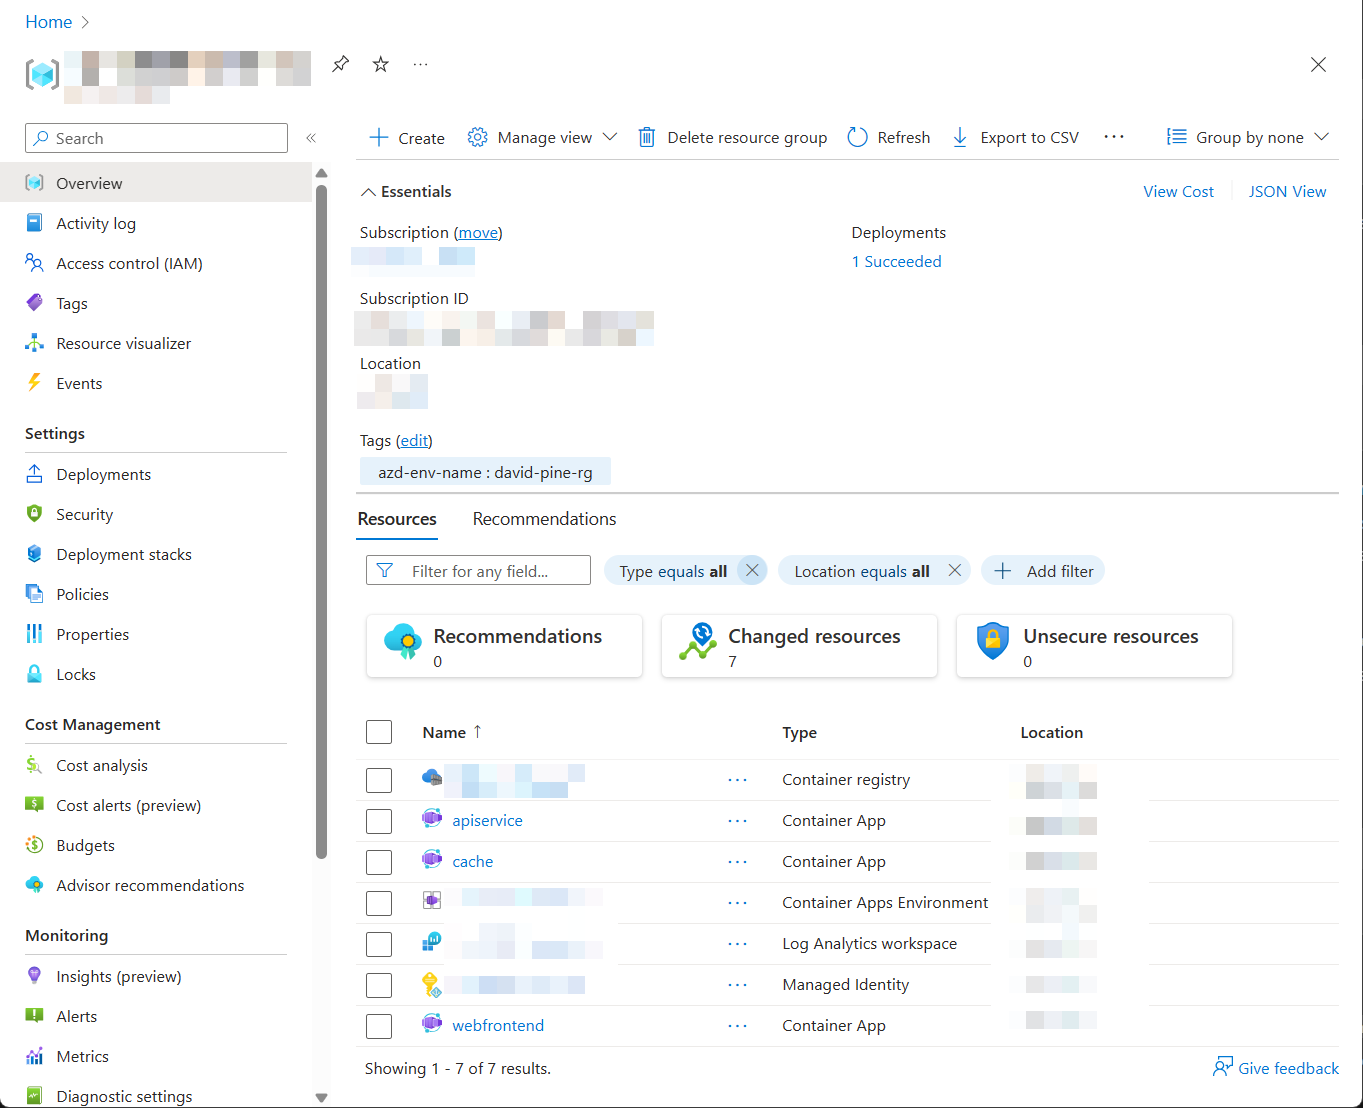

Three containers are deployed within this application:
webfrontend: Contains code from the web project in the starter template.apiservice: Contains code from the API service project in the starter template.cache: A Redis container image to supply a cache to the front-end.
Just like in local development, the configuration of connection strings has been handled automatically. In this case, azd was responsible for interpreting the application model and translating it to the appropriate deployment steps. As an example, consider the connection string and service discovery variables that are injected into the webfrontend container so that it knows how to connect to the Redis cache and apiservice.

For more information on how .NET Aspire projects handle connection strings and service discovery, see .NET Aspire orchestration overview.
Deploy application updates
When the azd up command is executed the underlying Azure resources are provisioned and a container image is built and deployed to the container apps hosting the .NET Aspire project. Typically once development is underway and Azure resources are deployed it won't be necessary to provision Azure resources every time code is updated—this is especially true for the developer inner loop.
To speed up deployment of code changes, azd supports deploying code updates in the container image. This is done using the azd deploy command:
azd deploy
Deploying services (azd deploy)

  (✓) Done: Deploying service apiservice
  - Endpoint: <YOUR UNIQUE apiservice APP>.azurecontainerapps.io/

  (✓) Done: Deploying service webfrontend
  - Endpoint: <YOUR UNIQUE webfrontend APP>.azurecontainerapps.io/

Aspire Dashboard: <LINK TO DEPLOYED .NET ASPIRE DASHBOARD>
It's not necessary to deploy all services each time. azd understands the .NET Aspire project model, it's possible to deploy just one of the services specified using the following command:
azd deploy webfrontend
For more information, see Azure Developer CLI reference: azd deploy.
Deploy infrastructure updates
Whenever the dependency structure within a .NET Aspire project changes, azd must re-provision the underlying Azure resources. The azd provision command is used to apply these changes to the infrastructure.
To see this in action, update the Program.cs file in the AppHost project to the following:
var builder = DistributedApplication.CreateBuilder(args);

var cache = builder.AddRedis("cache");

// Add the locations database.
var locationsdb = builder.AddPostgres("db").AddDatabase("locations");

// Add the locations database reference to the API service.
var apiservice = builder.AddProject<Projects.AspireSample_ApiService>("apiservice")
    .WithReference(locationsdb);

builder.AddProject<Projects.AspireSample_Web>("webfrontend")
    .WithReference(cache)
    .WithReference(apiservice);

builder.Build().Run();
Save the file and issue the following command:
azd provision
The azd provision command updates the infrastructure by creating a container app to host the Postgres database. The azd provision command didn't update the connection strings for the apiservice container. In order to have connection strings updated to point to the newly provisioned Postgres database the azd deploy command needs to be invoked again. When in doubt, use azd up to both provision and deploy.
Clean up resources
Remember to clean up the Azure resources that you've created during this walkthrough. Because azd knows the resource group in which it created the resources it can be used to spin down the environment using the following command:
azd down
The previous command may take some time to execute, but when completed the resource group and all its resources should be deleted.
Deleting all resources and deployed code on Azure (azd down)
Local application code is not deleted when running 'azd down'.

  Resource group(s) to be deleted:

    • <YOUR RESOURCE GROUP>: <LINK TO RESOURCE GROUP OVERVIEW>

? Total resources to delete: 7, are you sure you want to continue? Yes
Deleting your resources can take some time.

  (✓) Done: Deleting resource group: <YOUR RESOURCE GROUP>

SUCCESS: Your application was removed from Azure in 9 minutes 59 seconds.
Generate Bicep from .NET Aspire project model
Although development teams are free to use azd up (or azd provision and azd deploy) commands for their deployments both for development and production purposes, some teams may choose to generate Bicep files that they can review and manage as part of version control (this also allows these Bicep files to be referenced as part of a larger more complex Azure deployment).
For comprehensive guidance on customizing generated infrastructure for production scenarios, see Customize .NET Aspire Azure deployments.
azd includes the ability to output the Bicep it uses for provisioning via following command:
azd config set alpha.infraSynth on
azd infra gen
After this command is executed in the starter template example used in this guide, the following files are created in the AppHost project directory:
- infra/main.bicep: Represents the main entry point for the deployment.
- infra/main.parameters.json: Used as the parameters for main Bicep (maps to environment variables defined in .azure folder).
- infra/resources.bicep: Defines the Azure resources required to support the .NET Aspire project model.
- AspireSample.Web/manifests/containerApp.tmpl.yaml: The container app definition for
webfrontend. - AspireSample.ApiService/manifests/containerApp.tmpl.yaml: The container app definition for
apiservice.
The infra\resources.bicep file doesn't contain any definition of the container apps themselves (with the exception of container apps which are dependencies such as Redis and Postgres):
@description('The location used for all deployed resources')
param location string = resourceGroup().location

@description('Tags that will be applied to all resources')
param tags object = {}

var resourceToken = uniqueString(resourceGroup().id)

resource managedIdentity 'Microsoft.ManagedIdentity/userAssignedIdentities@2023-01-31' = {
  name: 'mi-${resourceToken}'
  location: location
  tags: tags
}

resource containerRegistry 'Microsoft.ContainerRegistry/registries@2023-07-01' = {
  name: replace('acr-${resourceToken}', '-', '')
  location: location
  sku: {
    name: 'Basic'
  }
  tags: tags
}

resource caeMiRoleAssignment 'Microsoft.Authorization/roleAssignments@2022-04-01' = {
  name: guid(containerRegistry.id, managedIdentity.id, subscriptionResourceId('Microsoft.Authorization/roleDefinitions', '7f951dda-4ed3-4680-a7ca-43fe172d538d'))
  scope: containerRegistry
  properties: {
    principalId: managedIdentity.properties.principalId
    principalType: 'ServicePrincipal'
    roleDefinitionId:  subscriptionResourceId('Microsoft.Authorization/roleDefinitions', '7f951dda-4ed3-4680-a7ca-43fe172d538d')
  }
}

resource logAnalyticsWorkspace 'Microsoft.OperationalInsights/workspaces@2022-10-01' = {
  name: 'law-${resourceToken}'
  location: location
  properties: {
    sku: {
      name: 'PerGB2018'
    }
  }
  tags: tags
}

resource containerAppEnvironment 'Microsoft.App/managedEnvironments@2023-05-01' = {
  name: 'cae-${resourceToken}'
  location: location
  properties: {
    appLogsConfiguration: {
      destination: 'log-analytics'
      logAnalyticsConfiguration: {
        customerId: logAnalyticsWorkspace.properties.customerId
        sharedKey: logAnalyticsWorkspace.listKeys().primarySharedKey
      }
    }
  }
  tags: tags
}

resource cache 'Microsoft.App/containerApps@2023-05-02-preview' = {
  name: 'cache'
  location: location
  properties: {
    environmentId: containerAppEnvironment.id
    configuration: {
      service: {
        type: 'redis'
      }
    }
    template: {
      containers: [
        {
          image: 'redis'
          name: 'redis'
        }
      ]
    }
  }
  tags: union(tags, {'aspire-resource-name': 'cache'})
}

resource locations 'Microsoft.App/containerApps@2023-05-02-preview' = {
  name: 'locations'
  location: location
  properties: {
    environmentId: containerAppEnvironment.id
    configuration: {
      service: {
        type: 'postgres'
      }
    }
    template: {
      containers: [
        {
          image: 'postgres'
          name: 'postgres'
        }
      ]
    }
  }
  tags: union(tags, {'aspire-resource-name': 'locations'})
}
output MANAGED_IDENTITY_CLIENT_ID string = managedIdentity.properties.clientId
output AZURE_CONTAINER_REGISTRY_ENDPOINT string = containerRegistry.properties.loginServer
output AZURE_CONTAINER_REGISTRY_MANAGED_IDENTITY_ID string = managedIdentity.id
output AZURE_CONTAINER_APPS_ENVIRONMENT_ID string = containerAppEnvironment.id
output AZURE_CONTAINER_APPS_ENVIRONMENT_DEFAULT_DOMAIN string = containerAppEnvironment.properties.defaultDomain
For more information on using Bicep to automate deployments to Azure see, What is Bicep?
The definition of the container apps from the .NET service projects is contained within the containerApp/tmpl.yaml files in the manifests directory in each project respectively. Here is an example from the webfrontend project:
location: {{ .Env.AZURE_LOCATION }}
identity:
  type: UserAssigned
  userAssignedIdentities:
    ? "{{ .Env.AZURE_CONTAINER_REGISTRY_MANAGED_IDENTITY_ID }}"
    : {}
properties:
  environmentId: {{ .Env.AZURE_CONTAINER_APPS_ENVIRONMENT_ID }}
  configuration:
    activeRevisionsMode: single
    ingress:
      external: true
      targetPort: 8080
      transport: http
      allowInsecure: false
    registries:
    - server: {{ .Env.AZURE_CONTAINER_REGISTRY_ENDPOINT }}
      identity: {{ .Env.AZURE_CONTAINER_REGISTRY_MANAGED_IDENTITY_ID }}
  template:
    containers:
    - image: {{ .Env.SERVICE_WEBFRONTEND_IMAGE_NAME }}
      name: webfrontend
      env:
      - name: AZURE_CLIENT_ID
        value: {{ .Env.MANAGED_IDENTITY_CLIENT_ID }}
      - name: ConnectionStrings__cache
        value: {{ connectionString "cache" }}
      - name: OTEL_DOTNET_EXPERIMENTAL_OTLP_EMIT_EVENT_LOG_ATTRIBUTES
        value: "true"
      - name: OTEL_DOTNET_EXPERIMENTAL_OTLP_EMIT_EXCEPTION_LOG_ATTRIBUTES
        value: "true"
      - name: services__apiservice__0
        value: http://apiservice.internal.{{ .Env.AZURE_CONTAINER_APPS_ENVIRONMENT_DEFAULT_DOMAIN }}
      - name: services__apiservice__1
        value: https://apiservice.internal.{{ .Env.AZURE_CONTAINER_APPS_ENVIRONMENT_DEFAULT_DOMAIN }}
tags:
  azd-service-name: webfrontend
  aspire-resource-name: webfrontend
After executing the azd infra gen command, when azd provision and azd deploy are called they use the Bicep and supporting generated files.
Important
If azd infra gen is called again, it replaces any modified files with freshly generated ones and prompts you for confirmation before doing so.
Isolated environments for debugging
Because azd makes it easy to provision new environments, it's possible for each team member to have an isolated cloud-hosted environment for debugging code in a setting that closely matches production. When doing this each team member should create their own environment using the following command:
azd env new
This will prompt the user for subscription and resource group information again and subsequent azd up, azd provision, and azd deploy invocations will use this new environment by default. The --environment switch can be applied to these commands to switch between environments.
Clean up resources
Run the following Azure CLI command to delete the resource group when you no longer need the Azure resources you created. Deleting the resource group also deletes the resources contained inside of it.
az group delete --name <your-resource-group-name>
For more information, see Clean up resources in Azure.
Collaborate with us on GitHub
The source for this content can be found on GitHub, where you can also create and review issues and pull requests. For more information, see our contributor guide.
.NET Aspire