Tutorial: Deploy a .NET Aspire project using the Azure Developer CLI
The Azure Developer CLI (azd) enables you to deploy .NET Aspire projects using GitHub Actions or Azure Devops pipelines by automatically configuring the required authentication and environment settings. This article walks you through the process of creating and deploying a .NET Aspire project on Azure Container Apps using azd. You learn the following concepts:
- Explore how
azdintegration works with .NET Aspire projects - Create and configure a GitHub or Azure DevOps repository for a .NET Aspire project using
azd - Monitor and explore GitHub Actions workflow or Azure DevOps pipeline executions and Azure deployments
Prerequisites
To work with .NET Aspire, you need the following installed locally:
- .NET 8.0 or .NET 9.0
- An OCI compliant container runtime, such as:
- Docker Desktop or Podman. For more information, see Container runtime.
- An Integrated Developer Environment (IDE) or code editor, such as:
- Visual Studio 2022 version 17.9 or higher (Optional)
- Visual Studio Code (Optional)
- C# Dev Kit: Extension (Optional)
- JetBrains Rider with .NET Aspire plugin (Optional)
For more information, see .NET Aspire setup and tooling, and .NET Aspire SDK.
- Create an Azure DevOps organization or choose an existing organization
- Create an Azure DevOps Personal Access Token (PAT) and save it for later use. Configure the token with the following permissions:
- Agent Pools (read, manage)
- Build (read and execute)
- Code (full)
- Project and team (read, write and manage)
- Release (read, write, execute and manage)
- Service Connections (read, query and manage)
You also need to have the Azure Developer CLI installed locally (version 1.5.1 or higher). Common install options include the following:
Create a .NET Aspire solution
As a starting point, this article assumes that you've created a .NET Aspire solution from the .NET Aspire Starter Application template. For more information, see Quickstart: Build your first .NET Aspire app.
Initialize the template
Open a new terminal window and
cdinto the directory of your .NET Aspire solution.Execute the
azd initcommand to initialize your project withazd, which will inspect the local directory structure and determine the type of app.azd initFor more information on the
azd initcommand, see azd init.Select Use code in the current directory when
azdprompts you with two app initialization options.? How do you want to initialize your app? [Use arrows to move, type to filter] > Use code in the current directory Select a templateAfter scanning the directory,
azdprompts you to confirm that it found the correct .NET Aspire AppHost project. Select the Confirm and continue initializing my app option.Detected services: .NET (Aspire) Detected in: D:\source\repos\AspireSample\AspireSample.AppHost\AspireSample.AppHost.csproj azd will generate the files necessary to host your app on Azure using Azure Container Apps. ? Select an option [Use arrows to move, type to filter] > Confirm and continue initializing my app Cancel and exitEnter an environment name, which is used to name provisioned resources in Azure and managing different environments such as
devandprod.Generating files to run your app on Azure: (✓) Done: Generating ./azure.yaml (✓) Done: Generating ./next-steps.md SUCCESS: Your app is ready for the cloud! You can provision and deploy your app to Azure by running the azd up command in this directory. For more information on configuring your app, see ./next-steps.md
azd generates a number of files and places them into the working directory. These files are:
- azure.yaml: Describes the services of the app, such as .NET Aspire AppHost project, and maps them to Azure resources.
- .azure/config.json: Configuration file that informs
azdwhat the current active environment is. - .azure/aspireazddev/.env: Contains environment specific overrides.
Create the GitHub repository and pipeline
The Azure Developer CLI enables you to automatically create CI/CD pipelines with the correct configurations and permissions to provision and deploy resources to Azure. azd can also create a GitHub repository for your app if it doesn't exist already.
Run the
azd pipeline configcommand to configure your deployment pipeline and securely connect it to Azure:azd pipeline configSelect the subscription to provision and deploy the app resources to.
Select the Azure location to use for the resources.
When prompted whether to create a new Git repository in the directory, enter y and press Enter.
Note
Creating a GitHub repository required you being logged into GitHub. There are a few selections that vary based on your preferences. After logging in, you will be prompted to create a new repository in the current directory.
Select Create a new private GitHub repository to configure the git remote.
Enter a name of your choice for the new GitHub repository or press enter to use the default name.
azdcreates a new repository in GitHub and configures it with the necessary secrets required to authenticate to Azure.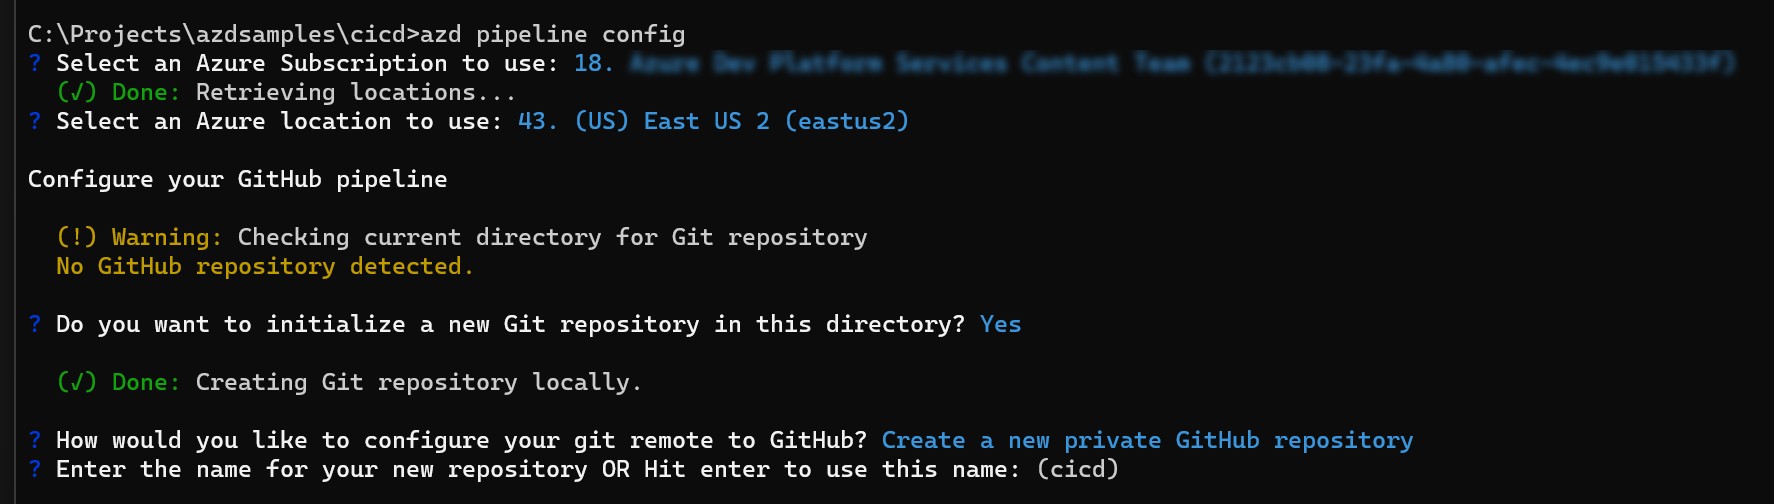
Enter y to proceed when
azdprompts you to commit and push your local changes to start the configured pipeline.
Explore the GitHub Actions workflow and deployment
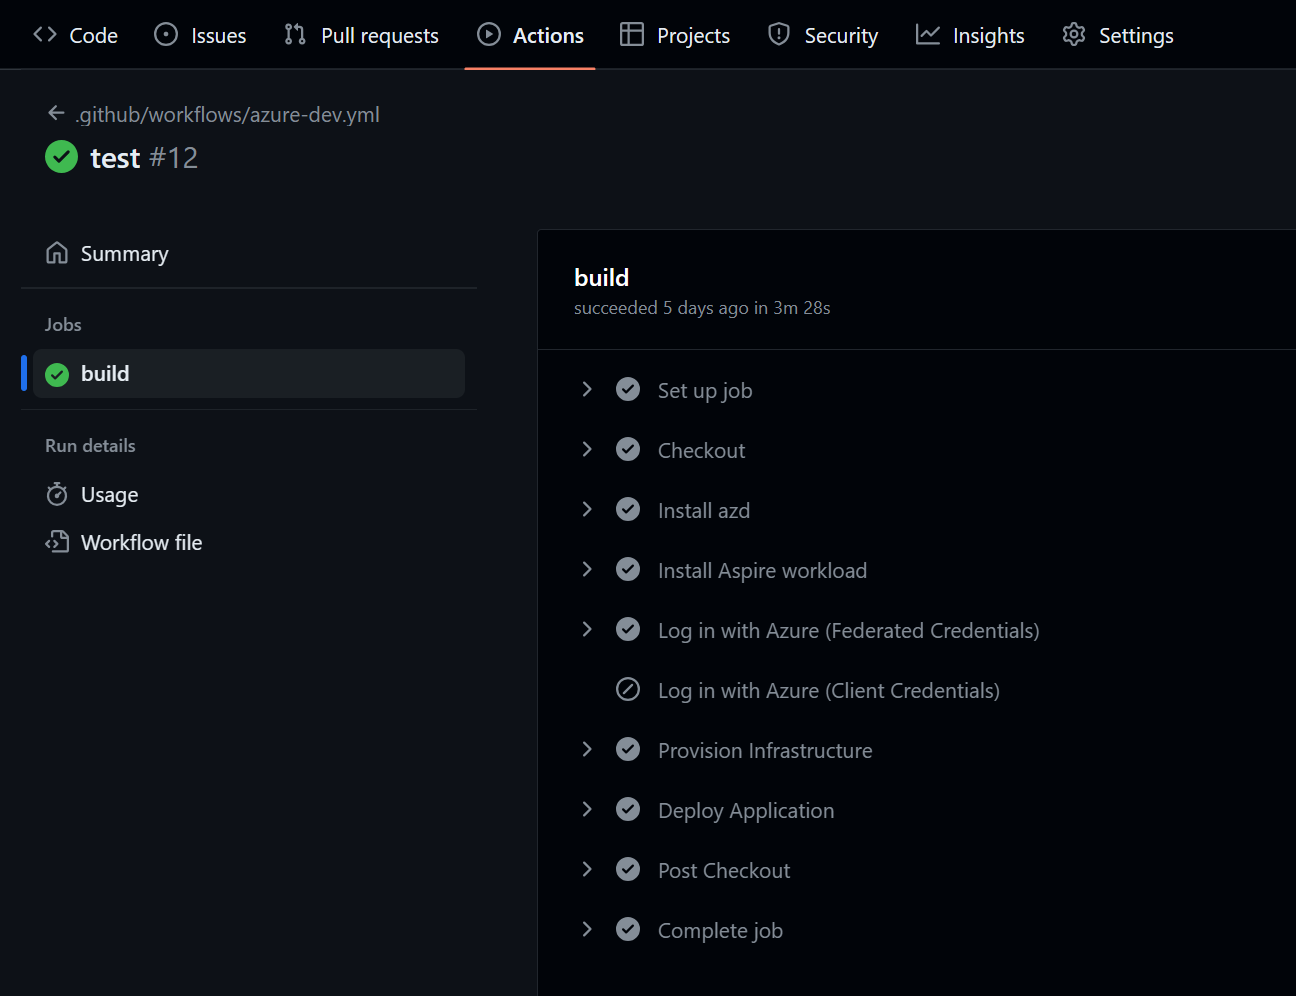
Navigate to your new GitHub repository using the link output by
azd.Select the Actions tab to view the repository workflows. You should see the new workflow either running or already completed. Select the workflow to view the job steps and details in the logs of the run. For example, you can expand steps such as Install .NET Aspire Workload or Deploy application to see the details of the completed action.
Select Deploy Application to expand the logs for that step. You should see two endpoint urls printed out for the
apiserviceandwebfrontend. Select either of these links to open them in another browser tab and explore the deployed application.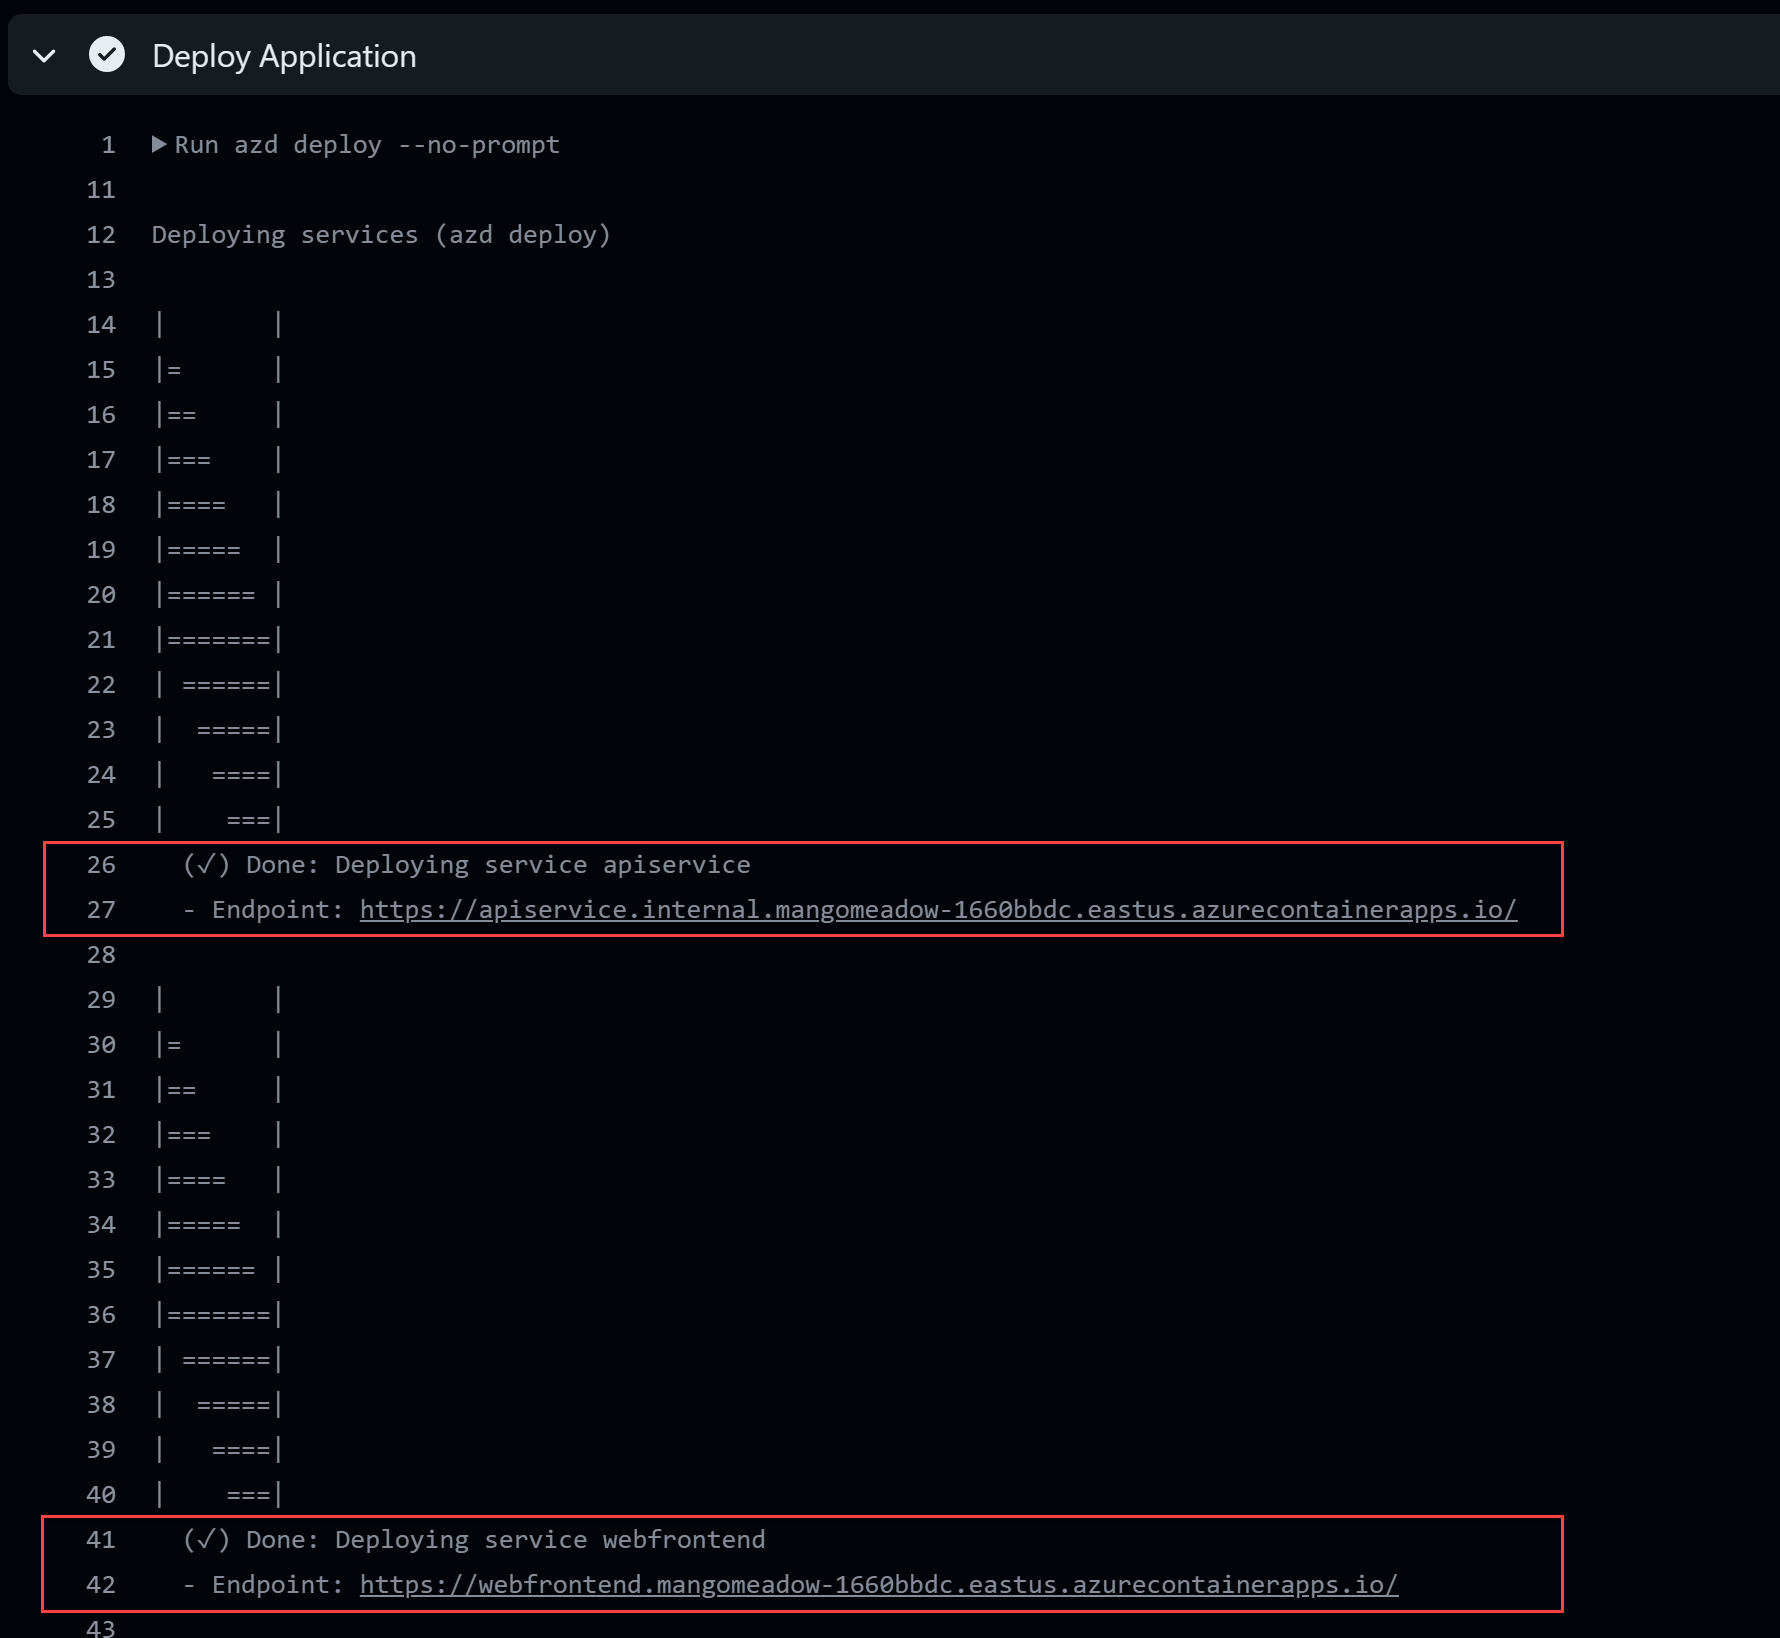
Congratulations! You successfully deployed a .NET Aspire project using the Azure Developer CLI and GitHub Actions.
Create the Azure DevOps repository and pipeline
Important
As mentioned in the prerequisites, you'll need to create an Azure DevOps organization or select an existing organization to complete the steps ahead. You will also need to create a Personal Access Token (PAT) with the permissions listed in the prerequisites.
The Azure Developer CLI enables you to automatically create pipelines with the correct configurations and permissions to provision and deploy resources to Azure. azd can also create an Azure Pipelines repository for your app if it doesn't exist already.
Run the
azd pipeline configcommand to configure your deployment pipeline and securely connect it to Azure. Include the--provider azdooption to use Azure Pipelines instead of the default GitHub Actions configuration.azd pipeline config --provider azdoSelect the subscription to provision and deploy the app resources to.
Select the Azure location to use for the resources.
Paste the Personal Access Token you created earlier.
Enter the Azure DevOps Organization name you created or selected.
When prompted to create a new repository in the current directory, enter y and press Enter.
When prompted to configure the git remote, select Create a new Azure DevOps Project.
Enter a unique name of your choice for the new repository, such as
aspireazd.azdcreates a new repository in Azure Repos and configures it with the necessary secrets required to authenticate to Azure.
Enter y to proceed when
azdprompts you to commit and push your local changes to start the configured pipeline.

Explore the pipeline and deployed app
Navigate to your new Azure Pipeline using the status link output by
azd.
Select the completed pipeline run to view the summary.
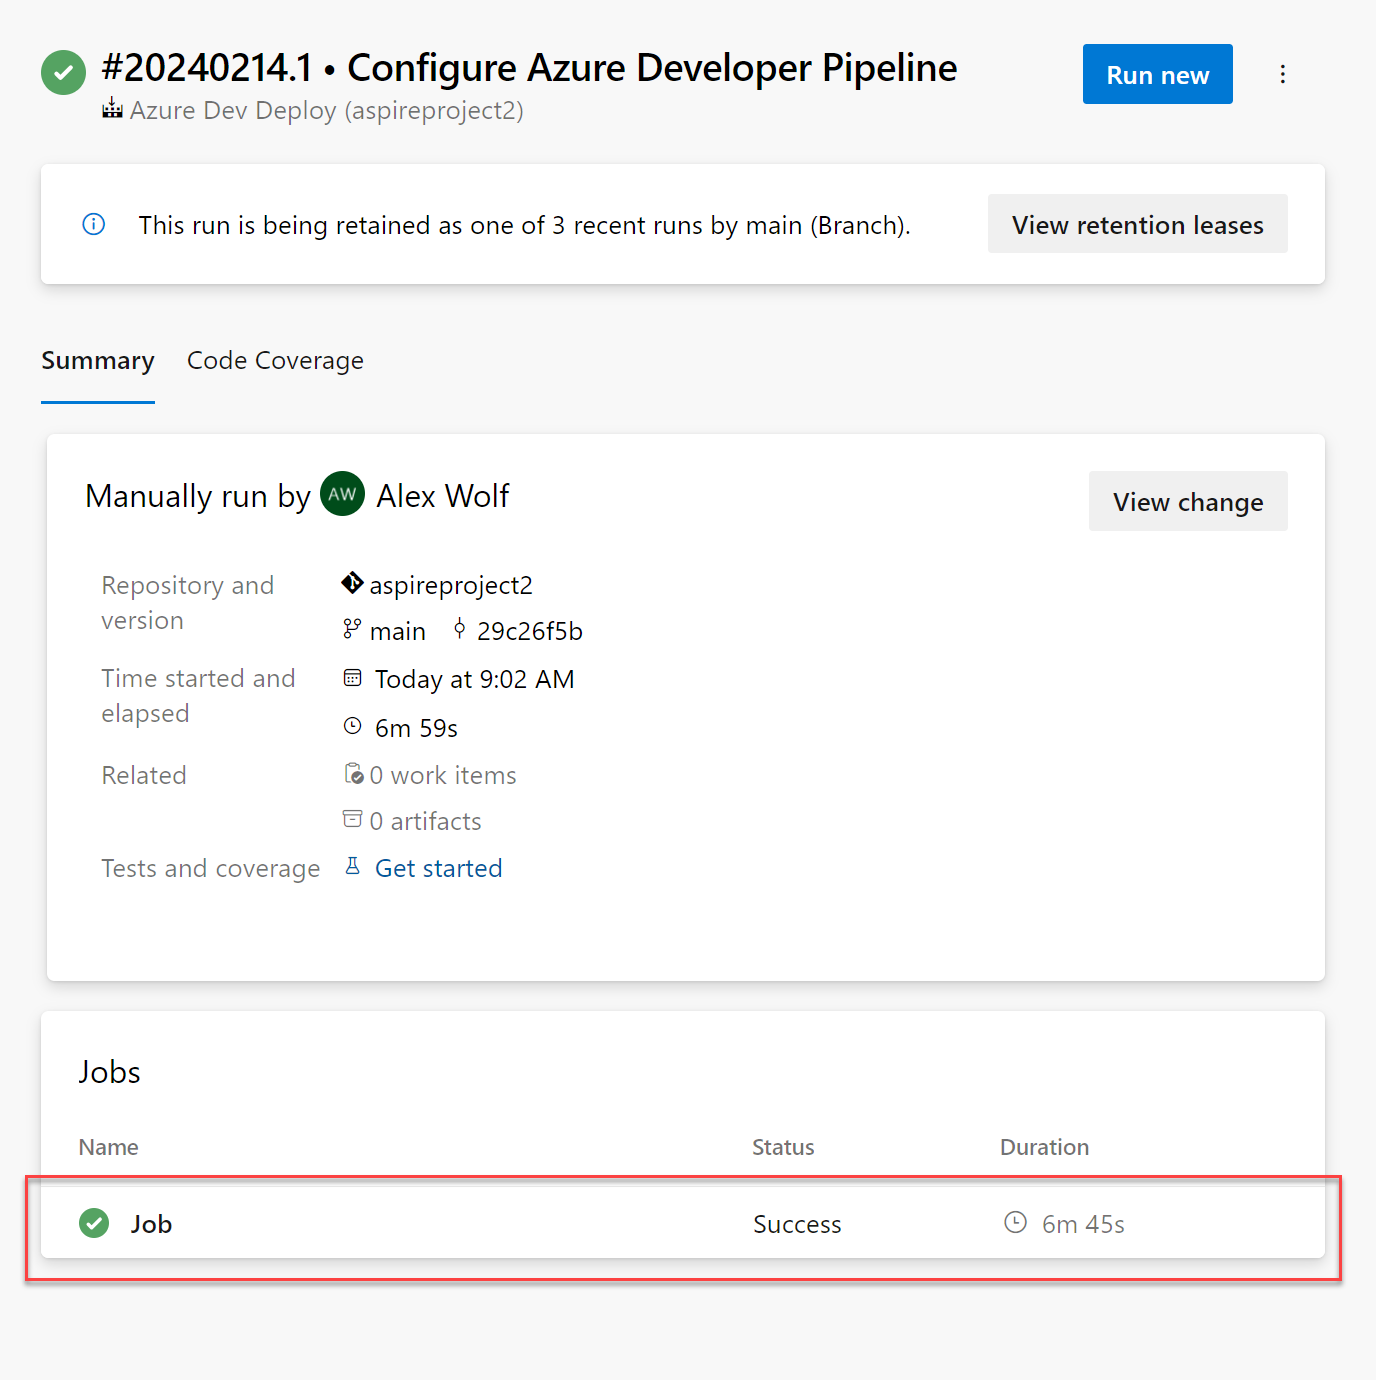
Select the job link at the bottom of the view to navigate to the job details.
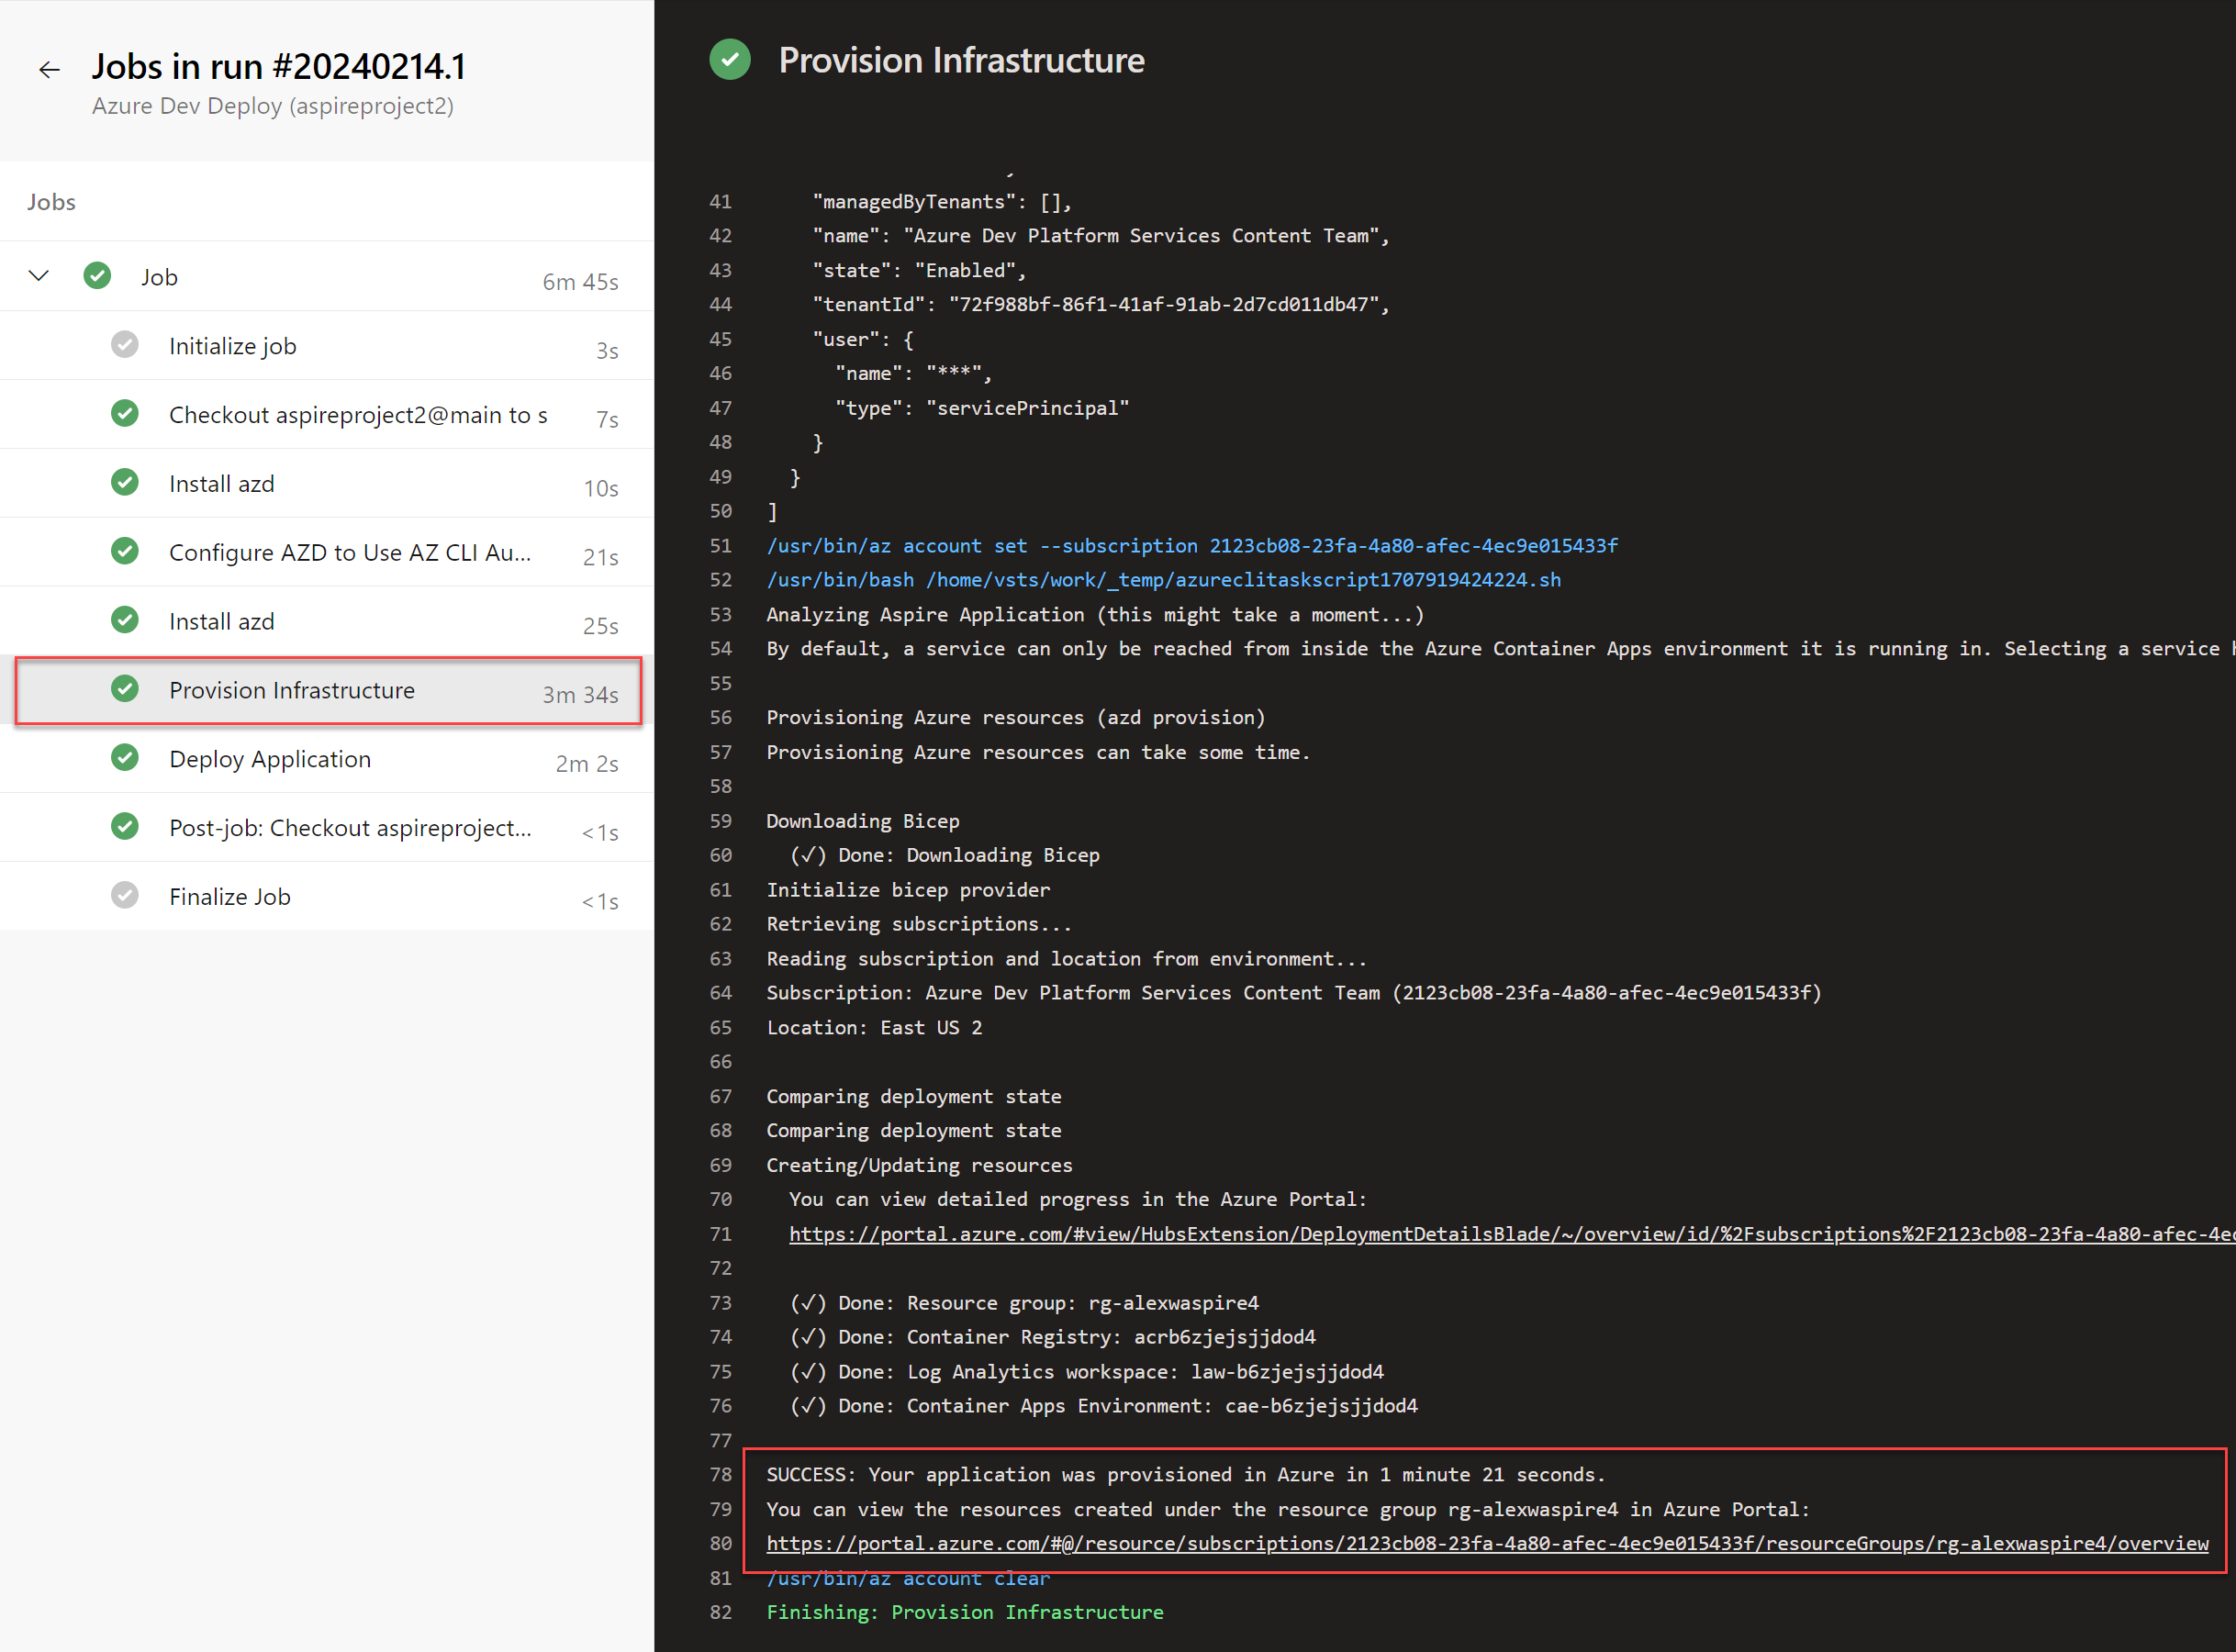
The job details page shows the status of all the individual stages. Select Provision Infrastructure to view the logs for that stage, which detail all of the provisioning steps completed by
azd. At the bottom of the logs take note of the final status message and link to the provisioned Azure resource group.Select the link at the bottom of the provisioning output logs to navigate to the new Azure resource group.
Note
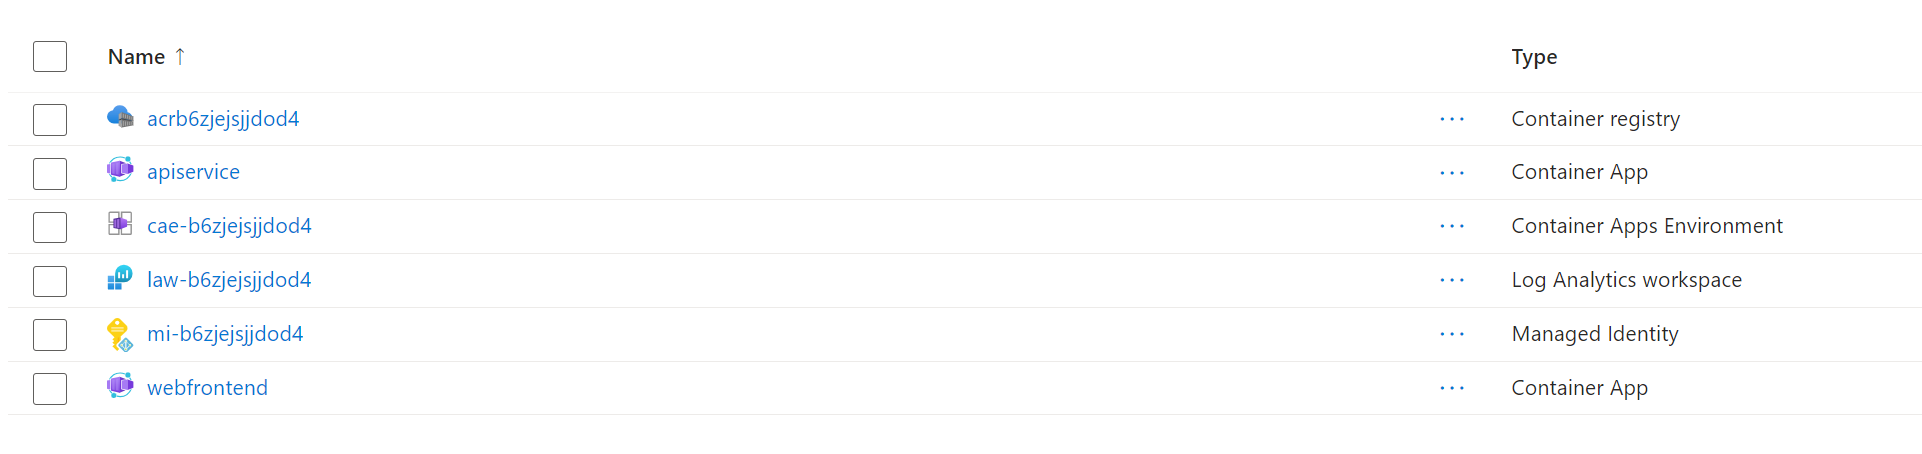
You can also navigate directly to your new resource group by searching for it in the Azure Portal. Your resource group name will be the environment name you provided to
azdprefixed withrg-.Select the webfrontend container app, which hosts the public facing portion of your site.
On the webfrontend details page, select the Application Url link to open your site in the browser.


Important
If you encounter a 403 Forbidden error when viewing your site in the browser, make sure the ingress settings are configured correctly. On the webfrontend app page in the Azure Portal, navigate to Ingress on the left navigation. Make sure Ingress traffic is set to Accepting traffic from anywhere and save your changes.
Congratulations! You successfully deployed a .NET Aspire project using the Azure Developer CLI and Azure Pipelines.
Clean up resources
Run the following Azure CLI command to delete the resource group when you no longer need the Azure resources you created. Deleting the resource group also deletes the resources contained inside of it.
az group delete --name <your-resource-group-name>
For more information, see Clean up resources in Azure.
.NET Aspire