Deploy a .NET Aspire app to Azure Container Apps
.NET Aspire apps are designed to run in containerized environments. Azure Container Apps is a fully managed environment that enables you to run microservices and containerized applications on a serverless platform. This article will walk you through creating a new .NET Aspire solution and deploying it to Microsoft Azure Container Apps using the Azure Developer CLI (azd), the Azure CLI, or Bicep. You'll learn how to complete the following tasks:
- Provision an Azure resource group and Container Registry
- Publish the .NET Aspire projects as container images in Azure Container Registry
- Provision a Redis container in Azure
- Deploy the apps to an Azure Container Apps environment
- View application console logs to troubleshoot application issues
Prerequisites
To work with .NET Aspire, you need the following installed locally:
- .NET 8.0
- .NET Aspire workload:
- Docker Desktop
- Integrated Developer Environment (IDE) or code editor, such as:
- Visual Studio 2022 Preview version 17.9 or higher (Optional)
- Visual Studio Code (Optional)
For more information, see .NET Aspire setup and tooling.
As an alternative to this tutorial and for a more in-depth guide, see Deploy a .NET Aspire app to Azure Container Apps using azd (in-depth guide).
Deploy .NET Aspire apps with azd
With .NET Aspire and Azure Container Apps (ACA), you have a great hosting scenario for building out your cloud-native apps with .NET. We built some great new features into the Azure Developer CLI (azd) specific for making .NET Aspire development and deployment to Azure a friction-free experience. You can still use the Azure CLI and/or Bicep options when you need a granular level of control over your deployments. But for new projects, you won't find an easier path to success for getting a new microservice topology deployed into the cloud.
Create the .NET Aspire template
To create a new .NET Aspire Starter Application, you can use either Visual Studio or the .NET CLI.
Visual Studio provides .NET Aspire project templates that handle some initial setup configurations for you. Complete the following steps to create a project for this quickstart:
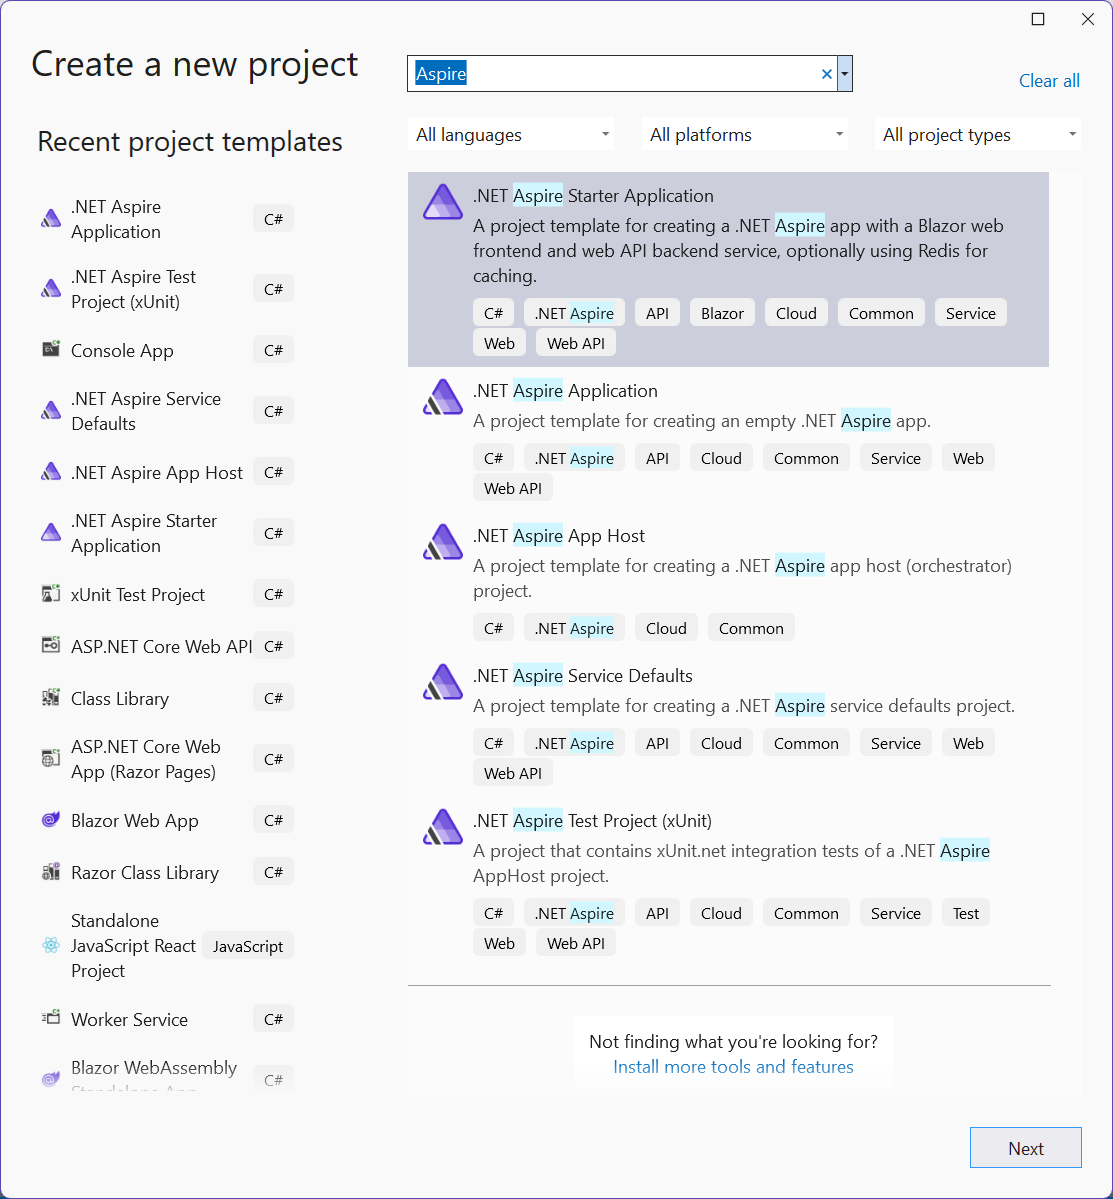
At the top of Visual Studio, navigate to File > New > Project.
In the dialog window, search for Aspire and select .NET Aspire Starter Application. Select Next.
On the Configure your new project screen:
- Enter a Project Name of AspireSample.
- Leave the rest of the values at their defaults and select Next.
On the Additional information screen:
- Make sure .NET 8.0 (Long Term Support) is selected.
- Ensure that Use Redis for caching (requires a supported container runtime) is checked and select Create.
- Optionally, you can select Create a tests project. For more information, see Testing .NET Aspire apps.

Visual Studio creates a new solution that is structured to use .NET Aspire.
Install the Azure Developer CLI
The process for installing azd varies based on your operating system, but it is widely available via winget, brew, apt, or directly via curl. To install azd, see Install Azure Developer CLI.
Initialize the template
Open a new terminal window and
cdinto the root of your .NET Aspire project.Execute the
azd initcommand to initialize your project withazd, which will inspect the local directory structure and determine the type of app.azd initFor more information on the
azd initcommand, see azd init.If this is the first time you've initialized the app,
azdprompts you for the environment name:Initializing an app to run on Azure (azd init) ? Enter a new environment name: [? for help]Enter the desired environment name to continue. For more information on managing environments with
azd, see azd env.Select Use code in the current directory when
azdprompts you with two app initialization options.? How do you want to initialize your app? [Use arrows to move, type to filter] > Use code in the current directory Select a templateAfter scanning the directory,
azdprompts you to confirm that it found the correct .NET Aspire AppHost project. Select the Confirm and continue initializing my app option.Detected services: .NET (Aspire) Detected in: D:\source\repos\AspireSample\AspireSample.AppHost\AspireSample.AppHost.csproj azd will generate the files necessary to host your app on Azure using Azure Container Apps. ? Select an option [Use arrows to move, type to filter] > Confirm and continue initializing my app Cancel and exitazdpresents each of the projects in the .NET Aspire solution and prompts you to identify which to deploy with HTTP ingress open publicly to all internet traffic. Select only thewebfrontend(using the ↓ and Space keys), since you want the API to be private to the Azure Container Apps environment and not available publicly.? Select an option Confirm and continue initializing my app By default, a service can only be reached from inside the Azure Container Apps environment it is running in. Selecting a service here will also allow it to be reached from the Internet. ? Select which services to expose to the Internet [Use arrows to move, space to select, <right> to all, <left> to none, type to filter] [ ] apiservice > [x] webfrontendFinally, specify the the environment name, which is used to name provisioned resources in Azure and managing different environments such as
devandprod.Generating files to run your app on Azure: (✓) Done: Generating ./azure.yaml (✓) Done: Generating ./next-steps.md SUCCESS: Your app is ready for the cloud! You can provision and deploy your app to Azure by running the azd up command in this directory. For more information on configuring your app, see ./next-steps.md
azd generates a number of files and places them into the working directory. These files are:
- azure.yaml: Describes the services of the app, such as .NET Aspire AppHost project, and maps them to Azure resources.
- .azure/config.json: Configuration file that informs
azdwhat the current active environment is. - .azure/aspireazddev/.env: Contains environment specific overrides.
- .azure/aspireazddev/config.json: Configuration file that informs
azdwhich services should have a public endpoint in this environment.
Deploy the app
Once azd is initialized, the provisioning and deployment process can be executed as a single command, azd up.
By default, a service can only be reached from inside the Azure Container Apps environment it is running in. Selecting a service here will also allow it to be reached from the Internet.
? Select which services to expose to the Internet webfrontend
? Select an Azure Subscription to use:  1. <YOUR SUBSCRIPTION>
? Select an Azure location to use: 1. <YOUR LOCATION>

Packaging services (azd package)


SUCCESS: Your application was packaged for Azure in less than a second.

Provisioning Azure resources (azd provision)
Provisioning Azure resources can take some time.

Subscription: <YOUR SUBSCRIPTION>
Location: <YOUR LOCATION>

  You can view detailed progress in the Azure Portal:
<LINK TO DEPLOYMENT>

  (✓) Done: Resource group: <YOUR RESOURCE GROUP>
  (✓) Done: Container Registry: <ID>
  (✓) Done: Log Analytics workspace: <ID>
  (✓) Done: Container Apps Environment: <ID>
  (✓) Done: Container App: <ID>

SUCCESS: Your application was provisioned in Azure in 1 minute 13 seconds.
You can view the resources created under the resource group <YOUR RESOURCE GROUP> in Azure Portal:
<LINK TO RESOURCE GROUP OVERVIEW>

Deploying services (azd deploy)

  (✓) Done: Deploying service apiservice
  - Endpoint: <YOUR UNIQUE apiservice APP>.azurecontainerapps.io/

  (✓) Done: Deploying service webfrontend
  - Endpoint: <YOUR UNIQUE webfrontend APP>.azurecontainerapps.io/


SUCCESS: Your application was deployed to Azure in 1 minute 39 seconds.
You can view the resources created under the resource group <YOUR RESOURCE GROUP> in Azure Portal:
<LINK TO RESOURCE GROUP OVERVIEW>

SUCCESS: Your up workflow to provision and deploy to Azure completed in 3 minutes 50 seconds.
First, the projects will be packaged into containers during the azd package phase, followed by the azd provision phase during which all of the Azure resources the app will need are provisioned.
Once provision is complete, azd deploy will take place. During this phase, the projects are pushed as containers into an Azure Container Registry instance, and then used to create new revisions of Azure Container Apps in which the code will be hosted.
At this point the app has been deployed and configured, and you can open the Azure portal and explore the resources.
Create the .NET Aspire template
To create a new .NET Aspire Starter Application, you can use either Visual Studio or the .NET CLI.
Visual Studio provides .NET Aspire project templates that handle some initial setup configurations for you. Complete the following steps to create a project for this quickstart:
At the top of Visual Studio, navigate to File > New > Project.
In the dialog window, search for Aspire and select .NET Aspire Starter Application. Select Next.
On the Configure your new project screen:
- Enter a Project Name of AspireSample.
- Leave the rest of the values at their defaults and select Next.
On the Additional information screen:
- Make sure .NET 8.0 (Long Term Support) is selected.
- Ensure that Use Redis for caching (requires a supported container runtime) is checked and select Create.
- Optionally, you can select Create a tests project. For more information, see Testing .NET Aspire apps.
Visual Studio creates a new solution that is structured to use .NET Aspire.
Deploy the app
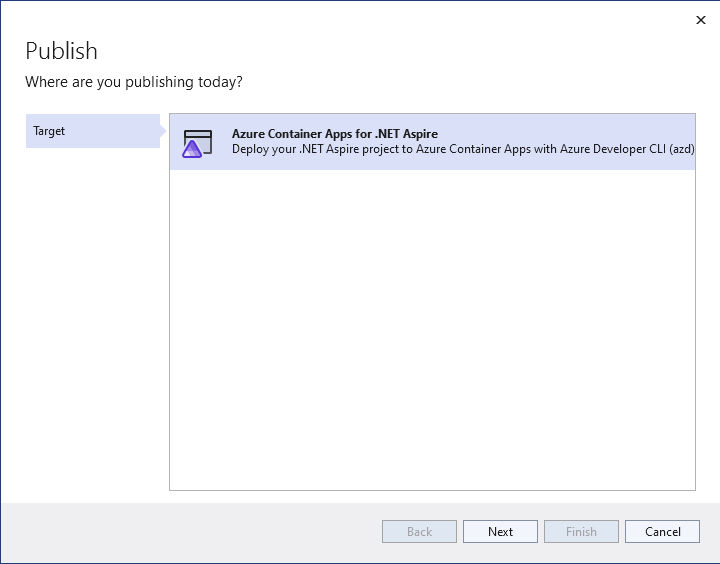
In the solution explorer, right-click on the .AppHost project and select Publish to open the Publish dialog.
Select Azure Container Apps for .NET Aspire as the publishing target.
On the AzDev Environment step, select your desired Subscription and Location values and then enter an Environment name such as aspire-vs. The environment name determines the naming of Azure Container Apps environment resources.
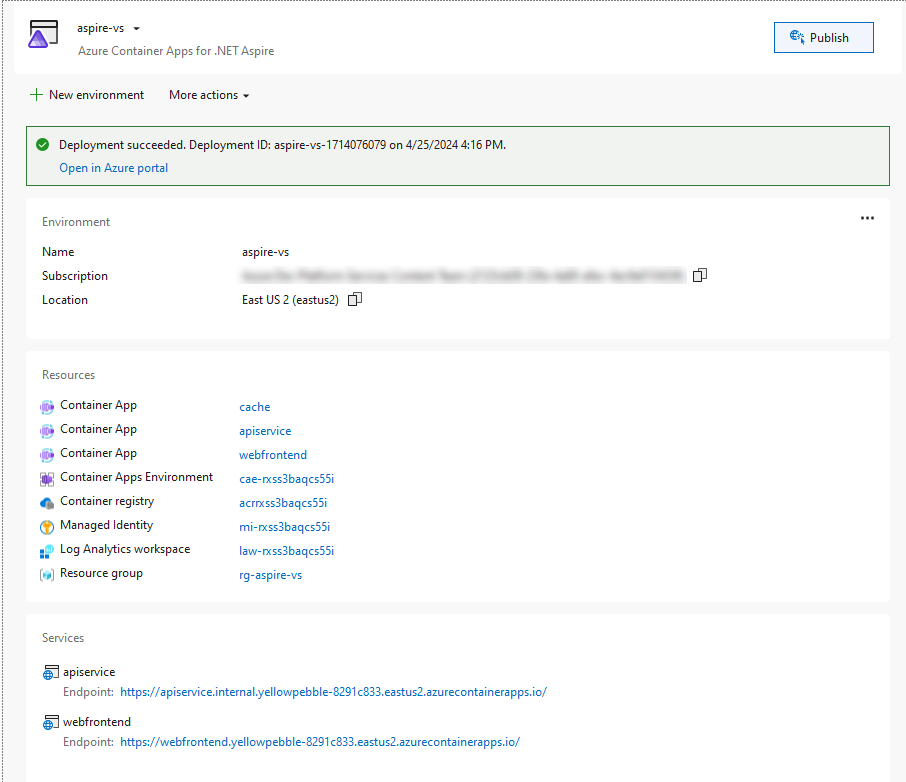
Select Finish to close the dialog workflow and view the deployment environment summary.
Select Publish to provision and deploy the resources on Azure. This process may take several minutes to complete. Visual Studio provides status updates on the deployment progress.
When the publish completes, Visual Studio displays the resource URLs at the bottom of the environment screen. Use these links to view the various deployed resources. Select the webfrontend URL to open a browser to the deployed app.
Create the .NET Aspire template
To create a new .NET Aspire Starter Application, you can use either Visual Studio or the .NET CLI.
Visual Studio provides .NET Aspire project templates that handle some initial setup configurations for you. Complete the following steps to create a project for this quickstart:
At the top of Visual Studio, navigate to File > New > Project.
In the dialog window, search for Aspire and select .NET Aspire Starter Application. Select Next.
On the Configure your new project screen:
- Enter a Project Name of AspireSample.
- Leave the rest of the values at their defaults and select Next.
On the Additional information screen:
- Make sure .NET 8.0 (Long Term Support) is selected.
- Ensure that Use Redis for caching (requires a supported container runtime) is checked and select Create.
- Optionally, you can select Create a tests project. For more information, see Testing .NET Aspire apps.
Visual Studio creates a new solution that is structured to use .NET Aspire.
Login using the
az logincommand, which will prompt you to open a browser.If you have access to more than one Azure subscription, get your subscription list as a table so you can find the right subscription and matching subscription id in which you want to experiment.
az account list --output tableCopy the string from the "SubscriptionId" column for the Azure subscription you wish to use, then paste that string to your command prompt as the parameter to the
az account setcommand:az account set --subscription your-subscription-id-pasted-hereAdd the Azure CLI
az containerappextension, which provides capabilities specific to Azure Container Apps. For more information, see the az containerapp docs.az extension add --name containerapp --upgradeRegister required
aznamespaces. For more information, see the az provider register docs:az provider register --namespace Microsoft.App az provider register --namespace Microsoft.OperationalInsights az provider register --namespace Microsoft.ContainerRegistry
Set the environment variables
Declare a set of environment variables to store commonly used values for the app deployment process. Setting these variables simplifies working with command-line parameters:
Note
You will need to customize the SOLUTION and LOCATION variables per your own needs. To get a list of the available Azure regions to which you can deploy, use the command az account list-locations --output table.
$env:SOLUTION="YOUR_APP_NAME"                           # Your app's name (e.g., "aspiresample42")
$env:LOCATION="YOUR_REGION"                             # Your desired Azure region (e.g., "westus")
$env:RESOURCE_GROUP="$($env:SOLUTION.ToLower())rg"      # Resource Group name, e.g. eshopliterg
$env:CONTAINER_REGISTRY="$($env:SOLUTION.ToLower())cr"  # Azure Container Registry name, e.g. eshoplitecr
$env:IMAGE_PREFIX="$($env:SOLUTION.ToLower())"          # Container image name prefix, e.g. eshoplite
$env:IDENTITY="$($env:SOLUTION.ToLower())id"            # Azure Managed Identity, e.g. eshopliteid
$env:ENVIRONMENT="$($env:SOLUTION.ToLower())cae"        # Azure Container Apps Environment name, e.g. eshoplitecae
Provision the Azure resources
Azure Container Apps (ACA) is an ideal hosting platform for .NET Aspire apps. You can use Bicep or the Azure CLI to create resources in Azure to host the .NET Aspire app code along with supporting services:
- An Azure Container Apps Environment to host your code and tertiary containers
- A pair of Azure Container Apps, hosting your code
- A Redis container inside the ACA Environment used by the output caching subsystem
- An Azure Log Analytics instance to host the log output from your apps
- An Azure Container Registry (ACR) instance for publishing your containers into the cloud
Create the Azure resource group that will hold the provision resources:
az group create --location $env:LOCATION --name $env:RESOURCE_GROUP
Create supporting resources in Azure
Execute the following command to provision the Azure Container Registry (ACR):
az acr create --resource-group $env:RESOURCE_GROUP --name $env:CONTAINER_REGISTRY --sku Basic --admin-enabled trueNote
Before the next step, ensure that the Docker Desktop engine is running on your local computer.
Log into the new container registry:
az acr login --name $env:CONTAINER_REGISTRY
Create an Azure Container app and containers
You can use the Azure CLI containerapp up command to create container apps for the application's API. This command also creates the required Log Analytics workspace and the Container Apps environment.
Create the container app by running this command:
az containerapp up ` --name apiservice ` --resource-group $env:RESOURCE_GROUP ` --location $env:LOCATION ` --environment $env:ENVIRONMENT ` --registry-server "$env:CONTAINER_REGISTRY.azurecr.io" ` --image mcr.microsoft.com/azuredocs/containerapps-helloworld:latest ` --target-port 80 ` --ingress external ` --query properties.configuration.ingress.fqdnNow, let's create a Redis service for the front end web app to use:
az containerapp add-on redis create ` --environment $env:ENVIRONMENT ` --name redisca ` --resource-group $env:RESOURCE_GROUPNext, create a container app for the web application's front end and configure it to use the Redis cache:
az containerapp create `
  --name web `
  --resource-group $env:RESOURCE_GROUP `
  --environment $env:ENVIRONMENT `
  --registry-server "$env:CONTAINER_REGISTRY.azurecr.io" `
  --image mcr.microsoft.com/azuredocs/containerapps-helloworld:latest `
  --target-port 80 `
  --ingress external `
  --query properties.configuration.ingress.fqdn
Connect the web containner app to the Redis cache
- Log into the Azure Portal and select Resource groups > <Your resource group> > web.
- In the menu on the left, select Containers.
- Select the Bindings tab, and then select Edit and deploy.
- Select the Bindings tab, select Add, and then select Add-on binding.
- In the Add-on drop-down list, select redisca, select Connect, and then select Create.
Publish the app container images into a container registry
Login to the ACR instance we'll be pushing the app container images to and get the server's FQDN into a parameter you'll use in a moment when you
dotnet buildthe Aspire solution:$loginServer = (az acr show --name $env:CONTAINER_REGISTRY --query loginServer --output tsv).NET's
publishcommand supports theContainerRegistryparameter. Setting this results in the output of thedotnet publishcommand being packaged into a container and pushed directly into your ACR instance in the cloud. Publish the solution projects to ACR using thedotnet publishcommand in the solution directory:dotnet publish -r linux-x64 -p:PublishProfile=DefaultContainer -p:ContainerRegistry=$loginServer
Configure the app for the deployed environment
Now that the infrastructure has been provisioned, you need to set a few configuration settings in the Azure Container Apps before your code can be published into them from their new ACR repositories.
Note
These last few steps will be mitigated in a future release of Bicep and ACA.
Configure the front end with the correct Redis connection configuration:
First, use the
az containerapp execcommand to log into the Container App:az containerapp exec --resource-group $env:RESOURCE_GROUP --name webNext, use
envto view theREDIS_ENDPOINTandREDIS_PASSWORDenvironment variables injected by the Azure Container Apps service binding, thenexitto close the connection to the Container App:env | grep "^REDIS_ENDPOINT" env | grep "^REDIS_PASSWORD" exitThe
webContainer App is using the .NET Aspire component for Redis, which loads the connection information from the app's configuration with the keyConnectionStrings__cache. Update the app configuration in ACA so that an environment variable with this name contains a valid connection string constructed using the details retrieved in the previous step. Note that .NET expects comma delimited values in the Redis connection string. For example,redis:6379,password=jH7DePUiK5E...:az containerapp update --name web --resource-group $env:RESOURCE_GROUP --set-env-vars 'ConnectionStrings__cache="redis:6379,password=<your password here>"'Then, update the target ports for the
webandapiserviceContainer Apps as the default "Hello World" app and our app have different target ports:Note
The string
aspiretoacais associated with the name of the .NET Aspire solution, in lowercase form. If, when you created the .NET Aspire solution with a different name, you'll need to tweak this string in the code below. For example, if you created an app in a directory namedMyNewAspireApp, you'd swap the stringaspiretoacawithmynewaspireappor the command will fail.az containerapp ingress update --name web --resource-group $env:RESOURCE_GROUP --target-port 8080 az containerapp ingress update --name apiservice --resource-group $env:RESOURCE_GROUP --target-port 8080 az containerapp update --name web --resource-group $env:RESOURCE_GROUP --image "$($env:CONTAINER_REGISTRY).azurecr.io/aspiretoaca-web:latest" az containerapp update --name apiservice --resource-group $env:RESOURCE_GROUP --image "$($env:CONTAINER_REGISTRY).azurecr.io/aspiretoaca-apiservice:latest"
Create the .NET Aspire template
To create a new .NET Aspire Starter Application, you can use either Visual Studio or the .NET CLI.
Visual Studio provides .NET Aspire project templates that handle some initial setup configurations for you. Complete the following steps to create a project for this quickstart:
At the top of Visual Studio, navigate to File > New > Project.
In the dialog window, search for Aspire and select .NET Aspire Starter Application. Select Next.
On the Configure your new project screen:
- Enter a Project Name of AspireSample.
- Leave the rest of the values at their defaults and select Next.
On the Additional information screen:
- Make sure .NET 8.0 (Long Term Support) is selected.
- Ensure that Use Redis for caching (requires a supported container runtime) is checked and select Create.
- Optionally, you can select Create a tests project. For more information, see Testing .NET Aspire apps.
Visual Studio creates a new solution that is structured to use .NET Aspire.
Login using the
az logincommand, which will prompt you to open a browser.If you have access to more than one Azure subscription, get your subscription list as a table so you can find the right subscription and matching subscription id in which you want to experiment.
az account list --output tableCopy the string from the "SubscriptionId" column for the Azure subscription you wish to use, then paste that string to your command prompt as the parameter to the
az account setcommand:az account set --subscription your-subscription-id-pasted-hereAdd the Azure CLI
az containerappextension, which provides capabilities specific to Azure Container Apps. For more information, see the az containerapp docs.az extension add --name containerapp --upgradeRegister required
aznamespaces. For more information, see the az provider register docs:az provider register --namespace Microsoft.App az provider register --namespace Microsoft.OperationalInsights az provider register --namespace Microsoft.ContainerRegistry
Set the environment variables
Declare a set of environment variables to store commonly used values for the app deployment process. Setting these variables simplifies working with command-line parameters:
Note
You will need to customize the SOLUTION and LOCATION variables per your own needs. To get a list of the available Azure regions to which you can deploy, use the command az account list-locations --output table.
$env:SOLUTION="YOUR_APP_NAME"                           # Your app's name (e.g., "aspiresample42")
$env:LOCATION="YOUR_REGION"                             # Your desired Azure region (e.g., "westus")
$env:RESOURCE_GROUP="$($env:SOLUTION.ToLower())rg"      # Resource Group name, e.g. eshopliterg
$env:CONTAINER_REGISTRY="$($env:SOLUTION.ToLower())cr"  # Azure Container Registry name, e.g. eshoplitecr
$env:IMAGE_PREFIX="$($env:SOLUTION.ToLower())"          # Container image name prefix, e.g. eshoplite
$env:IDENTITY="$($env:SOLUTION.ToLower())id"            # Azure Managed Identity, e.g. eshopliteid
$env:ENVIRONMENT="$($env:SOLUTION.ToLower())cae"        # Azure Container Apps Environment name, e.g. eshoplitecae
Provision the Azure resources
Azure Container Apps (ACA) is an ideal hosting platform for .NET Aspire apps. You can use Bicep or the Azure CLI to create resources in Azure to host the .NET Aspire app code along with supporting services:
- An Azure Container Apps Environment to host your code and tertiary containers
- A pair of Azure Container Apps, hosting your code
- A Redis container inside the ACA Environment used by the output caching subsystem
- An Azure Log Analytics instance to host the log output from your apps
- An Azure Container Registry (ACR) instance for publishing your containers into the cloud
Create the Azure resource group that will hold the provision resources:
az group create --location $env:LOCATION --name $env:RESOURCE_GROUP
Create the Azure Bicep provisioning files
Now, you'll create two new files — infra\provision.bicep and infra\provision.parms.bicepparam - representing the Infrastructure-as-Code (IaC) layer in the app. The provision.bicep file is an Azure Bicep template that provisions all of the Azure resources the app will need to run.
In
infra/provision.bicep, add the following code to the top of the empty file. These lines of code represent the parameters you'll feed the Bicep file using the environment variables you set earlier. Theenvvariable is an array that will be passed to both of the container apps hosting your Aspire project code, setting some conventional environment variables useful during development.@minLength(1) @maxLength(64) @description('Name of the resource group that will contain all the resources') param resourceGroupName string = 'aspiretoacarg' @minLength(1) @description('Primary location for all resources') param location string = 'westus' @minLength(5) @maxLength(50) @description('Name of the Azure Container Registry resource into which container images will be published') param containerRegistryName string = 'aspiretoacacr' @minLength(1) @maxLength(64) @description('Name of the identity used by the apps to access Azure Container Registry') param identityName string = 'aspiretoacaid' @description('CPU cores allocated to a single container instance, e.g., 0.5') param containerCpuCoreCount string = '0.25' @description('Memory allocated to a single container instance, e.g., 1Gi') param containerMemory string = '0.5Gi' var resourceToken = toLower(uniqueString(subscription().id, resourceGroupName, location)) var helloWorldContainerImage = 'mcr.microsoft.com/azuredocs/containerapps-helloworld:latest' // common environment variables used by each of the apps var env = [ { name: 'ASPNETCORE_ENVIRONMENT' value: 'Development' } { name: 'Logging__Console__FormatterName' value: 'simple' } { name: 'Logging__Console__FormatterOptions__SingleLine' value: 'true' } { name: 'Logging__Console__FormatterOptions__IncludeScopes' value: 'true' } { name: 'ASPNETCORE_LOGGING__CONSOLE__DISABLECOLORS' value: 'true' } ]Add the following Bicep code to
infra\provision.bicep. When you execute this Bicep template against your Azure subscription, these nodes of the file will produce the ACA Environment and the prerequisite Log Analytics instance in the resource group you created earlier.// log analytics resource logAnalytics 'Microsoft.OperationalInsights/workspaces@2021-12-01-preview' = { name: 'logs${resourceToken}' location: location properties: any({ retentionInDays: 30 features: { searchVersion: 1 } sku: { name: 'PerGB2018' } }) } // the container apps environment resource containerAppsEnvironment 'Microsoft.App/managedEnvironments@2023-04-01-preview' = { name: 'acae${resourceToken}' location: location properties: { appLogsConfiguration: { destination: 'log-analytics' logAnalyticsConfiguration: { customerId: logAnalytics.properties.customerId sharedKey: logAnalytics.listKeys().primarySharedKey } } } }Add the following code and the end of the
infra\provision.bicepfile to provision the Azure Container Registry (ACR) instance and create a user-assigned Azure Identity. Each of your apps will run as this identity, which will be given access to the ACR instance so the Azure Container Apps hosting your code can securely access your ACR instance and pull containers as they're updated.// the container registry resource containerRegistry 'Microsoft.ContainerRegistry/registries@2022-02-01-preview' = { name: containerRegistryName location: location sku: { name: 'Basic' } properties: { adminUserEnabled: true anonymousPullEnabled: false dataEndpointEnabled: false encryption: { status: 'disabled' } networkRuleBypassOptions: 'AzureServices' publicNetworkAccess: 'Enabled' zoneRedundancy: 'Disabled' } } // identity for the container apps resource identity 'Microsoft.ManagedIdentity/userAssignedIdentities@2023-01-31' = { name: identityName location: location } var principalId = identity.properties.principalId // azure system role for setting up acr pull access var acrPullRole = subscriptionResourceId('Microsoft.Authorization/roleDefinitions', '7f951dda-4ed3-4680-a7ca-43fe172d538d') // allow acr pulls to the identity used for the aca's resource aksAcrPull 'Microsoft.Authorization/roleAssignments@2022-04-01' = { scope: containerRegistry // Use when specifying a scope that is different than the deployment scope name: guid(subscription().id, resourceGroup().id, acrPullRole) properties: { roleDefinitionId: acrPullRole principalType: 'ServicePrincipal' principalId: principalId } }Add the following code to the
infra\provision.bicepfile to provision the Container App hosting the back-end API project.// apiservice - the app's back-end resource apiservice 'Microsoft.App/containerApps@2023-04-01-preview' = { name: 'apiservice' location: location identity: { type: 'UserAssigned' userAssignedIdentities: { '${identity.id}' : {}} } properties: { managedEnvironmentId: containerAppsEnvironment.id configuration: { activeRevisionsMode: 'Single' ingress: { external: true targetPort: 80 transport: 'http' } dapr: { enabled: false } registries: [ { server: '${containerRegistryName}.azurecr.io' identity: identity.id } ] } template: { scale: { minReplicas: 1 maxReplicas: 1 } serviceBinds: [] containers: [ { image: helloWorldContainerImage name: 'apiservice' env: env resources: { cpu: json(containerCpuCoreCount) memory: containerMemory } } ] } } }The final code you'll add to infra/provision.bicep will provision containers for the front-end and the Redis Azure Container App add-on your front-end will use to facilitate output caching.
// web - the app's front end
resource web 'Microsoft.App/containerApps@2023-04-01-preview' = {
    name: 'web'
    location: location
    identity: {
        type: 'UserAssigned'
        userAssignedIdentities: { '${identity.id}' : {}}
    }
    properties: {
        managedEnvironmentId: containerAppsEnvironment.id
        configuration: {
        activeRevisionsMode: 'Single'
        ingress: {
            external: true
            targetPort: 80
            transport: 'http'
        }
        dapr: { enabled: false }
        registries: [ {
            server: '${containerRegistryName}.azurecr.io'
            identity: identity.id
            } ]
        }
        template: {
            scale: {
                minReplicas: 1
                maxReplicas: 1
            }
            containers: [ {
                image: helloWorldContainerImage
                name: 'web'
                env: env
                resources: {
                    cpu: json(containerCpuCoreCount)
                    memory: containerMemory
                }
                } ]
            serviceBinds: [ {
                name: 'redis'
                serviceId: redis.id
            } ]
        }
    }
}

// redis - azure container apps service
resource redis 'Microsoft.App/containerApps@2023-04-01-preview' = {
    name: 'redis'
    location: location
    identity: {
        type: 'None'
        userAssignedIdentities: null
    }
    properties: {
        managedEnvironmentId: containerAppsEnvironment.id
        configuration: {
        activeRevisionsMode: 'Single'
        ingress: {
            external: false
            targetPort: 6379
            transport: 'tcp'
        }
        dapr: { enabled: false }
            service: { type: 'redis' }
        }
        template: {
            scale: {
                minReplicas: 1
                maxReplicas: 1
            }
        }
    }
}
Create a second file in the infra folder named provision.parms.bicepparam and paste this code into it.
New-Item provision.parms.bicepparamThis file will serve the purpose of reading the environment variables you set earlier. Those environment variables will be picked up and passed into the deployment process, so the template you wrote in
infra\provision.bicepcan read the parameters from your environment.using 'provision.bicep' param resourceGroupName = readEnvironmentVariable('RESOURCE_GROUP', 'acatoaspirerg') param location = readEnvironmentVariable('LOCATION', 'westus') param containerRegistryName = readEnvironmentVariable('CONTAINER_REGISTRY','acatoaspirecr') param identityName = readEnvironmentVariable('IDENTITY','acatoaspireid')Create a new Azure deployment using the Bicep templates. This command will take a few minutes to execute.
cd ..
az deployment group create --resource-group $env:RESOURCE_GROUP --template-file .\infra\provision.bicep --parameters .\infra\provision.parms.bicepparam
Publish the app container images into a container registry
Login to the ACR instance we'll be pushing the app container images to and get the server's FQDN into a parameter you'll use in a moment when you
dotnet buildthe .NET Aspire solution:az acr login --name $env:CONTAINER_REGISTRY $loginServer = (az acr show --name $env:CONTAINER_REGISTRY --query loginServer --output tsv).NET's
publishcommand supports theContainerRegistryparameter. Setting this results in the output of thedotnet publishcommand being packaged into a container and pushed directly into your ACR instance in the cloud. Publish the solution projects to ACR using thedotnet publishcommand in the solution directory:dotnet publish -r linux-x64 ` -p:PublishProfile=DefaultContainer ` -p:ContainerRegistry=$loginServer
Configure the app for the deployed environment
Now that the infrastructure has been provisioned, you need to set a few configuration settings in the Azure Container Apps before your code can be published into them from their new ACR repositories.
Note
These last few steps will be mitigated in a future release of Bicep and ACA.
Configure the front end with the correct Redis connection configuration:
First, use the
az containerapp execcommand to log into the Container App:az containerapp exec --resource-group $env:RESOURCE_GROUP --name webNext, use
envto view theREDIS_ENDPOINTandREDIS_PASSWORDenvironment variables injected by the Azure Container Apps service binding, thenexitto close the connection to the Container App:env | grep "^REDIS_ENDPOINT" env | grep "^REDIS_PASSWORD" exitThe
webContainer App is using the .NET Aspire component for Redis, which loads the connection information from the app's configuration with the keyConnectionStrings__cache. Update the app configuration in ACA so that an environment variable with this name contains a valid connection string constructed using the details retrieved in the previous step. Note that .NET expects comma delimited values in the Redis connection string. For example,redis:6379,password=jH7DePUiK5E...:az containerapp update --name web --resource-group $env:RESOURCE_GROUP --set-env-vars 'ConnectionStrings__cache="redis:6379,password=<your password here>"'Then, update the target ports for the
webandapiserviceContainer Apps as the default "Hello World" app and our app have different target ports:Note
The string
aspiretoacais associated with the name of the .NET Aspire solution, in lowercase form. If, when you created the .NET Aspire solution with a different name, you'll need to tweak this string in the code below. For example, if you created an app in a directory namedMyNewAspireApp, you'd swap the stringaspiretoacawithmynewaspireappor the command will fail.az containerapp ingress update --name web --resource-group $env:RESOURCE_GROUP --target-port 8080 az containerapp ingress update --name apiservice --resource-group $env:RESOURCE_GROUP --target-port 8080 az containerapp update --name web --resource-group $env:RESOURCE_GROUP --image "$($env:CONTAINER_REGISTRY).azurecr.io/aspiretoaca-web:latest" az containerapp update --name apiservice --resource-group $env:RESOURCE_GROUP --image "$($env:CONTAINER_REGISTRY).azurecr.io/aspiretoaca-apiservice:latest"
Test the deployed app
Now that the app has been provisioned and deployed, you can browse to the Azure portal. In the resource group where you deployed the app, you'll see the three container apps and other resources.

Click on the web Container App to open it up in the portal.

Click the Application URL link to open the front end in the browser.

When you click the "Weather" node in the navigation bar, the front end web container app makes a call to the apiservice container app to get data. The front end's output will be cached using the redis container app and the .NET Aspire Redis Output Caching component. As you refresh the front end a few times, you'll notice that the weather data is cached. It will update after a few seconds.
Clean up resources
Run the following Azure CLI command to delete the resource group when you no longer need the Azure resources you created. Deleting the resource group also deletes the resources contained inside of it.
az group delete --name <your-resource-group-name>
.NET Aspire
Feedback
Coming soon: Throughout 2024 we will be phasing out GitHub Issues as the feedback mechanism for content and replacing it with a new feedback system. For more information see: https://aka.ms/ContentUserFeedback.
Submit and view feedback for