Note
Access to this page requires authorization. You can try signing in or changing directories.
Access to this page requires authorization. You can try changing directories.
In this article, you learn how to use Python apps in an Aspire AppHost. The sample app in this article demonstrates launching a Python application. The Python extension for Aspire requires the use of virtual environments.
Prerequisites
To work with Aspire, you need the following installed locally:
- .NET 8.0 or .NET 9.0.
- Starting with Aspire 9.4, .NET 10 Preview 5 or later is supported.
- An OCI compliant container runtime, such as:
- Docker Desktop or Podman. For more information, see Container runtime.
- An Integrated Developer Environment (IDE) or code editor, such as:
- Visual Studio 2022 version 17.9 or higher (Optional)
- Visual Studio Code (Optional)
- C# Dev Kit: Extension (Optional)
- JetBrains Rider with Aspire plugin (Optional)
For more information, see Aspire setup and tooling, and Aspire SDK.
Additionally, you need to install Python on your machine. The sample app in this article was built with Python version 3.12.4 and pip version 24.1.2. To verify your Python and pip versions, run the following commands:
python --version
pip --version
To download Python (including pip), see the Python download page.
Create an Aspire project using the template
To get started launching a Python project in Aspire, use the starter template to first create an Aspire application host:
dotnet new aspire -o PythonSample
In the same terminal session, change directories into the newly created project:
cd PythonSample
After the template is created, launch the AppHost with the following command to ensure that the AppHost and the Aspire dashboard run successfully:
dotnet run --project ./PythonSample.AppHost/PythonSample.AppHost.csproj
If the Aspire Dashboard doesn't open, open it with the link in the console output. At this point the dashboard won't show any resources. Stop the AppHost by pressing Ctrl + C in the terminal.
Prepare a Python app
From your previous terminal session where you created the Aspire solution, create a new directory to contain the Python source code.
mkdir hello-python
Change directories into the newly created hello-python directory:
cd hello-python
Initialize the Python virtual environment
To work with Python apps, they need to be within a virtual environment. To create a virtual environment, run the following command:
python -m venv .venv
For more information on virtual environments, see the Python: Install packages in a virtual environment using pip and venv.
To activate the virtual environment, enabling installation and usage of packages, run the following command:
source .venv/bin/activate
Ensure that pip within the virtual environment is up-to-date by running the following command:
python -m pip install --upgrade pip
Install Python packages
Install the Flask package by creating a requirements.txt file in the hello-python directory and adding the following line:
Flask==3.0.3
Then, install the Flask package by running the following command:
python -m pip install -r requirements.txt
After Flask is installed, create a new file named main.py in the hello-python directory and add the following code:
import os
import flask

app = flask.Flask(__name__)

@app.route('/', methods=['GET'])
def hello_world():
    return 'Hello, World!'

if __name__ == '__main__':
    port = int(os.environ.get('PORT', 8111))
    app.run(host='0.0.0.0', port=port)
The preceding code creates a simple Flask app that listens on port 8111 and returns the message "Hello, World!" when the root endpoint is accessed.
Update the AppHost project
Install the Python hosting package by running the following command:
dotnet add ../PythonSample.AppHost/PythonSample.AppHost.csproj package Aspire.Hosting.Python --version 9.0.0
After the package is installed, the project XML should have a new package reference similar to the following example:
<Project Sdk="Microsoft.NET.Sdk">

  <Sdk Name="Aspire.AppHost.Sdk" Version="9.5.2" />

  <PropertyGroup>
    <OutputType>Exe</OutputType>
    <TargetFramework>net9.0</TargetFramework>
    <ImplicitUsings>enable</ImplicitUsings>
    <Nullable>enable</Nullable>
    <UserSecretsId>5fd92a87-fff8-4a09-9f6e-2c0d656e25ba</UserSecretsId>
  </PropertyGroup>

  <ItemGroup>
    <PackageReference Include="Aspire.Hosting.AppHost" Version="13.0.0" />
    <PackageReference Include="Aspire.Hosting.Python" Version="13.0.0" />
  </ItemGroup>

</Project>
Replace the AppHost.cs code with the following snippet. This code adds the Python project to Aspire by calling the AddPythonApp API and specifying the project name, project path, and the entry point file:
using Microsoft.Extensions.Hosting;

var builder = DistributedApplication.CreateBuilder(args);

#pragma warning disable ASPIREHOSTINGPYTHON001
var pythonapp = builder.AddPythonApp("hello-python", "../hello-python", "main.py")
       .WithHttpEndpoint(env: "PORT")
       .WithExternalHttpEndpoints()
       .WithOtlpExporter();
#pragma warning restore ASPIREHOSTINGPYTHON001

if (builder.ExecutionContext.IsRunMode && builder.Environment.IsDevelopment())
{
    pythonapp.WithEnvironment("DEBUG", "True");
}

builder.Build().Run();
Important
The preceding code suppresses the ASPIREHOSTINGPYTHON001 diagnostic error. This error is generated because the AddPythonApp API is experimental and might change in future release. For more information, see Compiler Error ASPIREHOSTINGPYTHON001.
Run the app
Now that you've added the Python hosting package, updated the AppHost.cs file, and created a Python project, you can run the AppHost:
dotnet run --project ../PythonSample.AppHost/PythonSample.AppHost.csproj
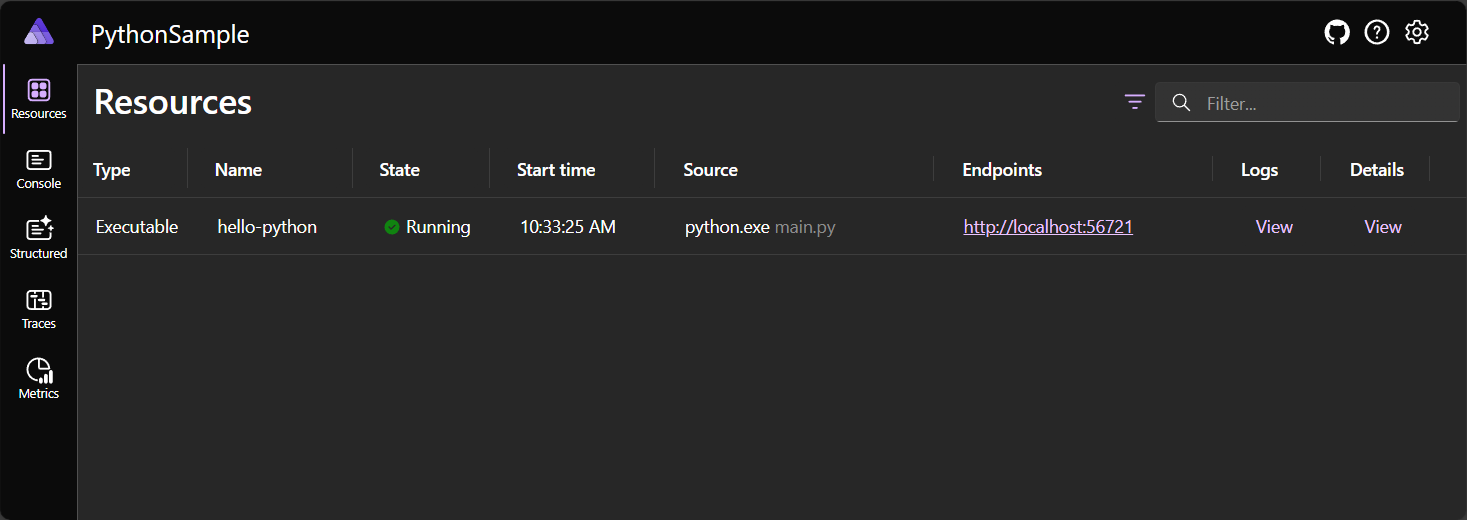
Launch the dashboard by clicking the link in the console output. The dashboard should display the Python project as a resource.
Select the Endpoints link to open the hello-python endpoint in a new browser tab. The browser should display the message "Hello, World!":
Stop the AppHost by pressing Ctrl + C in the terminal.
Add telemetry support
To add a bit of observability, add telemetry to help monitor the dependant Python app. In the Python project, add the following OpenTelemetry packages as a dependency in the requirements.txt file:
Flask==3.0.3
opentelemetry-distro
opentelemetry-exporter-otlp-proto-grpc
opentelemetry-instrumentation-flask
gunicorn
Next, reinstall the Python app requirements into the virtual environment by running the following command:
python -m pip install -r requirements.txt
The preceding command installs the OpenTelemetry package and the OTLP exporter, in the virtual environment. Update the Python app to include the OpenTelemetry code, by replacing the existing main.py code with the following:
import os
import logging
import flask
from opentelemetry import trace
from opentelemetry.exporter.otlp.proto.grpc.trace_exporter import OTLPSpanExporter
from opentelemetry.sdk.trace import TracerProvider
from opentelemetry.sdk.trace.export import BatchSpanProcessor
from opentelemetry.instrumentation.flask import FlaskInstrumentor

app = flask.Flask(__name__)

trace.set_tracer_provider(TracerProvider())
otlpExporter = OTLPSpanExporter()
processor = BatchSpanProcessor(otlpExporter)
trace.get_tracer_provider().add_span_processor(processor)

FlaskInstrumentor().instrument_app(app)

logging.basicConfig(level=logging.INFO)
logger = logging.getLogger(__name__)

@app.route('/', methods=['GET'])
def hello_world():
    logger.info("request received!")
    return 'Hello, World!'

if __name__ == '__main__':
    port = int(os.environ.get('PORT', 8111))
    debug = bool(os.environ.get('DEBUG', False))
    host = os.environ.get('HOST', '127.0.0.1')
    app.run(port=port, debug=debug, host=host)
Update the AppHost project's launchSettings.json file to include the ASPIRE_ALLOW_UNSECURED_TRANSPORT environment variable under the http profile:
{
  "$schema": "https://json.schemastore.org/launchsettings.json",
  "profiles": {
    "https": {
      "commandName": "Project",
      "dotnetRunMessages": true,
      "launchBrowser": true,
      "applicationUrl": "https://localhost:17171;http://localhost:15209",
      "environmentVariables": {
        "ASPNETCORE_ENVIRONMENT": "Development",
        "DOTNET_ENVIRONMENT": "Development",
        "ASPIRE_DASHBOARD_OTLP_ENDPOINT_URL": "https://localhost:21171",
        "ASPIRE_RESOURCE_SERVICE_ENDPOINT_URL": "https://localhost:22122"
      }
    },
    "http": {
      "commandName": "Project",
      "dotnetRunMessages": true,
      "launchBrowser": true,
      "applicationUrl": "http://localhost:15209",
      "environmentVariables": {
        "ASPNETCORE_ENVIRONMENT": "Development",
        "DOTNET_ENVIRONMENT": "Development",
        "ASPIRE_DASHBOARD_OTLP_ENDPOINT_URL": "http://localhost:19171",
        "ASPIRE_RESOURCE_SERVICE_ENDPOINT_URL": "http://localhost:20208",
        "ASPIRE_ALLOW_UNSECURED_TRANSPORT": "true"
      }
    }
  }
}
The ASPIRE_ALLOW_UNSECURED_TRANSPORT variable is required because when running locally the OpenTelemetry client in Python rejects the local development certificate. Launch the AppHost again:
dotnet run --project ../PythonSample.AppHost/PythonSample.AppHost.csproj --launch-profile http
Important
The Aspire AppHost must be run using HTTP instead of HTTPS. The OpenTelemetry library requires HTTP when running in a local dev environment.
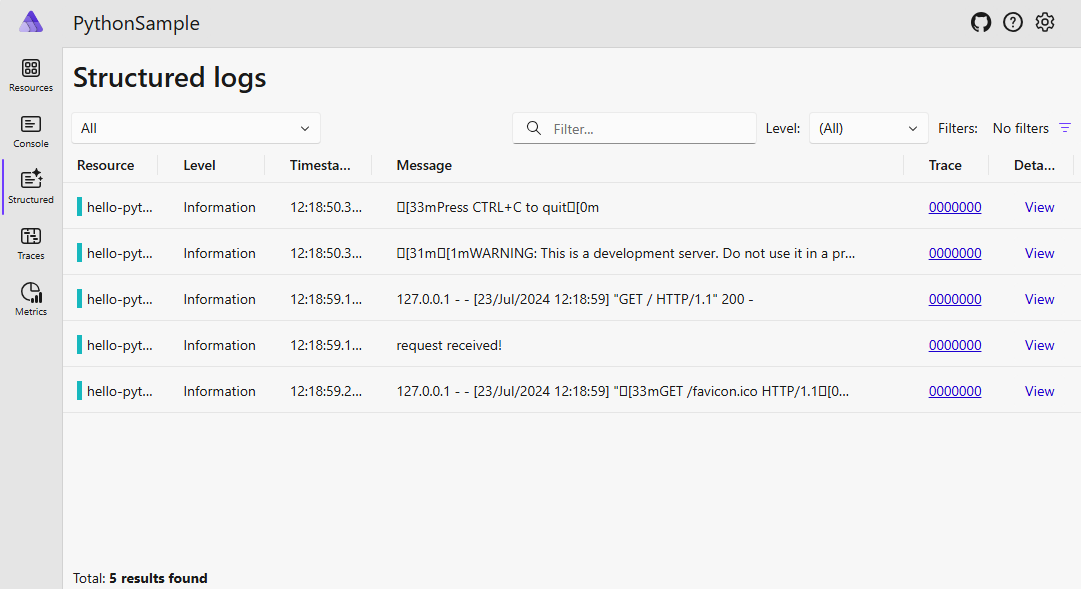
Once the AppHost is running, navigate to the dashboard and select the Structured logging tab. Notice that it now contains logging events.
Summary
While there are several considerations that are beyond the scope of this article, you learned how to build Aspire solution that integrates with Python. You also learned how to use the AddPythonApp API to host Python apps.


