Tutorial: Use .NET Aspire messaging integrations in ASP.NET Core
Cloud-native apps often require scalable messaging solutions that provide capabilities such as messaging queues and topics and subscriptions. .NET Aspire integrations simplify the process of connecting to various messaging providers, such as Azure Service Bus. In this tutorial, you'll create an ASP.NET Core app that uses .NET Aspire integrations to connect to Azure Service Bus to create a notification system. Submitted messages will be sent to a Service Bus topic for consumption by subscribers. You'll learn how to:
- Create a basic .NET app that is set up to use .NET Aspire integrations
- Add an .NET Aspire integration to connect to Azure Service Bus
- Configure and use .NET Aspire integration features to send and receive data
Prerequisites
To work with .NET Aspire, you need the following installed locally:
- .NET 8.0
- .NET Aspire workload:
- Installed with the Visual Studio installer or the .NET CLI workload.
- An OCI compliant container runtime, such as:
- Docker Desktop or Podman.
- An Integrated Developer Environment (IDE) or code editor, such as:
- Visual Studio 2022 version 17.10 or higher (Optional)
- Visual Studio Code (Optional)
- C# Dev Kit: Extension (Optional)
For more information, see .NET Aspire setup and tooling.
In addition to the preceding prerequisites, you also need to install the Azure CLI. To install the Azure CLI, follow the instructions in the Azure CLI installation guide.
Set up the Azure Service Bus account
For this tutorial, you'll need access to an Azure Service Bus namespace with a topic and subscription configured. Use one of the following options to set up the require resources:
- Azure portal: Create a service bus account with a topic and subscription.
Alternatively:
Azure CLI: Run the following commands in the Azure CLI or CloudShell to set up the required Azure Service Bus resources:
az group create -n <your-resource-group-name> --location eastus
az servicebus namespace create -g <your-resource-group-name> --name <your-namespace-name> --location eastus
az servicebus topic create -g <your-resource-group-name> --namespace-name <your-namespace-name> --name notifications
az servicebus topic subscription create -g <your-resource-group-name> --namespace-name <your-namespace-name> --topic-name notifications --name mobile
Note
Replace the your-resource-group-name and your-namespace-name placeholders with your own values. Service Bus namespace names must be globally unique across Azure.
Azure authentication
This quickstart can be completed using either passwordless authentication or a connection string. Passwordless connections use Azure Active Directory and role-based access control (RBAC) to connect to a Service Bus namespace. You don't need to worry about having hard-coded connection string in your code, a configuration file, or in secure storage such as Azure Key Vault.
You can also use a connection string to connect to a Service Bus namespace, but the passwordless approach is recommended for real-world applications and production environments. For more information, read about Authentication and authorization or visit the passwordless overview page.
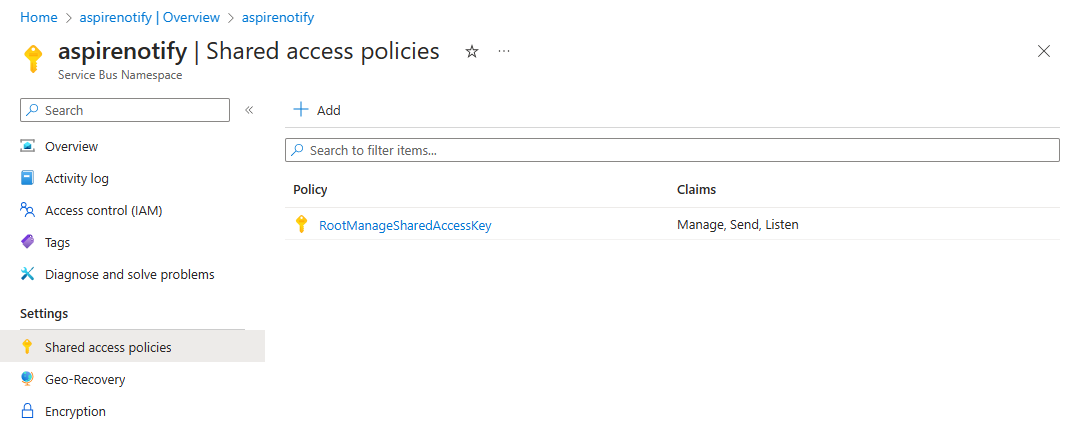
On your Service Bus namespace, assign the following role to the user account you logged into Visual Studio or the Azure CLI with:
- Service Bus Data Owner: Assign an Azure RBAC role
Create the sample solution
To create a new .NET Aspire Starter Application, you can use either Visual Studio, Visual Studio Code, or the .NET CLI.
Visual Studio provides .NET Aspire project templates that handle some initial setup configurations for you. Complete the following steps to create a project for this quickstart:
At the top of Visual Studio, navigate to File > New > Project.
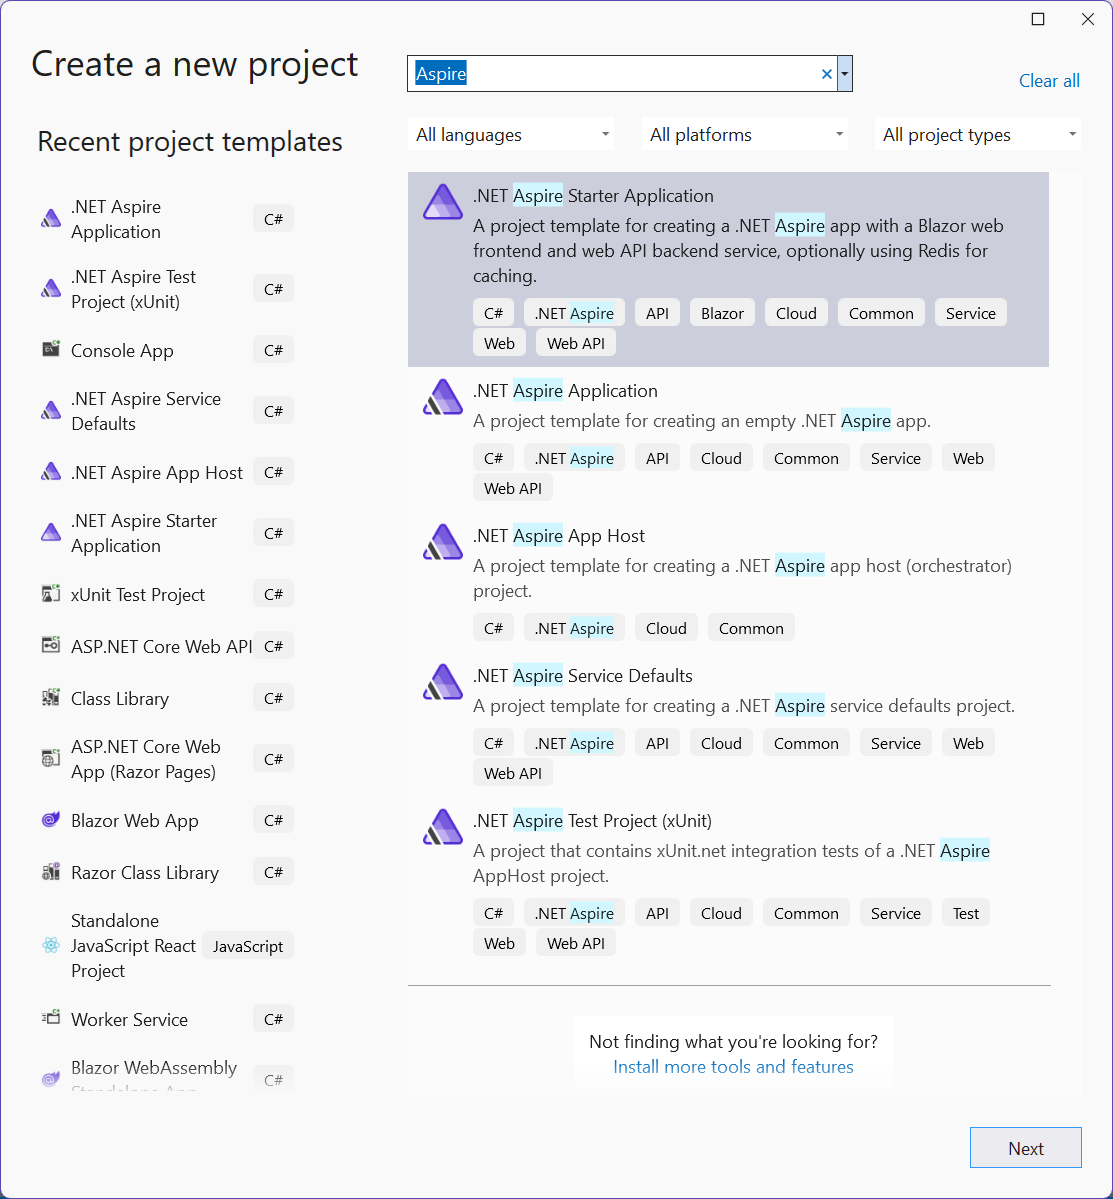
In the dialog window, search for Aspire and select .NET Aspire Starter Application. Select Next.
On the Configure your new project screen:
- Enter a Project Name of AspireSample.
- Leave the rest of the values at their defaults and select Next.
On the Additional information screen:
- Make sure .NET 8.0 (Long Term Support) is selected.
- Ensure that Use Redis for caching (requires a supported container runtime) is checked and select Create.
- Optionally, you can select Create a tests project. For more information, see Write your first .NET Aspire test.

Visual Studio creates a new solution that is structured to use .NET Aspire.
Visual Studio Code provides .NET Aspire project templates that handle some initial setup configurations for you. Complete the following steps to create a project for this quickstart:
From a new instance of Visual Studio Code (without a folder open), select Create .NET project button.
Select the .NET Aspire Starter Application template.


dotnet new aspire-starter --use-redis-cache --output AspireSample
For more information, see dotnet new. The .NET CLI creates a new solution that is structured to use .NET Aspire.
Add the Worker Service project
Next, add a Worker Service project to the solution to retrieve and process messages to and from Azure Service Bus.
- In the solution explorer, right click on the top level
AspireSamplesolution node and select Add > New project. - Search for and select the Worker Service template and choose Next.
- For the Project name, enter AspireSample.WorkerService and select Next.
- On the Additional information screen:
- Make sure .NET 8.0 is selected.
- Make sure Enlist in .NET Aspire orchestration is checked and select Create.
Visual Studio adds the project to your solution and updates the Program.cs file of the AspireSample.AppHost project with a new line of code:
builder.AddProject<Projects.AspireSample_WorkerService>(
    "aspiresample-workerservice");
Visual Studio tooling added this line of code to register your new project with the IDistributedApplicationBuilder object, which enables orchestration features you'll explore later.
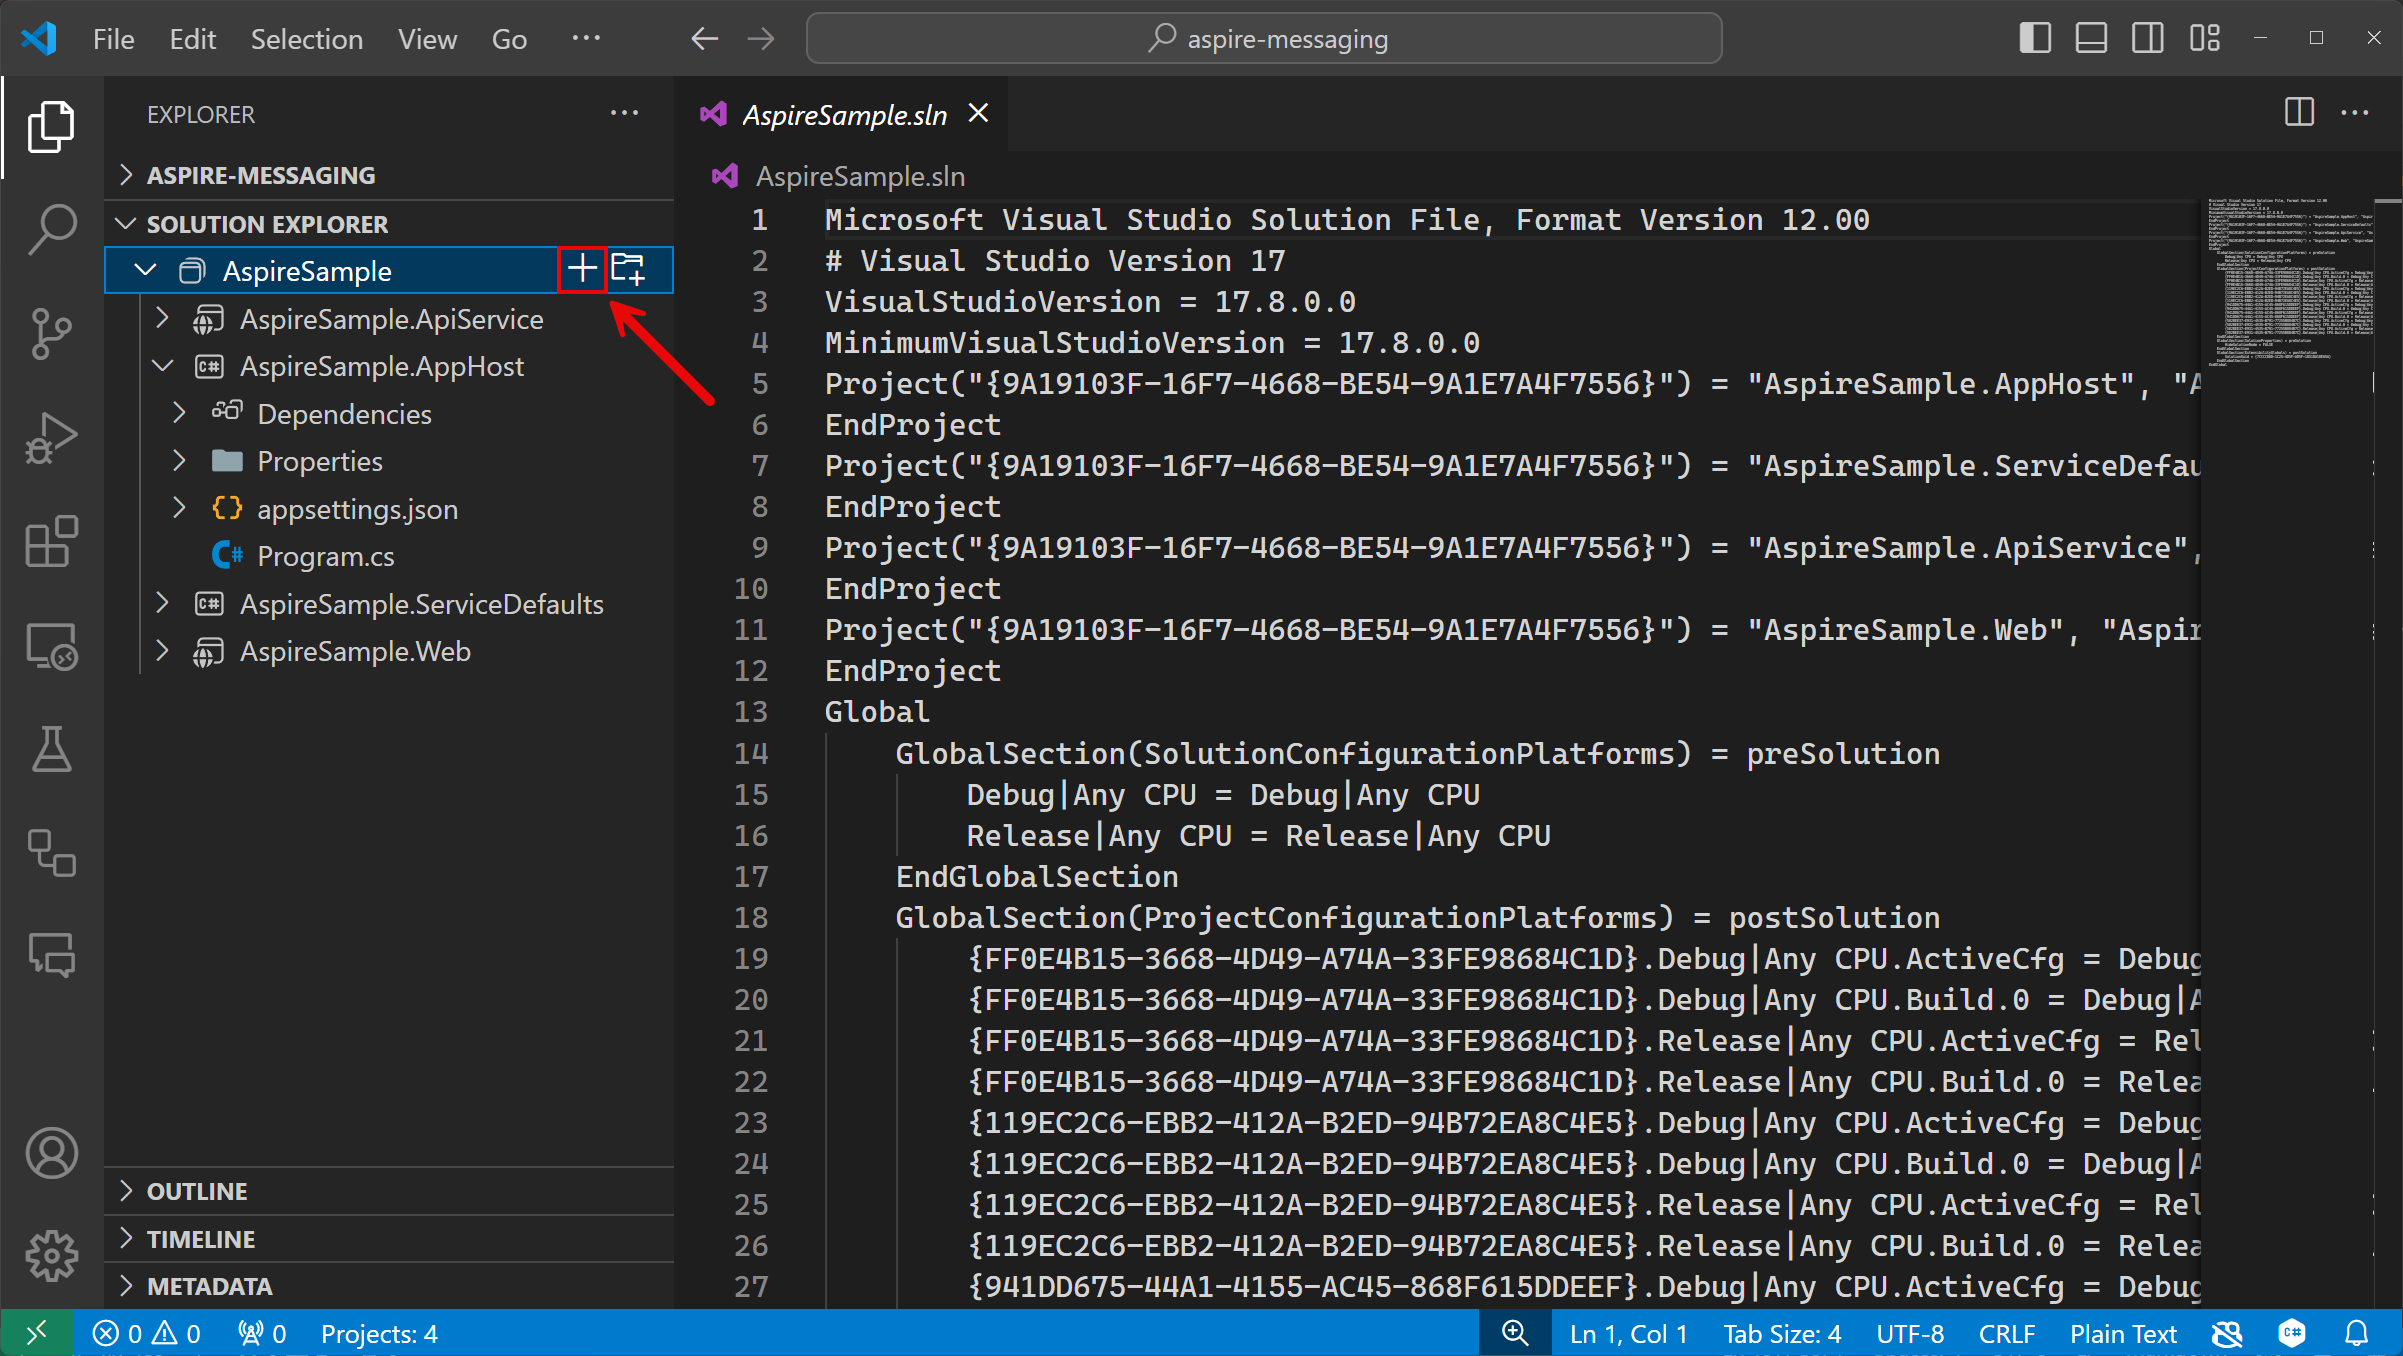
From the Solution Explorer in Visual Studio Code, select the + button next to the solution name to add a new project to the solution:
To filter the project templates, enter Worker in the search box and select the Worker Service template that's found:

Choose the Worker Service template and enter the project name as AspireSample.WorkerService.
Select Default directory to create the project in the same directory as the solution.
Select Create project to add the project to the solution.
Right-click on the AspireSample.AppHost project in the Solution Explorer and select Add Project Reference:

Add the following line of code to the Program.cs file in the AspireSample.AppHost project before the call to
builder.Build().Run();:builder.AddProject<Projects.AspireSample_WorkerService>( "aspiresample-workerservice");


In the root directory of the app, use the dotnet new command to create a new Worker Service app:
dotnet new worker --name AspireSample.WorkerServiceUse the
dotnet slncommand to add the project to the solution:dotnet sln AspireSample.sln add AspireSample.WorkerService/AspireSample.WorkerService.csprojUse the
dotnet addcommand to add a project reference between the .AppHost and .WorkerService project:dotnet add AspireSample.AppHost/AspireSample.AppHost.csproj reference AspireSample.WorkerService/AspireSample.WorkerService.csprojAdd the following line of code to the Program.cs file in the AspireSample.AppHost project before the call to
builder.Build().Run();:builder.AddProject<Projects.AspireSample_WorkerService>( "aspiresample-workerservice");
The completed solution structure should resemble the following, assuming the top-level directory is named aspire-messaging:
└───📂 aspire-messaging
     ├───📂 AspireSample.WorkerService
     │    ├───📂 Properties
     │    │    └─── launchSettings.json
     │    ├─── appsettings.Development.json
     │    ├─── appsettings.json
     │    ├─── AspireSample.WorkerService.csproj
     │    ├─── Program.cs
     │    └─── Worker.cs
     ├───📂 AspireSample.ApiService
     │    ├───📂 Properties
     │    │    └─── launchSettings.json
     │    ├─── appsettings.Development.json
     │    ├─── appsettings.json
     │    ├─── AspireSample.ApiService.csproj
     │    └─── Program.cs
     ├───📂 AspireSample.AppHost
     │    ├───📂 Properties
     │    │    └─── launchSettings.json
     │    ├─── appsettings.Development.json
     │    ├─── appsettings.json
     │    ├─── AspireSample.AppHost.csproj
     │    └─── Program.cs
     ├───📂 AspireSample.ServiceDefaults
     │    ├─── AspireSample.ServiceDefaults.csproj
     │    └─── Extensions.cs
     ├───📂 AspireSample.Web
     │    ├───📂 Components
     │    │    ├───📂 Layout
     │    │    │    ├─── MainLayout.razor
     │    │    │    ├─── MainLayout.razor.css
     │    │    │    ├─── NavMenu.razor
     │    │    │    └─── NavMenu.razor.css
     │    │    ├───📂 Pages
     │    │    │    ├─── Counter.razor
     │    │    │    ├─── Error.razor
     │    │    │    ├─── Home.razor
     │    │    │    └─── Weather.razor
     │    │    ├─── _Imports.razor
     │    │    ├─── App.razor
     │    │    └─── Routes.razor
     │    ├───📂 Properties
     │    │    └─── launchSettings.json
     │    ├───📂 wwwroot
     │    │    ├───📂 bootstrap
     │    │    │    ├─── bootstrap.min.css
     │    │    │    └─── bootstrap.min.css.map
     │    │    ├─── app.css
     │    │    └─── favicon.png
     │    ├─── appsettings.Development.json
     │    ├─── appsettings.json
     │    ├─── AspireSample.Web.csproj
     │    ├─── Program.cs
     │    └─── WeatherApiClient.cs
     └─── AspireSample.sln
Add the .NET Aspire integration to the API
Add the .NET Aspire Azure Service Bus integration to your AspireSample.ApiService app:
In the Solution Explorer, double-click the AspireSample.ApiService.csproj file to open its XML file.
Add the following
<PackageReference>item to the<ItemGroup>element:<ItemGroup> <PackageReference Include="Aspire.Azure.Messaging.ServiceBus" Version="8.0.1" /> </ItemGroup>
In the Solution Explorer, right-click on the AspireSample.ApiService project and select Add NuGet Package:

Enter Aspire.Azure.Messaging.ServiceBus in the search box and select the package from the list.
Select the (latest) version to install the package.

dotnet add package Aspire.Azure.Messaging.ServiceBus
In the Program.cs file of the AspireSample.ApiService project, add a call to the AddAzureServiceBusClient extension method—replacing the existing call to AddServiceDefaults:
// Add service defaults & Aspire integrations.
builder.AddServiceDefaults();
builder.AddAzureServiceBusClient("serviceBusConnection");
For more information, see AddAzureServiceBusClient.
This method accomplishes the following tasks:
- Registers a ServiceBusClient with the DI container for connecting to Azure Service Bus.
- Automatically enables corresponding health checks, logging, and telemetry for the respective services.
In the appsettings.json file of the same project, add the corresponding connection information:
{
  // Existing configuration is omitted for brevity.
  "ConnectionStrings": {
    "serviceBusConnection": "{your_namespace}.servicebus.windows.net"
  }
}
Note
Make sure to replace {your_namespace} in the service URIs with the name of your own Service Bus namespace.
Create the API endpoint
The API must provide an endpoint to receive data and publish it to the Service Bus topic and broadcast to subscribers. Add the following endpoint to the AspireSample.ApiService project to send a message to the Service Bus topic. Replace all of the contents of the Program.cs file with the following C# code:
using Azure.Messaging.ServiceBus;

var builder = WebApplication.CreateBuilder(args);

// Add service defaults & Aspire integrations.
builder.AddServiceDefaults();
builder.AddAzureServiceBusClient("serviceBusConnection");

// Add services to the container.
builder.Services.AddProblemDetails();

var app = builder.Build();

// Configure the HTTP request pipeline.
app.UseExceptionHandler();

app.MapPost("/notify", static async (ServiceBusClient client, string message) =>
{
    var sender = client.CreateSender("notifications");

    // Create a batch
    using ServiceBusMessageBatch messageBatch =
        await sender.CreateMessageBatchAsync();

    if (messageBatch.TryAddMessage(
            new ServiceBusMessage($"Message {message}")) is false)
    {
        // If it's too large for the batch.
        throw new Exception(
            $"The message {message} is too large to fit in the batch.");
    }

    // Use the producer client to send the batch of
    // messages to the Service Bus topic.
    await sender.SendMessagesAsync(messageBatch);

    Console.WriteLine($"A message has been published to the topic.");
});

app.MapDefaultEndpoints();

app.Run();
Add the .NET Aspire integration to the Worker Service
Add the .NET Aspire Azure Service Bus integration to your AspireSample.WorkerService project. Follow the same steps as you did before when you added the Aspire.Azure.Messaging.ServiceBus NuGet package to the AspireSample.ApiService project. Once it's been added, you can configure the worker service to process messages from the Service Bus topic.
In the Program.cs file of the AspireSample.WorkerService project, repace the existing code with the following:
using AspireSample.WorkerService;

var builder = Host.CreateApplicationBuilder(args);

builder.AddAzureServiceBusClient("serviceBusConnection");

builder.Services.AddHostedService<Worker>();

var host = builder.Build();
host.Run();
The AddAzureServiceBusClient method accomplishes the following tasks:
- Registers a ServiceBusClient with the DI container for connecting to Azure Service Bus.
- Automatically enables corresponding health checks, logging, and telemetry for the respective services.
In the appsettings.json file of the AspireSample.WorkerService project, add the corresponding connection information:
{
  // Existing configuration is omitted for brevity.
  "ConnectionStrings": {
    "serviceBusConnection": "{your_namespace}.servicebus.windows.net"
  }
}
Note
Make sure to replace {your_namespace} in the Service URIs with the name of your own Service Bus namespace.
Process the message from the subscriber
When a new message is placed on the messages queue, the worker service should retrieve, process, and delete the message. Update the Worker.cs class to match the following code:
using Azure.Messaging.ServiceBus;

namespace AspireSample.WorkerService;

public sealed class Worker(
    ILogger<Worker> logger,
    ServiceBusClient client) : BackgroundService
{
    protected override async Task ExecuteAsync(CancellationToken stoppingToken)
    {
        while (!stoppingToken.IsCancellationRequested)
        {
            var processor = client.CreateProcessor(
                "notifications",
                "mobile",
                new ServiceBusProcessorOptions());

            // Add handler to process messages
            processor.ProcessMessageAsync += MessageHandler;

            // Add handler to process any errors
            processor.ProcessErrorAsync += ErrorHandler;

            // Start processing
            await processor.StartProcessingAsync();

            logger.LogInformation("""
                Wait for a minute and then press any key to end the processing
                """);

            Console.ReadKey();

            // Stop processing
            logger.LogInformation("""

                Stopping the receiver...
                """);

            await processor.StopProcessingAsync();

            logger.LogInformation("Stopped receiving messages");
        }
    }

    async Task MessageHandler(ProcessMessageEventArgs args)
    {
        string body = args.Message.Body.ToString();

        logger.LogInformation("Received: {Body} from subscription.", body);

        // Complete the message. messages is deleted from the subscription.
        await args.CompleteMessageAsync(args.Message);
    }

    // Handle any errors when receiving messages
    Task ErrorHandler(ProcessErrorEventArgs args)
    {
        logger.LogError(args.Exception, "{Error}", args.Exception.Message);

        return Task.CompletedTask;
    }
}
Run and test the app locally
The sample app is now ready for testing. Verify that the data submitted to the API is sent to the Azure Service Bus topic and consumed by the subscriber worker service:
- Launch the .NET Aspire project by selecting the Start debugging button, or by pressing F5. The .NET Aspire dashboard app should open in the browser.
- Launch the .NET Aspire project by selecting the Start debugging button, or by pressing F5. The .NET Aspire dashboard app should open in the browser.
- Launch the .NET Aspire project by running
dotnet run --project AspireSample.AppHost. The .NET Aspire dashboard app should open in the browser.
On the resources page, in the apiservice row, find the link in the Endpoints that opens the
weatherforecastendpoint. Note the HTTPS port number.On the .NET Aspire dashboard, navigate to the logs for the aspiresample-workerservice project.
In a terminal window, use the
curlcommand to send a test message to the API:curl -X POST -H "Content-Type: application/json" https://localhost:{port}/notify?message=hello%20aspireBe sure to replace {port} with the port number from earlier.
Switch back to the aspiresample-workerservice logs. You should see the test message printed in the output logs.
Congratulations! You created and configured an ASP.NET Core API that connects to Azure Service Bus using Aspire integrations.
Clean up resources
Run the following Azure CLI command to delete the resource group when you no longer need the Azure resources you created. Deleting the resource group also deletes the resources contained inside of it.
az group delete --name <your-resource-group-name>
For more information, see Clean up resources in Azure.
.NET Aspire