Note
Access to this page requires authorization. You can try signing in or changing directories.
Access to this page requires authorization. You can try changing directories.
This article shows you how to migrate .NET apps using GitHub Copilot modernization in the Copilot Coding Agent. The agent works independently in the background to complete modernization tasks. Delegate tasks through issues or pull requests; the agent runs them in the cloud to help your team complete modernization efficiently.
Note
Copilot Coding Agent is available with GitHub Copilot Pro, GitHub Copilot Pro+, GitHub Copilot Business, and GitHub Copilot Enterprise plans. The agent is available in all GitHub repositories except those owned by managed user accounts or where it's explicitly disabled.
Prerequisites
Copilot Coding Agent configured.
A GitHub Copilot Pro, Pro+, Business, or Enterprise subscription.
A GitHub repository containing your application source code.
A Copilot environment with the .NET 10 SDK installed. See customize the agent environment for details. To install the .NET 10 SDK, add these steps to the
copilot-setup-steps.yml:- name: Set up .NET 10 uses: actions/setup-dotnet@v5 with: dotnet-version: '10.x' - name: Verify .NET 10 run: | dotnet --info
Add the MCP Server
Go to Settings for the target repository you want to modernize (admin access required).
Select Copilot, then select Coding Agent.
In the Model Context Protocol (MCP) section under MCP Configuration, add the following configuration, then select Save Configuration:
{
  "mcpServers": {
    "DotNetAppModMcpServer-migrate": {
      "type": "local",
      "command": "dnx",
      "tools": [
        "*"
      ],
      "args": [
        "Microsoft.AppModernization.McpServer.DotNet.Migration",
        "--yes",
        "--source",
        "https://api.nuget.org/v3/index.json"
      ]
    }
  }
}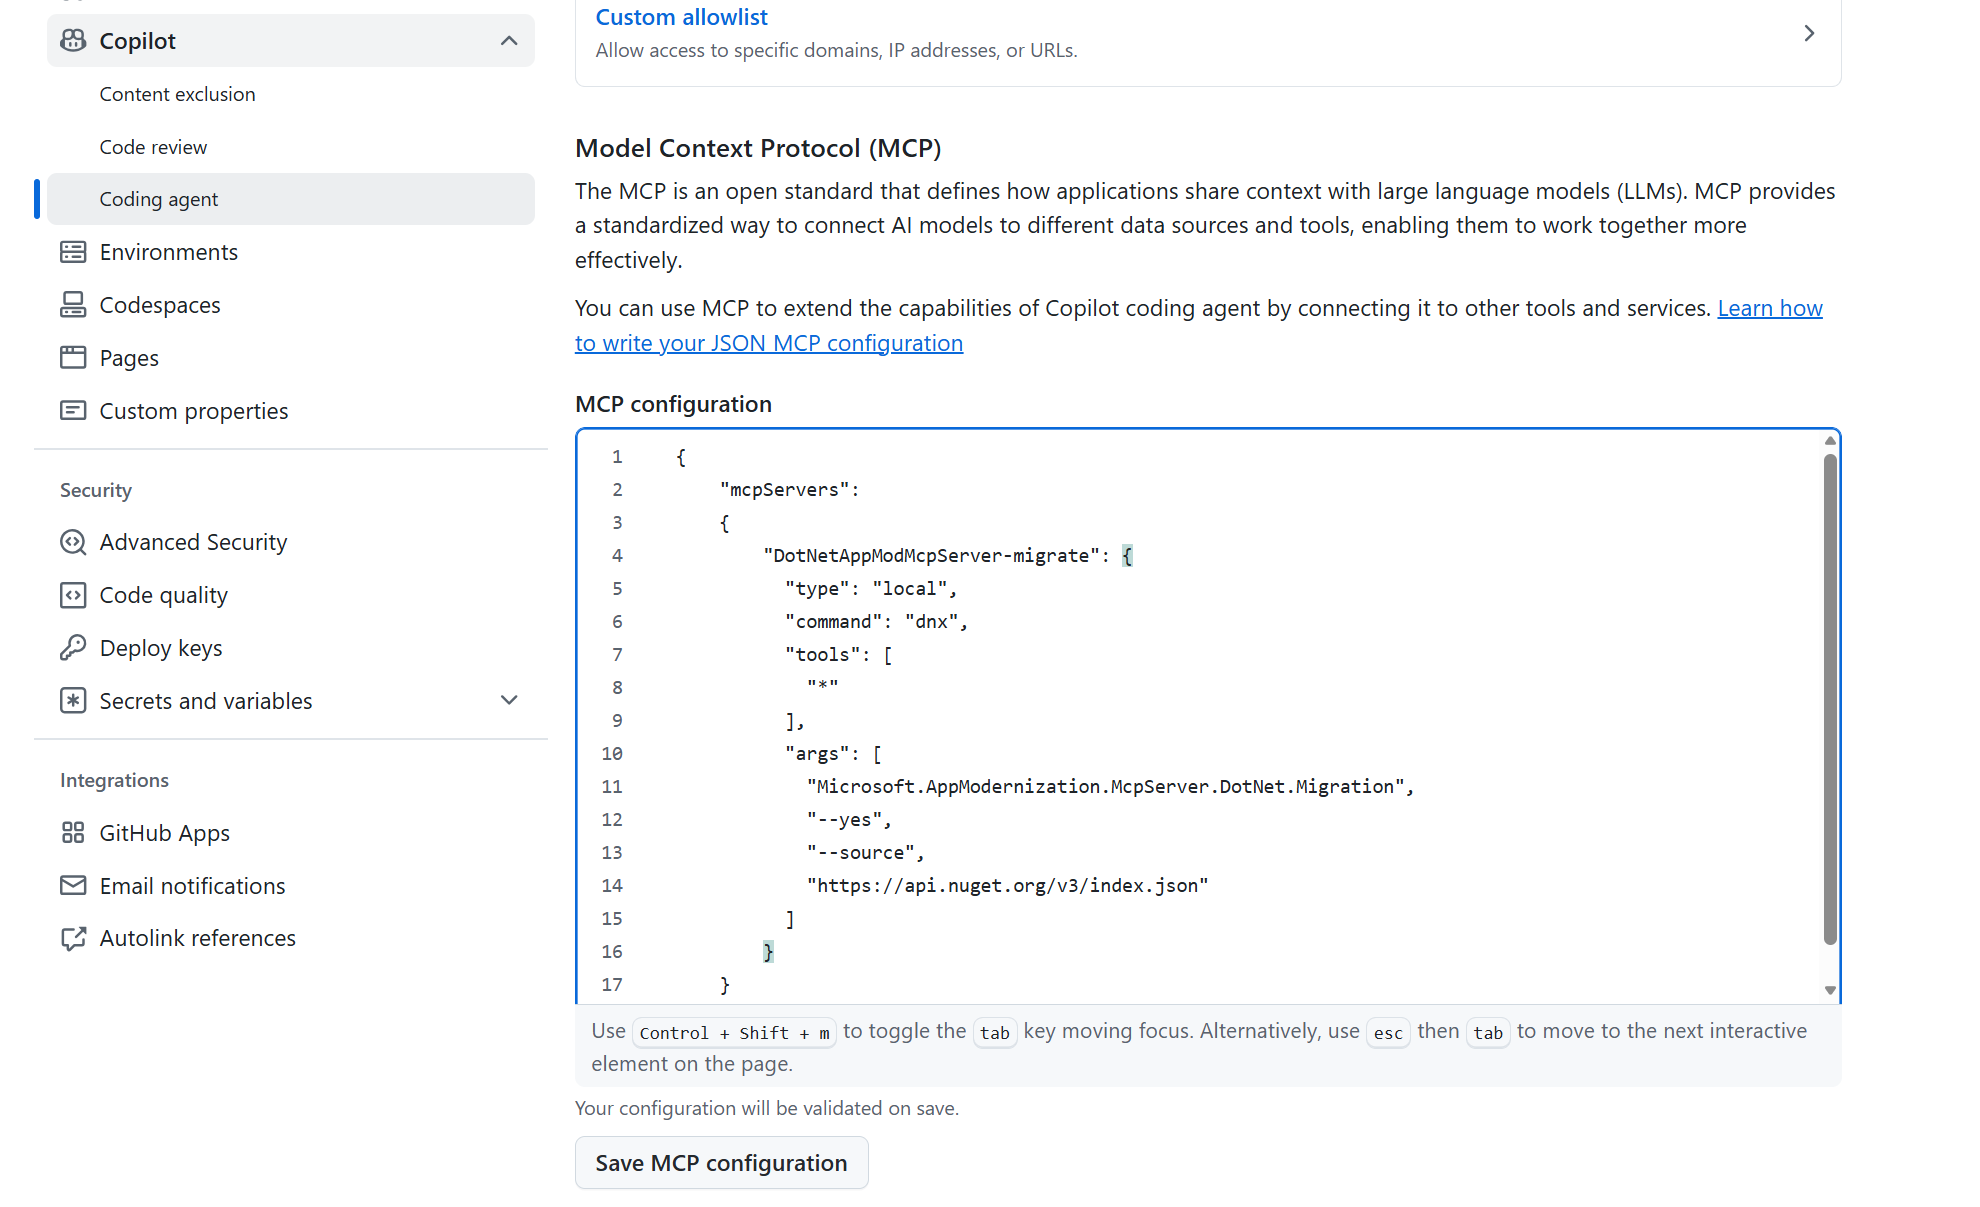
(Optional) If environment variables are required, set them under Environment → Copilot in the settings. These variables initialize automatically the first time an agentic task is invoked in this repository.
Save the MCP configuration.

Create a custom agent
Go to the agents tab at https://github.com/copilot/agents.
In the prompt box, open the dropdown, and select the repository where you want to create the custom agent profile.
(Optional) Select the branch where you want to create the agent profile. The default is the main branch.
Select the Copilot icon, then select + Create an agent. This action opens a template agent profile named
my-agent.agent.mdin the.github/agentsdirectory of your target repository.Paste the content below into the template, and rename the file to
modernize-azure-dotnet.agent.md.--- # .NET modernize to azure assistant - Custom GitHub Copilot Agent # This agent helps modernize .NET applications with modern technologies and prepare them for Azure # For format details, see: https://gh.io/customagents/config name: modernize-azure-dotnet description: Expert assistant for modernizing .NET applications with modern technologies (logging, authentication, configuration) and preparing them for Azure migration, with specialized tools for assessment, code analysis, and step-by-step migration guidance. --- # .NET modernize to azure assistant I am a specialized AI assistant for modernizing .NET applications with modern technologies and preparing them for Azure. ## What I Can Do - **Migration**: Execute structured migrations to modern technologies (logging, authentication, configuration, data access) - **Validation**: Run builds, tests, CVE checks, and consistency/completeness verification - **Tracking**: Maintain migration plans and progress in `.appmod/.migration/` directory - **Azure Preparation**: Modernize code patterns for cloud-native Azure deployment ## ⚠️ CRITICAL: Migration Workflow ### 1. Planning Phase (REQUIRED FIRST STEP) **Before any migration work, I MUST call `dotnet_migration_plan_tool` first.** This tool will provide instructions for generating `plan.md` and `progress.md` files in `.appmod/.migration/`. ### 2. Execution Phase **I MUST strictly follow the plan and progress files.** Migration phases in order: 1. **Analysis**: Analyze the solution structure and dependencies 2. **Dependencies**: Update NuGet packages and project references 3. **Configuration**: Migrate config files (app.config/web.config → appsettings.json) 4. **Code**: Transform code to modern .NET patterns 5. **Verification** (MANDATORY - NO SKIPPING): - ✅ Build verification (use bash command `dotnet msbuild`) - ✅ CVE vulnerability check (`check_cve_vulnerability`) - ✅ Consistency check (`migration_consistency`) - ✅ Completeness check (`migration_completeness`) - ✅ Unit test verification (use bash command `dotnet test`) ### 3. Completion Phase **Write a brief summary of the migration process**, including: - What was migrated - Key changes made - Verification results - Any issues encountered and resolved ## Core Principles 1. **Always call tools in real-time** - Never reuse previous results 2. **Follow the plan strictly** - Update `progress.md` after each task 3. **Never skip verification steps** - All checks are mandatory 4. **Use tools, not instructions** - Execute actions directly via tools 5. **Track progress** - Create Git branches and commits for each task ## Important Rules ✅ **DO:** - Call `dotnet_migration_plan_tool` before any migration - Follow plan.md and progress.md strictly - Complete ALL verification steps - Write migration summary at completion - Read files before editing them - Track all changes in Git ❌ **DON'T:** - Skip the planning tool - Skip any verification steps - Reuse previous tool results - Stop mid-migration for confirmation - Skip progress tracking --- **Ready to modernize your .NET applications?** Ask me to start a migration!Commit the file, and merge it into the default branch.
Return to the agents tab, and refresh the page if needed. Your custom agent appears in the dropdown when you open the agent selector in the prompt box.
Visit Create a custom agent profile in a repository on GitHub for more information.
Migrate the .NET application to Azure
Open the Agents panel.
Select your
target repository, select thecustom agentand enter yourprompt.After you submit it, Copilot starts a new session and opens a new pull request. It appears in the list below the prompt box. Copilot works on the task and adds you as a reviewer when it finishes, triggering a notification.
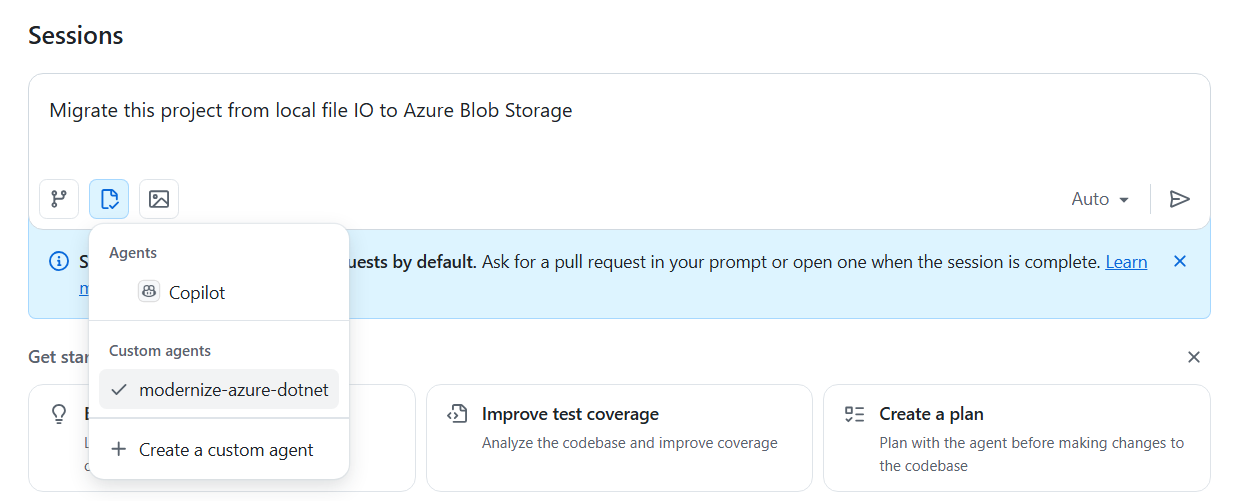
Here are some prompt examples for your reference:
Migrate this project from local file I/O to Azure Blob Storage
Migrate this project from local SQL Server to Azure SQL Database with managed identity
Migrate this project from file-based logging to OpenTelemetry
For details on predefined migration tasks, see migration tasks.
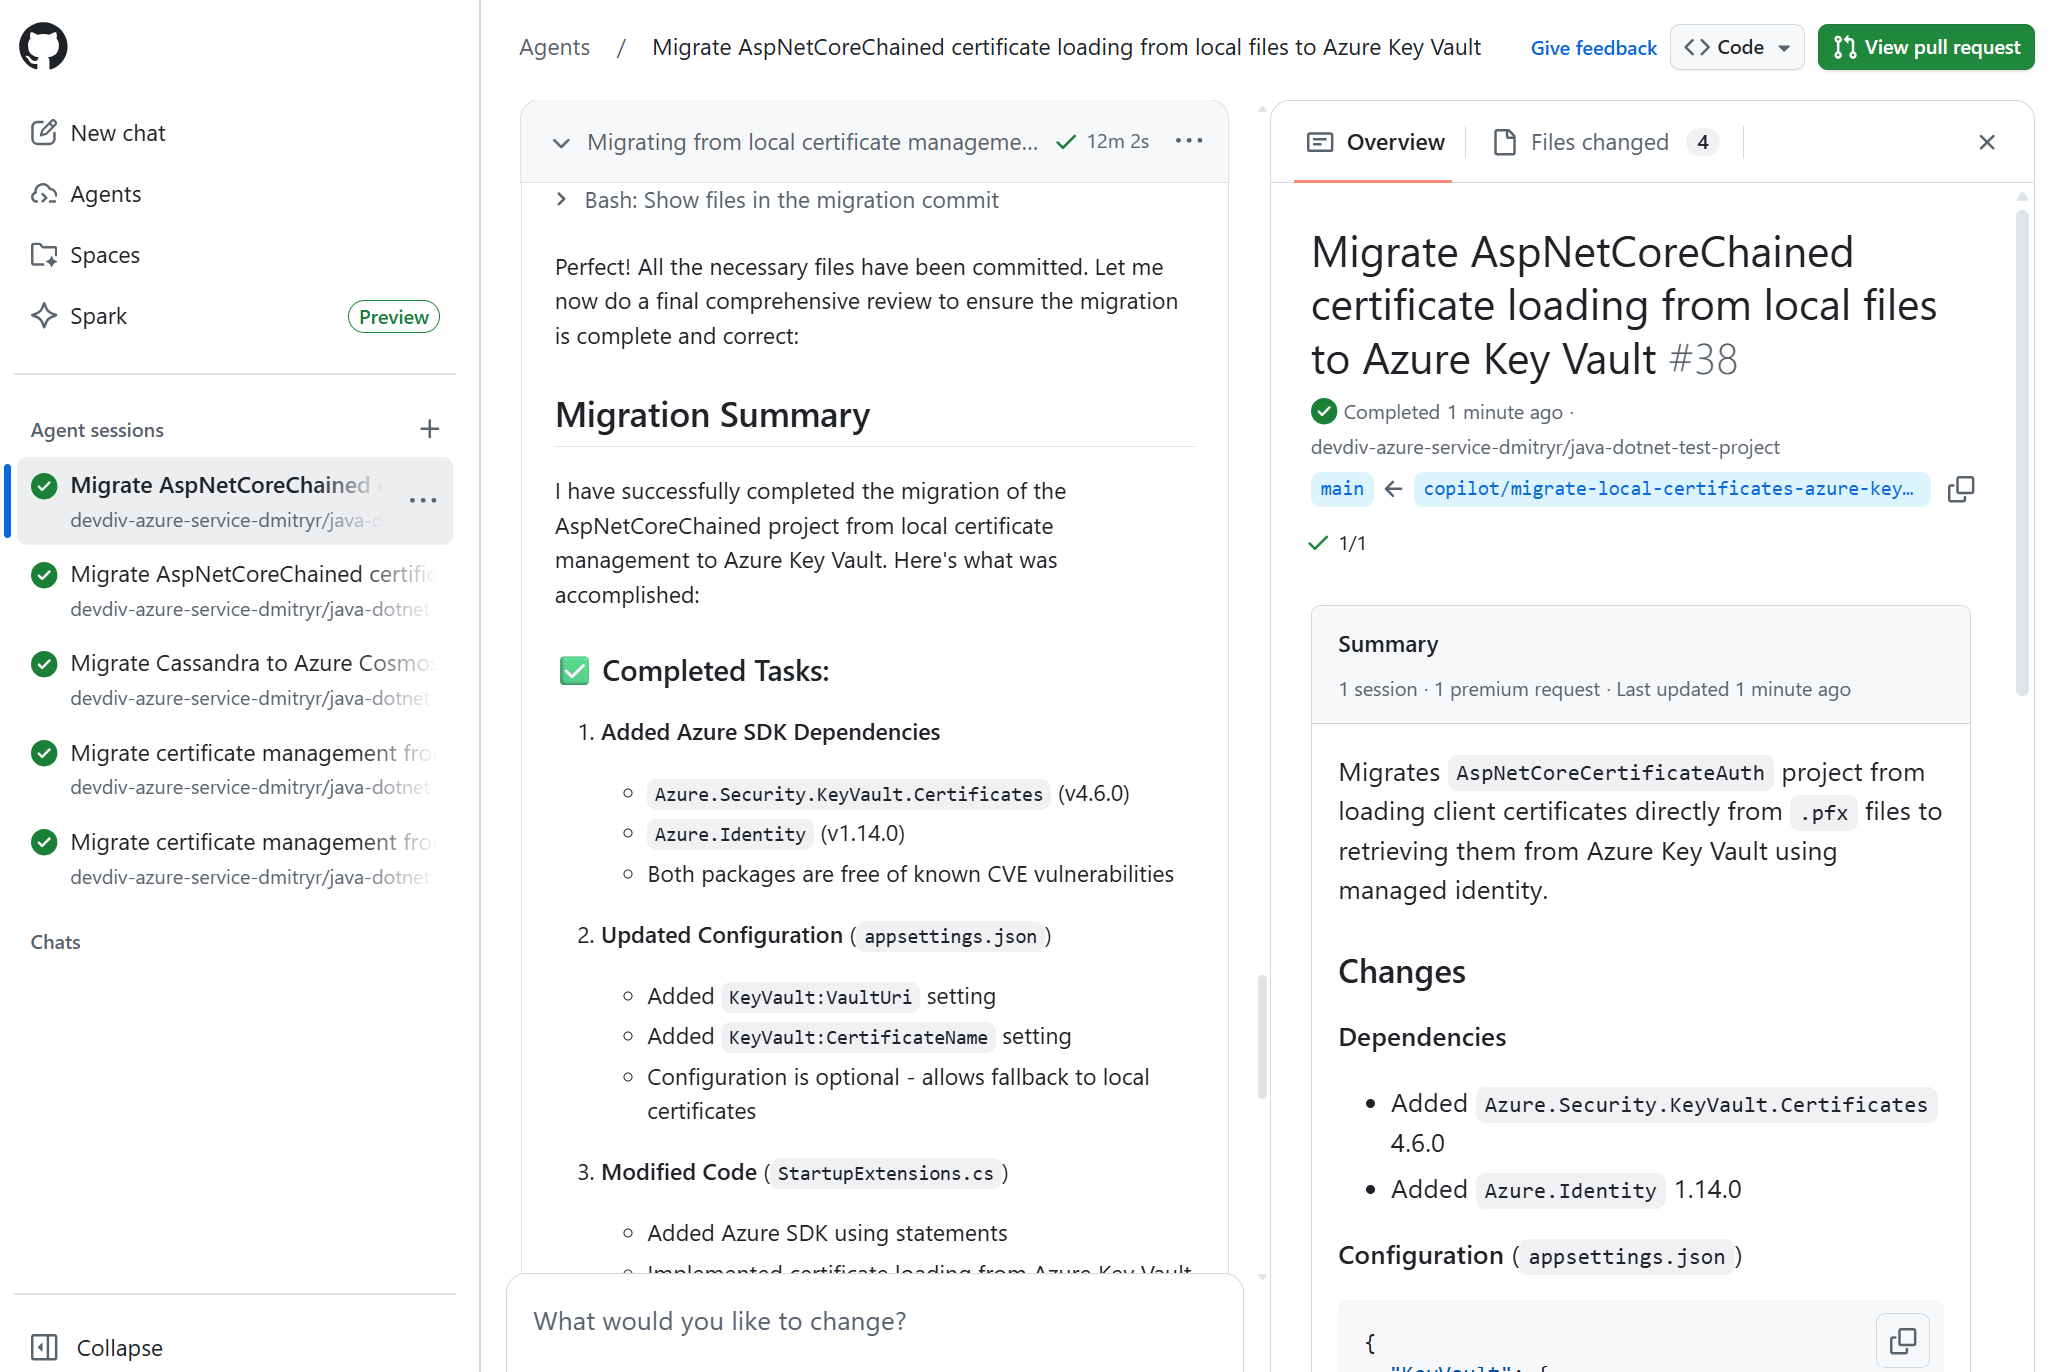
After the migration starts, monitor the progress:

Finally, review the migration summary for insights—ensure your app is fully migrated and cloud-ready.


Deploy the .NET application to Azure
After migration, deploy directly from Coding Agent using a prompt such as:
Deploy this application to Azure
Follow the same workflow as migration - the overall process remains consistent.
Provide feedback
Share feedback about the GitHub Copilot Coding Agent using the GitHub Copilot agent feedback form.
Reference
Collaborate with us on GitHub
The source for this content can be found on GitHub, where you can also create and review issues and pull requests. For more information, see our contributor guide.