Install .NET on Windows
There are many different ways to install .NET on Windows. This article helps you understand the difference between the SDK and Runtime, which runtime you should install, and the method you should use to install .NET.
.NET is made up of the runtime and the SDK. The runtime runs .NET apps, and the SDK is used to create apps.
Unlike .NET Framework, .NET isn't installed and tied to your version of Windows. You can only have a single version of .NET Framework installed on Windows. .NET can be installed anywhere on your computer and some apps might include their own copy of .NET.
By default, .NET is installed to the Program Files\dotnet directory on your computer, unless the install method chooses a different directory.
Choose the correct runtime
There are three different runtimes for Windows, which enable different types of apps to run. The SDK includes all three runtimes. If you install a specific runtime, it might include other runtimes. The following table describes which runtime is included with a particular .NET installer:
| Includes .NET Runtime | Includes .NET Desktop Runtime | Includes ASP.NET Core Runtime | |
|---|---|---|---|
| .NET Runtime | Yes | No | No |
| .NET Desktop Runtime | Yes | Yes | No |
| ASP.NET Core Runtime | No | No | Yes |
| .NET SDK | Yes | Yes | Yes |
To ensure that you can run all .NET apps on Windows, install both the ASP.NET Core Runtime and the .NET Desktop Runtime. The ASP.NET Core Runtime runs any web apps, and the .NET Desktop Runtime runs any desktop app, such as a Windows Presentation Foundation (WPF) or Windows Forms (WinForms) app.
Choose how to install .NET
There are different ways to install .NET, and some products, like Visual Studio, might manage their own version of .NET. If you install .NET through software that manages its own version of .NET, you should also install the .NET runtime separately so that you can run .NET apps.
If you're unsure which method you should choose after reviewing the lists in the following sections, you probably want to use the .NET Installer.
Developers
-
Use Visual Studio to install .NET when you want to develop .NET apps using Visual Studio. Visual Studio manages its own copy of .NET. This method installs the SDK, Runtime, and Visual Studio templates.
Visual Studio Code - C# Dev Kit
Install the C# Dev Kit extension for Visual Studio Code to develop .NET apps. This method uses the SDKs you've previously installed.
Users and Developers
-
Install .NET with a Windows Installer package, which is an executable that you run. This method can install the SDK and Runtime. Installs are performed system-wide.
Windows Package Manager (WinGet)
Use WinGet to install .NET when you want to manage .NET through the command line. This method can install the SDK and Runtime. Installs are performed system-wide.
-
A PowerShell script that can automate the install of the SDK or Runtime. You can choose which version of .NET to install.
Supported versions
The following table is a list of currently supported .NET releases and the versions of Windows they're supported on. These versions remain supported until either the version of .NET reaches end-of-support or the version of Windows reaches end-of-life.
Tip
As a reminder, this table applies to modern .NET (as opposed to .NET Framework). To install .NET Framework, see the .NET Framework Installation guide.
Windows 10 versions end-of-service dates are segmented by edition. Only Home, Pro, Pro Education, and Pro for Workstations editions are considered in the following table. Check the Windows lifecycle fact sheet for specific details.
| Operating System | .NET 8 (Architectures) | .NET 6 (Architectures) |
|---|---|---|
| Windows 11 | ✔️ x64, x86, Arm64 | ✔️ x64, Arm64 |
| Windows Server 2022 | ✔️ x64, x86 | ✔️ x64, x86 |
| Windows 10, Version 1607 or later | ✔️ x64, x86, Arm64 | ✔️ x64, x86, Arm64 |
| Windows 8.1 | ❌ | ✔️ x64, x86 |
| Windows 7 SP1 ESU | ❌ | ✔️ x64, x86 |
| Windows Server 2022 Windows Server 2019 Windows Server, Version 1903 or later Windows Server 2016 Windows Server 2012 R2 Windows Server 2012 |
✔️ x64, x86 | ✔️ x64, x86 |
| Windows Server Core 2012 (and R2) | ✔️ x64, x86 | ✔️ x64, x86 |
| Nano Server, Version 1809+ | ✔️ x64 | ✔️ x64 |
| Nano Server, Version 1803 | ❌ | ❌ |
Tip
A + symbol represents the minimum version.
Windows 7 / 8.1 / Server 2012
While Windows 2012 is still supported with the latest version of .NET, .NET 6 was the last version to support Windows 7 and Windows 8.1. All three of these versions of Windows require further dependencies to be installed:
| Operating System | Prerequisites |
|---|---|
| Windows 7 SP1 ESU | - Microsoft Visual C++ 2015-2019 Redistributable 64-bit / 32-bit - KB3063858 64-bit / 32-bit - Microsoft Root Certificate Authority 2011 (.NET Core 2.1 offline installer only) |
| Windows 8.1 | Microsoft Visual C++ 2015-2019 Redistributable 64-bit / 32-bit |
| Windows Server 2012 | Microsoft Visual C++ 2015-2019 Redistributable 64-bit / 32-bit |
| Windows Server 2012 R2 | Microsoft Visual C++ 2015-2019 Redistributable 64-bit / 32-bit |
The previous requirements are also required if you receive an error related to either of the following dlls:
- api-ms-win-crt-runtime-l1-1-0.dll
- api-ms-win-cor-timezone-l1-1-0.dll
- hostfxr.dll
Arm-based Windows PCs
The following sections describe things you should consider when installing .NET on an Arm-based Windows PC.
What is supported
The following table describes which versions of .NET are supported on an Arm-based Windows PC:
| .NET Version | SDK | Runtime | Path conflict | Supported |
|---|---|---|---|---|
| 8 | Yes | Yes | No | ✔️ |
| 8 | Yes | Yes | No | ✔️ |
| 6 | Yes | Yes | No | ✔️ |
| 6 | Yes | Yes | No | ✔️ |
The x86, x64, and Arm64 versions of the .NET SDK exist independently from each other. If a new version is released, each architecture install needs to be upgraded.
Path differences
On an Arm-based Windows PC, all Arm64 versions of .NET are installed to the normal C:\Program Files\dotnet\ folder. However, the x64 version of the .NET SDK is installed to the C:\Program Files\dotnet\x64\ folder.
Path conflicts
The x64 .NET SDK installs to its own directory, as described in the previous section. This allows the Arm64 and x64 versions of the .NET SDK to exist on the same machine. However, any x64 SDK older than 6.0, isn't supported and installs to the same location as the Arm64 version, the C:\Program Files\dotnet\ folder. If you want to install an unsupported x64 SDK, you must uninstall the Arm64 version first. The opposite is also true. You must uninstall the unsupported x64 SDK to install the Arm64 version.
Path variables
Environment variables that add .NET to system path, such as the PATH variable, might need to be changed if you have both the x64 and Arm64 versions of the .NET SDK installed. Additionally, some tools rely on the DOTNET_ROOT environment variable, which would also need to be updated to point to the appropriate .NET SDK installation folder.
Install with Visual Studio
Visual Studio installs its own copy of .NET separate from other copies of .NET. Different versions of Visual Studio support different versions of .NET. The latest version of Visual Studio always supports the latest version of .NET.
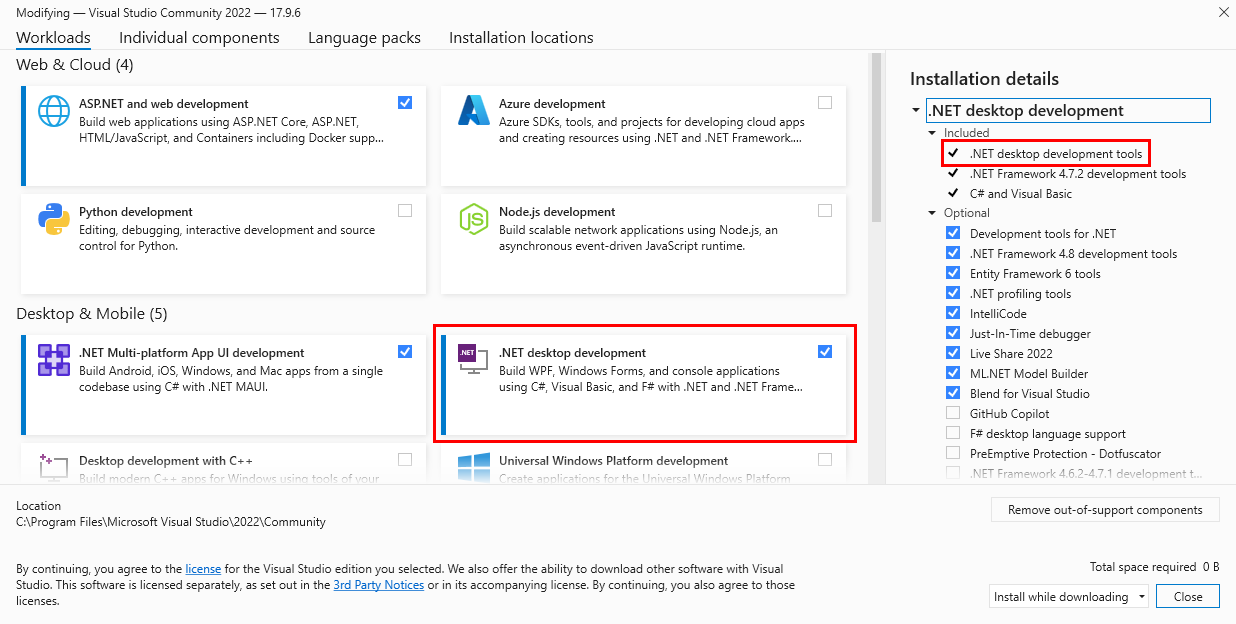
Visual Studio Installer installs and configures Visual Studio. Some Visual Studio workloads include .NET, such as ASP.NET and web development and .NET Multi-platform App UI development. Specific versions of .NET can be installed through the Individual Components tab.
The Visual Studio documentation provides instructions on how to:
.NET Versions and Visual Studio
If you're using Visual Studio to develop .NET apps, the following table describes the minimum required version of Visual Studio based on the target .NET SDK version.
| .NET SDK version | Visual Studio version |
|---|---|
| 8 | Visual Studio 2022 version 17.8 or higher. |
| 7 | Visual Studio 2022 version 17.4 or higher. |
| 6 | Visual Studio 2022 version 17.0 or higher. |
| 5 | Visual Studio 2019 version 16.8 or higher. |
| 3.1 | Visual Studio 2019 version 16.4 or higher. |
| 3.0 | Visual Studio 2019 version 16.3 or higher. |
| 2.2 | Visual Studio 2017 version 15.9 or higher. |
| 2.1 | Visual Studio 2017 version 15.7 or higher. |
If you already have Visual Studio installed, you can check your version with the following steps.
- Open Visual Studio.
- Select Help > About Microsoft Visual Studio.
- Read the version number from the About dialog.
For more information about, see .NET SDK, MSBuild, and Visual Studio versioning.
Install with Visual Studio Code
Visual Studio Code uses the versions of .NET already installed on your system. Install .NET using either .NET Installer or Windows Package Manager. Visual Studio installs its own copy of .NET that can't be used by Visual Studio Code.
.NET apps are created in Visual Studio Code with the C# Dev Kit extension.
First, install the .NET SDK by following the steps in one of the other sections, except for the section on Visual Studio.
Next, install Visual Studio Code, if you haven't already. For more information, see Visual Studio Code on Windows.
Lastly, install the C# Dev Kit extension. For more information, see Getting Started with C# in VS Code.
.NET Installer
The download page for .NET provides Windows Installer executables.
Open a web browser and navigate to https://dotnet.microsoft.com/download/dotnet.
Select the version of .NET you want to download, such as 8.0.
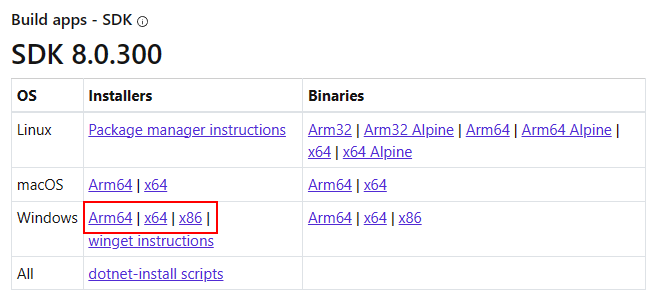
Find the SDK or Runtime box that contains the links for downloading .NET.
Under the Installers column, find the Windows row and select the link for your CPU architecture. If you're unsure, select x64 as it's the most common.
The browser automatically downloads the MSI package.
Tip
The following image shows the SDK, but you can also download the Runtime.
Open Windows Explorer and navigate to where the file was downloaded, most likely your Downloads folder.
Double-click on the file to install .NET.
The Windows Installer dialog is opened.
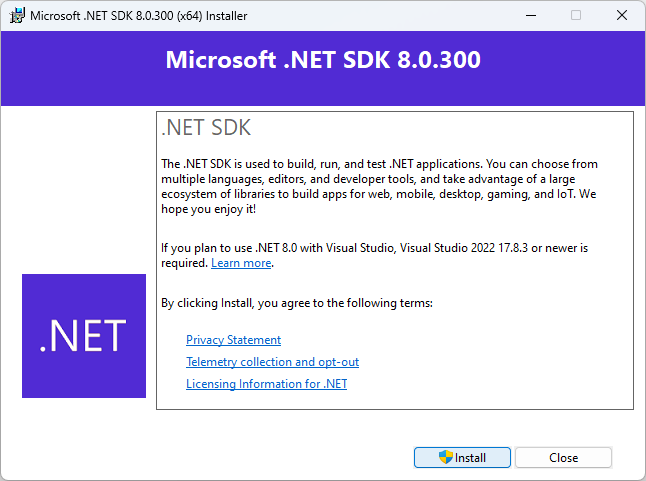
Select Install and follow the instructions to install .NET.

Command-line options
If you want to install .NET silently, such as in a production environment or to support continuous integration, use the following Windows Installer options:
/install
Installs .NET./quiet
Prevents any UI and prompts from displaying./norestart
Suppresses any attempts to restart.
dotnet-sdk-8.0.100-win-x64.exe /install /quiet /norestart
For more information, see Standard Installer Command-Line Options.
Tip
The installer returns an exit code of 0 for success and an exit code of 3010 to indicate that a restart is required. Any other value is most likely an error code.
Install with Windows Package Manager (WinGet)
You can install and manage .NET through the Windows Package Manager service, using the winget.exe tool. For more information about how to install and use WinGet, see Use the winget tool to install and manage applications.
If you're installing .NET system-wide, install with administrative privileges.
The .NET WinGet packages are:
Microsoft.DotNet.Runtime.8—.NET Runtime 8.0.Microsoft.DotNet.AspNetCore.8—ASP.NET Core Runtime 8.0Microsoft.DotNet.DesktopRuntime.8—.NET Desktop Runtime 8.0Microsoft.DotNet.SDK.8—.NET SDK 8.0
Install the SDK
If you install the SDK, you don't need to install the corresponding runtime.
Open a terminal, such as PowerShell or
cmd.exe.Run the
winget installcommand and pass the name of the SDK package:winget install Microsoft.DotNet.SDK.8
Install the runtime
There are different runtimes you can install. Refer to the Choose the correct runtime section to understand what's included with each runtime.
Open a terminal, such as PowerShell or Command Prompt.
Run the
winget installcommand and pass the name of the SDK package:winget install Microsoft.DotNet.DesktopRuntime.8 winget install Microsoft.DotNet.AspNetCore.8
Search for versions
Use the winget search command to search for different versions of the package you want to install. For example, the following command searches for all .NET SDKs available via WinGet:
winget search Microsoft.DotNet.SDK
The search results are printed in a table with each package identifier.
Name                           Id                           Version                    Source
----------------------------------------------------------------------------------------------
Microsoft .NET SDK 9.0 Preview Microsoft.DotNet.SDK.Preview 9.0.100-preview.3.24204.13 winget
Microsoft .NET SDK 8.0         Microsoft.DotNet.SDK.8       8.0.300                    winget
Microsoft .NET SDK 7.0         Microsoft.DotNet.SDK.7       7.0.409                    winget
Microsoft .NET SDK 6.0         Microsoft.DotNet.SDK.6       6.0.422                    winget
Microsoft .NET SDK 5.0         Microsoft.DotNet.SDK.5       5.0.408                    winget
Microsoft .NET SDK 3.1         Microsoft.DotNet.SDK.3_1     3.1.426                    winget
Install preview versions
You can install preview versions by substituting the version number, such as 8, with the word Preview. The following example installs the preview release of the .NET Desktop Runtime:
winget install Microsoft.DotNet.DesktopRuntime.Preview
Install with PowerShell
Installing .NET through the dotnet-install PowerShell script is recommended for continuous integration and nonadmin installs. If you're installing .NET for normal use on your system, use either the .NET Installer or Windows Package Manager installation methods.
The script defaults to installing the latest long term support (LTS) version, which is .NET 8. You can choose a specific release by specifying the -Channel switch. Include the -Runtime switch to install a runtime. Otherwise, the script installs the SDK. The script is available at https://dot.net/v1/dotnet-install.ps1 and the source code is hosted on GitHub.
For more information about the script, see dotnet-install script reference.
Install the runtime
The .NET Runtime is installed by providing the -Runtime switch.
Download the install script from https://dot.net/v1/dotnet-install.ps1
Open PowerShell and navigate to the folder containing the script.
Run the following commands to install both the Desktop runtime and ASP.NET Core runtime for maximum compatibility:
dotnet-install.ps1 -Runtime windowsdesktop
dotnet-install.ps1 -Runtime aspnetcore
Install the SDK
If you install the SDK, you don't need to install the runtimes.
Download the install script from https://dot.net/v1/dotnet-install.ps1
Open PowerShell and navigate to the folder containing the script.
Run the following command to install the .NET SDK.
dotnet-install.ps1Note
The SDK is installed by omitting the
-Runtimeswitch.
Validation
After downloading an installer, verify it to make sure that the file hasn't been changed or corrupted. You can verify the checksum on your computer and then compare it to what was reported on the download website.
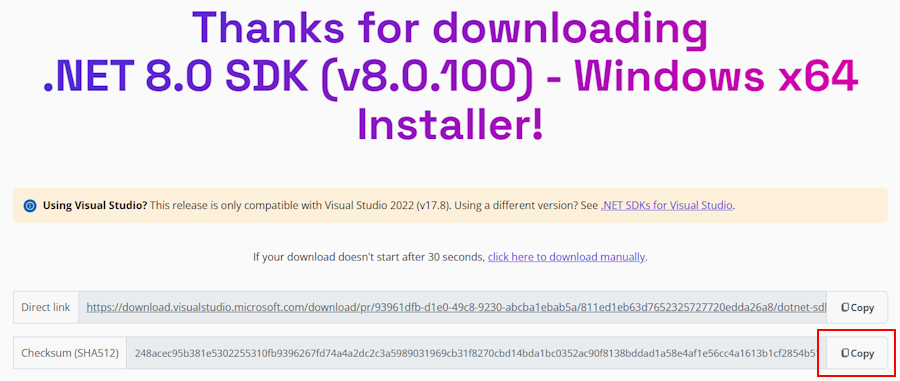
When you download an installer or binary from an official download page, the checksum for the file is displayed. Select the Copy button to copy the checksum value to your clipboard.
You can use PowerShell or Command Prompt to validate the checksum of the file you've downloaded. For example, the following command reports the checksum of the dotnet-sdk-8.0.100-win-x64.exe file:
> certutil -hashfile dotnet-sdk-8.0.100-win-x64.exe SHA512
SHA512 hash of dotnet-sdk-8.0.100-win-x64.exe:
248acec95b381e5302255310fb9396267fd74a4a2dc2c3a5989031969cb31f8270cbd14bda1bc0352ac90f8138bddad1a58e4af1e56cc4a1613b1cf2854b518e
CertUtil: -hashfile command completed successfully.
> (Get-FileHash .\dotnet-sdk-8.0.100-win-x64.exe -Algorithm SHA512).Hash
248acec95b381e5302255310fb9396267fd74a4a2dc2c3a5989031969cb31f8270cbd14bda1bc0352ac90f8138bddad1a58e4af1e56cc4a1613b1cf2854b518e
Compare the checksum with the value provided by the download site.
Use PowerShell and a checksum file to validate
The .NET release notes contain a link to a checksum file you can use to validate your downloaded file. The following steps describe how to download the checksum file and validate a .NET install binary:
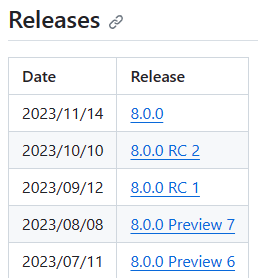
The release notes page for .NET 8 on GitHub at https://github.com/dotnet/core/tree/main/release-notes/8.0 contains a section named Releases. The table in that section links to the downloads and checksum files for each .NET 8 release:
Select the link for the version of .NET that you downloaded. The previous section used .NET SDK 8.0.100, which is in the .NET 8.0.0 release.
Tip
If you're not sure which .NET release contains your checksum file, explore the links until you find it.
In the release page, you can see the .NET Runtime and .NET SDK version, and a link to the checksum file:
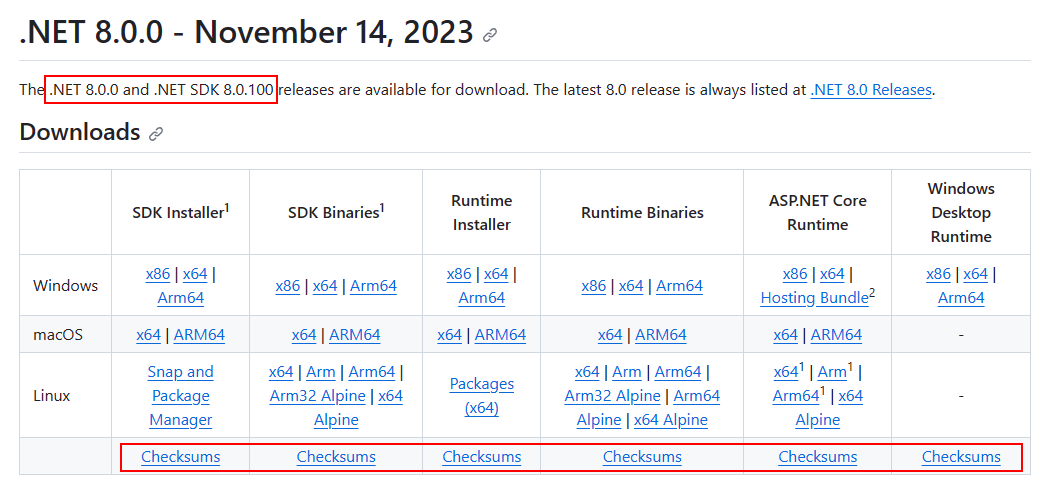
Copy the link to the checksum file.
Use the following script, but replace the link to download the appropriate checksum file:
Invoke-WebRequest https://dotnetcli.blob.core.windows.net/dotnet/checksums/8.0.0-sha.txt -OutFile 8.0.0-sha.txtWith both the checksum file and the .NET release file downloaded to the same directory, search the checksum file for the checksum of the .NET download:
When validation passes, you see True printed:
> (Get-Content .\8.0.0-sha.txt | Select-String "dotnet-sdk-8.0.100-win-x64.exe").Line -like (Get-FileHash .\dotnet-sdk-8.0.100-win-x64.exe -Algorithm SHA512).Hash + "*"
True
If you see False printed, the file you downloaded isn't valid and shouldn't be used.
Troubleshooting
After installing the .NET SDK, you might run into problems trying to run .NET CLI commands. This section collects those common problems and provides solutions.
- No .NET SDK was found
- Building apps is slower than expected
hostfxr.dll/api-ms-win-crt-runtime-l1-1-0.dll/api-ms-win-cor-timezone-l1-1-0.dllis missing
No .NET SDK was found
Most likely you installed both the x86 (32-bit) and x64 (64-bit) versions of the .NET SDK. This is causing a conflict because when you run the dotnet command, it's resolving to the x86 version when it should resolve to the x64 version. This problem is fixed by adjusting the %PATH% variable to resolve the x64 version first.
Verify that you have both versions installed by running the
where.exe dotnetcommand. If you do, you should see an entry for both the Program Files\ and Program Files (x86)\ folders. If the Program Files (x86)\ folder is first, as demonstrated by the following example, it's incorrect and you should continue on to the next step.> where.exe dotnet C:\Program Files (x86)\dotnet\dotnet.exe C:\Program Files\dotnet\dotnet.exeIf it's correct and the Program Files\ is first, you don't have the problem this section is discussing and you should create a .NET help request issue on GitHub
Press the Windows button and type "Edit the system environment variables" into search. Select Edit the system environment variables.

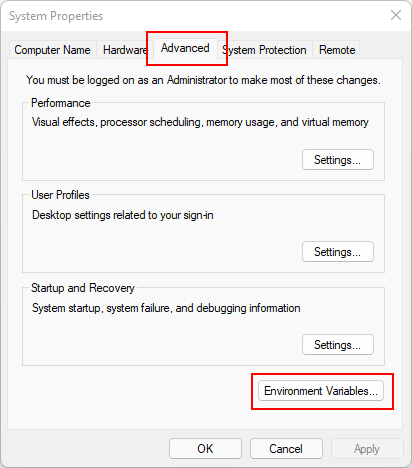
The System Properties window opens up to the Advanced Tab. Select Environment Variables.
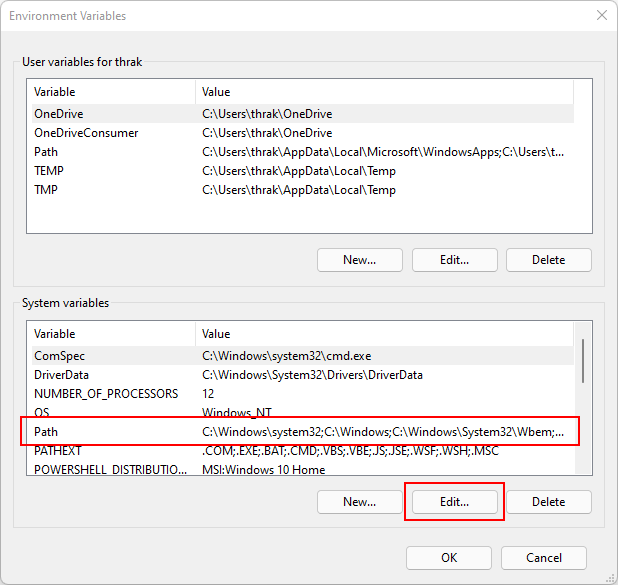
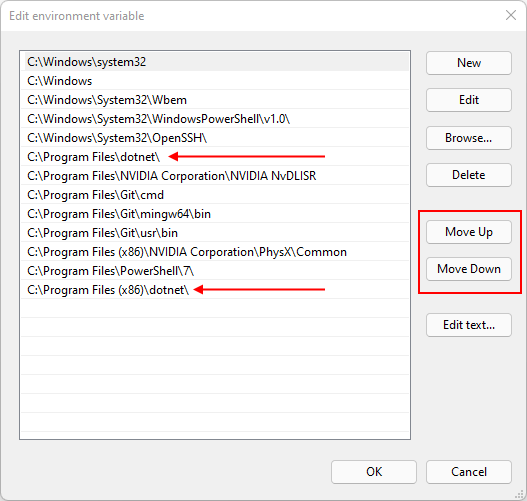
On the Environment Variables window, under the System variables group, select the Path* row and then select the Edit button.
Use the Move Up and Move Down buttons to move the C:\Program Files\dotnet\ entry above C:\Program Files (x86)\dotnet\.
Building apps is slower than expected
Ensure that Smart App Control, a Windows feature, is off. Smart App Control isn't recommended to be enabled on machines used for development. Any setting other than "off" might negatively affect SDK performance.
hostfxr.dll / api-ms-win-crt-runtime-l1-1-0.dll / api-ms-win-cor-timezone-l1-1-0.dll is missing
Install the Microsoft Visual C++ 2015-2019 Redistributable (64-bit or 32-bit).
Related content
Feedback
Coming soon: Throughout 2024 we will be phasing out GitHub Issues as the feedback mechanism for content and replacing it with a new feedback system. For more information see: https://aka.ms/ContentUserFeedback.
Submit and view feedback for