Note
Access to this page requires authorization. You can try signing in or changing directories.
Access to this page requires authorization. You can try changing directories.
This tutorial builds on concepts and techniques explored in the Get started with syntax analysis and Get started with semantic analysis quickstarts. If you haven't already, you should complete those quickstarts before beginning this one.
In this quickstart, you explore techniques for creating and transforming syntax trees. In combination with the techniques you learned in previous quickstarts, you create your first command-line refactoring!
Installation instructions - Visual Studio Installer
There are two different ways to find the .NET Compiler Platform SDK in the Visual Studio Installer:
Install using the Visual Studio Installer - Workloads view
The .NET Compiler Platform SDK is not automatically selected as part of the Visual Studio extension development workload. You must select it as an optional component.
- Run Visual Studio Installer
- Select Modify
- Check the Visual Studio extension development workload.
- Open the Visual Studio extension development node in the summary tree.
- Make sure the box for .NET Compiler Platform SDK is checked.
- Select Modify.
Optionally, you'll also want the DGML editor to display graphs in the visualizer:
- Open the Individual components node in the summary tree.
- Check the box for DGML editor
Install using the Visual Studio Installer - Individual components tab
- Run Visual Studio Installer
- Select Modify
- Select the Individual components tab
- Check the box for .NET Compiler Platform SDK. You'll find it at the top under the Compilers, build tools, and runtimes section.
- Select Modify.
Optionally, you'll also want the DGML editor to display graphs in the visualizer:
- Check the box for DGML editor. You'll find it under the Code tools section.
Immutability and the .NET compiler platform
Immutability is a fundamental tenet of the .NET compiler platform. Immutable data structures can't be changed after they're created. Immutable data structures can be safely shared and analyzed by multiple consumers simultaneously. There's no danger that one consumer affects another in unpredictable ways. Your analyzer doesn't need locks or other concurrency measures. This rule applies to syntax trees, compilations, symbols, semantic models, and every other data structure you encounter. Instead of modifying existing structures, APIs create new objects based on specified differences to the old ones. You apply this concept to syntax trees to create new trees using transformations.
Create and transform trees
You choose one of two strategies for syntax transformations. Factory methods are best used when you're searching for specific nodes to replace, or specific locations where you want to insert new code. Rewriters are best when you want to scan an entire project for code patterns that you want to replace.
Create nodes with factory methods
The first syntax transformation demonstrates the factory methods. You're going to replace a using System.Collections; statement with a using System.Collections.Generic; statement. This example demonstrates how you create Microsoft.CodeAnalysis.CSharp.CSharpSyntaxNode objects using the Microsoft.CodeAnalysis.CSharp.SyntaxFactory factory methods. For each kind of node, token, or trivia, there's a factory method that creates an instance of that type. You create syntax trees by composing nodes hierarchically in a bottom-up fashion. Then, you'll transform the existing program by replacing existing nodes with the new tree you've created.
Start Visual Studio, and create a new C# Stand-Alone Code Analysis Tool project. In Visual Studio, choose File > New > Project to display the New Project dialog. Under Visual C# > Extensibility choose a Stand-Alone Code Analysis Tool. This quickstart has two example projects, so name the solution SyntaxTransformationQuickStart, and name the project ConstructionCS. Click OK.
This project uses the Microsoft.CodeAnalysis.CSharp.SyntaxFactory class methods to construct a Microsoft.CodeAnalysis.CSharp.Syntax.NameSyntax representing the System.Collections.Generic namespace.
Add the following using directive to the top of the Program.cs.
using static Microsoft.CodeAnalysis.CSharp.SyntaxFactory;
using static System.Console;
You'll create name syntax nodes to build the tree that represents the using System.Collections.Generic; statement. NameSyntax is the base class for four types of names that appear in C#. You compose these four types of names together to create any name that can appear in the C# language:
- Microsoft.CodeAnalysis.CSharp.Syntax.NameSyntax, which represents simple single identifier names like
SystemandMicrosoft. - Microsoft.CodeAnalysis.CSharp.Syntax.GenericNameSyntax, which represents a generic type or method name such as
List<int>. - Microsoft.CodeAnalysis.CSharp.Syntax.QualifiedNameSyntax, which represents a qualified name of the form
<left-name>.<right-identifier-or-generic-name>such asSystem.IO. - Microsoft.CodeAnalysis.CSharp.Syntax.AliasQualifiedNameSyntax, which represents a name using an assembly extern alias such as
LibraryV2::Foo.
You use the IdentifierName(String) method to create a NameSyntax node. Add the following code in your Main method in Program.cs:
NameSyntax name = IdentifierName("System");
WriteLine($"\tCreated the identifier {name}");
The preceding code creates an IdentifierNameSyntax object and assigns it to the variable name. Many of the Roslyn APIs return base classes to make it easier to work with related types. The variable name, an NameSyntax, can be reused as you build the QualifiedNameSyntax. Don't use type inference as you build the sample. You'll automate that step in this project.
You've created the name. Now, it's time to build more nodes into the tree by building a QualifiedNameSyntax. The new tree uses name as the left of the name, and a new IdentifierNameSyntax for the Collections namespace as the right side of the QualifiedNameSyntax. Add the following code to program.cs:
name = QualifiedName(name, IdentifierName("Collections"));
WriteLine(name.ToString());
Run the code again, and see the results. You're building a tree of nodes that represents code. You'll continue this pattern to build the QualifiedNameSyntax for the namespace System.Collections.Generic. Add the following code to Program.cs:
name = QualifiedName(name, IdentifierName("Generic"));
WriteLine(name.ToString());
Run the program again to see that you've built the tree for the code to add.
Create a modified tree
You've built a small syntax tree that contains one statement. The APIs to create new nodes are the right choice to create single statements or other small code blocks. However, to build larger blocks of code, you should use methods that replace nodes or insert nodes into an existing tree. Remember that syntax trees are immutable. The Syntax API doesn't provide any mechanism for modifying an existing syntax tree after construction. Instead, it provides methods that produce new trees based on changes to existing ones. With* methods are defined in concrete classes that derive from SyntaxNode or in extension members declared in the SyntaxNodeExtensions class. These methods create a new node by applying changes to an existing node's child properties. Additionally, the ReplaceNode extension member can be used to replace a descendent node in a subtree. This method also updates the parent to point to the newly created child and repeats this process up the entire tree - a process known as re-spinning the tree.
The next step is to create a tree that represents an entire (small) program and then modify it. Add the following code to the beginning of the Program class:
        private const string sampleCode =
@"using System;
using System.Collections;
using System.Linq;
using System.Text;

namespace HelloWorld
{
    class Program
    {
        static void Main(string[] args)
        {
            Console.WriteLine(""Hello, World!"");
        }
    }
}";
Note
The example code uses the System.Collections namespace and not the System.Collections.Generic namespace.
Next, add the following code to the bottom of the Main method to parse the text and create a tree:
SyntaxTree tree = CSharpSyntaxTree.ParseText(sampleCode);
var root = (CompilationUnitSyntax)tree.GetRoot();
This example uses the WithName(NameSyntax) method to replace the name in a UsingDirectiveSyntax node with the one constructed in the preceding code.
Create a new UsingDirectiveSyntax node using the WithName(NameSyntax) method to update the System.Collections name with the name you created in the preceding code. Add the following code to the bottom of the Main method:
var oldUsing = root.Usings[1];
var newUsing = oldUsing.WithName(name);
WriteLine(root.ToString());
Run the program and look carefully at the output. The newUsing hasn't been placed in the root tree. The original tree hasn't been changed.
Add the following code using the ReplaceNode extension method to create a new tree. The new tree is the result of replacing the existing import with the updated newUsing node. You assign this new tree to the existing root variable:
root = root.ReplaceNode(oldUsing, newUsing);
WriteLine(root.ToString());
Run the program again. This time the tree now correctly imports the System.Collections.Generic namespace.
Transform trees using SyntaxRewriters
The With* and ReplaceNode methods provide convenient means to transform individual branches of a syntax tree. The Microsoft.CodeAnalysis.CSharp.CSharpSyntaxRewriter class performs multiple transformations on a syntax tree. The Microsoft.CodeAnalysis.CSharp.CSharpSyntaxRewriter class is a subclass of Microsoft.CodeAnalysis.CSharp.CSharpSyntaxVisitor<TResult>. The CSharpSyntaxRewriter applies a transformation to a specific type of SyntaxNode. You can apply transformations to multiple types of SyntaxNode objects wherever they appear in a syntax tree. The second project in this quickstart creates a command-line refactoring that removes explicit types in local variable declarations anywhere that type inference could be used.
Create a new C# Stand-Alone Code Analysis Tool project. In Visual Studio, right-click the SyntaxTransformationQuickStart solution node. Choose Add > New Project to display the New Project dialog. Under Visual C# > Extensibility, choose Stand-Alone Code Analysis Tool. Name your project TransformationCS and click OK.
The first step is to create a class that derives from CSharpSyntaxRewriter to perform your transformations. Add a new class file to the project. In Visual Studio, choose Project > Add Class.... In the Add New Item dialog type TypeInferenceRewriter.cs as the filename.
Add the following using directives to the TypeInferenceRewriter.cs file:
using Microsoft.CodeAnalysis;
using Microsoft.CodeAnalysis.CSharp;
using Microsoft.CodeAnalysis.CSharp.Syntax;
Next, make the TypeInferenceRewriter class extend the CSharpSyntaxRewriter class:
public class TypeInferenceRewriter : CSharpSyntaxRewriter
Add the following code to declare a private read-only field to hold a SemanticModel and initialize it in the constructor. You will need this field later on to determine where type inference can be used:
private readonly SemanticModel SemanticModel;

public TypeInferenceRewriter(SemanticModel semanticModel) => SemanticModel = semanticModel;
Override the VisitLocalDeclarationStatement(LocalDeclarationStatementSyntax) method:
public override SyntaxNode VisitLocalDeclarationStatement(LocalDeclarationStatementSyntax node)
{

}
Note
Many of the Roslyn APIs declare return types that are base classes of the actual runtime types returned. In many scenarios, one kind of node may be replaced by another kind of node entirely - or even removed. In this example, the VisitLocalDeclarationStatement(LocalDeclarationStatementSyntax) method returns a SyntaxNode, instead of the derived type of LocalDeclarationStatementSyntax. This rewriter returns a new LocalDeclarationStatementSyntax node based on the existing one.
This quickstart handles local variable declarations. You could extend it to other declarations such as foreach loops, for loops, LINQ expressions, and lambda expressions. Furthermore this rewriter will only transform declarations of the simplest form:
Type variable = expression;
If you want to explore on your own, consider extending the finished sample for these types of variable declarations:
// Multiple variables in a single declaration.
Type variable1 = expression1,
     variable2 = expression2;
// No initializer.
Type variable;
Add the following code to the body of the VisitLocalDeclarationStatement method to skip rewriting these forms of declarations:
if (node.Declaration.Variables.Count > 1)
{
    return node;
}
if (node.Declaration.Variables[0].Initializer == null)
{
    return node;
}
The method indicates that no rewriting takes place by returning the node parameter unmodified. If neither of those if expressions are true, the node represents a possible declaration with initialization. Add these statements to extract the type name specified in the declaration and bind it using the SemanticModel field to obtain a type symbol:
var declarator = node.Declaration.Variables.First();
var variableTypeName = node.Declaration.Type;

var variableType = (ITypeSymbol)SemanticModel
    .GetSymbolInfo(variableTypeName)
    .Symbol;
Now, add this statement to bind the initializer expression:
var initializerInfo = SemanticModel.GetTypeInfo(declarator.Initializer.Value);
Finally, add the following if statement to replace the existing type name with the var keyword if the type of the initializer expression matches the type specified:
if (SymbolEqualityComparer.Default.Equals(variableType, initializerInfo.Type))
{
    TypeSyntax varTypeName = SyntaxFactory.IdentifierName("var")
        .WithLeadingTrivia(variableTypeName.GetLeadingTrivia())
        .WithTrailingTrivia(variableTypeName.GetTrailingTrivia());

    return node.ReplaceNode(variableTypeName, varTypeName);
}
else
{
    return node;
}
The conditional is required because the declaration may cast the initializer expression to a base class or interface. If that's desired, the types on the left and right-hand side of the assignment don't match. Removing the explicit type in these cases would change the semantics of a program. var is specified as an identifier rather than a keyword because var is a contextual keyword. The leading and trailing trivia (white space) are transferred from the old type name to the var keyword to maintain vertical white space and indentation. It's simpler to use ReplaceNode rather than With* to transform the LocalDeclarationStatementSyntax because the type name is actually the grandchild of the declaration statement.
You've finished the TypeInferenceRewriter. Now return to your Program.cs file to finish the example. Create a test Compilation and obtain the SemanticModel from it. Use that SemanticModel to try your TypeInferenceRewriter. You'll do this step last. In the meantime declare a placeholder variable representing your test compilation:
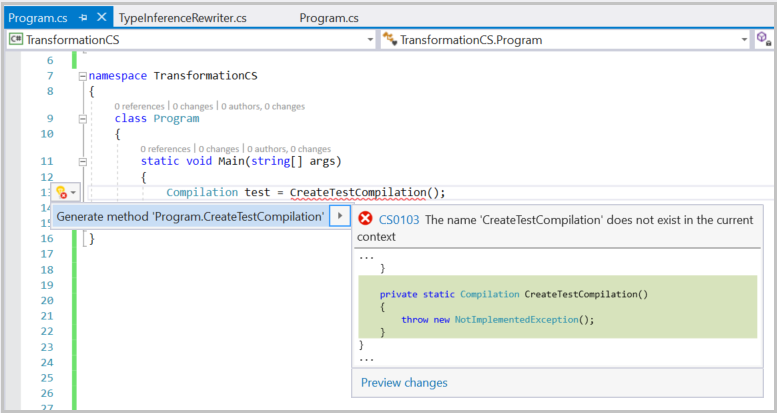
Compilation test = CreateTestCompilation();
After pausing a moment, you should see an error squiggle appear reporting that no CreateTestCompilation method exists. Press Ctrl+Period to open the light-bulb and then press Enter to invoke the Generate Method Stub command. This command will generate a method stub for the CreateTestCompilation method in the Program class. You'll come back to fill in this method later:
Write the following code to iterate over each SyntaxTree in the test Compilation. For each one, initialize a new TypeInferenceRewriter with the SemanticModel for that tree:
foreach (SyntaxTree sourceTree in test.SyntaxTrees)
{
    SemanticModel model = test.GetSemanticModel(sourceTree);

    TypeInferenceRewriter rewriter = new TypeInferenceRewriter(model);

    SyntaxNode newSource = rewriter.Visit(sourceTree.GetRoot());

    if (newSource != sourceTree.GetRoot())
    {
        File.WriteAllText(sourceTree.FilePath, newSource.ToFullString());
    }
}
Inside the foreach statement you created, add the following code to perform the transformation on each source tree. This code conditionally writes out the new transformed tree if any edits were made. Your rewriter should only modify a tree if it encounters one or more local variable declarations that could be simplified using type inference:
SyntaxNode newSource = rewriter.Visit(sourceTree.GetRoot());

if (newSource != sourceTree.GetRoot())
{
    File.WriteAllText(sourceTree.FilePath, newSource.ToFullString());
}
You should see squiggles under the File.WriteAllText code. Select the light bulb, and add the necessary using System.IO; statement.
You're almost done! There's one step left: creating a test Compilation. Since you haven't been using type inference at all during this quickstart, it would have made a perfect test case. Unfortunately, creating a Compilation from a C# project file is beyond the scope of this walkthrough. But fortunately, if you've been following instructions carefully, there's hope. Replace the contents of the CreateTestCompilation method with the following code. It creates a test compilation that coincidentally matches the project described in this quickstart:
String programPath = @"..\..\..\Program.cs";
String programText = File.ReadAllText(programPath);
SyntaxTree programTree =
               CSharpSyntaxTree.ParseText(programText)
                               .WithFilePath(programPath);

String rewriterPath = @"..\..\..\TypeInferenceRewriter.cs";
String rewriterText = File.ReadAllText(rewriterPath);
SyntaxTree rewriterTree =
               CSharpSyntaxTree.ParseText(rewriterText)
                               .WithFilePath(rewriterPath);

SyntaxTree[] sourceTrees = { programTree, rewriterTree };

MetadataReference mscorlib =
        MetadataReference.CreateFromFile(typeof(object).Assembly.Location);
MetadataReference codeAnalysis =
        MetadataReference.CreateFromFile(typeof(SyntaxTree).Assembly.Location);
MetadataReference csharpCodeAnalysis =
        MetadataReference.CreateFromFile(typeof(CSharpSyntaxTree).Assembly.Location);

MetadataReference[] references = { mscorlib, codeAnalysis, csharpCodeAnalysis };

return CSharpCompilation.Create("TransformationCS",
    sourceTrees,
    references,
    new CSharpCompilationOptions(OutputKind.ConsoleApplication));
Cross your fingers and run the project. In Visual Studio, choose Debug > Start Debugging. You should be prompted by Visual Studio that the files in your project have changed. Click "Yes to All" to reload the modified files. Examine them to observe your awesomeness. Note how much cleaner the code looks without all those explicit and redundant type specifiers.
Congratulations! You've used the Compiler APIs to write your own refactoring that searches all files in a C# project for certain syntactic patterns, analyzes the semantics of source code that matches those patterns, and transforms it. You're now officially a refactoring author!
Collaborate with us on GitHub
The source for this content can be found on GitHub, where you can also create and review issues and pull requests. For more information, see our contributor guide.