Note
Access to this page requires authorization. You can try signing in or changing directories.
Access to this page requires authorization. You can try changing directories.
The .NET Compiler Platform SDK provides the tools you need to create custom diagnostics (analyzers), code fixes, code refactoring, and diagnostic suppressors that target C# or Visual Basic code. An analyzer contains code that recognizes violations of your rule. Your code fix contains the code that fixes the violation. The rules you implement can be anything from code structure to coding style to naming conventions and more. The .NET Compiler Platform provides the framework for running analysis as developers are writing code, and all the Visual Studio UI features for fixing code: showing squiggles in the editor, populating the Visual Studio Error List, creating the "light bulb" suggestions, and showing the rich preview of the suggested fixes.
In this tutorial, you explore the creation of an analyzer and an accompanying code fix using the Roslyn APIs. An analyzer is a way to perform source code analysis and report a problem to the user. Optionally, you can associate a code fix with the analyzer to represent a modification to the user's source code. This tutorial creates an analyzer that finds local variable declarations that could be declared using the const modifier but aren't. The accompanying code fix modifies those declarations to add the const modifier.
Prerequisites
You need to install the .NET Compiler Platform SDK by using the Visual Studio Installer:
Installation instructions - Visual Studio Installer
There are two different ways to find the .NET Compiler Platform SDK in the Visual Studio Installer:
Install using the Visual Studio Installer - Workloads view
The .NET Compiler Platform SDK is not automatically selected as part of the Visual Studio extension development workload. You must select it as an optional component.
- Run Visual Studio Installer
- Select Modify
- Check the Visual Studio extension development workload.
- Open the Visual Studio extension development node in the summary tree.
- Make sure the box for .NET Compiler Platform SDK is checked.
- Select Modify.
Optionally, you'll also want the DGML editor to display graphs in the visualizer:
- Open the Individual components node in the summary tree.
- Check the box for DGML editor
Install using the Visual Studio Installer - Individual components tab
- Run Visual Studio Installer
- Select Modify
- Select the Individual components tab
- Check the box for .NET Compiler Platform SDK. You'll find it at the top under the Compilers, build tools, and runtimes section.
- Select Modify.
Optionally, you'll also want the DGML editor to display graphs in the visualizer:
- Check the box for DGML editor. You'll find it under the Code tools section.
Creating and validating your analyzer involves several steps:
- Create the solution.
- Register the analyzer name and description.
- Report analyzer warnings and recommendations.
- Implement the code fix to accept recommendations.
- Improve the analysis through unit tests.
Create the solution
- In Visual Studio, select File > New > Project/Solution to open the New Project dialog.
- In the search box, type Analyzer to find the Analyzer with Code Fix (.NET Standard) template.
- Select Next.
- Name your project "MakeConst" and select Create.
Note
You might get a compilation error (MSB4062: The "CompareBuildTaskVersion" task couldn't be loaded). To fix this error, update the NuGet packages in the solution by using NuGet Package Manager or use Update-Package in the Package Manager Console window.
Explore the analyzer template
The analyzer with code fix template creates five projects:
- MakeConst, which contains the analyzer.
- MakeConst.CodeFixes, which contains the code fix.
- MakeConst.Package, which is used to produce NuGet package for the analyzer and code fix.
- MakeConst.Test, which is a unit test project.
- MakeConst.Vsix, which is the default startup project that starts a second instance of Visual Studio that has loaded your new analyzer. Press F5 to start the VSIX project.
Note
Analyzers should target .NET Standard 2.0 because they can run in .NET Core environment (command line builds) and .NET Framework environment (Visual Studio).
Tip
When you run your analyzer, you start a second copy of Visual Studio. This second copy uses a different registry hive to store settings. That difference enables you to differentiate the visual settings in the two copies of Visual Studio. You can pick a different theme for the experimental run of Visual Studio. In addition, don't roam your settings or sign in to your Visual Studio account by using the experimental run of Visual Studio. That keeps the settings different.
The hive includes not only the analyzer under development, but also any previous analyzers opened. To reset Roslyn hive, you need to manually delete it from %LocalAppData%\Microsoft\VisualStudio. The folder name of Roslyn hive ends in Roslyn, for example, 16.0_9ae182f9Roslyn. You might need to clean the solution and rebuild it after deleting the hive.
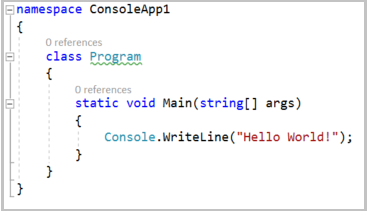
In the second Visual Studio instance that you just started, create a new C# Console Application project (any target framework will work -- analyzers work at the source level.) Hover over the token with a wavy underline, and the warning text provided by an analyzer appears.
The template creates an analyzer that reports a warning on each type declaration where the type name contains lowercase letters, as shown in the following figure:
The template also provides a code fix that changes any type name containing lower case characters to all upper case. You can select the light bulb displayed with the warning to see the suggested changes. Accepting the suggested changes updates the type name and all references to that type in the solution. Now that you see the initial analyzer in action, close the second Visual Studio instance and return to your analyzer project.
You don't have to start a second copy of Visual Studio and create new code to test every change in your analyzer. The template also creates a unit test project for you. That project contains two tests. TestMethod1 shows the typical format of a test that analyzes code without triggering a diagnostic. TestMethod2 shows the format of a test that triggers a diagnostic, and then applies a suggested code fix. As you build your analyzer and code fix, you'll write tests for different code structures to verify your work. Unit tests for analyzers are much quicker than testing them interactively with Visual Studio.
Tip
Analyzer unit tests are a great tool when you know what code constructs should and shouldn't trigger your analyzer. Loading your analyzer in another copy of Visual Studio is a great tool to explore and find constructs you might not have thought about yet.
In this tutorial, you write an analyzer that reports to the user any local variable declarations that can be converted to local constants. For example, consider the following code:
int x = 0;
Console.WriteLine(x);
In the code preceding, x is assigned a constant value and is never modified. It can be declared by using the const modifier:
const int x = 0;
Console.WriteLine(x);
The analysis to determine whether a variable can be made constant is involved, requiring syntactic analysis, constant analysis of the initializer expression, and dataflow analysis to ensure that the variable is never written to. The .NET Compiler Platform provides APIs that make it easier to perform this analysis.
Create analyzer registrations
The template creates the initial DiagnosticAnalyzer class in the MakeConstAnalyzer.cs file. This initial analyzer shows two important properties of every analyzer.
- Every diagnostic analyzer must provide a
[DiagnosticAnalyzer]attribute that describes the language it operates on. - Every diagnostic analyzer must derive (directly or indirectly) from the DiagnosticAnalyzer class.
The template also shows the basic features that are part of any analyzer:
- Register actions. The actions represent code changes that should trigger your analyzer to examine code for violations. When Visual Studio detects code edits that match a registered action, it calls your analyzer's registered method.
- Create diagnostics. When your analyzer detects a violation, it creates a diagnostic object that Visual Studio uses to notify the user of the violation.
You register actions in your override of DiagnosticAnalyzer.Initialize(AnalysisContext) method. In this tutorial, you'll visit syntax nodes looking for local declarations, and see which of those have constant values. If a declaration could be constant, your analyzer creates and reports a diagnostic.
The first step is to update the registration constants and Initialize method so these constants indicate your "Make Const" analyzer. Most of the string constants are defined in the string resource file. Follow that practice for easier localization. Open the Resources.resx file for the MakeConst analyzer project. This action displays the resource editor. Update the string resources as follows:
- Change
AnalyzerDescriptionto "Variables that aren't modified should be made constants.". - Change
AnalyzerMessageFormatto "Variable '{0}' can be made constant". - Change
AnalyzerTitleto "Variable can be made constant".
When you finish, the resource editor should appear as shown in the following figure:

Make the remaining changes in the analyzer file. Open MakeConstAnalyzer.cs in Visual Studio. Change the registered action from one that acts on symbols to one that acts on syntax. In the MakeConstAnalyzerAnalyzer.Initialize method, find the line that registers the action on symbols:
context.RegisterSymbolAction(AnalyzeSymbol, SymbolKind.NamedType);
Replace it with the following line:
context.RegisterSyntaxNodeAction(AnalyzeNode, SyntaxKind.LocalDeclarationStatement);
After that change, you can delete the AnalyzeSymbol method. This analyzer examines SyntaxKind.LocalDeclarationStatement, not SymbolKind.NamedType statements. Notice that AnalyzeNode has red squiggles under it. The code you just added references an AnalyzeNode method that isn't declared. Declare that method by using the following code:
private void AnalyzeNode(SyntaxNodeAnalysisContext context)
{
}
Change the Category to "Usage" in MakeConstAnalyzer.cs as shown in the following code:
private const string Category = "Usage";
Find local declarations that could be const
Now you're ready to write the first version of the AnalyzeNode method. It should look for a single local declaration that could be const but isn't, like the following code:
int x = 0;
Console.WriteLine(x);
The first step is to find local declarations. Add the following code to AnalyzeNode in MakeConstAnalyzer.cs:
var localDeclaration = (LocalDeclarationStatementSyntax)context.Node;
This cast always succeeds because your analyzer registered for changes to local declarations, and only local declarations. No other node type triggers a call to your AnalyzeNode method. Next, check the declaration for any const modifiers. If you find them, return immediately. The following code looks for any const modifiers on the local declaration:
// make sure the declaration isn't already const:
if (localDeclaration.Modifiers.Any(SyntaxKind.ConstKeyword))
{
    return;
}
Finally, you need to check that the variable could be const. That check makes sure the variable is never assigned after it's initialized.
Perform some semantic analysis by using the SyntaxNodeAnalysisContext. Use the context argument to determine whether the local variable declaration can be made const. A Microsoft.CodeAnalysis.SemanticModel represents all of semantic information in a single source file. You can learn more in the article that covers semantic models. Use the Microsoft.CodeAnalysis.SemanticModel to perform data flow analysis on the local declaration statement. Then, use the results of this data flow analysis to ensure that the local variable isn't written with a new value anywhere else. Call the GetDeclaredSymbol extension member to retrieve the ILocalSymbol for the variable and check that it isn't contained within the DataFlowAnalysis.WrittenOutside collection of the data flow analysis. Add the following code to the end of the AnalyzeNode method:
// Perform data flow analysis on the local declaration.
DataFlowAnalysis dataFlowAnalysis = context.SemanticModel.AnalyzeDataFlow(localDeclaration);

// Retrieve the local symbol for each variable in the local declaration
// and ensure that it is not written outside of the data flow analysis region.
VariableDeclaratorSyntax variable = localDeclaration.Declaration.Variables.Single();
ISymbol variableSymbol = context.SemanticModel.GetDeclaredSymbol(variable, context.CancellationToken);
if (dataFlowAnalysis.WrittenOutside.Contains(variableSymbol))
{
    return;
}
The code you just added ensures that the variable isn't modified, and can therefore be made const. It's time to raise the diagnostic. Add the following code as the last line in AnalyzeNode:
context.ReportDiagnostic(Diagnostic.Create(Rule, context.Node.GetLocation(), localDeclaration.Declaration.Variables.First().Identifier.ValueText));
You can check your progress by pressing F5 to run your analyzer. You can load the console application you created earlier and then add the following test code:
int x = 0;
Console.WriteLine(x);
The light bulb should appear, and your analyzer should report a diagnostic. However, depending on your version of Visual Studio, you'll either see:
- The light bulb, which still uses the template generated code fix, will tell you it can be made upper case.
- A banner message at the top of the editor saying the 'MakeConstCodeFixProvider' encountered an error and has been disabled. This error occurs because the code fix provider hasn't yet been changed and still expects to find
TypeDeclarationSyntaxelements instead ofLocalDeclarationStatementSyntaxelements.
The next section explains how to write the code fix.
Write the code fix
An analyzer can provide one or more code fixes. A code fix defines an edit that addresses the reported issue. For the analyzer that you created, you can provide a code fix that inserts the const keyword:
- int x = 0;
+ const int x = 0;
Console.WriteLine(x);
The user chooses it from the light bulb UI in the editor and Visual Studio changes the code.
Open CodeFixResources.resx file and change CodeFixTitle to "Make constant".
Open the MakeConstCodeFixProvider.cs file added by the template. This code fix is already wired up to the Diagnostic ID produced by your diagnostic analyzer, but it doesn't yet implement the right code transform.
Next, delete the MakeUppercaseAsync method. It no longer applies.
All code fix providers derive from CodeFixProvider. They all override CodeFixProvider.RegisterCodeFixesAsync(CodeFixContext) to report available code fixes. In RegisterCodeFixesAsync, change the ancestor node type you're searching for to a LocalDeclarationStatementSyntax to match the diagnostic:
var declaration = root.FindToken(diagnosticSpan.Start).Parent.AncestorsAndSelf().OfType<LocalDeclarationStatementSyntax>().First();
Next, change the last line to register a code fix. Your fix creates a new document that results from adding the const modifier to an existing declaration:
// Register a code action that will invoke the fix.
context.RegisterCodeFix(
    CodeAction.Create(
        title: CodeFixResources.CodeFixTitle,
        createChangedDocument: c => MakeConstAsync(context.Document, declaration, c),
        equivalenceKey: nameof(CodeFixResources.CodeFixTitle)),
    diagnostic);
You'll notice red squiggles in the code you just added on the symbol MakeConstAsync. Add a declaration for MakeConstAsync like the following code:
private static async Task<Document> MakeConstAsync(Document document,
    LocalDeclarationStatementSyntax localDeclaration,
    CancellationToken cancellationToken)
{
}
Your new MakeConstAsync method transforms the Document representing the user's source file into a new Document that now contains a const declaration.
You create a new const keyword token to insert at the front of the declaration statement. Be careful to first remove any leading trivia from the first token of the declaration statement and attach it to the const token. Add the following code to the MakeConstAsync method:
// Remove the leading trivia from the local declaration.
SyntaxToken firstToken = localDeclaration.GetFirstToken();
SyntaxTriviaList leadingTrivia = firstToken.LeadingTrivia;
LocalDeclarationStatementSyntax trimmedLocal = localDeclaration.ReplaceToken(
    firstToken, firstToken.WithLeadingTrivia(SyntaxTriviaList.Empty));

// Create a const token with the leading trivia.
SyntaxToken constToken = SyntaxFactory.Token(leadingTrivia, SyntaxKind.ConstKeyword, SyntaxFactory.TriviaList(SyntaxFactory.ElasticMarker));
Next, add the const token to the declaration using the following code:
// Insert the const token into the modifiers list, creating a new modifiers list.
SyntaxTokenList newModifiers = trimmedLocal.Modifiers.Insert(0, constToken);
// Produce the new local declaration.
LocalDeclarationStatementSyntax newLocal = trimmedLocal
    .WithModifiers(newModifiers)
    .WithDeclaration(localDeclaration.Declaration);
Next, format the new declaration to match C# formatting rules. Formatting your changes to match existing code creates a better experience. Add the following statement immediately after the existing code:
// Add an annotation to format the new local declaration.
LocalDeclarationStatementSyntax formattedLocal = newLocal.WithAdditionalAnnotations(Formatter.Annotation);
A new namespace is required for this code. Add the following using directive to the top of the file:
using Microsoft.CodeAnalysis.Formatting;
The final step is to make your edit. There are three steps to this process:
- Get a handle to the existing document.
- Create a new document by replacing the existing declaration with the new declaration.
- Return the new document.
Add the following code to the end of the MakeConstAsync method:
// Replace the old local declaration with the new local declaration.
SyntaxNode oldRoot = await document.GetSyntaxRootAsync(cancellationToken).ConfigureAwait(false);
SyntaxNode newRoot = oldRoot.ReplaceNode(localDeclaration, formattedLocal);

// Return document with transformed tree.
return document.WithSyntaxRoot(newRoot);
Your code fix is ready to try. Press F5 to run the analyzer project in a second instance of Visual Studio. In the second Visual Studio instance, create a new C# Console Application project and add a few local variable declarations initialized with constant values to the Main method. You see that they're reported as warnings as shown in the following image.

You've made a lot of progress. There are squiggles under the declarations that can be made const. But there is still work to do. This works fine if you add const to the declarations starting with i, then j, and finally k. But, if you add the const modifier in a different order, starting with k, your analyzer creates errors: k can't be declared const, unless i and j are both already const. You need to do more analysis to ensure you handle the different ways variables can be declared and initialized.
Build unit tests
Your analyzer and code fix work on a simple case of a single declaration that you can make const. Numerous possible declaration statements exist where this implementation makes mistakes. You'll address these cases by working with the unit test library written by the template. It's much faster than repeatedly opening a second copy of Visual Studio.
Open the MakeConstUnitTests.cs file in the unit test project. The template created two tests that follow the two common patterns for an analyzer and code fix unit test. TestMethod1 shows the pattern for a test that ensures the analyzer doesn't report a diagnostic when it shouldn't. TestMethod2 shows the pattern for reporting a diagnostic and running the code fix.
The template uses Microsoft.CodeAnalysis.Testing packages for unit testing.
Tip
The testing library supports a special markup syntax, including the following:
[|text|]: indicates that a diagnostic is reported fortext. By default, this form may only be used for testing analyzers with exactly oneDiagnosticDescriptorprovided byDiagnosticAnalyzer.SupportedDiagnostics.{|ExpectedDiagnosticId:text|}: indicates that a diagnostic with IdExpectedDiagnosticIdis reported fortext.
Replace the template tests in the MakeConstUnitTest class with the following test method:
        [TestMethod]
        public async Task LocalIntCouldBeConstant_Diagnostic()
        {
            await VerifyCS.VerifyCodeFixAsync(@"
using System;

class Program
{
    static void Main()
    {
        [|int i = 0;|]
        Console.WriteLine(i);
    }
}
", @"
using System;

class Program
{
    static void Main()
    {
        const int i = 0;
        Console.WriteLine(i);
    }
}
");
        }
Run this test to make sure it passes. In Visual Studio, open the Test Explorer by selecting Test > Windows > Test Explorer. Then select Run All.
Create tests for valid declarations
As a general rule, analyzers should exit as quickly as possible, doing minimal work. Visual Studio calls registered analyzers as the user edits code. Responsiveness is a key requirement. Several test cases exist for code that shouldn't raise your diagnostic. Your analyzer already handles several of those tests. Add the following test methods to represent those cases:
        [TestMethod]
        public async Task VariableIsAssigned_NoDiagnostic()
        {
            await VerifyCS.VerifyAnalyzerAsync(@"
using System;

class Program
{
    static void Main()
    {
        int i = 0;
        Console.WriteLine(i++);
    }
}
");
        }
        [TestMethod]
        public async Task VariableIsAlreadyConst_NoDiagnostic()
        {
            await VerifyCS.VerifyAnalyzerAsync(@"
using System;

class Program
{
    static void Main()
    {
        const int i = 0;
        Console.WriteLine(i);
    }
}
");
        }
        [TestMethod]
        public async Task NoInitializer_NoDiagnostic()
        {
            await VerifyCS.VerifyAnalyzerAsync(@"
using System;

class Program
{
    static void Main()
    {
        int i;
        i = 0;
        Console.WriteLine(i);
    }
}
");
        }
These tests pass because your analyzer already handles these conditions:
- Variables assigned after initialization are detected by data flow analysis.
- Declarations that are already
constare filtered out by checking for theconstkeyword. - Declarations with no initializer are handled by the data flow analysis that detects assignments outside the declaration.
Next, add test methods for conditions you haven't handled yet:
Declarations where the initializer isn't a constant, because they can't be compile-time constants:
        [TestMethod]
        public async Task InitializerIsNotConstant_NoDiagnostic()
        {
            await VerifyCS.VerifyAnalyzerAsync(@"
using System;

class Program
{
    static void Main()
    {
        int i = DateTime.Now.DayOfYear;
        Console.WriteLine(i);
    }
}
");
        }
It can be even more complicated because C# allows multiple declarations as one statement. Consider the following test case string constant:
        [TestMethod]
        public async Task MultipleInitializers_NoDiagnostic()
        {
            await VerifyCS.VerifyAnalyzerAsync(@"
using System;

class Program
{
    static void Main()
    {
        int i = 0, j = DateTime.Now.DayOfYear;
        Console.WriteLine(i);
        Console.WriteLine(j);
    }
}
");
        }
The variable i can be constant, but the variable j can't. Therefore, this statement can't be a const declaration.
Run your tests again, and you see these last two test cases fail.
Update your analyzer to ignore correct declarations
You need to enhance your analyzer's AnalyzeNode method to filter out code that matches these conditions. These conditions are all related, so similar changes fix all these conditions. Make the following changes to AnalyzeNode:
- Your semantic analysis examined a single variable declaration. This code needs to be in a
foreachloop that examines all the variables declared in the same statement. - Each declared variable needs to have an initializer.
- Each declared variable's initializer must be a compile-time constant.
In your AnalyzeNode method, replace the original semantic analysis:
// Perform data flow analysis on the local declaration.
DataFlowAnalysis dataFlowAnalysis = context.SemanticModel.AnalyzeDataFlow(localDeclaration);

// Retrieve the local symbol for each variable in the local declaration
// and ensure that it is not written outside of the data flow analysis region.
VariableDeclaratorSyntax variable = localDeclaration.Declaration.Variables.Single();
ISymbol variableSymbol = context.SemanticModel.GetDeclaredSymbol(variable, context.CancellationToken);
if (dataFlowAnalysis.WrittenOutside.Contains(variableSymbol))
{
    return;
}
with the following code snippet:
// Ensure that all variables in the local declaration have initializers that
// are assigned with constant values.
foreach (VariableDeclaratorSyntax variable in localDeclaration.Declaration.Variables)
{
    EqualsValueClauseSyntax initializer = variable.Initializer;
    if (initializer == null)
    {
        return;
    }

    Optional<object> constantValue = context.SemanticModel.GetConstantValue(initializer.Value, context.CancellationToken);
    if (!constantValue.HasValue)
    {
        return;
    }
}

// Perform data flow analysis on the local declaration.
DataFlowAnalysis dataFlowAnalysis = context.SemanticModel.AnalyzeDataFlow(localDeclaration);

foreach (VariableDeclaratorSyntax variable in localDeclaration.Declaration.Variables)
{
    // Retrieve the local symbol for each variable in the local declaration
    // and ensure that it is not written outside of the data flow analysis region.
    ISymbol variableSymbol = context.SemanticModel.GetDeclaredSymbol(variable, context.CancellationToken);
    if (dataFlowAnalysis.WrittenOutside.Contains(variableSymbol))
    {
        return;
    }
}
The first foreach loop examines each variable declaration by using syntactic analysis. The first check guarantees that the variable has an initializer. The second check guarantees that the initializer is a constant. The second loop has the original semantic analysis. The semantic checks are in a separate loop because they have a greater impact on performance. Run your tests again, and you should see them all pass.
Add the final polish
You're almost done. There are a few more conditions for your analyzer to handle. Visual Studio calls analyzers while the user is writing code. It's often the case that your analyzer is called for code that doesn't compile. The diagnostic analyzer's AnalyzeNode method doesn't check if the constant value is convertible to the variable type. So, the current implementation happily converts an incorrect declaration such as int i = "abc" to a local constant. Add a test method for this case:
        [TestMethod]
        public async Task DeclarationIsInvalid_NoDiagnostic()
        {
            await VerifyCS.VerifyAnalyzerAsync(@"
using System;

class Program
{
    static void Main()
    {
        int x = {|CS0029:""abc""|};
    }
}
");
        }
In addition, reference types aren't handled properly. The only constant value allowed for a reference type is null, except in the case of System.String, which allows string literals. In other words, const string s = "abc" is legal, but const object s = "abc" is not. This code snippet verifies that condition:
        [TestMethod]
        public async Task DeclarationIsNotString_NoDiagnostic()
        {
            await VerifyCS.VerifyAnalyzerAsync(@"
using System;

class Program
{
    static void Main()
    {
        object s = ""abc"";
    }
}
");
        }
To be thorough, you need to add another test to make sure that you can create a constant declaration for a string. The following snippet defines both the code that raises the diagnostic, and the code after the fix is applied:
        [TestMethod]
        public async Task StringCouldBeConstant_Diagnostic()
        {
            await VerifyCS.VerifyCodeFixAsync(@"
using System;

class Program
{
    static void Main()
    {
        [|string s = ""abc"";|]
    }
}
", @"
using System;

class Program
{
    static void Main()
    {
        const string s = ""abc"";
    }
}
");
        }
Finally, if a variable is declared with the var keyword, the code fix does the wrong thing and generates a const var declaration, which the C# language doesn't support. To fix this bug, the code fix must replace the var keyword with the inferred type's name:
        [TestMethod]
        public async Task VarIntDeclarationCouldBeConstant_Diagnostic()
        {
            await VerifyCS.VerifyCodeFixAsync(@"
using System;

class Program
{
    static void Main()
    {
        [|var item = 4;|]
    }
}
", @"
using System;

class Program
{
    static void Main()
    {
        const int item = 4;
    }
}
");
        }

        [TestMethod]
        public async Task VarStringDeclarationCouldBeConstant_Diagnostic()
        {
            await VerifyCS.VerifyCodeFixAsync(@"
using System;

class Program
{
    static void Main()
    {
        [|var item = ""abc"";|]
    }
}
", @"
using System;

class Program
{
    static void Main()
    {
        const string item = ""abc"";
    }
}
");
        }
Fortunately, you can address all of the above bugs by using the same techniques that you just learned.
To fix the first bug, open MakeConstAnalyzer.cs and locate the foreach loop where each of the local declaration's initializers are checked to ensure that they're assigned constant values. Immediately before the first foreach loop, call context.SemanticModel.GetTypeInfo() to retrieve detailed information about the declared type of the local declaration:
TypeSyntax variableTypeName = localDeclaration.Declaration.Type;
ITypeSymbol variableType = context.SemanticModel.GetTypeInfo(variableTypeName, context.CancellationToken).ConvertedType;
Then, inside your foreach loop, check each initializer to make sure it's convertible to the variable type. Add the following check after ensuring that the initializer is a constant:
// Ensure that the initializer value can be converted to the type of the
// local declaration without a user-defined conversion.
Conversion conversion = context.SemanticModel.ClassifyConversion(initializer.Value, variableType);
if (!conversion.Exists || conversion.IsUserDefined)
{
    return;
}
The next change builds upon the last one. Before the closing curly brace of the first foreach loop, add the following code to check the type of the local declaration when the constant is a string or null.
// Special cases:
//  * If the constant value is a string, the type of the local declaration
//    must be System.String.
//  * If the constant value is null, the type of the local declaration must
//    be a reference type.
if (constantValue.Value is string)
{
    if (variableType.SpecialType != SpecialType.System_String)
    {
        return;
    }
}
else if (variableType.IsReferenceType && constantValue.Value != null)
{
    return;
}
You must write a bit more code in your code fix provider to replace the var keyword with the correct type name. Return to MakeConstCodeFixProvider.cs. The code you'll add does the following steps:
- Check if the declaration is a
vardeclaration, and if it is: - Create a new type for the inferred type.
- Make sure the type declaration is not an alias. If so, it is legal to declare
const var. - Make sure that
varisn't a type name in this program. (If so,const varis legal). - Simplify the full type name
That sounds like a lot of code. It's not. Replace the line that declares and initializes newLocal with the following code. It goes immediately after the initialization of newModifiers:
// If the type of the declaration is 'var', create a new type name
// for the inferred type.
VariableDeclarationSyntax variableDeclaration = localDeclaration.Declaration;
TypeSyntax variableTypeName = variableDeclaration.Type;
if (variableTypeName.IsVar)
{
    SemanticModel semanticModel = await document.GetSemanticModelAsync(cancellationToken).ConfigureAwait(false);

    // Special case: Ensure that 'var' isn't actually an alias to another type
    // (e.g. using var = System.String).
    IAliasSymbol aliasInfo = semanticModel.GetAliasInfo(variableTypeName, cancellationToken);
    if (aliasInfo == null)
    {
        // Retrieve the type inferred for var.
        ITypeSymbol type = semanticModel.GetTypeInfo(variableTypeName, cancellationToken).ConvertedType;

        // Special case: Ensure that 'var' isn't actually a type named 'var'.
        if (type.Name != "var")
        {
            // Create a new TypeSyntax for the inferred type. Be careful
            // to keep any leading and trailing trivia from the var keyword.
            TypeSyntax typeName = SyntaxFactory.ParseTypeName(type.ToDisplayString())
                .WithLeadingTrivia(variableTypeName.GetLeadingTrivia())
                .WithTrailingTrivia(variableTypeName.GetTrailingTrivia());

            // Add an annotation to simplify the type name.
            TypeSyntax simplifiedTypeName = typeName.WithAdditionalAnnotations(Simplifier.Annotation);

            // Replace the type in the variable declaration.
            variableDeclaration = variableDeclaration.WithType(simplifiedTypeName);
        }
    }
}
// Produce the new local declaration.
LocalDeclarationStatementSyntax newLocal = trimmedLocal.WithModifiers(newModifiers)
                           .WithDeclaration(variableDeclaration);
You'll need to add one using directive to use the Simplifier type:
using Microsoft.CodeAnalysis.Simplification;
Run your tests, and they should all pass. Congratulate yourself by running your finished analyzer. Press Ctrl+F5 to run the analyzer project in a second instance of Visual Studio with the Roslyn Preview extension loaded.
- In the second Visual Studio instance, create a new C# Console Application project and add
int x = "abc";to the Main method. Thanks to the first bug fix, no warning is reported for this local variable declaration (though there's a compiler error as expected). - Next, add
object s = "abc";to the Main method. Because of the second bug fix, no warning is reported. - Finally, add another local variable that uses the
varkeyword. You see that a warning is reported and a suggestion appears beneath to the left. - Move the editor caret over the squiggly underline and press Ctrl+.. to display the suggested code fix. Upon selecting your code fix, note that the
varkeyword is now handled correctly.
Finally, add the following code:
int i = 2;
int j = 32;
int k = i + j;
After these changes, you get red squiggles only on the first two variables. Add const to both i and j, and you get a new warning on k because it can now be const.
Congratulations! You created your first .NET Compiler Platform extension that performs on-the-fly code analysis to detect an issue and provides a quick fix to correct it. Along the way, you learned many of the code APIs that are part of the .NET Compiler Platform SDK (Roslyn APIs). You can check your work against the completed sample in the samples GitHub repository.
Other resources
Collaborate with us on GitHub
The source for this content can be found on GitHub, where you can also create and review issues and pull requests. For more information, see our contributor guide.