Note
Access to this page requires authorization. You can try signing in or changing directories.
Access to this page requires authorization. You can try changing directories.
This article outlines how to use the .NET SDK and its tools on a build server. The .NET toolset works both interactively, where a developer types commands at a command prompt, and automatically, where a continuous integration (CI) server runs a build script. The commands, options, inputs, and outputs are the same, and the only things you supply are a way to acquire the tooling and a system to build your app. This article focuses on scenarios of tool acquisition for CI with recommendations on how to design and structure your build scripts.
Installation options for CI build servers
If you're using GitHub, the installation is straightforward. You can rely on GitHub Actions to install the .NET SDK in your workflow. The recommended way to install the .NET SDK in a workflow is with the actions/setup-net-core-sdk action. For more information, see the Setup .NET Core SDK action in the GitHub marketplace. For examples of how this works, see Quickstart: Create a build validation GitHub workflow.
Native installers
Native installers are available for macOS, Linux, and Windows. The installers require admin (sudo) access to the build server. The advantage of using a native installer is that it installs all of the native dependencies required for the tooling to run. Native installers also provide a system-wide installation of the SDK.
macOS users should use the PKG installers. On Linux, there's a choice of using a feed-based package manager, such as apt-get for Ubuntu or yum for CentOS Stream, or using the packages themselves, DEB or RPM. On Windows, use the MSI installer.
The latest stable binaries are found at .NET downloads. If you wish to use the latest (and potentially unstable) pre-release tooling, use the links provided at the dotnet/installer GitHub repository. For Linux distributions, tar.gz archives (also known as tarballs) are available; use the installation scripts within the archives to install .NET.
Installer script
Using the installer script allows for non-administrative installation on your build server and easy automation for obtaining the tooling. The script takes care of downloading the tooling and extracting it into a default or specified location for use. You can also specify a version of the tooling that you wish to install and whether you want to install the entire SDK or only the shared runtime.
The installer script is automated to run at the start of the build to fetch and install the desired version of the SDK. The desired version is whatever version of the SDK your projects require to build. The script allows you to install the SDK in a local directory on the server, run the tools from the installed location, and then clean up (or let the CI service clean up) after the build. This provides encapsulation and isolation to your entire build process. The installation script reference is found in the dotnet-install article.
Note
Azure DevOps Services
When using the installer script, native dependencies aren't installed automatically. You must install the native dependencies if the operating system doesn't have them. For more information, see Install .NET on Windows, Linux, and macOS.
CI setup examples
This section describes a manual setup using a PowerShell or bash script, along with descriptions of software as a service (SaaS) CI solutions. The SaaS CI solutions covered are Travis CI, AppVeyor, and Azure Pipelines. For GitHub Actions, see GitHub Actions and .NET.
Manual setup
Each SaaS service has its methods for creating and configuring a build process. If you use a different SaaS solution than those listed or require customization beyond the pre-packaged support, you must perform at least some manual configuration.
In general, a manual setup requires you to acquire a version of the tools (or the latest nightly builds of the tools) and run your build script. You can use a PowerShell or bash script to orchestrate the .NET commands or use a project file that outlines the build process. The orchestration section provides more detail on these options.
After you create a script that performs a manual CI build server setup, use it on your dev machine to build your code locally for testing purposes. Once you confirm that the script is running well locally, deploy it to your CI build server. A relatively simple PowerShell script demonstrates how to obtain the .NET SDK and install it on a Windows build server:
You provide the implementation for your build process at the end of the script. The script acquires the tools and then executes your build process.
$ErrorActionPreference="Stop"
$ProgressPreference="SilentlyContinue"

# $LocalDotnet is the path to the locally-installed SDK to ensure the
#   correct version of the tools are executed.
$LocalDotnet=""
# $InstallDir and $CliVersion variables can come from options to the
#   script.
$InstallDir = "./cli-tools"
$CliVersion = "6.0.7"

# Test the path provided by $InstallDir to confirm it exists. If it
#   does, it's removed. This is not strictly required, but it's a
#   good way to reset the environment.
if (Test-Path $InstallDir)
{
    rm -Recurse $InstallDir
}
New-Item -Type "directory" -Path $InstallDir

Write-Host "Downloading the CLI installer..."

# Use the Invoke-WebRequest PowerShell cmdlet to obtain the
#   installation script and save it into the installation directory.
Invoke-WebRequest `
    -Uri "https://dot.net/v1/dotnet-install.ps1" `
    -OutFile "$InstallDir/dotnet-install.ps1"

Write-Host "Installing the CLI requested version ($CliVersion) ..."

# Install the SDK of the version specified in $CliVersion into the
#   specified location ($InstallDir).
& $InstallDir/dotnet-install.ps1 -Version $CliVersion `
    -InstallDir $InstallDir

Write-Host "Downloading and installation of the SDK is complete."

# $LocalDotnet holds the path to dotnet.exe for future use by the
#   script.
$LocalDotnet = "$InstallDir/dotnet"

# Run the build process now. Implement your build script here.
Travis CI
You can configure Travis CI to install the .NET SDK using the csharp language and the dotnet key. For more information, see the official Travis CI docs on Building a C#, F#, or Visual Basic Project. Note as you access the Travis CI information that the community-maintained language: csharp language identifier works for all .NET languages, including F#, and Mono.
Travis CI runs both macOS and Linux jobs in a build matrix, where you specify a combination of runtime, environment, and exclusions/inclusions to cover the build combinations for your app. For more information, see the Customizing the Build article in the Travis CI documentation. The MSBuild-based tools include the long-term support (LTS) and standard-term support (STS) runtimes in the package; so by installing the SDK, you receive everything you need to build.
AppVeyor
AppVeyor installs the .NET 6 SDK with the Visual Studio 2022 build worker image. Other build images with different versions of the .NET SDK are available. For more information, see the Build worker images article in the AppVeyor docs.
The .NET SDK binaries are downloaded and unzipped in a subdirectory using the install script, and then they're added to the PATH environment variable. Add a build matrix to run integration tests with multiple versions of the .NET SDK:
environment:
  matrix:
    - CLI_VERSION: 6.0.7
    - CLI_VERSION: Latest
Azure DevOps Services
Configure Azure DevOps Services to build .NET projects using one of these approaches:
- Run the script from the manual setup step using your commands.
- Create a build composed of several Azure DevOps Services built-in build tasks that are configured to use .NET tools.
Both solutions are valid. Using a manual setup script, you control the version of the tools that you receive, since you download them as part of the build. The build is run from a script that you must create. This article only covers the manual option. For more information on composing a build with Azure DevOps Services build tasks, see the Azure Pipelines documentation.
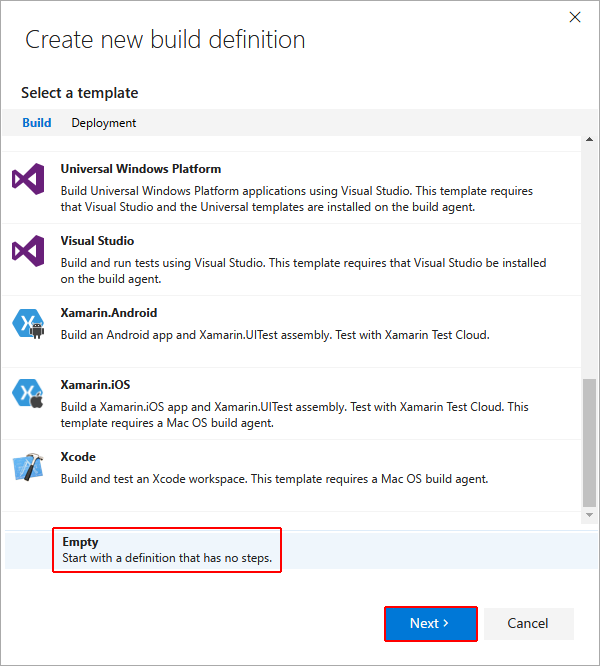
To use a manual setup script in Azure DevOps Services, create a new build definition and specify the script to run for the build step. This is accomplished using the Azure DevOps Services user interface:
Start by creating a new build definition. Once you reach the screen that provides you an option to define what kind of a build you wish to create, select the Empty option.
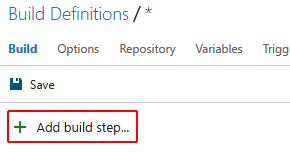
After configuring the repository to build, you're directed to the build definitions. Select Add build step:
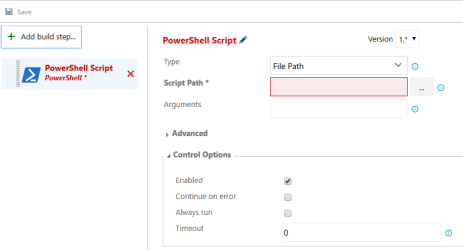
You're presented with the Task catalog. The catalog contains tasks that you use in the build. Since you have a script, select the Add button for PowerShell: Run a PowerShell script.

Configure the build step. Add the script from the repository that you're building:
Orchestrating the build
Most of this document describes how to acquire the .NET tools and configure various CI services without providing information on how to orchestrate, or actually build, your code with .NET. The choices on how to structure the build process depend on many factors that can't be covered in a general way here. For more information on orchestrating your builds with each technology, explore the resources and samples provided in the documentation sets of Travis CI, AppVeyor, and Azure Pipelines.
Two general approaches that you take in structuring the build process for .NET code using the .NET tools are using MSBuild directly or using the .NET command-line commands. Which approach you should take is determined by your comfort level with the approaches and trade-offs in complexity. MSBuild provides you the ability to express your build process as tasks and targets, but it comes with the added complexity of learning MSBuild project file syntax. Using the .NET command-line tools is perhaps simpler, but it requires you to write orchestration logic in a scripting language like bash or PowerShell.
Tip
One MSBuild property you'll want to set to true is ContinuousIntegrationBuild. This property enables settings that only apply to official builds as opposed to local development builds.
See also
Collaborate with us on GitHub
The source for this content can be found on GitHub, where you can also create and review issues and pull requests. For more information, see our contributor guide.