Publish an Android app for Google Play distribution
The most common approach to distributing Android apps to users is through the Google Play. The first time an app is submitted to Google Play it must be submitted through the Google Play Console. Subsequent versions of the app can be submitted through Visual Studio. In both cases, a Google Play Developer account is required. Apps submitted to Google Play require approval from Google.
To distribute a .NET Multi-platform App UI (.NET MAUI) Android app, you'll need to sign it with a key from your keystore, prior to upload to Google Play. Keystores are binary files that serve as repositories of certificates and private keys.
Google Play requires that you submit your app as an Android App Bundle (AAB). Google Play uses your app bundle to generate and serve optimized Android Packages (APK) for each device configuration, so that only the code and resources that are needed for a specific device are downloaded to run your app. For more information about Android App Bundles, see About Android App Bundles on developer.android.com.
The process for distributing a .NET MAUI Android app through Google Play is as follows:
- Create a Google Play Developer account. For more information, see Create a Google Play Developer account.
- Create your app in Google Play Console. For more information, see Create your app in Google Play Console.
- Setup your app in Google Play Console. For more information, see Setup your app in Google Play Console.
- Ensure your app uses the correct package format. For more information, see Ensure correct package format.
- Build and sign your app in Visual Studio, and then distribute it through Google Play Console. For more information, see Distribute your app through Google Play Console.
Then, subsequent versions of your app can be published through Visual Studio. For more information, see Distribute your app through Visual Studio.
Create a Google Play Developer account
To publish Android apps on Google Play, you'll need to create a Google Play Developer account:
- Using your Google Account, sign up for a Google Play Developer account.
- Enter information about your developer identity.
- During the sign-up process, you'll need to review and accept the Google Play Developer Distribution Agreement.
- Pay the one-time $25 registration fee.
- Verify your identity by following the instructions in your verification email.
Important
Identity verification must be complete before you can publish apps through Google Play.
Once your Google Play Developer account has been created you'll be able to begin the process to publish an app to Google Play.
For more information, see Register for a Google Play Developer account on support.google.com.
Create your app in Google Play Console
After you've created your Google Play Developer account, you'll need to create an app in Google Play Console:
Login to your Google Play Developer account.
In Google Play Console, on the All apps tab, select the Create app button:
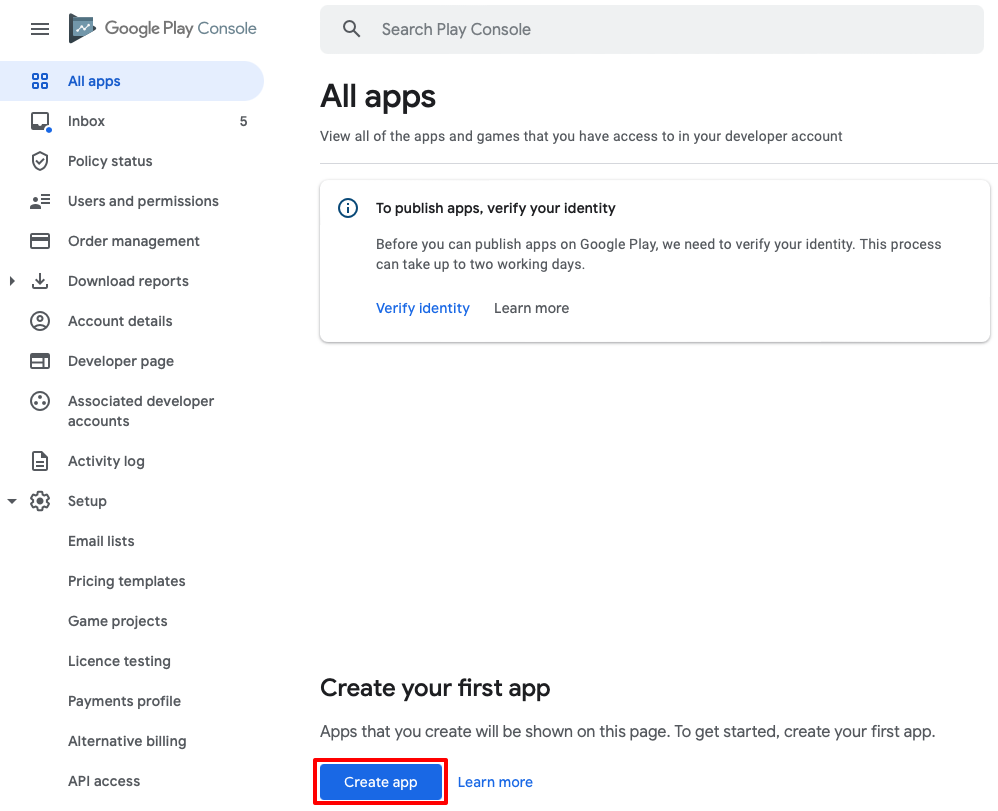
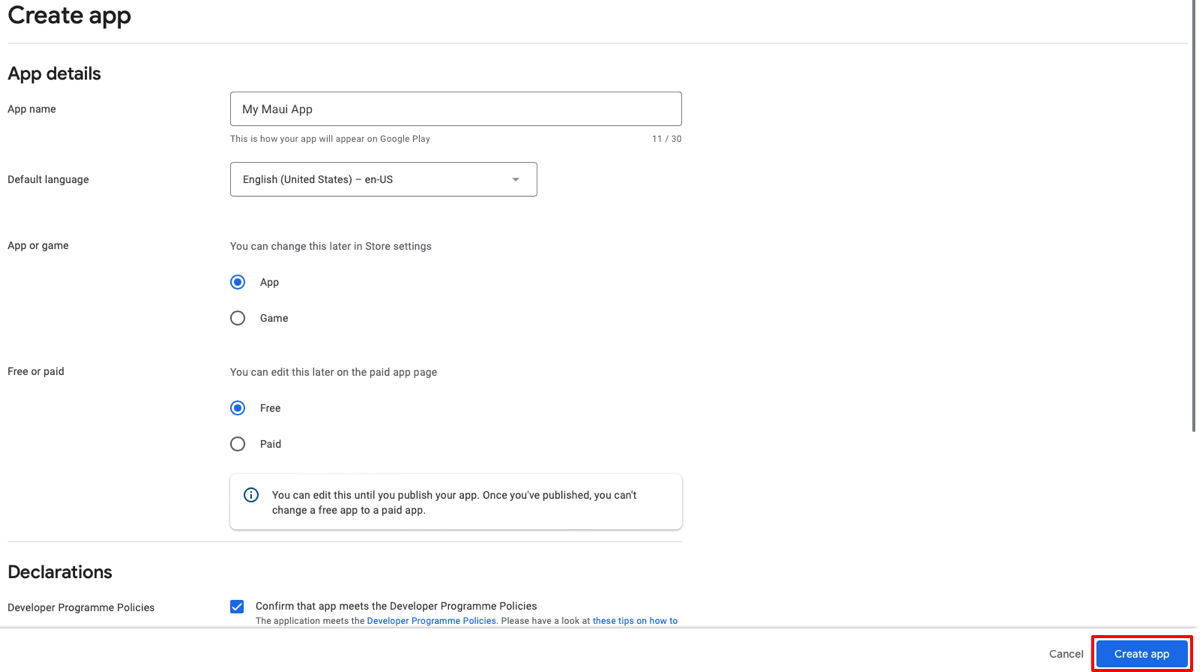
In the Create app page, enter your app details and select the Create app button:
For more information about creating an app in Google Play Console, see Create and set up your app on support.google.com.
Setup your app in Google Play Console
After creating your app, you should set it up. Your app's dashboard will guide you through all the most important steps.
To start setting up your app, select Dashboard at the left menu. Under your app's details at the top of the page you'll find different categories and tasks relating to app setup and release. You must complete the mandatory tasks before you can launch your app on Google Play. When you complete a task you'll see a green tick mark and strikethrough text. The progress bar at the top of the section will also be updated. For more information, see Set up your app on the app dashboard on support.google.com.
Ensure correct package format
To publish a .NET MAUI Android app for Google Play distribution requires that your app package format is AAB, which is the default package format for release builds. To verify that your app's package format is set correctly:
In Visual Studio's Solution Explorer right-click on your .NET MAUI app project and select Properties. Then, navigate to the Android > Options tab and ensure that the value of the Release field is set to bundle:
 Publish
Distribute your app through Google Play Console
The first time an AAB is submitted to Google Play, it must be manually uploaded through the Google Play Console. This enables Google Play to match the signature of the key on all future bundles to the original key used for the first version of the app. In order to upload the app through the Google Play Console, it must first be built and signed in Visual Studio.
To build and sign your app in Visual Studio:
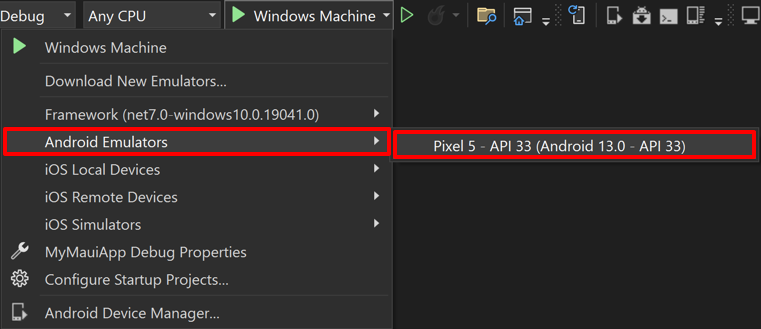
In the Visual Studio toolbar, use the Debug Target drop-down to select Android Emulators and then your chosen emulator:
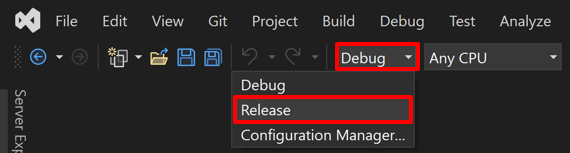
In the Visual Studio toolbar, use the Solutions Configuration drop-down to change from the debug configuration to the release configuration:
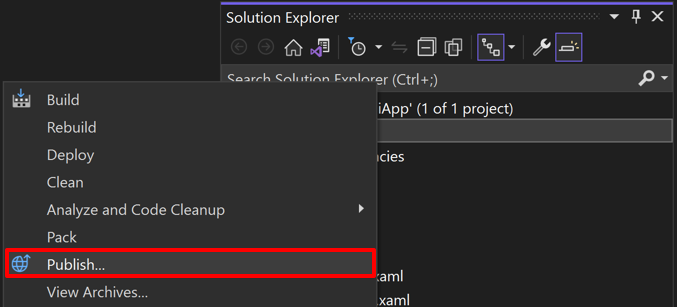
In Solution Explorer, right-click on your .NET MAUI app project and select Publish...:
The Archive Manager will open and Visual Studio will begin to archive your app bundle:

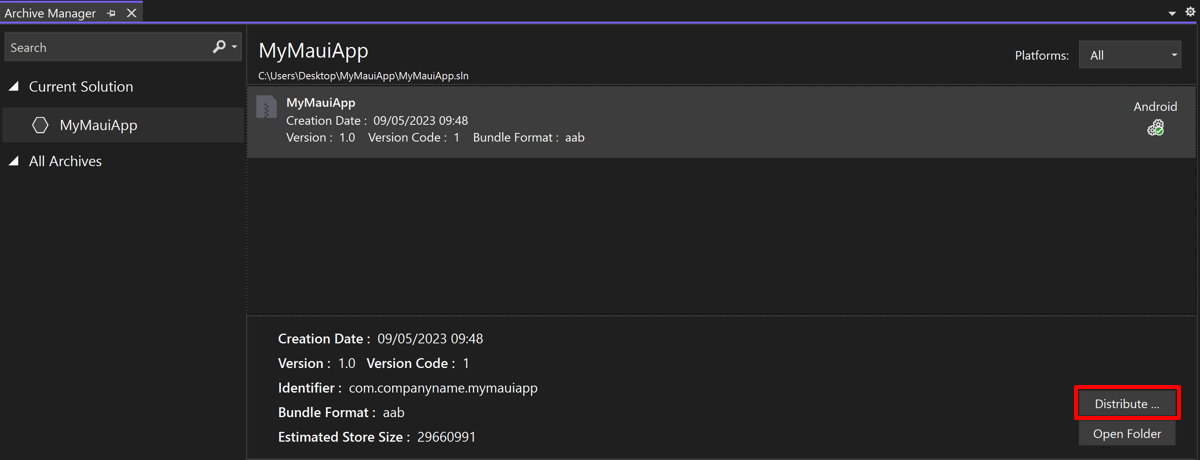
In the Archive Manager, once archiving has successfully completed, ensure your archive is selected and then select the Distribute ... button to begin the process of distributing your app:
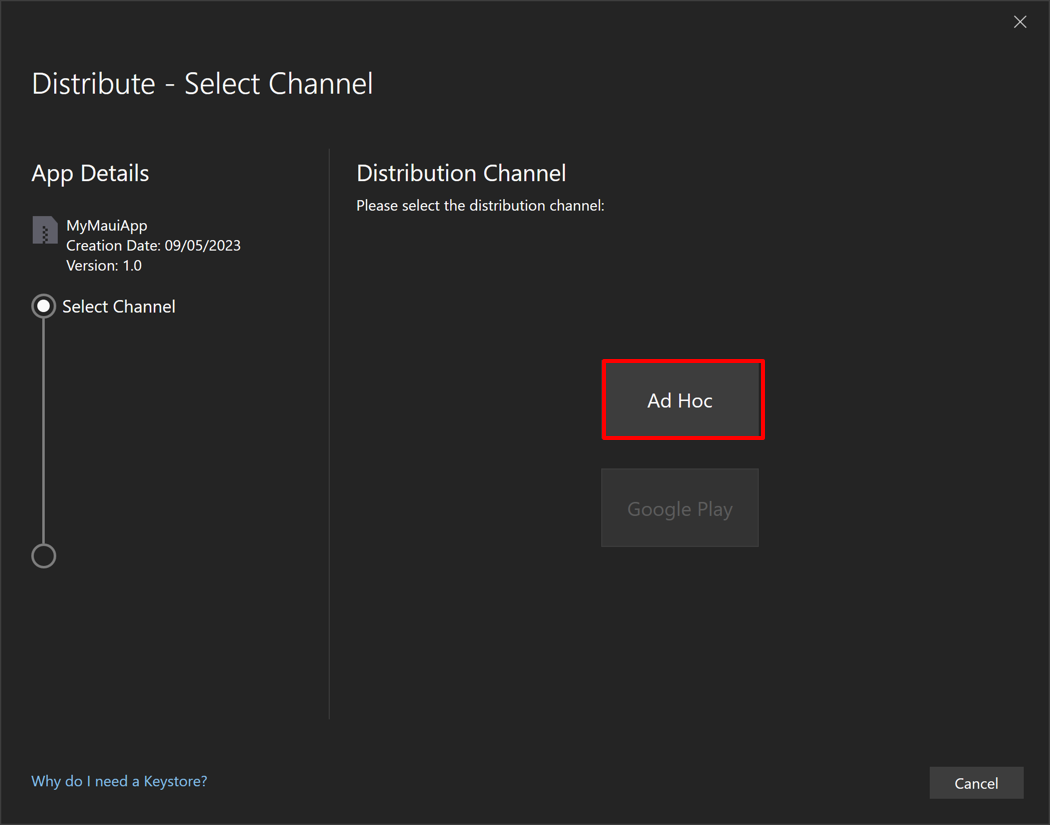
The Distribute - Select Channel dialog will appear.
In the Distribute - Select Channel dialog, select the Ad Hoc button:
In the Distribute - Signing Identity dialog, select the + button to create a new signing identity:
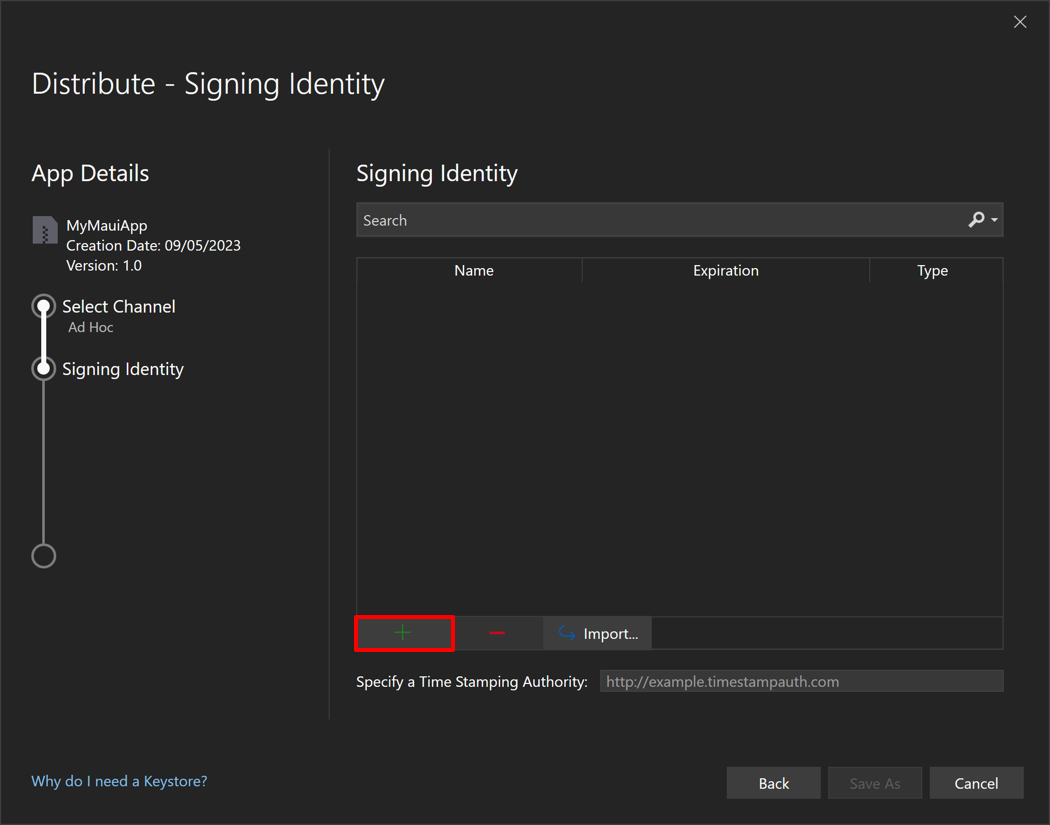
The Create Android Keystore dialog will appear.
Note
Alternatively, an existing signing identity can be used by selecting the Import button.
In the Create Android Keystore dialog, enter the required information to create a new signing identity, known as a keystore, and then select the Create button:
- Alias. Enter an identifying name for your key.
- Password. Create and confirm a secure password for your key.
- Validity. Set the length of time, in years, that your key will be valid.
- Full name, organization unit, organization, city or locality, state or province, and country code. This information is not displayed in your app, but is included in your certificate.

A new keystore, which contains a new certificate, will be saved to C:\Users{Username}\AppData\Local\Xamarin\Mono for Android\Keystore{Alias}{Alias}.keystore.
Important
The keystore and password isn't saved to your Visual Studio solution. Therefore, ensure you back up this data. If you lose it you'll be unable to sign your app with the same signing identity.
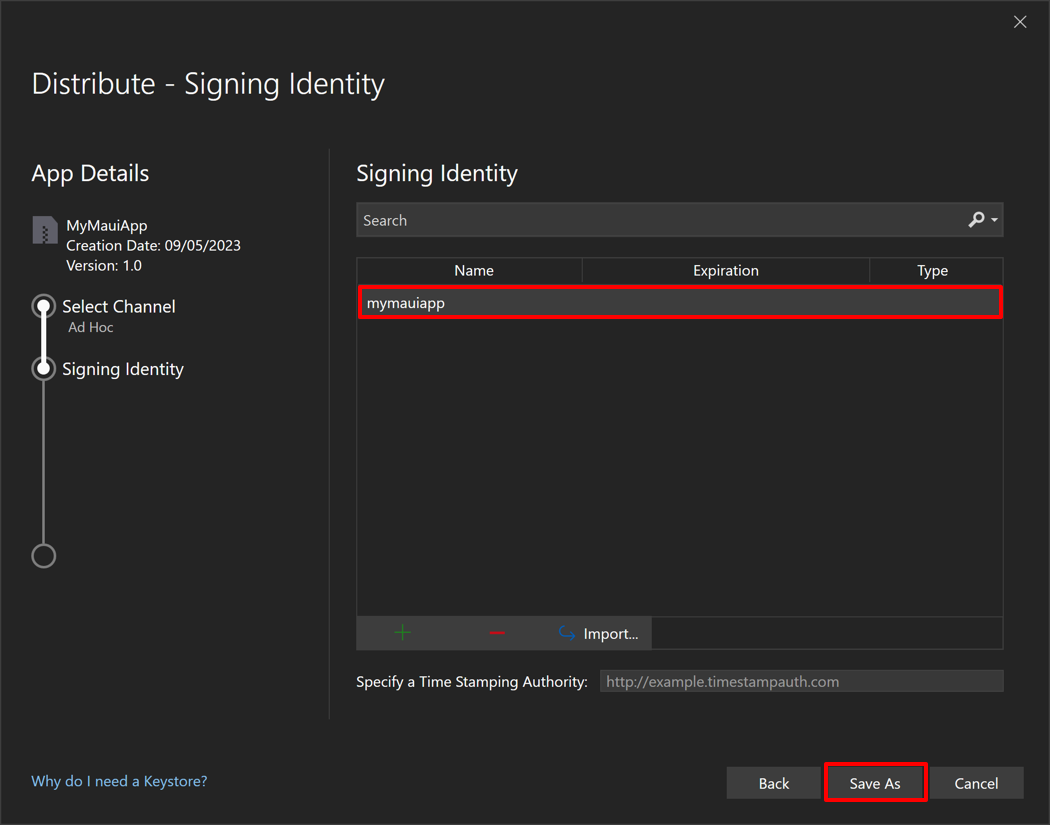
In the Distribute - Signing Identity dialog, select your newly created signing identity and select the Save As button:
The Archive Manager displays the publishing process.
In the Save As dialog, confirm the location and file name for your package is correct and select the Save button.
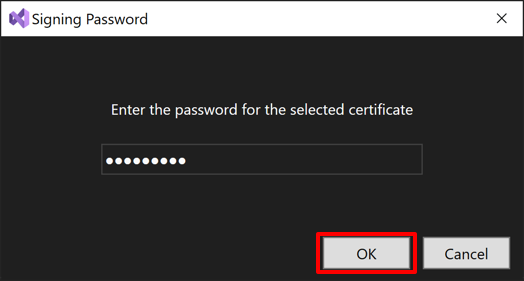
In the Signing Password dialog, enter your signing identity password and select the OK button:
In the Archive Manager, select the Open Distribution button once the publishing process completes:
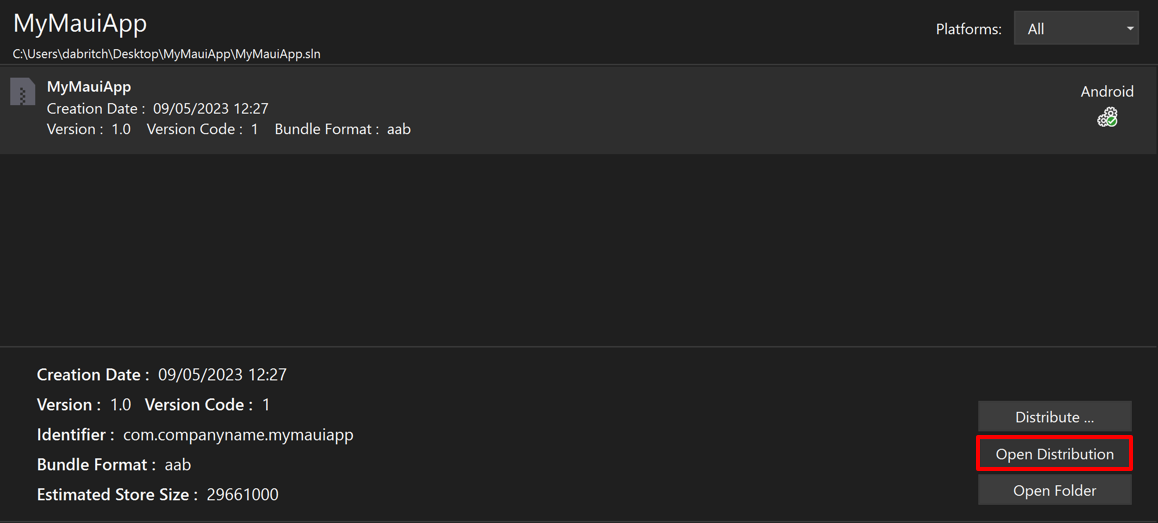
Visual Studio will open the folder containing the published app.
The published app can then be released to Google Play via the Google Play Console. To do this you must first create a release in Google Play Console. A release is a combination of one or more app versions that you'll prepare in order to launch an app, or roll out an update. You can create a release on the following tracks:
- Internal testing. Internal testing releases are available to up to 100 testers that you can choose.
- Closed testing. Closed testing releases are available to a limited number of testers that you choose, who can test a pre-release version of your app and submit feedback.
- Open testing. Open testing releases are available to testers on Google Play. Users can join tests from your Store listing.
- Production. Production releases are available to all Google Play users in your chosen countries.
For more information about creating a release in Google Play Console, see Prepare and roll out a release on support.google.com.
Important
App's submitted to Google Play typically undergo a review process. For more information, see Prepare your app for review and Publish your app on support.google.com.
Distribute your app through Visual Studio
An AAB must have already been submitted to Google Play, and have passed review, before you can distribute it from Visual Studio. If you attempt to distribute an AAB from Visual Studio that hasn't first been uploaded from the Play Console, you'll receive the following error:
Google Play requires you to manually upload your first package (APK/AAB) for this app. You can use an ad-hoc package for this.
When this error occurs, manually upload an AAB via the Google Play Console. Subsequent releases of the app can then be published through Visual Studio. However, you must change the version code of the app for each upload, otherwise the following error will occur:
An AAB with version code (1) has already been uploaded.
To resolve this error, rebuild the app with a different version number and then resubmit it to Google Play via Visual Studio.
Note
The app's version number can be updated by increasing the value of the ApplicationVersion integer property in the app's project file.
Uploading your app from Visual Studio to Google Play first requires you to setup API access in the Google Play Console.
Enable Google API access
The Google Play Developer Publishing API enables Visual Studio to upload new versions of an app to Google Play. Before Visual Studio can start making API calls, you'll need to set up API access in your Google Play Developer account. This involves linking your Google Play Developer account to a Google Cloud project, and configuring access to the Google Play Developer Publishing API with an OAuth client.
To enable Google API access:
Login to your Google Play Developer account.
In Google Play Console, expand the Setup item and select API access. Then in the API access page, select the Choose a project to link button:
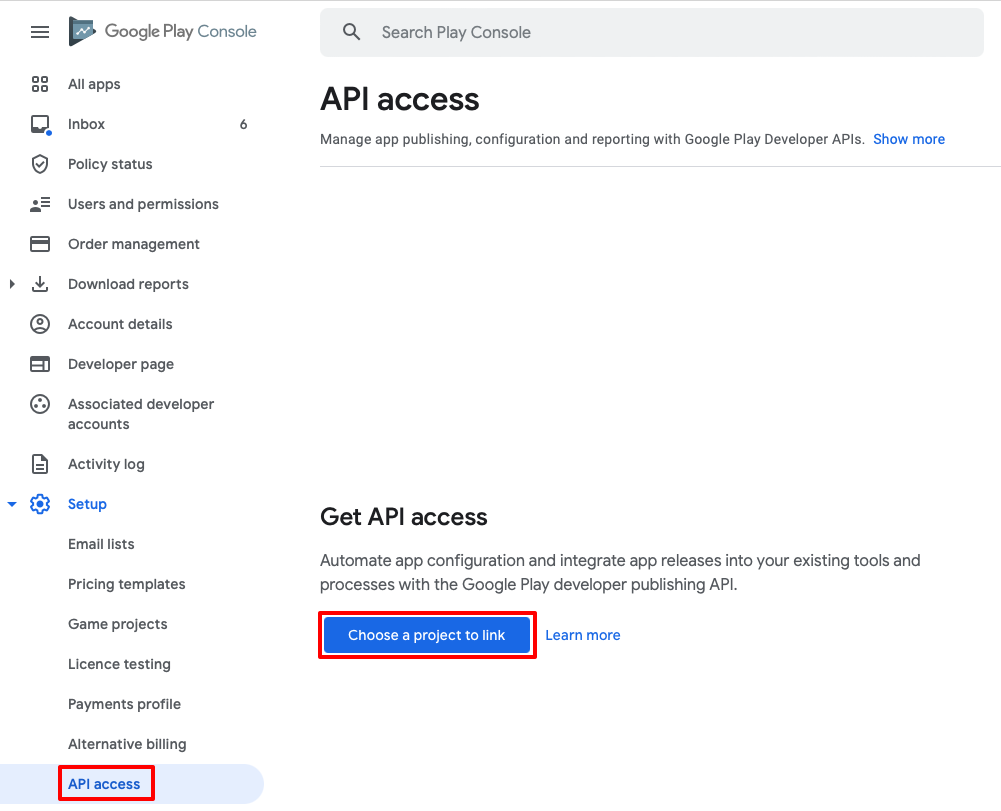
To use Google Play Developer APIs you'll need a Google Cloud project that must be linked to your Google Play Developer account.
Note
A Google Play Developer account can only be linked to a single Google Cloud project. Therefore, if you publish multiple apps from one Google Play Developer account, they all must share the same Google Cloud project.
In the API access page, select the Create a new Google Cloud project radio button followed by the Save button:
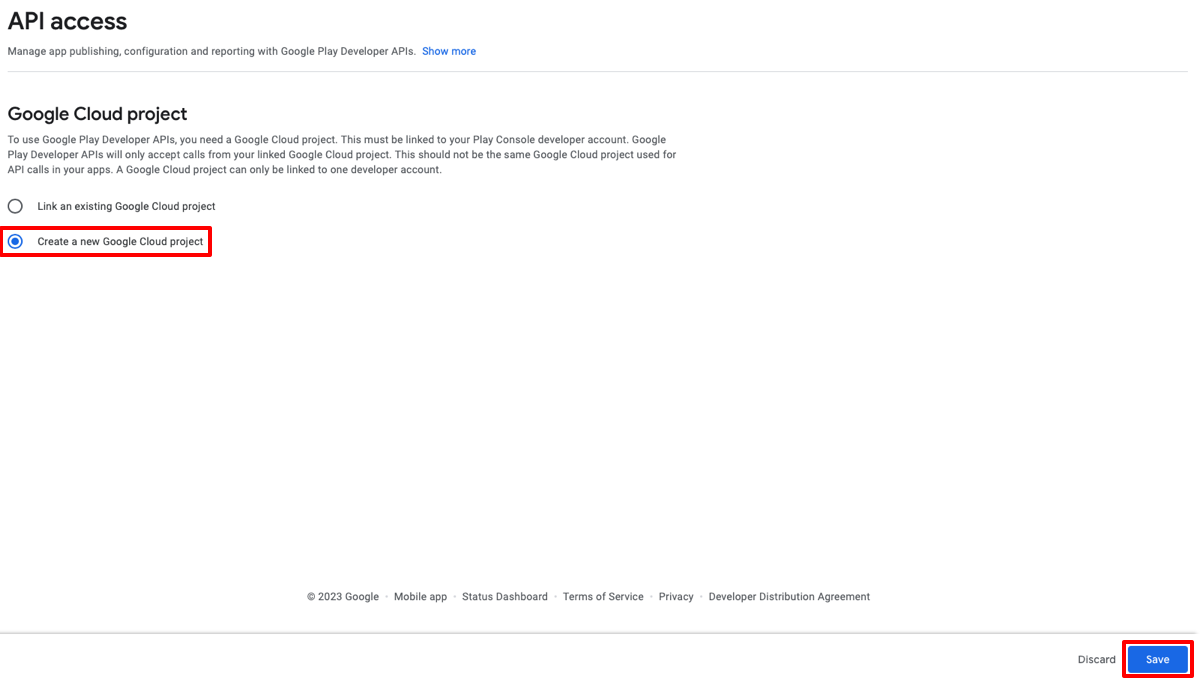
A new Google Cloud project will be created and linked to your Google Play Developer account.
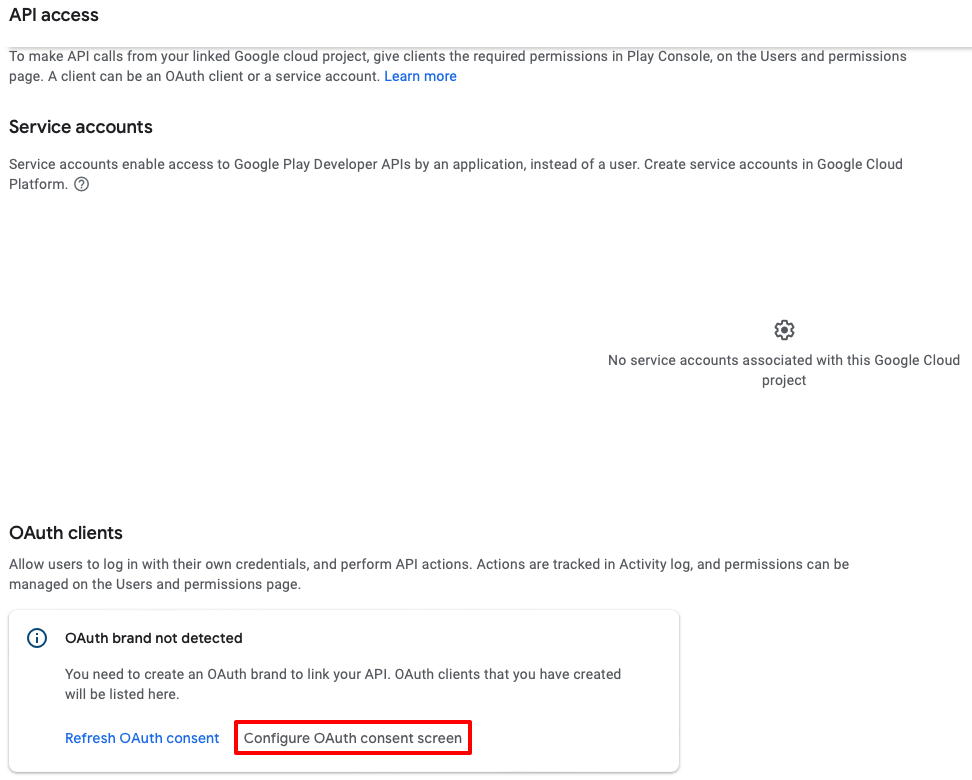
In the API access page, in the OAuth clients section, select Configure OAuth consent screen:
In the OAuth consent screen page, select your required user type radio button and then select the CREATE button:
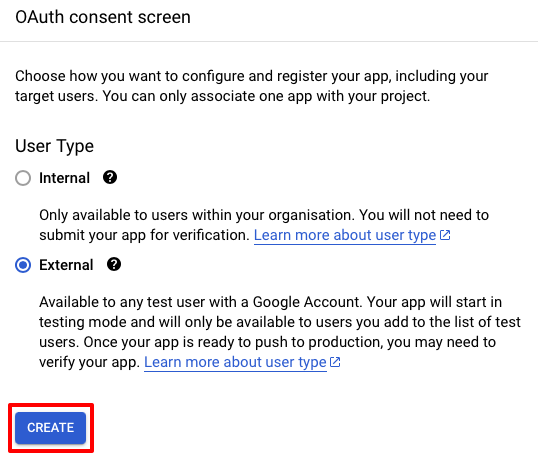
For more information about the user types, see User type on support.google.com.
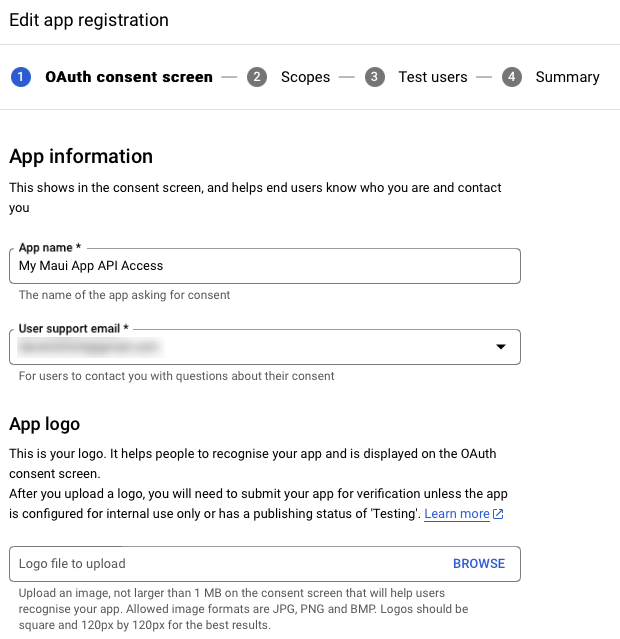
In the Edit app registration page, complete the fields marked as required and then select the SAVE AND CONTINUE button:

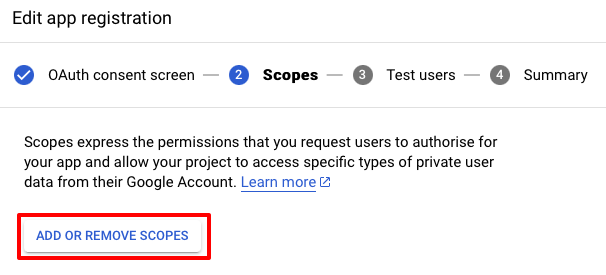
In the Edit app registration page, select the ADD OR REMOVE SCOPES button:
In the Update selected scopes flyout, select the
./auth/androidpublisherscope in the table and then select the UPDATE button: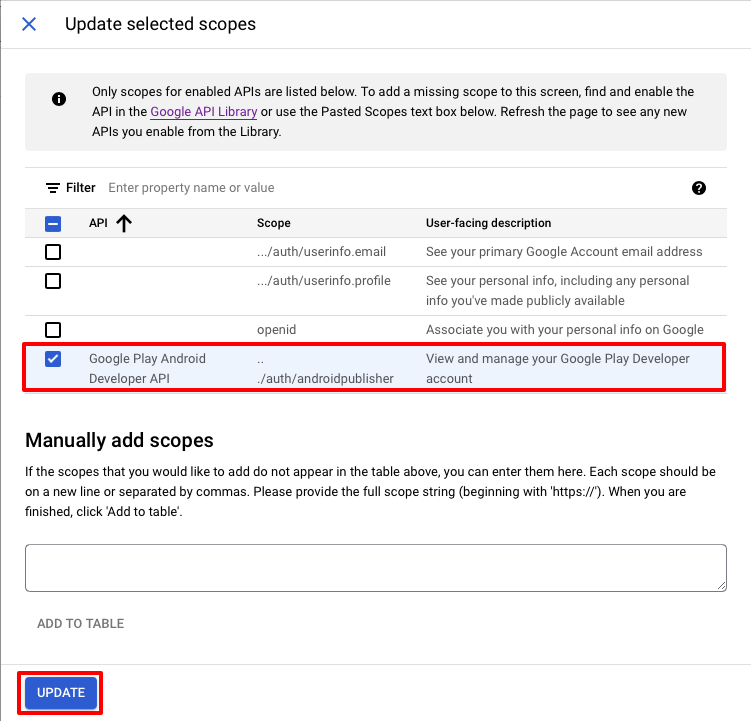
Note
The other scopes in the table can be optionally selected as they are standard scopes.
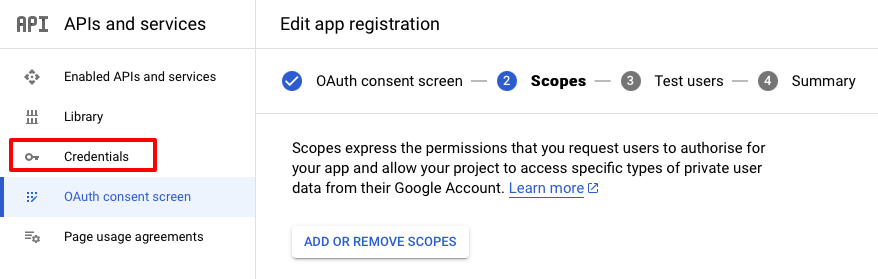
In the Edit app registration page, select the Credentials tab:
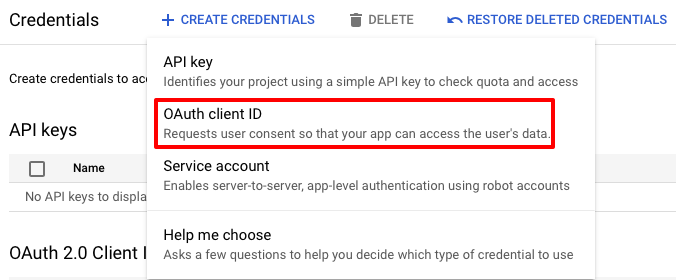
In the Credentials page, select the + CREATE CREDENTIALS button and then the OAuth client ID item:
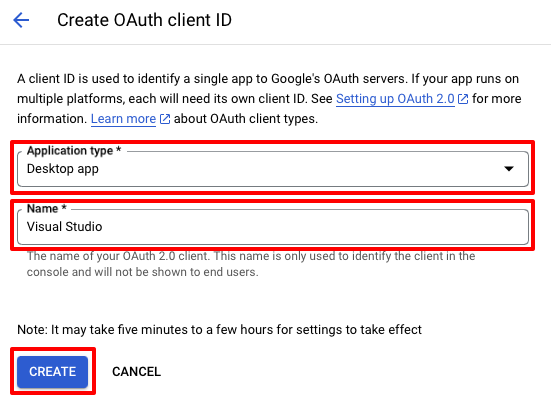
In the Create OAuth client ID page, choose Desktop app in the Application type drop-down, enter Visual Studio in the Name field, and then select the CREATE button:
In the OAuth client created dialog, select the DOWNLOAD JSON data button to download your client ID and client secret. This will be required later. Then click the OK button to dismiss the dialog.
For more information about enabling Google API access to your Google Play Developer account, see Getting Started on developers.google.com. For more information about setting up your OAuth consent screen, see Setting up your OAuth consent screen on support.google.com.
Upload your app through Visual Studio
To build and sign your app in Visual Studio:
In the Visual Studio toolbar, use the Debug Target drop-down to select Android Emulators and then your chosen emulator:
In the Visual Studio toolbar, use the Solutions Configuration drop-down to change from the debug configuration to the release configuration:
In Solution Explorer, right-click on your .NET MAUI app project and select Publish...:
The Archive Manager will open and Visual Studio will begin to archive your app bundle:
In the Archive Manager, once archiving has successfully completed, ensure your archive is selected and then select the Distribute ... button to begin the process of distributing your app:
The Distribute - Select Channel dialog will appear.
In the Distribute - Select Channel dialog, select the Google Play button:

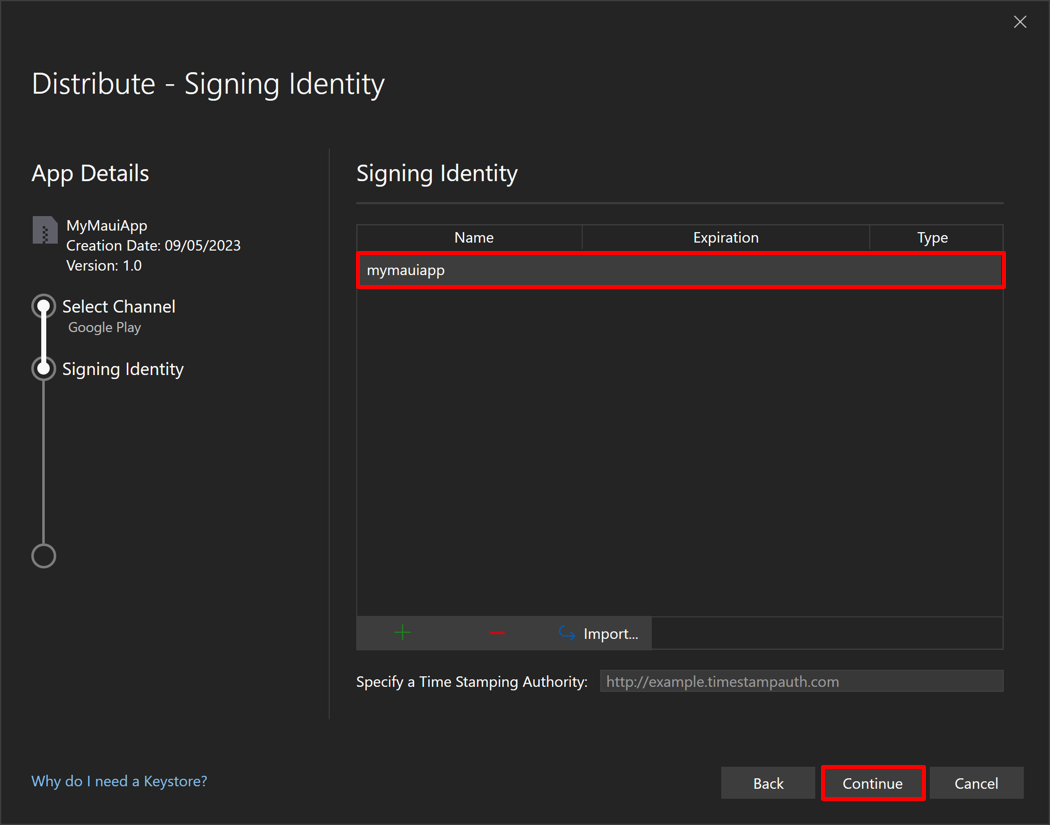
In the Distribute - Signing Identity dialog, select the signing identity you created when building the app for distribution through the Google Play Console, and then select the Continue button:
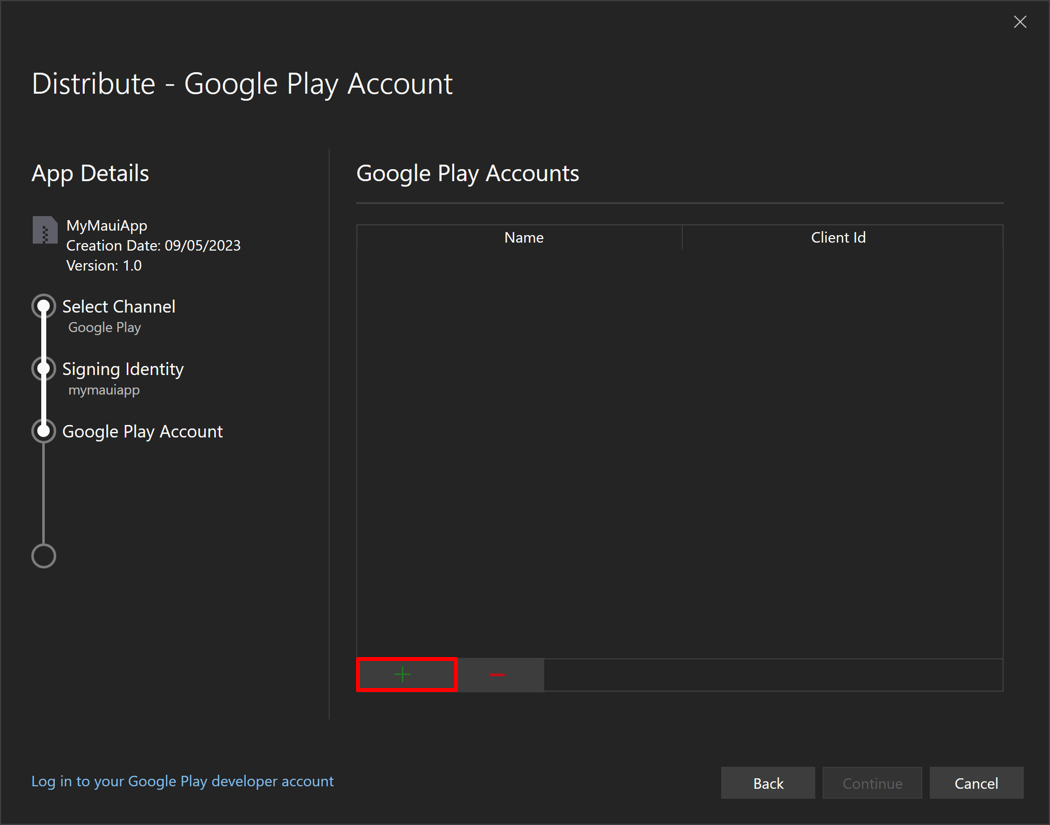
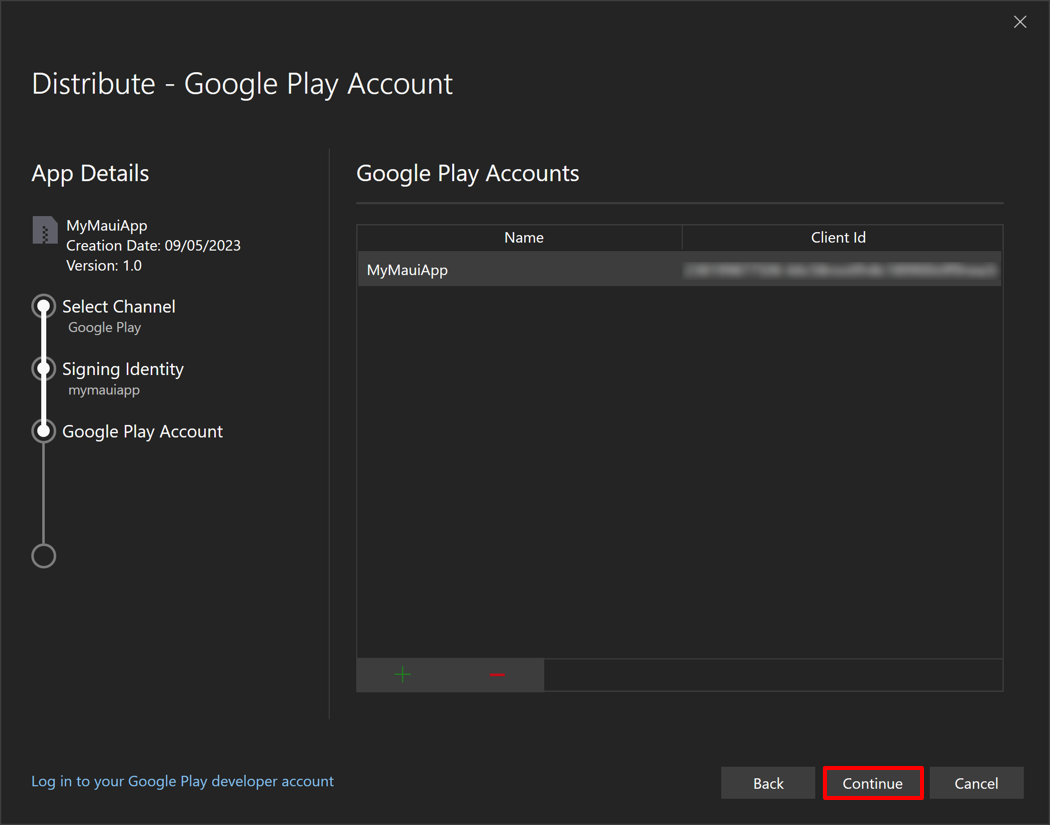
In the Distribute - Google Play Account dialog, select the + button to add your Google Play Developer account details:
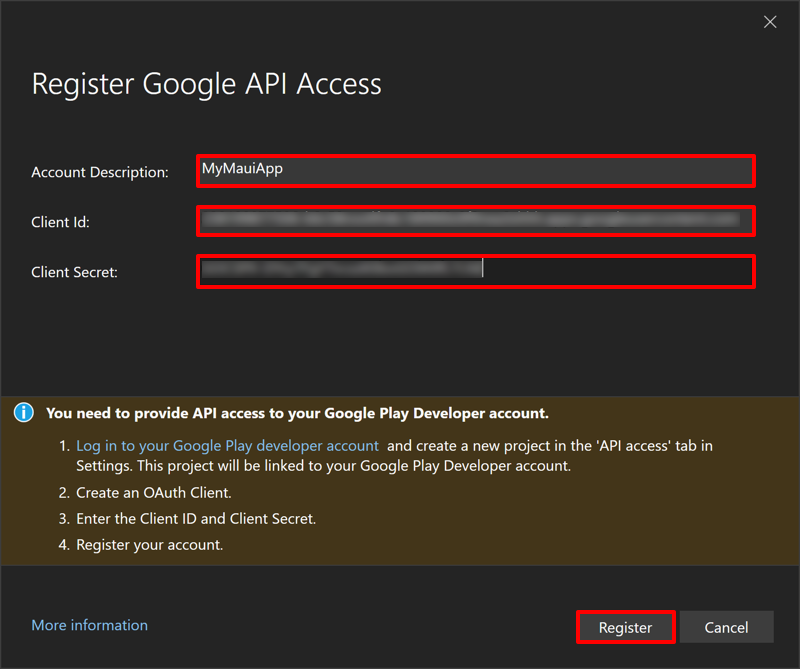
In the Register Google API Access dialog, enter a description and your OAuth client ID and client secret, and then click the Register button:
Note
The account description makes it possible to register more than one Google Play Developer account and upload apps to different Google Play Developer accounts.
A web browser will open.
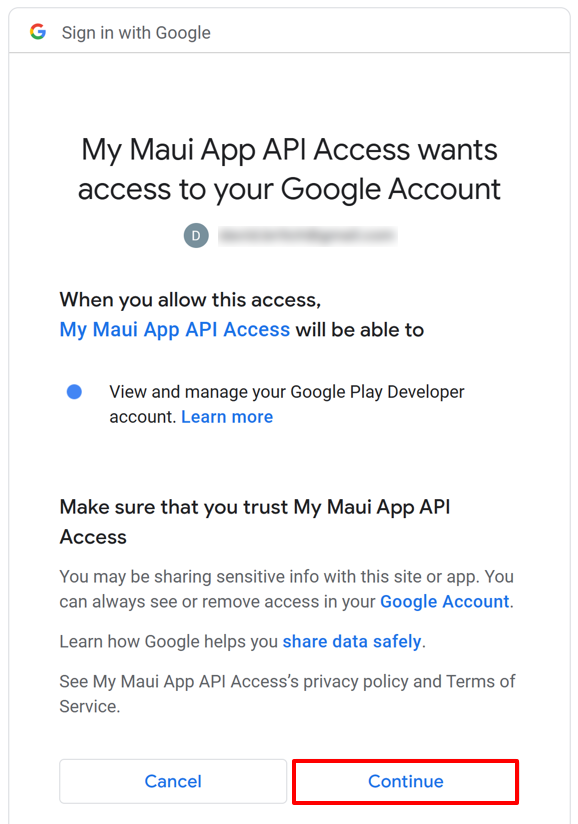
In the web browser, sign into your Google Play Developer account. After you sign in, a message may be displayed telling you that Google hasn't verified the app. If this occurs select the Continue button:

In the web browser, select the Continue button to authorize the app:
The web browser will receive a verification code.
Important
Don't close the web browser.
In Visual Studio, in the Distribute - Google Play Account dialog, select Continue:
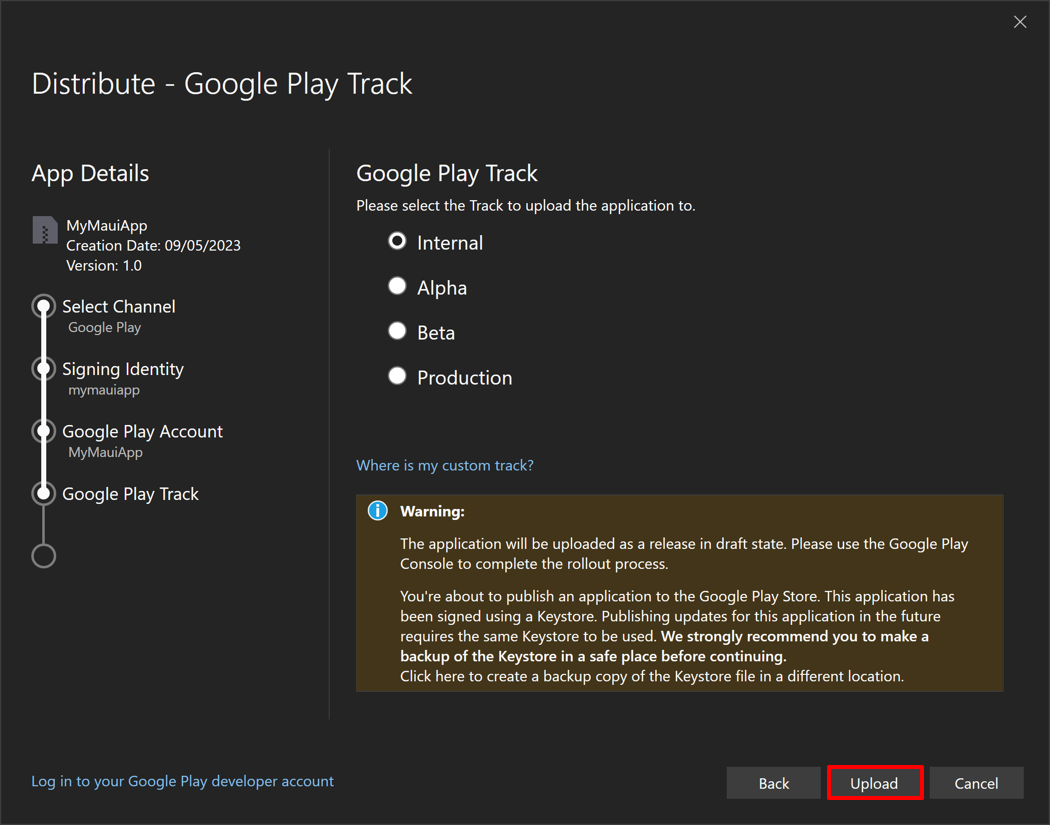
In the Distribute - Google Play Track dialog, select the track to upload your app to. Google Play offers five tracks for uploading your app:
- Internal should be used for quickly distributing your app for internal testing and quality assurance checks.
- Alpha should be used for uploading an early version of your app to a small group of testers.
- Beta should be used for uploading an early version of your app to a larger group of testers.
- Production should be used for full distribution to the Google Play store.
- Custom should be used for testing pre-release versions of your app with specific users by creating a list of testers by email address.
Important
If you don't see the custom track, ensure you've created a release for that track in the Google Play Console. For more information, see Prepare and roll out a release on support.google.com.
Select the track to upload your app to and then select the Upload button:
For more information about Google Play testing, see Set up an open, closed, or internal test on support.google.com.
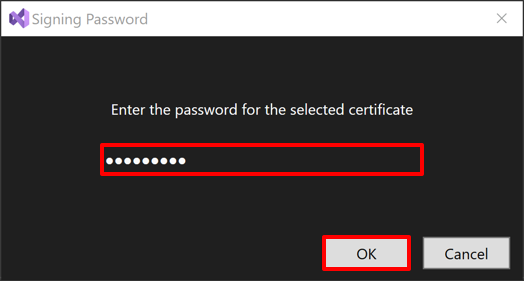
Visual Studio will begin publishing your app to Google Play. In the Signing Password dialog, enter your password you created for the signing identity and select the OK button:
Visual Studio will sign your app bundle and upload it to Google Play.
Important
App's submitted to Google Play typically undergo a review process. For more information, see Prepare your app for review and Publish your app on support.google.com.
Feedback
Coming soon: Throughout 2024 we will be phasing out GitHub Issues as the feedback mechanism for content and replacing it with a new feedback system. For more information see: https://aka.ms/ContentUserFeedback.
Submit and view feedback for