Note
Access to this page requires authorization. You can try signing in or changing directories.
Access to this page requires authorization. You can try changing directories.
To publish your app from the command line on a Mac, open a terminal and navigate to the folder for your .NET Multi-platform App UI (.NET MAUI) app project. Run the dotnet publish command, providing the following parameters:
| Parameter | Value |
|---|---|
-f or --framework |
The target framework, which is net8.0-ios. |
-c or --configuration |
The build configuration, which is Release. |
Warning
Attempting to publish a .NET MAUI solution will result in the dotnet publish command attempting to publish each project in the solution individually, which can cause issues when you've added other project types to your solution. Therefore, the dotnet publish command should be scoped to your .NET MAUI app project.
Additional build parameters can be specified on the command line, if they aren't provided in a <PropertyGroup> in your project file. The following table lists some of the common parameters:
| Parameter | Value |
|---|---|
-p:ApplicationTitle |
The user-visible name for the app. |
-p:ApplicationId |
The unique identifier for the app, such as com.companyname.mymauiapp. |
-p:ApplicationVersion |
The version of the build that identifies an iteration of the app. |
-p:ApplicationDisplayVersion |
The version number of the app. |
-p:RuntimeIdentifier |
The runtime identifier (RID) for the project. Use ios-arm64. |
-p:ArchiveOnBuild |
A boolean value that indicates whether to produce the app archive. Use true to produce the .ipa. |
-p:CodesignKey |
The name of the code signing key. |
-p:CodesignProvision |
The provisioning profile to use when signing the app bundle. |
-p:CodesignEntitlements |
The path to the entitlements file that specifies the entitlements the app requires. |
For a full list of build properties, see Project file properties.
Important
Values for these parameters don't have to be provided on the command line. They can also be provided in the project file. When a parameter is provided on the command line and in the project file, the command line parameter takes precedence. For more information about providing build properties in your project file, see Define build properties in your project file.
For example, use the following command to build and sign an .ipa on a Mac:
dotnet publish -f net8.0-ios -c Release -p:ArchiveOnBuild=true -p:RuntimeIdentifier=ios-arm64 -p:CodesignKey="Apple Distribution: John Smith (AY2GDE9QM7)" -p:CodesignProvision="MyMauiApp"
Note
In .NET 8, the dotnet publish command defaults to the Release configuration. Therefore, the build configuration can be omitted from the command line. In addition, the dotnet publish command also defaults to the ios-arm64 RuntimeIdentifier. Therefore, the RuntimeIdentifier can also be omitted from the command line.
Publishing builds and signs the app, and then copies the .ipa to the bin/Release/net8.0-ios/ios-arm64/publish/ folder. The distribution channel for the app is specified in the distribution certificate contained within the provisioning profile. For information about creating provisioning profiles for the different distribution channels, see Publish an iOS app for App Store distribution, Publish an iOS app for ad-hoc distribution, and Publish an iOS app for in-house distribution.
For more information about the dotnet publish command, see dotnet publish.
Define build properties in your project file
An alternative to specifying build parameters on the command line is to specify them in your project file in a <PropertyGroup>. The following table lists some of the common build properties:
| Property | Value |
|---|---|
<ApplicationTitle> |
The user-visible name for the app. |
<ApplicationId> |
The unique identifier for the app, such as com.companyname.mymauiapp. |
<ApplicationVersion> |
The version of the build that identifies an iteration of the app. |
<ApplicationDisplayVersion> |
The version number of the app. |
<RuntimeIdentifier> |
The runtime identifier (RID) for the project. Use ios-arm64. |
<ArchiveOnBuild> |
A boolean value that indicates whether to produce the app archive. Use true to produce the .ipa. |
<CodesignKey> |
The name of the code signing key. |
<CodesignProvision> |
The provisioning profile to use when signing the app bundle. |
<CodesignEntitlements> |
The path to the entitlements file that specifies the entitlements the app requires. |
For a full list of build properties, see Project file properties.
Important
Values for these build properties don't have to be provided in the project file. They can also be provided on the command line when you publish the app. This enables you to omit specific values from your project file.
The following example shows a typical property group for building and signing your iOS app with its provisioning profile:
<PropertyGroup Condition="$(TargetFramework.Contains('-ios')) and '$(Configuration)' == 'Release'">
  <CodesignKey>Apple Distribution: John Smith (AY2GDE9QM7)</CodesignKey>
  <CodesignProvision>MyMauiApp</CodesignProvision>
  <ArchiveOnBuild>true</ArchiveOnBuild>
</PropertyGroup>
This example <PropertyGroup> adds a condition check, preventing the settings from being processed unless the condition check passes. The condition check looks for two items:
- The target framework is set to something containing the text
-ios. - The build configuration is set to
Release.
If either of these conditions fail, the settings aren't processed. More importantly, the <CodesignKey> and <CodesignProvision> settings aren't set, preventing the app from being signed.
Publish an iOS app from Windows
Building native iOS apps using .NET MAUI requires access to Apple's build tools, which only run on a Mac. Because of this, Visual Studio 2022 must connect to a network-accessible Mac to build .NET MAUI iOS apps. For more information, see Pair to Mac for iOS development.
Note
The first time Pair to Mac logs into a Mac build host from Visual Studio 2022, it sets up SSH keys. With these keys, future logins will not require a username or password.
To publish your app from the command line on Windows, open a terminal and navigate to the folder for your .NET MAUI app project. Run the dotnet publish command, providing the same command line parameters, or build properties in your project file, that you'd provide when publishing from a Mac. In addition, you must provide the following command line parameters:
| Parameter | Value |
|---|---|
-p:ServerAddress |
The IP address of your Mac build host. |
-p:ServerUser |
The username to use when logging into your Mac build host. Use your system username rather than your full name. |
-p:ServerPassword |
The password for the username used to log into your Mac build host. |
-p:TcpPort |
The TCP port to use to communicate with your Mac build host, which is 58181. |
-p:_DotNetRootRemoteDirectory |
The folder on your Mac build host that contains the .NET SDK. Use /Users/{macOS username}/Library/Caches/Xamarin/XMA/SDKs/dotnet/. |
Important
Values for these parameters can also be provided in the project file as build properties. However, values for <ServerAddress>, <ServerUser>, <ServerPassword>, and <_DotNetRootRemoteDirectory> will typically be provided on the command line for security reasons.
For example, use the following command to build and sign an .ipa from Windows:
dotnet publish -f net8.0-ios -c Release -p:ArchiveOnBuild=true -p:RuntimeIdentifier=ios-arm64 -p:CodesignKey="Apple Distribution: John Smith (AY2GDE9QM7)" -p:CodesignProvision="MyMauiApp" -p:ServerAddress={macOS build host IP address} -p:ServerUser={macOS username} -p:ServerPassword={macOS password} -p:TcpPort=58181 -p:_DotNetRootRemoteDirectory=/Users/{macOS username}/Library/Caches/Xamarin/XMA/SDKs/dotnet/
Note
In .NET 8, the dotnet publish command defaults to the Release configuration. Therefore, the build configuration can be omitted from the command line. In addition, the dotnet publish command also defaults to the ios-arm64 RuntimeIdentifier. Therefore, the RuntimeIdentifier can also be omitted from the command line.
Note
If the ServerPassword parameter is omitted from a command line build invocation, Pair to Mac attempts to log in to the Mac build host using its saved SSH keys.
Publishing builds and signs the app, and then copies the .ipa to the bin\Release\net8.0-ios\ios-arm64\publish folder on your Windows machine. The distribution channel for the app is specified in the distribution certificate contained within the provisioning profile. For information about creating distribution provisioning profiles for the different distribution channels, see Publish an iOS app for App Store distribution, Publish an iOS app for ad-hoc distribution, and Publish an iOS app for in-house distribution
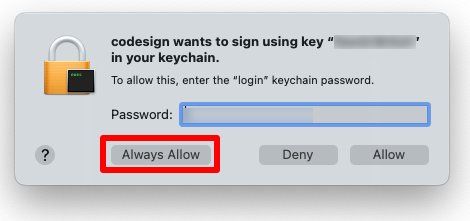
During the publishing process it maybe necessary to allow codesign to run on your paired Mac:
Troubleshoot a remote build
If a RuntimeIdentifier isn't specified when building remotely from the command line on Windows, the architecture of the Windows machine will be used. This occurs because the RuntimeIdentifier has to be set early in the build process, before the build can connect to the Mac to derive its architecture.
If a RuntimeIdentifier isn't specified when building remotely using Visual Studio on Windows, the IDE will detect the architecture of the remote Mac and set it accordingly. Overriding the default can be achieved by setting the $(ForceSimulatorX64ArchitectureInIDE) build property:
<PropertyGroup Condition="'$(Configuration)' == 'Release' And '$(TargetFramework)' == 'net8.0-ios'">
    <ForceSimulatorX64ArchitectureInIDE>true</ForceSimulatorX64ArchitectureInIDE>
</PropertyGroup>
Distribute the app
The .ipa file can be distributed with one of the following approaches:
- Ad-hoc apps can be distributed using Apple Configurator. For more information, see Apple Configurator user guide on support.apple.com. |
- App Store apps can be uploaded to the App Store through an app such as Transporter. This will require you to have created a record for the app in App Store Connect, and to create an app-specific password. For more information, see Create an app record on developer.apple.com, and Sign in to apps with your Apple ID using app-specific passwords on support.apple.com.
- In-house apps can be distributed via a secure website, or via Mobile Device Management (MDM). Both of these approaches require the app to be prepared for distribution, which includes the preparation of a manifest. For more information, see Distribute proprietary in-house apps to Apple devices on support.apple.com.
Collaborate with us on GitHub
The source for this content can be found on GitHub, where you can also create and review issues and pull requests. For more information, see our contributor guide.