Note
Access to this page requires authorization. You can try signing in or changing directories.
Access to this page requires authorization. You can try changing directories.
Automatic provisioning is the recommended approach for deploying a .NET Multi-platform App UI (.NET MAUI) iOS app to a device. With this approach, Visual Studio automatically creates and manages signing identifies, App IDs, and provisioning profiles. Before starting the automatic provisioning process, you should ensure that you've added your Apple Developer Account to Visual Studio. For more information, see Apple account management.
Once you've added your Apple Developer Account to Visual Studio, you can use any associated team. Certificates, App IDs, and profiles can then be created against the team. The team ID is also used to create a prefix for the App ID that will be included in the provisioning profile, which enables Apple to verify that an app can be deployed to a device.
Important
Before you begin, ensure that you've accepted any user license agreements in your Apple Developer Account and App Store Connect.
Enable automatic provisioning
Once you've added your Apple Developer Account to Visual Studio, you need to enable automatic provisioning for the .NET MAUI app project:
In Solution Explorer, right-click on your .NET MAUI app project and select Properties. Then, navigate to the iOS > Bundle Signing tab and ensure that Automatic Provisioning is selected in the Scheme drop-down:

In the Bundle Signing settings, click the Configure Automatic Provisioning hyperlink.
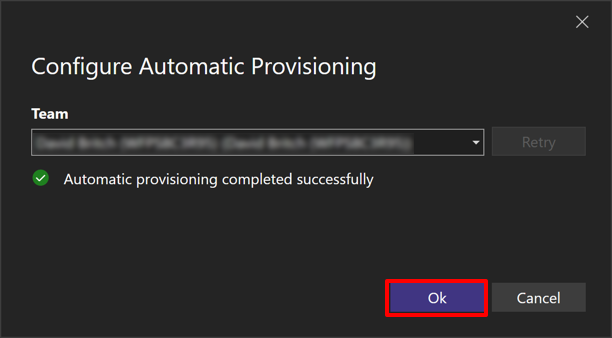
In the Configure Automatic Provisioning dialog, select your team. Visual Studio will attempt to automatically provision your project and will indicate if the process completed successfully:
If the automatic provisioning fails the Configure Automatic Provisioning dialog will display the reason for the error.
In the Configure Automatic Provisioning dialog, click the Ok button to dismiss the dialog.
Deploy to device
After configuring provisioning in your .NET MAUI app project, the app can be deployed to a device with Visual Studio:
In Visual Studio, ensure that the IDE is paired to a Mac Build host. For more information, see Pair to Mac for iOS development.
Ensure that your iOS device is connected to your Mac build host via USB or WiFi. For more information about wireless deployment, see Wireless deployment for .NET MAUI iOS apps.
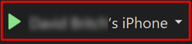
In the Visual Studio toolbar, use the Debug Target drop-down to select iOS Remote Devices and then the device that's connected to your Mac build host:

In the Visual Studio toolbar, press the green Start button to launch the app on your remote device:
Note
An alternative approach to deploying a .NET MAUI iOS app to a device is to use hot restart. Hot restart enables you to deploy a .NET MAUI app to a 64-bit local iOS device, from Visual Studio, without requiring a Mac build host. For more information, see Deploy an iOS app using hot restart.
Run automatic provisioning
When automatic provisioning is enabled, Visual Studio will re-run the automatic provisioning process if necessary when any of the following occur:
- An iOS device is plugged into your Mac. This automatically checks to see if the device is registered in your Apple Developer Account. If it isn't, it will add it and generate a new provisioning profile that contains it.
- The Bundle ID of your app is changed. This updates the App ID and so a new provisioning profile containing this App ID is created.
- A supported capability is enabled in the Entitlements.plist file. This capability will be added to the App ID and a new provisioning profile with the updated App ID is generated. Not all capabilities are currently supported. For more information about capabilities, see Capabilities.
Wildcard App IDs
By default automatic provisioning will attempt to create and use a wildcard App ID and provisioning profile instead of an explicit App ID based on the app's bundle identifier. Wildcard App IDs reduce the number of profiles and IDs to maintain in your Apple Developer Account. For more information about wildcard App IDs, see Create a development provisioning profile.
In some cases, an app's entitlements require an explicit App ID. The following entitlements do not support wildcard App IDs:
- App Groups
- Associated Domains
- Apple Pay
- Game Center
- HealthKit
- HomeKit
- Hotspot
- In-App purchase
- Multipath
- NFC
- Personal VPN
- Push Notifications
- Wireless Accessory Configuration
If your app uses one of these entitlements, Visual Studio will attempt to create an explicit App ID.
Troubleshoot
It may take several hours for a new Apple Developer Account to be approved. You won't be able to enable automatic provisioning until the account has been approved.
If the automatic provisioning process fails with the error message Authentication Service Is Unavailable, sign in to either App Store Connect or your Apple Developer account to check that you have accepted the latest service agreements.
Certificate can't be found in local keychain
If you use multiple machines for development, you may receive the following error message when attempting to configure automatic provisioning on a machine: "There was an error while trying to automatically provision the project: 'Certificate: Apple Development: Create via API (Key ID)' already exists but cannot be found in the local Keychain. It may have been created on another development machine. Import the certificate and private key from that machine or revoke it and try again to automatically create a new one.'":
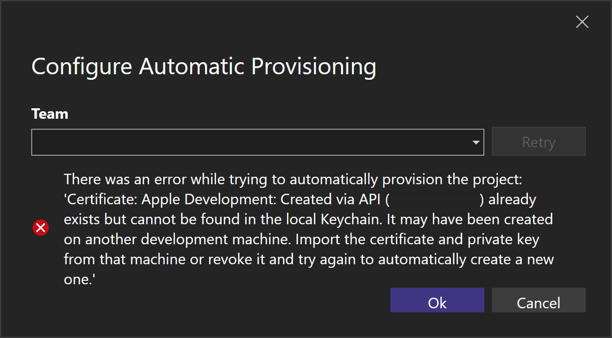
This can occur because automatic provisioning doesn't remove the need to manually copy certificates between machines, when you're using multiple machines for development. This is because the private key that creates a certificate only exists on the machine that created the certificate.
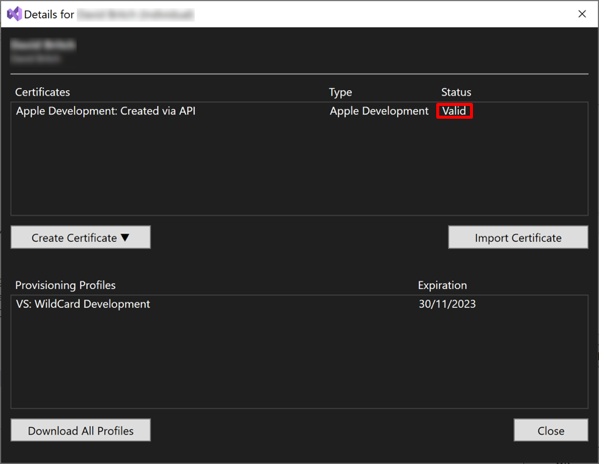
To discover if a required certificate is missing from your development machine, in Visual Studio go to Tools > Options > Xamarin > Apple Accounts. Then, in the Apple Developer Accounts dialog, select a team and click the View Details... button:
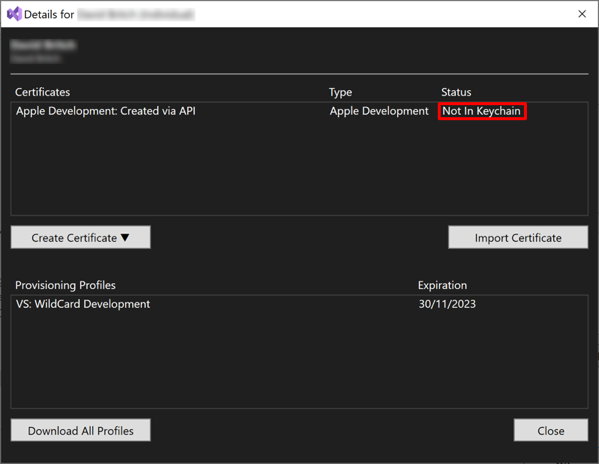
If the required certificate isn't installed on the machine, the Details window will show a "Not in Keychain" status for the certificate. In this scenario, the specific certificate must be exported from the machine that created it, in .p12 format, and then imported into Visual Studio with the Import Certificate button.
Note
- To copy a certificate from a Mac to another Mac, export the certificate from Keychain Access on the Mac that created the certificate and then import it into Keychain Access on the other Mac.
- To copy a certificate from a Mac to a Windows machine, export the certificate from Keychain Access on the Mac and then on the Windows machine import it into Visual Studio with the Import Certificate button.
- It's not possible to copy a certificate that was created by Visual Studio on a Windows machine, to another machine, because it's password protected.
After the certificate has been imported, Visual Studio will show its status as "Valid":
It should then be possible for Visual Studio to automatically provision your project.
Collaborate with us on GitHub
The source for this content can be found on GitHub, where you can also create and review issues and pull requests. For more information, see our contributor guide.