Publish a packaged .NET MAUI app for Windows with the CLI
When distributing your .NET Multi-platform App UI (.NET MAUI) app for Windows, you can publish the app and its dependencies to a folder for deployment to another system. You can also package the app into an MSIX package, which has numerous benefits for the users installing your app. For more information about the benefits of MSIX, see What is MSIX?
Create a signing certificate
You must use a signing certificate for use in publishing your app. This certificate is used to sign the MSIX package. The following steps demonstrate how to create and install a self-signed certificate with PowerShell:
Note
When you create and use a self-signed certificate only users who install and trust your certificate can run your app. This is easy to implement for testing but it may prevent additional users from installing your app. When you are ready to publish your app we recommend that you use a certificate issued by a trusted source. This system of centralized trust helps to ensure that the app ecosystem has levels of verification to protect users from malicious actors.
Open a PowerShell terminal and navigate to the directory with your project.
Use the
New-SelfSignedCertificatecommand to generate a self-signed certificate.The
<PublisherName>value is displayed to the user when they install your app, supply your own value and omit the< >characters. You can set theFriendlyNameparameter to any string of text you want.New-SelfSignedCertificate -Type Custom ` -Subject "CN=<PublisherName>" ` -KeyUsage DigitalSignature ` -FriendlyName "My temp dev cert" ` -CertStoreLocation "Cert:\CurrentUser\My" ` -TextExtension @("2.5.29.37={text}1.3.6.1.5.5.7.3.3", "2.5.29.19={text}")Use the following PowerShell command to query the certificate store for the certificate that was created:
Get-ChildItem "Cert:\CurrentUser\My" | Format-Table Thumbprint, Subject, FriendlyNameYou should see results similar to the following output:
Thumbprint                               Subject                                  FriendlyName
----------                               -------                                  ------------
DE8B962E7BF797CB48CCF66C8BCACE65C6585E2F CN=1f23fa36-2a2f-475e-a69e-3a14fe56ed4
A6CA34FD0BA6B439787391F51C87B1AD0C9E7FAE CN=someone@microsoft.com
94D93DBC97D4F7E4364A215F15C6ACFEFC71E569 CN=localhost                             ASP.NET Core HTTPS development certificate
F14211566DACE867DA0BF9C2F9C47C01E3CF1D9B CN=john
568027317BE8EE5E6AACDE5079D2DE76EC46EB88 CN=e1f823e2-4674-03d2-aaad-21ab23ad84ae
DC602EE83C95FEDF280835980E22306067EFCA96 CN=John Smith, OU=MSE, OU=Users, DC=com
07AD38F3B646F5AAC16F2F2570CAE40F4842BBE0 CN=Contoso                               My temp dev cert
The Thumbprint of your certificate will be used later, so copy it to your clipboard. It's the Thumbprint value whose entry matches the Subject and FriendlyName of your certificate.
For more information, see Create a certificate for package signing.
Configure the project build settings
The project file is a good place to put Windows-specific build settings. You may not want to put some settings into the project file, such as passwords. The settings described in this section can be passed on the command line with the -p:name=value format. If the setting is already defined in the project file, a setting passed on the command line overrides the project setting.
Add the following <PropertyGroup> node to your project file. This property group is only processed when the target framework is Windows and the configuration is set to Release. This config section runs whenever a build or publish in Release mode.
<PropertyGroup Condition="$([MSBuild]::GetTargetPlatformIdentifier('$(TargetFramework)')) == 'windows' and '$(Configuration)' == 'Release'">
    <AppxPackageSigningEnabled>true</AppxPackageSigningEnabled>
    <PackageCertificateThumbprint>A10612AF095FD8F8255F4C6691D88F79EF2B135E</PackageCertificateThumbprint>
</PropertyGroup>
<PropertyGroup Condition="$([MSBuild]::GetTargetPlatformIdentifier('$(TargetFramework)')) == 'windows' and '$(RuntimeIdentifierOverride)' != ''">
    <RuntimeIdentifier>$(RuntimeIdentifierOverride)</RuntimeIdentifier>
</PropertyGroup>
Replace the <PackageCertificateThumbprint> property value with the certificate thumbprint you previously generated. Alternatively, you can remove this setting from the project file and provide it on the command line. For example: -p:PackageCertificateThumbprint=A10612AF095FD8F8255F4C6691D88F79EF2B135E.
The second <PropertyGroup> in the example is required to work around a bug in the Windows SDK. For more information about the bug, see WindowsAppSDK Issue #3337.
Publish
To publish your app, open the Developer Command Prompt for VS 2022 terminal and navigate to the folder for your .NET MAUI app project. Run the dotnet publish command, providing the following parameters:
| Parameter | Value |
|---|---|
-f |
The target framework, which is net8.0-windows{version}. This value is a Windows TFM, such as net8.0-windows10.0.19041.0. Ensure that this value is identical to the value in the <TargetFrameworks> node in your .csproj file. |
-c |
The build configuration, which is Release. |
-p:RuntimeIdentifierOverride=win10-x64- or - -p:RuntimeIdentifierOverride=win10-x86 |
Avoids the bug detailed in WindowsAppSDK Issue #3337. Choose the -x64 or -x86 version of the parameter based on your target platform. |
Warning
Attempting to publish a .NET MAUI solution will result in the dotnet publish command attempting to publish each project in the solution individually, which can cause issues when you've added other project types to your solution. Therefore, the dotnet publish command should be scoped to your .NET MAUI app project.
For example:
dotnet publish -f net8.0-windows10.0.19041.0 -c Release -p:RuntimeIdentifierOverride=win10-x64
Note
In .NET 8, the dotnet publish command defaults to the Release configuration. Therefore, the build configuration can be omitted from the command line.
Publishing builds and packages the app, copying the signed package to the bin\Release\net8.0-windows10.0.19041.0\win10-x64\AppPackages\<appname>\ folder. <appname> is a folder named after both your project and version. In this folder, there's an msix file, and that's the app package.
For more information about the dotnet publish command, see dotnet publish.
Installing the app
To install the app, it must be signed with a certificate that you already trust. If it isn't, Windows won't let you install the app. You'll be presented with a dialog similar to the following, with the Install button disabled:
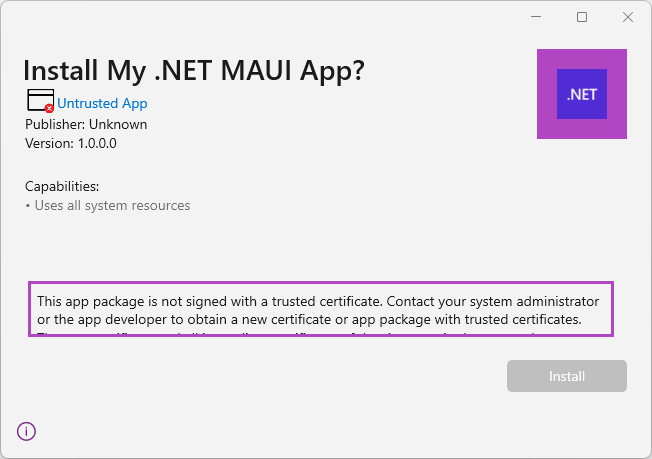
Notice that in the previous image, the Publisher was "unknown."
To trust the certificate of app package, perform the following steps:
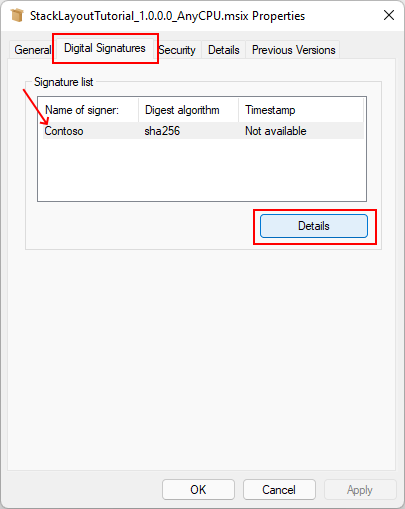
Right-click on the .msix file and choose Properties.
Select the Digital Signatures tab.
Choose the certificate then press Details.
Select View Certificate.
Select Install Certificate....
Choose Local Machine then select Next.
If you're prompted by User Account Control to Do you want to allow this app to make changes to your device?, select Yes.
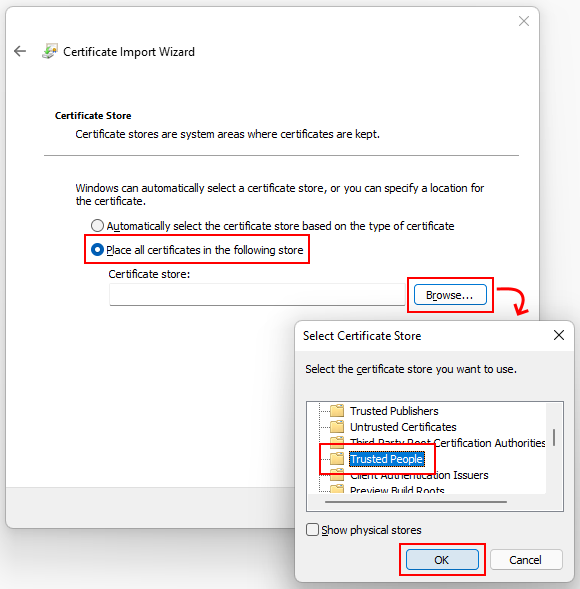
In the Certificate Import Wizard window, select Place all certificates in the following store.
Select Browse... and then choose the Trusted People store. Select OK to close the dialog.
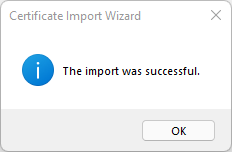
Select Next and then Finish. You should see a dialog that says: The import was successful.
Select OK on any window opened as part of this process, to close them all.
Now, try opening the package file again to install the app. You should see a dialog similar to the following, with the Publisher correctly displayed:
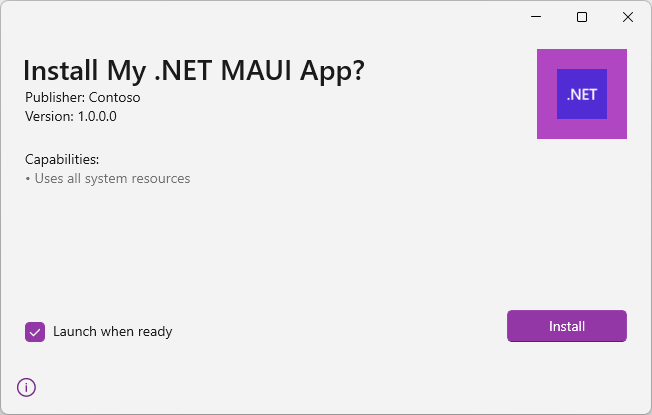
Select the Install button if you would like to install the app.
Current limitations
The following list describes the current limitations with publishing and packaging:
- The published app doesn't work if you try to run it directly with the executable file out of the publish folder.
- The way to run the app is to first install it through the packaged MSIX file.
Feedback
Coming soon: Throughout 2024 we will be phasing out GitHub Issues as the feedback mechanism for content and replacing it with a new feedback system. For more information see: https://aka.ms/ContentUserFeedback.
Submit and view feedback for