Data binding and MVVM
 Browse the sample
The Model-View-ViewModel (MVVM) pattern enforces a separation between three software layers — the XAML user interface, called the view, the underlying data, called the model, and an intermediary between the view and the model, called the viewmodel. The view and the viewmodel are often connected through data bindings defined in XAML. The BindingContext for the view is usually an instance of the viewmodel.
Important
.NET Multi-platform App UI (.NET MAUI) marshals binding updates to the UI thread. When using MVVM this enables you to update data-bound viewmodel properties from any thread, with .NET MAUI's binding engine bringing the updates to the UI thread.
There are multiple approaches to implementing the MVVM pattern, and this article focuses on a simple approach. It uses views and viewmodels, but not models, to focus on the data binding between the two layers. For a detailed explanation of using the MVVM pattern in .NET MAUI, see Model-View-ViewModel (MVVM) in Enterprise Application Patterns using .NET MAUI. For a tutorial that helps you to implement the MVVM pattern, see Upgrade your app with MVVM concepts.
Simple MVVM
In XAML markup extensions you saw how to define a new XML namespace declaration to allow a XAML file to reference classes in other assemblies. The following example uses the x:Static markup extension to obtain the current date and time from the static DateTime.Now property in the System namespace:
<ContentPage xmlns="http://schemas.microsoft.com/dotnet/2021/maui"
             xmlns:x="http://schemas.microsoft.com/winfx/2009/xaml"
             xmlns:sys="clr-namespace:System;assembly=netstandard"
             x:Class="XamlSamples.OneShotDateTimePage"
             Title="One-Shot DateTime Page">

    <VerticalStackLayout BindingContext="{x:Static sys:DateTime.Now}"
                         Spacing="25" Padding="30,0"
                         VerticalOptions="Center" HorizontalOptions="Center">

        <Label Text="{Binding Year, StringFormat='The year is {0}'}" />
        <Label Text="{Binding StringFormat='The month is {0:MMMM}'}" />
        <Label Text="{Binding Day, StringFormat='The day is {0}'}" />
        <Label Text="{Binding StringFormat='The time is {0:T}'}" />

    </VerticalStackLayout>

</ContentPage>
In this example, the retrieved DateTime value is set as the BindingContext on a StackLayout. When you set the BindingContext on an element, it is inherited by all the children of that element. This means that all the children of the StackLayout have the same BindingContext, and they can contain bindings to properties of that object:
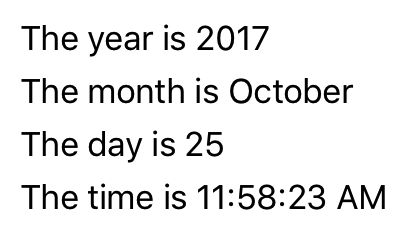
However, the problem is that the date and time are set once when the page is constructed and initialized, and never change.
A XAML page can display a clock that always shows the current time, but it requires additional code. The MVVM pattern is a natural choice for .NET MAUI apps when data binding from properties between visual objects and the underlying data. When thinking in terms of MVVM, the model and viewmodel are classes written entirely in code. The view is often a XAML file that references properties defined in the viewmodel through data bindings. In MVVM, a model is ignorant of the viewmodel, and a viewmodel is ignorant of the view. However, often you tailor the types exposed by the viewmodel to the types associated with the UI.
Note
In simple examples of MVVM, such as those shown here, often there is no model at all, and the pattern involves just a view and viewmodel linked with data bindings.
The following example shows a viewmodel for a clock, with a single property named DateTime that's updated every second:
using System.ComponentModel;
using System.Runtime.CompilerServices;

namespace XamlSamples;

class ClockViewModel: INotifyPropertyChanged
{
    public event PropertyChangedEventHandler PropertyChanged;

    private DateTime _dateTime;
    private Timer _timer;

    public DateTime DateTime
    {
        get => _dateTime;
        set
        {
            if (_dateTime != value)
            {
                _dateTime = value;
                OnPropertyChanged(); // reports this property
            }
        }
    }

    public ClockViewModel()
    {
        this.DateTime = DateTime.Now;

        // Update the DateTime property every second.
        _timer = new Timer(new TimerCallback((s) => this.DateTime = DateTime.Now),
                           null, TimeSpan.Zero, TimeSpan.FromSeconds(1));
    }

    ~ClockViewModel() =>
        _timer.Dispose();

    public void OnPropertyChanged([CallerMemberName] string name = "") =>
        PropertyChanged?.Invoke(this, new PropertyChangedEventArgs(name));
}
Viewmodels typically implement the INotifyPropertyChanged interface, which provides the ability for a class to raise the PropertyChanged event whenever one of its properties changes. The data binding mechanism in .NET MAUI attaches a handler to this PropertyChanged event so it can be notified when a property changes and keep the target updated with the new value. In the previous code example, the OnPropertyChanged method handles raising the event while automatically determining the property source name: DateTime.
The following example shows XAML that consumes ClockViewModel:
<ContentPage xmlns="http://schemas.microsoft.com/dotnet/2021/maui"
xmlns:x="http://schemas.microsoft.com/winfx/2009/xaml"
xmlns:local="clr-namespace:XamlSamples"
x:Class="XamlSamples.ClockPage"
Title="Clock Page">
<ContentPage.BindingContext>
<local:ClockViewModel />
</ContentPage.BindingContext>
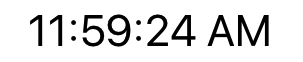
<Label Text="{Binding DateTime, StringFormat='{0:T}'}"
FontSize="18"
HorizontalOptions="Center"
VerticalOptions="Center" />
</ContentPage>
In this example, ClockViewModel is set to the BindingContext of the ContentPage using property element tags. Alternatively, the code-behind file could instantiate the viewmodel.
The Binding markup extension on the Text property of the Label formats the DateTime property. The following screenshot shows the result:
In addition, it’s possible to access individual properties of the DateTime property of the viewmodel by separating the properties with periods:
<Label Text="{Binding DateTime.Second, StringFormat='{0}'}" … >
Interactive MVVM
MVVM is often used with two-way data bindings for an interactive view based on an underlying data model.
The following example shows the HslViewModel that converts a Color value into Hue, Saturation, and Luminosity values, and back again:
using System.ComponentModel;
using System.Runtime.CompilerServices;

namespace XamlSamples;

class HslViewModel: INotifyPropertyChanged
{
    public event PropertyChangedEventHandler PropertyChanged;

    private float _hue, _saturation, _luminosity;
    private Color _color;

    public float Hue
    {
        get => _hue;
        set
        {
            if (_hue != value)
                Color = Color.FromHsla(value, _saturation, _luminosity);
        }
    }

    public float Saturation
    {
        get => _saturation;
        set
        {
            if (_saturation != value)
                Color = Color.FromHsla(_hue, value, _luminosity);
        }
    }

    public float Luminosity
    {
        get => _luminosity;
        set
        {
            if (_luminosity != value)
                Color = Color.FromHsla(_hue, _saturation, value);
        }
    }

    public Color Color
    {
        get => _color;
        set
        {
            if (_color != value)
            {
                _color = value;
                _hue = _color.GetHue();
                _saturation = _color.GetSaturation();
                _luminosity = _color.GetLuminosity();

                OnPropertyChanged("Hue");
                OnPropertyChanged("Saturation");
                OnPropertyChanged("Luminosity");
                OnPropertyChanged(); // reports this property
            }
        }
    }

    public void OnPropertyChanged([CallerMemberName] string name = "") =>
        PropertyChanged?.Invoke(this, new PropertyChangedEventArgs(name));
}
In this example, changes to the Hue, Saturation, and Luminosity properties cause the Color property to change, and changes to the Color property causes the other three properties to change. This might seem like an infinite loop, except that the viewmodel doesn't invoke the PropertyChanged event unless the property has changed.
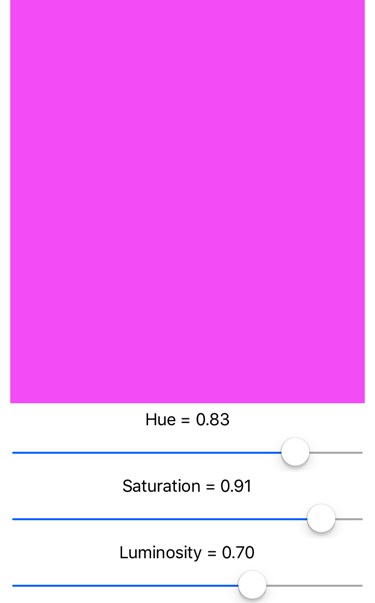
The following XAML example contains a BoxView whose Color property is bound to the Color property of the viewmodel, and three Slider and three Label views bound to the Hue, Saturation, and Luminosity properties:
<ContentPage xmlns="http://schemas.microsoft.com/dotnet/2021/maui"
             xmlns:x="http://schemas.microsoft.com/winfx/2009/xaml"
             xmlns:local="clr-namespace:XamlSamples"
             x:Class="XamlSamples.HslColorScrollPage"
             Title="HSL Color Scroll Page">
    <ContentPage.BindingContext>
        <local:HslViewModel Color="Aqua" />
    </ContentPage.BindingContext>

    <VerticalStackLayout Padding="10, 0, 10, 30">
        <BoxView Color="{Binding Color}"
                 HeightRequest="100"
                 WidthRequest="100"
                 HorizontalOptions="Center" />
        <Label Text="{Binding Hue, StringFormat='Hue = {0:F2}'}"
               HorizontalOptions="Center" />
        <Slider Value="{Binding Hue}"
                Margin="20,0,20,0" />
        <Label Text="{Binding Saturation, StringFormat='Saturation = {0:F2}'}"
               HorizontalOptions="Center" />
        <Slider Value="{Binding Saturation}"
                Margin="20,0,20,0" />
        <Label Text="{Binding Luminosity, StringFormat='Luminosity = {0:F2}'}"
               HorizontalOptions="Center" />
        <Slider Value="{Binding Luminosity}"
                Margin="20,0,20,0" />
    </VerticalStackLayout>
</ContentPage>
The binding on each Label is the default OneWay. It only needs to display the value. However, the default binding on each Slider is TwoWay. This allows the Slider to be initialized from the viewmodel. When the viewmodel is instantiated it's Color property is set to Aqua. A change in a Slider sets a new value for the property in the viewmodel, which then calculates a new color:
Commanding
Sometimes an app has needs that go beyond property bindings by requiring the user to initiate commands that affect something in the viewmodel. These commands are generally signaled by button clicks or finger taps, and traditionally they are processed in the code-behind file in a handler for the Clicked event of the Button or the Tapped event of a TapGestureRecognizer.
The commanding interface provides an alternative approach to implementing commands that is much better suited to the MVVM architecture. The viewmodel can contain commands, which are methods that are executed in reaction to a specific activity in the view such as a Button click. Data bindings are defined between these commands and the Button.
To allow a data binding between a Button and a viewmodel, the Button defines two properties:
Commandof typeSystem.Windows.Input.ICommandCommandParameterof typeObject
Note
Many other controls also define Command and CommandParameter properties.
The ICommand interface is defined in the System.Windows.Input namespace, and consists of two methods and one event:
void Execute(object arg)bool CanExecute(object arg)event EventHandler CanExecuteChanged
The viewmodel can define properties of type ICommand. You can then bind these properties to the Command property of each Button or other element, or perhaps a custom view that implements this interface. You can optionally set the CommandParameter property to identify individual Button objects (or other elements) that are bound to this viewmodel property. Internally, the Button calls the Execute method whenever the user taps the Button, passing to the Execute method its CommandParameter.
The CanExecute method and CanExecuteChanged event are used for cases where a Button tap might be currently invalid, in which case the Button should disable itself. The Button calls CanExecute when the Command property is first set and whenever the CanExecuteChanged event is raised. If CanExecute returns false, the Button disables itself and doesn’t generate Execute calls.
You can use the Command or Command<T> class included in .NET MAUI to implement the ICommand interface. These two classes define several constructors plus a ChangeCanExecute method that the viewmodel can call to force the Command object to raise the CanExecuteChanged event.
The following example shows a viewmodel for a simple keypad that is intended for entering telephone numbers:
using System.ComponentModel;
using System.Runtime.CompilerServices;
using System.Windows.Input;

namespace XamlSamples;

class KeypadViewModel: INotifyPropertyChanged
{
    public event PropertyChangedEventHandler PropertyChanged;

    private string _inputString = "";
    private string _displayText = "";
    private char[] _specialChars = { '*', '#' };

    public ICommand AddCharCommand { get; private set; }
    public ICommand DeleteCharCommand { get; private set; }

    public string InputString
    {
        get => _inputString;
        private set
        {
            if (_inputString != value)
            {
                _inputString = value;
                OnPropertyChanged();
                DisplayText = FormatText(_inputString);

                // Perhaps the delete button must be enabled/disabled.
                ((Command)DeleteCharCommand).ChangeCanExecute();
            }
        }
    }

    public string DisplayText
    {
        get => _displayText;
        private set
        {
            if (_displayText != value)
            {
                _displayText = value;
                OnPropertyChanged();
            }
        }
    }

    public KeypadViewModel()
    {
        // Command to add the key to the input string
        AddCharCommand = new Command<string>((key) => InputString += key);

        // Command to delete a character from the input string when allowed
        DeleteCharCommand =
            new Command(
                // Command will strip a character from the input string
                () => InputString = InputString.Substring(0, InputString.Length - 1),

                // CanExecute is processed here to return true when there's something to delete
                () => InputString.Length > 0
            );
    }

    string FormatText(string str)
    {
        bool hasNonNumbers = str.IndexOfAny(_specialChars) != -1;
        string formatted = str;

        // Format the string based on the type of data and the length
        if (hasNonNumbers || str.Length < 4 || str.Length > 10)
        {
            // Special characters exist, or the string is too small or large for special formatting
            // Do nothing
        }

        else if (str.Length < 8)
            formatted = string.Format("{0}-{1}", str.Substring(0, 3), str.Substring(3));

        else
            formatted = string.Format("({0}) {1}-{2}", str.Substring(0, 3), str.Substring(3, 3), str.Substring(6));

        return formatted;
    }


    public void OnPropertyChanged([CallerMemberName] string name = "") =>
        PropertyChanged?.Invoke(this, new PropertyChangedEventArgs(name));
}
In this example, the Execute and CanExecute methods for the commands are defined as lambda functions in the constructor. The viewmodel assumes that the AddCharCommand property is bound to the Command property of several buttons (or anything other controls that have a command interface), each of which is identified by the CommandParameter. These buttons add characters to an InputString property, which is then formatted as a phone number for the DisplayText property. There's also a second property of type ICommand named DeleteCharCommand. This is bound to a back-spacing button, but the button should be disabled if there are no characters to delete.
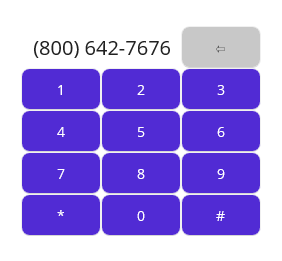
The following example shows the XAML that consumes the KeypadViewModel:
<ContentPage xmlns="http://schemas.microsoft.com/dotnet/2021/maui"
xmlns:x="http://schemas.microsoft.com/winfx/2009/xaml"
xmlns:local="clr-namespace:XamlSamples"
x:Class="XamlSamples.KeypadPage"
Title="Keypad Page">
<ContentPage.BindingContext>
<local:KeypadViewModel />
</ContentPage.BindingContext>
<Grid HorizontalOptions="Center" VerticalOptions="Center">
<Grid.RowDefinitions>
<RowDefinition Height="Auto" />
<RowDefinition Height="Auto" />
<RowDefinition Height="Auto" />
<RowDefinition Height="Auto" />
<RowDefinition Height="Auto" />
</Grid.RowDefinitions>
<Grid.ColumnDefinitions>
<ColumnDefinition Width="80" />
<ColumnDefinition Width="80" />
<ColumnDefinition Width="80" />
</Grid.ColumnDefinitions>
<Label Text="{Binding DisplayText}"
Margin="0,0,10,0" FontSize="20" LineBreakMode="HeadTruncation"
VerticalTextAlignment="Center" HorizontalTextAlignment="End"
Grid.ColumnSpan="2" />
<Button Text="⇦" Command="{Binding DeleteCharCommand}" Grid.Column="2"/>
<Button Text="1" Command="{Binding AddCharCommand}" CommandParameter="1" Grid.Row="1" />
<Button Text="2" Command="{Binding AddCharCommand}" CommandParameter="2" Grid.Row="1" Grid.Column="1" />
<Button Text="3" Command="{Binding AddCharCommand}" CommandParameter="3" Grid.Row="1" Grid.Column="2" />
<Button Text="4" Command="{Binding AddCharCommand}" CommandParameter="4" Grid.Row="2" />
<Button Text="5" Command="{Binding AddCharCommand}" CommandParameter="5" Grid.Row="2" Grid.Column="1" />
<Button Text="6" Command="{Binding AddCharCommand}" CommandParameter="6" Grid.Row="2" Grid.Column="2" />
<Button Text="7" Command="{Binding AddCharCommand}" CommandParameter="7" Grid.Row="3" />
<Button Text="8" Command="{Binding AddCharCommand}" CommandParameter="8" Grid.Row="3" Grid.Column="1" />
<Button Text="9" Command="{Binding AddCharCommand}" CommandParameter="9" Grid.Row="3" Grid.Column="2" />
<Button Text="*" Command="{Binding AddCharCommand}" CommandParameter="*" Grid.Row="4" />
<Button Text="0" Command="{Binding AddCharCommand}" CommandParameter="0" Grid.Row="4" Grid.Column="1" />
<Button Text="#" Command="{Binding AddCharCommand}" CommandParameter="#" Grid.Row="4" Grid.Column="2" />
</Grid>
</ContentPage>
In this example, the Command property of the first Button that is bound to the DeleteCharCommand. The other buttons are bound to the AddCharCommand with a CommandParameter that's the same as the character that appears on the Button:
Feedback
Coming soon: Throughout 2024 we will be phasing out GitHub Issues as the feedback mechanism for content and replacing it with a new feedback system. For more information see: https://aka.ms/ContentUserFeedback.
Submit and view feedback for