Note
Access to this page requires authorization. You can try signing in or changing directories.
Access to this page requires authorization. You can try changing directories.
You can use Invoicing to enter and edit invoices and returns and print an invoice or return. In this article, we describe the transaction activity in the Invoicing module in Dynamics GP.
This guide is designed to give you an understanding of how to use the features of Invoicing, and how it integrates with the Microsoft Dynamics GP system.
To make best use of Invoicing, you should be familiar with system-wide features described in the System User's Guide, the System Setup Guide, and the System Administrator's Guide.
Some features described in the documentation are optional and can be purchased through your Microsoft Dynamics GP partner.
To view information about the release of Microsoft Dynamics GP that you're using and which modules or features you are registered to use, choose Help >> About Microsoft Dynamics GP.
The manual is divided into the following parts:
Part 1 - Setup introduces Invoicing and gives detailed instructions on how to set it up.
Part 2 - Transaction entry explains how to enter and edit invoices and returns and how to print an invoice or return. It also explains how to post Invoicing transactions.
Part 3 - Transaction activity includes information that will help manage your invoicing documents once they are entered.
Part 4 - Inquiries, reports, and utilities describes how to use inquiries and reports to analyze your invoicing activity and explains procedures you can use to clear historical data.
Part 3: Transaction activity
This part of the documentation includes information that will help manage your invoicing documents once they are entered. You can transfer, modify, delete, post, and print invoicing documents.
The following information is discussed:
Chapter 8, "Invoicing document maintenance," explains how to correct, delete, and void invoicing documents.
Chapter 9, "Printing documents," explains how to print a quote, order, invoice, back order, or return, and send it to a customer. You also can print packing slips, picking tickets, shipping labels and cash on delivery (COD) tags.
Chapter 10, "Posting," describes how to transfer transactions to permanent records and how to transfer the original transaction information to history.
Chapter 8: Invoicing document maintenance
Before you transfer or post an invoice, you can modify the item, commission, and total information. For example, you can change quantities, add items, correct addresses, split commissions, or add freight charges. If the invoice was entered in error, you can delete the invoice.
Invoicing document maintenance information is divided into the following sections:
Adding comments to invoices and returns
Changing a serial or lot number
Modifying commission information
Splitting commissions
Correcting an invoicing document
Deleting an invoicing document
Entering Intrastat statistics
Adding comments to invoices and returns
You can add comments to invoices, returns, or to individual line items on these documents. You also can define standard comments on a company-wide basis, and those used on Sales Order Processing, Invoicing, or Purchase Order Processing documents.
Only the first 200 characters of a line item comment will appear on an invoice or return. For longer comments to appear, use Report Writer to modify the default document layouts.
You can enter or select the ID of a predefined comment in the Invoice Entry window or Invoice Item Detail Entry window and can create new comments while you are entering transactions. You also can create custom comments for a particular document or line item, or modify existing comments. One-time comments or modified comments won't be available for other documents or line items.
To create a new comment:
- Open the Comment Setup window.
(Transactions >> Sales >> Invoice Entry >> enter a new Comment ID value >> press TAB or ENTER >> Add button)
Select the Sales series.
Enter the comment text.
Choose Save, then close the Comment Setup window.
To create a one-time comment:
- Open the Invoice Comment Entry window.
(Transactions >> Sales >> Invoice Entry >> Comment ID expansion button)
If the Comment ID field contained a value, you'll be able to modify the existing comment. If the Comment ID field was blank, you'll be able to create a new, one-time comment.
Enter or change the comment text.
Choose OK.
Changing a serial or lot number
You can verify or change the serial or lot number assigned to an item before the sale is posted.
To change a serial or lot number:
Open the Invoice Entry window.
(Transactions >> Sales >> Invoice Entry)
Enter or select a serial- or lot-numbered item, then choose the Item Number expansion button.
In the Invoice Item Detail Entry window, choose Serial/Lot.
Select the serial or lot number in the Selected list to change and choose Remove.
From the list of available serial or lot numbers, select one to use. If you selected a lot number, also enter a quantity. Choose Insert.
You can also enter a serial or lot number that hasn't been entered. To do so, enter the number in the Serial Number or Lot Number field and choose Insert.
Note
A warning icon appears in the Lot Number field if you select a lot number that has expired.
Choose OK to save your changes and close the window.
Save your changes and close the Invoice Item Detail Entry window.
Modifying commission information
Use the Invoice Commission Entry window to modify commission amounts, percentages and commission sales amounts on invoices and returns. The commission amounts will be posted when the transaction is posted.
Commission amounts on invoicing documents are calculated using the commission information from the Salesperson Maintenance window. Commission amounts on return documents will decrease the commissions payable to a salesperson. For more information about the Salesperson Maintenance window, refer to the Receivables Management documentation.
To modify commission information:
Open the Invoice Commission Entry window. (Transactions >> Sales >> Invoice Entry >> enter or select an item number >> Commissions button)
IMAGE - INVCOME.jpg

Choose the hide and show button to expand the scrolling window.
Make your changes to the commission information. You also can enter or select a different salesperson ID.
Note
To remove a commission distribution, select the line and choose Edit >>Delete Row.
Choose OK to save changes and close the window.
Splitting commissions
You can split the commission on invoices and returns among multiple salespeople. Use the Invoice Commission Entry window to split commissions. Commission amounts on return documents will decrease the commissions payable to a salesperson.
To split commissions:
Open the Invoice Commission Entry window. (Transactions >> Sales >> Invoice Entry >> enter or select an item number >> Commissions button)
Choose the hide and show button to expand the scrolling window.
Change the Percent of Sale amount to the appropriate percentage for the first salesperson listed.
In the next available line, enter or select an additional salesperson. Enter an amount in the Percent of Sale and Commission Sale Amount fields for the additional salesperson. The Commission amount will be calculated automatically.
Choose OK to save the changes and close the window.
Correcting an invoicing document
You can correct mistakes in Invoicing transactions before posting. As you enter transactions, you can print a variety of reports that allow you to double-check the information you've entered. When you identify errors on these reports, the errors must be corrected to ensure accurate reporting of your sales activity.
Tip
You can change invoices that have been printed only if Edit Printed Documents is marked in the Invoicing Setup Options window.
You can't correct a transaction that has been posted. If the transaction has been posted, you must enter a transaction to reverse the original—incorrect—transaction. Then you can enter the transaction correctly.
To correct an invoicing document:
Open the Invoice Entry window. (Transactions >> Sales >> Invoice Entry)
Select the transaction.
Highlight the field to change and enter the correct information.
Choose Save.
Deleting an invoicing document
When you delete an invoice, all the items on that invoice will be unallocated in inventory, if Inventory Control is part of your Microsoft Dynamics GP system. If Track Voided Transactions in History is marked in the Invoicing Setup window, a voided document will be transferred to your company's historical records.
You can't delete an invoice or return if:
The invoice has been posted.
The document is in a batch that is being processed.
Void Documents isn't marked in the Invoicing Setup Options window.
The document is on hold.
To delete an invoicing document:
In the navigation pane, choose the Sales button, and then choose the Invoicing Transactions list.
Mark the invoice or return.
Choose Delete.
Entering Intrastat statistics
Intrastat is the system for collecting statistics on the trade of goods between European Union (EU) countries/regions. Intrastat data is required for all items either bought from EU vendors or sold to EU customers, and must be provided on a monthly basis. Requirements for Intrastat are similar in all EU countries/regions. The government uses these statistics as an economic indicator.
For information on setting up Intrastat codes, see the System Setup Guide (Help >> Contents >> select Setting up the System).
Use the Invoice Intrastat Entry window to enter the information required to create the Intrastat Trade Report you submit to your government, and the EC Sales List, which displays cumulative goods value totals by each vendor or customer Tax Registration number. You can enter Intrastat statistics for each line item.
If Intrastat information was entered for the customer's ship to address ID, that information appears in this window. You can use the Invoice Intrastat Entry window to change Intrastat information for an individual transaction, or to enter Intrastat information if none was entered for the customer.
You can enter Intrastat statistics only if Enable Intrastat Tracking is marked in the Company Setup Options window.
To enter Intrastat statistics:
Open the Invoice Entry window. (Transactions >> Sales >> Invoice Entry)
Enter the EU transaction, including the customer ID and the goods value.
Choose the Item EU expansion button to open the Invoice Intrastat Entry window. If this button is unavailable, choose the Customer ID expansion button to open the Invoice Customer Detail Entry window and mark EU Transaction.
If the country/region code assigned to the customer's shipping address is designated an EU country/region, this is marked automatically.
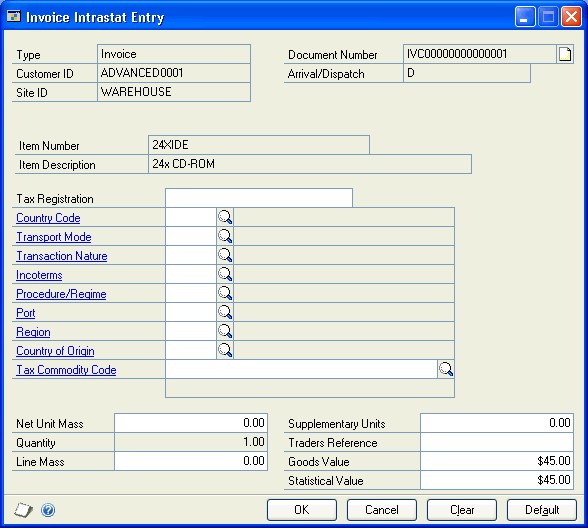
Enter Intrastat information, or change the default entries, if necessary.
In the Net Unit Mass field, enter the weight of the goods in kilograms.
The item's shipping weight from the Item Maintenance window is the default weight. You can change this information.
The line mass displays the total mass per item and is calculated by multiplying the amount entered in the Net Unit Mass field by the amount displayed in the Quantity field.
Enter a supplementary units amount, if applicable. The supplementary units amount is simply a second quantity. Supplementary units amounts are required by the EU Combined Nomenclature for certain goods.
In the Traders Reference field, enter a reference code, such as an invoice or dispatch number, or any other information that will identify the transaction.
Choose OK to save the record.
Chapter 9: Printing documents
After you enter a quote, order, invoice, back order, or return, you can print the document and send it to a customer. You also can print packing slips, picking tickets, shipping labels and cash on delivery (COD) tags.
Information about printing documents is divided into the following sections:
Printing options
Printing an individual document
Printing all documents in a batch
Printing a posted document
Printing invoice labels
Printing options
When you print an invoice or return, you can choose the Options menu in the Invoice Entry window or the Invoice Batch Entry window to select several printing options.
Document Format Opens the Invoice Document Formats window where you can change the document format used to print invoices, returns and packing slips.
Print Invoice or Return Prints invoice or return documents in the Invoice Entry window and prints a batch of invoice or return documents in the Invoice Batch Entry window.
Print Packing Slip Prints a packing slip for each invoicing document.
Include Tax Details on Doc. Prints the tax details and tax amount for each item and prints the total tax amount for each detail after the last item.
Print Alignment Form Prints an alignment form before you print documents, to ensure that the information is printed in the correct fields on the document.
Printing an individual document
You can print a single invoice or return when you enter the document in the Invoice Entry window. Before you print documents, you can print an alignment form to ensure that the information is printed in the correct fields on the document. You can use four predefined document formats to print documents—blank paper, short form, long form, or other form.
You also can print a packing slip at the same time as you print the invoicing document.
Choose Options >> Document Format to change the document format used to print the invoice, return, or packing slip.
To print an individual document:
- Open the Invoice Entry window.
(Transactions >> Sales >> Invoice Entry)
Enter or select a document.
Choose Options >> Print Packing Slip to print a packing slip when the invoice or return is printed.
Choose Options >> Include Tax Details on Doc. to include tax details on the invoice or return.
Choose Options >> Print Alignment Form to print an alignment form.
If a tax detail doesn't appear on a document, check the Tax Detail Maintenance window. The Print on Documents option must be marked.
- Choose Print.
Printing all documents in a batch
You can print all of the documents in a batch using four predefined document formats to print documents—blank paper, short form, long form, or other form. You also can print packing slips at the same time as you print the documents.
You can print an alignment form to ensure that the information is printed in the correct fields on the document.
To print all documents in a batch:
- Open the Invoice Batch Entry window.
(Transactions >> Sales >> Invoicing Batches)
Select a batch.
Choose Options >> Document Format to change the document format used to print the invoice, return, or packing slip.
Choose Options >> Print Packing Slip to print a packing slip when the invoice or return is printed.
Choose Options >> Include Tax Details on Doc. to include tax details on the invoice or return.
Choose Options >> Print Alignment Form to print an alignment form.
If a tax detail doesn't appear on a document, be sure Print on Documents is marked in the Tax Detail Maintenance window.
Choose a sorting option.
Choose Print.
Printing a posted document
You can reprint individual invoicing documents from historical records. Documents are moved to history when they are posted or voided. You can't reprint packing slips for documents that have been moved to history.
You can print an alignment form to ensure that the information is printed in the correct fields on the document. To print an alignment form, choose Options and mark the Alignment Form option. You can use four predefined document formats to print documents—blank paper, short form, long form, or other form.
If you modified the invoicing document in Report Writer, your changes will not appear when you print a posted document because a different report is used to print posted documents.
To print a posted document:
Open the Invoicing Document Inquiry window. (Inquiry >> Sales >> Invoice)
Select a sorting option or a range of documents.
Mark to include History and choose Redisplay.
Highlight a document and click the Document Number link to open the Invoice Inquiry window.
Choose Print.
Printing invoice labels
Use the Mailing Labels window to print invoice labels for a range of unposted transactions in Invoicing. You can print labels for invoices and can select a range by batch, document ID, state, ZIP or postal code, customer, or date.
To print invoice labels:
- Open the Mailing Labels window.
(Reports >> Company >> Mailing Labels)
Select Invoice Labels from the Reports list, and choose New to open the Mailing Label Report Options window.
Enter or select an option name.
Mark a format to use, select the number across and number of copies to be printed.
Note
If you mark Laser, the labels will be printed two across.
Mark the address to be used, select sorting options and enter restrictions.
Choose Destination to select a printing destination.
Choose Print. You can save the report option and print it later from either the Mailing Labels window or the Mailing Label Report Options window.
Chapter 10: Posting
Posting is the process of transferring transactions to permanent records. If you need to change or delete a transaction, you must do so before posting the transaction.
When you post Invoicing transactions, transaction information is transferred to other parts of your financial records. Quantity information for items, the balances of customer accounts, and the balances of the posting accounts in your chart of accounts are updated. Transaction information becomes part of an open fiscal year's permanent records.
Posting also transfers the original transaction information to history, so you can later review individual transactions and print reports of historical activity.
Posting reports will be printed when you post transactions, either individually or in batches. For more information about posting reports for Invoicing, refer to Invoicing report summary.
For more information about setting up posting, see the System Setup Guide (Help >> Contents >> select Setting up the System).
Some Invoicing setup options affect posting and history. For more information, see Setting Invoicing general options and defaults .
Posting information is divided into the following sections:
Posting an individual transaction
Posting transactions for the Sales series
Posting transactions in all modules
Posting an individual transaction
Transaction-level posting allows you to enter and post transactions without ever having to create a batch. Sales and inventory information will be up to date when you post using this method, because transactions are posted or deleted immediately. They can't be saved and posted later. Also, you can't post to a year that hasn't been set up in the Fiscal Periods Setup window.
Transaction-level posting is optional and can be selected in the Posting Setup window when you set up Microsoft Dynamics GP. If your system has been set up to allow transaction-level posting, you'll be able to enter and post transactions directly from the Invoice Entry window. If your system doesn't allow individual transaction entry, you'll need to create a batch before you save transactions.
When you post transactions individually, the posting date will be the same as the transaction date used to make the entry, but can be changed in the Invoice Date Entry window. If you're posting using the transaction date and transaction-level posting isn't allowed, the document date will be used as the posting date. All transactions posted individually in a single data entry session will have the same audit trail code.
To post an individual transaction:
Open the Invoice Entry window.
(Transactions >> Sales >> Invoice Entry)
Enter or select a transaction. For new transactions, leave the Batch ID field blank. For existing transactions that were previously entered in a batch, clear the Batch ID field.
Choose Post to post the transaction.
Close the window. The Invoicing Posting Journal will be printed if you chose to print this audit trail report when you set up Microsoft Dynamics GP.
Note
When you post transactions individually, your user ID will appear on reports as a batch ID.
Posting transactions for the Sales series
Use the Sales Series Posting window to post transactions for the Sales series.
You can require that a password be entered before batches can be posted. The options to approve batches for posting and to require passwords before posting will be available only if you've marked the Require Batch Approval option and entered a batch approval password using the Posting Setup window.
Depending on the selections that you made in the Invoice Batch Entry window and Posting Setup window, you may not be able to post a batch until you've entered a specific number of transactions or transactions that total a certain amount. For more information about batch status and setting batch requirements, see Creating a batch.
To post transactions for the Sales series:
Open the Sales Series Posting window. (Transactions >> Sales >> Series Post)
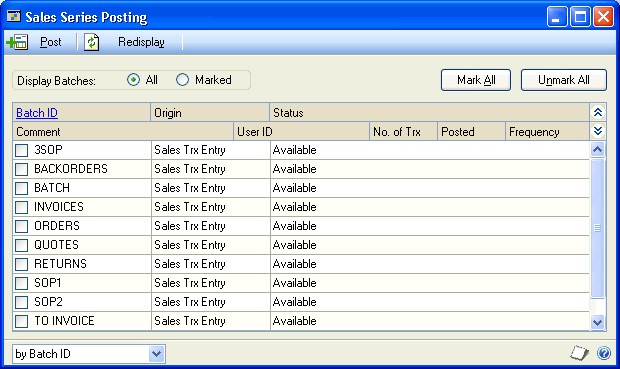
Set display options. You can display all Sales series batches or only those that have been marked. Choose the show button to display information about the user who created or last marked a batch for posting, comments entered for each batch, and additional information.
Tip
If you're using Microsoft Dynamics GP on a network, choose Redisplay to show any batches that have been added or changed by your coworkers since you opened the window. If a batch was marked previously, the User column identifies the person who marked it. To post that batch, unmark it and mark it again so the batch is assigned to you. The series posting method allows you to post only those batches that you've marked.
To mark a batch for posting, mark the box in the Batch ID column. The batch status column displays the current status of each batch. For more information about batch requirements and approval options, refer to the System User's Guide (Help >> Contents >> select Using the System).
Note
You might not have posting privileges for all batch types in Invoicing, depending on how security has been set up for your Microsoft Dynamics GP system.
Choose Post to post the selected batches.
If you've entered batch total requirements or batch approval requirements in Invoicing and posted a batch through General Ledger, the batch will be posted through regardless of the batch requirement or approval requirements that you've selected in General Ledger. For more information about posting to or through General Ledger, see the System Setup Guide (Help >> Contents >> select Setting up the System).
Print the posting journals. Depending on the settings you made in the Posting Setup window, posting journals and distribution breakdown registers may be printed when the series posting process is complete.
Posting transactions in all modules
You can post batches from any Microsoft Dynamics GP modules you have in addition to Invoicing using master posting. When you use the master posting process, all batches marked for posting, in all modules, will be posted regardless of who marked them. Master posting is an excellent way to update all the records in the Microsoft Dynamics GP system at the same time.
You can require that a password be entered before batches can be posted. The options to approve batches for posting and to require passwords before posting will be available only if you've marked the Require Batch Approval option and entered a batch approval password using the Posting Setup window.
To post transactions in all modules:
Open the Master Posting window. (Microsoft Dynamics GP menu >> Tools >> Routines >> Master Posting)

Set display options. You can list batches by batch ID, origin, or frequency. You also can display all batches, those that have been marked, or those for a specific series.
To mark a batch for posting, mark the box in the Batch ID column. The batch status column displays the current status of each batch. For more information about batch requirements and approval options, refer to the System User's Guide (Help >> Contents >> select Using the System).
Choose Post to post the selected batches.
Print the posting journals. Depending on the settings you made in the Posting Setup window, posting journals and distribution breakdown registers may be printed when the series posting process is complete.
See also
Invoicing in Microsoft Dynamics GP
Invoicing in Microsoft Dynamics GP - Part 2: Transaction entry
Invoicing in Microsoft Dynamics GP - Part 4: Inquiries, reports, and utilities
Glossary of Terms in the Invoicing Area in Dynamics GP