Note
Access to this page requires authorization. You can try signing in or changing directories.
Access to this page requires authorization. You can try changing directories.
The Project Accounting Cost Management Guide includes information for project managers about how to use Microsoft Dynamics GP Project Accounting to estimate and track project costs. It also includes information about how to specify how billing amounts, revenue, and profit should be calculated, based on project costs.
You can use Project Accounting to set up the various cost categories to use for projects. A cost category determines how cost, the billing amount, revenue, and profit are calculated for a specific activity. You can assign cost categories to a project budget and use the budget to estimate and track project performance. You also can assign fees to a project.
You must enter information about the employees and equipment that you will use as resources for projects. You can create rate tables to specify how much customers should be billed for employees and equipment. Using timesheets and employee expense transactions, you can track the time that employees spend on projects and the expenses they incur. You can use equipment logs to track how equipment is used for a projects, and use miscellaneous logs to track miscellaneous expenses for a project that can't be tracked using other transactions.
You can purchase items for projects and receive them using Purchase Order Processing, and then enter inventory transfers to make the items that you purchase available for projects in Project Accounting.
Projects must be assigned to a contract. You can create multiple contracts for a customer, and a contract can include one or more projects. This introduction is divided into the following sections:
What's in this manual
Symbols and conventions
Resources available from the Help menu
Send us your documentation comments
This manual is designed to give you an understanding of how to use the cost management features of Project Accounting, and how it integrates with the Microsoft Dynamics GP system.
To make best use of Project Accounting, you should be familiar with systemwide features described in the System User's Guide, the System Setup Guide, and the System Administrator's Guide.
You might also need to be familiar with features described in General Ledger, Bank Reconciliation, Multicurrency Management, Purchase Order Processing, Purchase Order Enhancements, Payables Management, Receivables Management, Inventory Control, United States Payroll, Canadian Payroll, or Report Writer.
Some features described in the documentation are optional and can be purchased through your Microsoft® Business Solutions partner.
To view information about the release of Microsoft Dynamics GP that you're using and which modules or features you are registered to use, choose **Help
About Microsoft Dynamics GP.**
The manual is divided into the following parts.
Part 1, Resource planning, includes information about setting up employee, vendor, equipment, and miscellaneous records for tracking project costs and billing customers. It also describes how to create rate tables for calculating project costs, overhead, and profit, and how to create unit of measure schedules. It also includes information about default unit costs and how overhead is calculated.
Part 2, Cost budgeting templates, includes information about how to create contract and project templates and how to apply those templates to contract and project records.
Part 3, Cost budgeting, includes information about how to set up fees and the cost categories that you can include in project budgets to calculate costs, billing amounts, revenue, and profits. It also includes information about how to enter contract and project records, and how to assign employees, equipment, cost categories, and fees to projects.
Part 4, Cost control, includes information about how to control what data users can enter when they enter cost transactions, how to control the use of change orders for projects, and how to close customer, contract, and project records to control the accrual of project costs.
Part 5, Project cost tracking includes information about how to set up cost transactions for tracking project costs and billing customers and how to enter cost transactions. It also describes how to view detailed information about cost, billing, revenue, and profit amounts for contracts, projects, and cost categories.
Part 1: Resource planning
This part of the documentation includes information for project managers about setting up employee, vendor, equipment, and miscellaneous records for tracking project costs and billing customers. The documentation also includes information about how to create rate tables for calculating project costs, overhead, and profit.
It also includes information about how to create unit of measure schedules and about default unit costs and how overhead is calculated.
Chapter 1, "Unit quantities, costs, and overhead," includes information about how to create unit of measure schedules. It also includes information about default unit costs and how overhead is calculated.
Chapter 2, "Employees and vendors," includes information about how to set up employee and vendor records for tracking project costs and billing customers.
Chapter 3, "Equipment and miscellaneous records," includes information about how to set up equipment and miscellaneous records for tracking project costs and billing customers.
Chapter 4, "Rate tables," includes information about how to create employee, position, and equipment rate tables to calculate costs, overhead, and profit for projects.
Chapter 1: Unit quantities, costs, and overhead
This part of the documentation includes information for project managers about how to create unit of measure schedules. It also includes information about default unit costs and how overhead is calculated. The following topics are discussed.
Create a unit of measure schedule
Default unit costs
Total cost
Overhead calculation methods
Create a unit of measure schedule
You can set up a unit of measure schedule to define the quantities that your business buys or sells items in. A unit of measure schedule is a group of related quantities.
- Open the PA Unit of Measure Schedule Setup window.
Microsoft Dynamics GP menu > Tools > Setup > Project > Unit of Measure Schedule
Enter a unit of measure schedule ID and description.
You can click Copy to select a unit of measure schedule to copy information from.
Select the number of decimal places for the quantities that you're entering in the unit of measure schedule.
Enter the name for the base unit of measure. It is the smallest quantity in the schedule and typically has a quantity of 1. For example, EACH might be used as the base unit of measure. The name that you enter for the base unit of measure will be displayed on the first line of the scrolling window.
In the U of M field enter the name for another quantity. In the Quantity field enter the number of units of the base unit of measure that make up the quantity. In the Equivalent field enter the name of the base unit of measure. Click Save and close the window.
Note
For each quantity that you enter, you first must identify how that quantity is equivalent to the base unit of measure. You then can identify how the quantity is equivalent to other quantities in the schedule.*
Default unit costs
Unit costs are used to calculate the total cost for a line item on a cost transaction using the following formula.
Total cost = (Quantity x Unit Cost) + Overhead
When you set up cost transactions for tracking project costs, you can select the default unit cost to use for cost transactions.
None Don't use a default unit cost for the cost transaction.
Employee Use the unit cost for the employee record.
Budget Use the unit cost for the cost category in the project budget.
Cost Category Use the unit cost for the cost category record.
Equipment Use the unit cost for the equipment record.
Miscellaneous Use the unit cost for the miscellaneous record. See Part 5, Project cost tracking, for more information.
Total cost
How total cost is calculated for projects depends on the project type and accounting method.
For the Time and Materials project type, if the accounting method for the project is When Performed, cost transaction amounts are included in total cost when the transactions are posted. If the accounting method is When Billed, cost transaction amounts are included in total cost when billing invoices are posted for those cost transaction amounts.
For the Fixed Price and Cost Plus project types, only cost transaction amounts that have been recognized as revenue using the revenue recognition routine are included in total cost.
See Accounting methods and recognizing revenue on page 27 in the Project Accounting Accounting Control Guide for more information.
Overhead calculation methods
There are two overhead calculation methods that you can use to include overhead in project costs.
Amount per Unit Overhead is a flat amount that is added to the unit cost for each single unit quantity of time or an item.
Percentage of Actual Cost Overhead is a percentage of the actual cost for each single unit quantity of time or an item.
If the quantity or cost of a single unit of time or an item is not available when calculating overhead, overhead will be calculated as the total cost for the transaction divided by the unit cost or unit quantity, whichever is available. If neither is available, overhead will be the total cost for the transaction.
Chapter 2: Employees and vendors
This part of the documentation includes information for project managers about how to set up employee and vendor records for tracking project costs and billing customers.
The following topics are discussed:
Set up an employee class for tracking project costs and billing customers
Set up an employee record for tracking project costs and billing customers
Set up a vendor class for tracking project costs and billing customers
Set up a vendor record for tracking project costs and billing customers
Set up an employee class for tracking project costs and billing customers
You can set up an employee class for tracking project costs and billing customers. If you assign an employee to the class, the employee record will inherit information from the class. See Set up an employee record for tracking project costs and billing customers.
- If you're using U.S. Payroll, open the PA Employee Class Options window. Microsoft Dynamics GP menu > Tools > Setup > Payroll > Employee Class > select Class ID > Project button
If you're using Canadian Payroll, open the PA Employee Class Options - Canada window.
Cards > Payroll - Canada > Employee Class > Project button
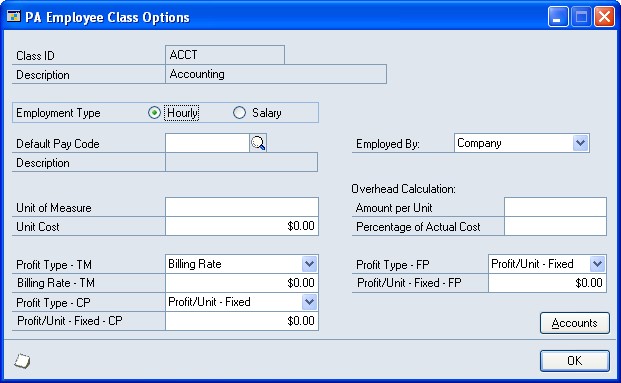
Select whether the employee is paid hourly or is salaried.
Select the default pay code to use for the employee on timesheets.
Select the employment relationship in the Employed By field. If you will post timesheets for employees in the class to payroll, select Company.
Enter a unit of measure and the corresponding unit cost.
In the Amount per Unit field, enter a flat overhead amount for each hour that an employee in the class works on a project. In the Percentage of Actual Cost field, enter a percentage to be used with the employee's pay rate to calculate overhead.
Select profit types for the employee class for Time and Materials, Cost Plus, and Fixed Price projects and enter amounts or percentages in the corresponding fields. See Profit types for calculating billing amounts for more information.
Click Accounts to specify posting accounts for the employee class. See Specify default posting account numbers for records and classes for cost transactions in the Project Accounting Accounting Control Guide for more information.
Click OK.
Set up an employee record for tracking project costs and billing customers
You can set up an employee record for tracking project costs and billing customers.
If you're using U.S. Payroll, open the PA Employee Options window. Cards > Payroll > Employee > select an Employee ID > Project button
If you're using Canadian Payroll, open the PA Employee Options - Canada window.
Cards > Payroll - Canada > Employee > Project button
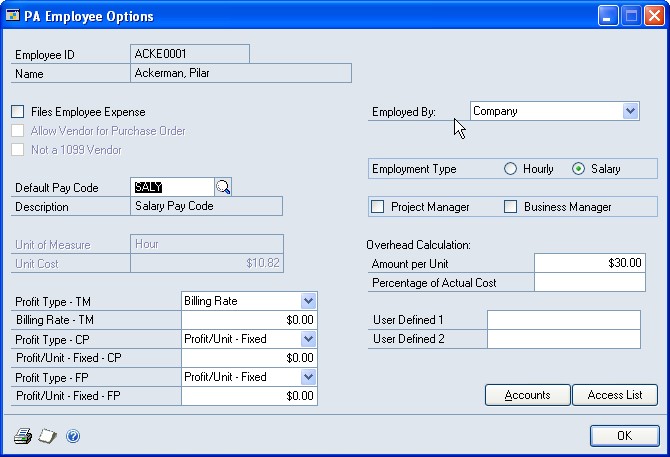
Select Files Employee Expense to grant the employee permission to enter employee expense transactions. After you save the employee record, a vendor record will be created for the employee automatically using the employee ID as the vendor ID. To reimburse an employee for employee expenses, the employee must also be a vendor.
You can use the Vendor Maintenance window (Cards > Purchasing > Vendor) to modify the vendor record for the employee. See the Payables Management documentation (Help > Printable Manuals) for more information. This includes setting up the vendor record for tracking project costs and billing
Select Allow Vendor for Purchase Order to allow the employee to be selected as the vendor for purchase orders, shipment receipts, shipment/invoice receipts, and invoice receipts.
Select Not a 1099 Vendor to be able to select Not a 1099 Vendor in the Tax Type list in the Vendor Maintenance Options window (Cards > Purchasing > Vendor > Options button) for the vendor record for the employee. See the Payables Management documentation (Help > Printable Manuals) for more information.
Select the default pay code to use for the employee on timesheets.
You must select Use Pay Codes for Unit Cost in the Project Setup window to use pay codes with timesheets. See Configure general settings for all projects for more information.
Enter a unit of measure and the corresponding unit cost.
Tip
You also can use an employee or position rate table to calculate cost and overhead for an employee. See Create an employee rate table Create a position rate table on page 25 for more information.
Select the employment relationship in the Employed By field. If you will post timesheets for the employee to payroll, select Company.
Select whether the employee is paid hourly or is salaried.
Select whether the employee will be listed as project manager or business manager on reports.
In the Amount per Unit field, enter a flat overhead amount for each hour that the employee works on a project. In the Percentage of Actual Cost field, enter a percentage to be used with the employee's pay rate to calculate overhead. See Overhead calculation methods for more information.
Select profit types for the employee record for Time and Materials, Cost Plus, and Fixed Price projects and enter amounts or percentages in the corresponding fields. See Profit types for calculating billing amounts for more information.
Enter information in user-defined fields. See Enter names for user-defined field labels for more information.
Click Accounts to specify posting accounts for the employee. See Specify default posting account numbers for records and classes for cost transactions in the Project Accounting Accounting Control Guide for more information.
Click Access List to assign the employee to projects. See Assign an employee to projects for more information, click OK.
Set up a vendor class for tracking project costs and billing customers
You can set up a vendor class for tracking project costs and billing customers. If you assign a vendor to the class, the vendor record will inherit information from the class. See Set up a vendor record for tracking project costs and billing customers on page 17 for more information.
- Open the PA Vendor Class Options window.
Microsoft Dynamics GP menu > Tools > Setup > Purchasing > Vendor Class > select a Class ID > Project button
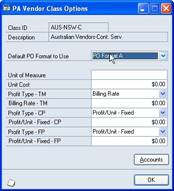
Select the default purchase order format to use when printing purchase orders for vendors in the class.
Enter a unit cost and a default unit of measure for vendors in the class.
Select profit types for the vendor class for Time and Materials, Cost Plus, and Fixed Price projects and enter amounts or percentages in the corresponding fields. See Profit types for calculating billing amounts for more information.
Click Accounts to specify posting accounts for the vendor class. See Specify default posting account numbers for records and classes for cost transactions on page 10 in the Project Accounting Accounting Control Guide for more information.
Click OK.
Set up a vendor record for tracking project costs and billing customers
You can set up a vendor record for tracking project costs and billing customers.
Open the PA Vendor Options window.
Cards > Purchasing > Vendor > select a Vendor ID > Project button

Select the default purchase order format to use when printing purchase orders for the vendor.
Enter a unit cost and a default unit of measure for the vendor.
Select profit types for the vendor record for Time and Materials, Cost Plus, and Fixed Price projects and enter amounts or percentages in the corresponding fields. See Profit types for calculating billing amounts on page 49 for more information.
Enter information in user-defined fields. See Enter names for user-defined field labels on page 47 for more information.
Click Accounts to specify posting accounts for the vendor. See Specify default posting account numbers for records and classes for cost transactions on page 10 in the Project Accounting Accounting Control Guide for more information.
Click OK.
Chapter 3: Equipment and miscellaneous records
This part of the documentation includes information for project managers about how to set up equipment and miscellaneous records for tracking project costs and billing customers.
The following topics are discussed:
Set up an equipment class for tracking project costs and billing customers
Set up an equipment record for tracking project costs and billing customers
Set up a miscellaneous class for tracking project costs and billing customers
Set up a miscellaneous record for tracking project costs and billing customers
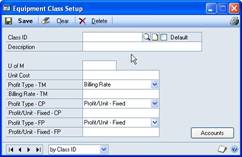
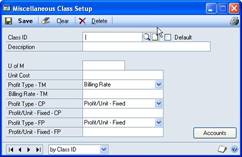
Set up an equipment class for tracking project costs and billing customers
You can set up an equipment class for tracking project costs and billing customers. If you assign an equipment record to the class, the equipment record will inherit information from the class. See Set up an equipment record for tracking project costs and billing customers on page 20 for more information.
- Open the Equipment Class Setup window.
Microsoft Dynamics GP menu > Tools > Setup > Project > Equipment Class
PACM 6.JPEG
A screenshot of a cell phone Description automatically generated
Select a class ID.
Enter a unit of measure and the corresponding unit cost.
Select profit types for the equipment class for Time and Materials, Cost Plus, and Fixed Price projects and enter amounts or percentages in the corresponding fields. See Profit types for calculating billing amounts on page 49 for more information.
Click Accounts to specify posting accounts for the equipment class. See Specify default posting account numbers for records and classes for cost transactions on page 10 in the Project Accounting Accounting Control Guide for more information.
Click Save and close the window.
Set up an equipment record for tracking project costs and billing customers
You can set up an equipment record for tracking project costs and billing customers.
Note
If you don't have permission to enter equipment records, you can use the Equipment Maintenance Inquiry window (Inquiry > Project > Maintenance > Equipment) to view them.
- Open the Equipment Maintenance window. Cards > Project > Equipment
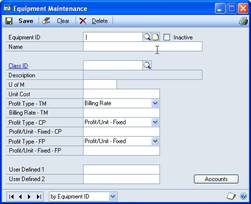
Select an equipment ID.
You can select an equipment class ID for the equipment record. The equipment record will inherit cost information from the class.
Enter a unit of measure and the corresponding unit cost.
Select profit types for the equipment record for Time and Materials, Cost Plus, and Fixed Price projects and enter amounts or percentages in the corresponding fields. See Profit types for calculating billing amounts on page 49 for more information.
Click Accounts to specify posting accounts for the equipment record. See Specify default posting account numbers for records and classes for cost transactions on page 10 in the Project Accounting Accounting Control Guide for more information.
Click Save and close the window.
Set up a miscellaneous class for tracking project costs and billing customers
You can set up a miscellaneous class for tracking project costs and billing customers. If you assign a miscellaneous record to the class, the miscellaneous record will inherit information from the class. See Set up a miscellaneous record for tracking project costs and billing customers on page 22 for more information.
Open the Miscellaneous Class Setup window.
Microsoft Dynamics GP menu > Tools > Setup > Project > Miscellaneous Class
Select a class ID.
Enter a unit of measure and the corresponding unit cost.
Select profit types for the miscellaneous class for Time and Materials, Cost Plus, and Fixed Price projects and enter amounts or percentages in the corresponding fields. See Profit types for calculating billing amounts on page 49 for more information.
Click Accounts to specify posting accounts for the miscellaneous class. See Specify default posting account numbers for records and classes for cost transactions on page 10 in the Project Accounting Accounting Control Guide for more information.
Click Save and close the window.
Set up a miscellaneous record for tracking project costs and billing customers
You can set up a miscellaneous record for tracking project costs and billing customers.
Note
If you don't have permission to enter miscellaneous records, you can use the Miscellaneous Maintenance Inquiry window (Inquiry > Project > Maintenance > Miscellaneous) to view them.
- Open the Miscellaneous Maintenance window. Cards > Project > Miscellaneous
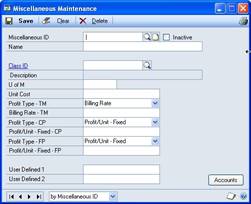
Select a miscellaneous ID.
You can select a class ID for the miscellaneous record. The miscellaneous record will inherit cost information from the class.
Enter a unit of measure and the corresponding unit cost.
Select profit types for the miscellaneous record for Time and Materials, Cost Plus, and Fixed Price projects and enter amounts or percentages in the corresponding fields. See Profit types for calculating billing amounts on page 49 for more information.
Click Accounts to specify posting accounts for the miscellaneous record. See Specify default posting account numbers for records and classes for cost transactions on page 10 in the Project Accounting Accounting Control Guide for more information.
Click Save and close the window.
Chapter 4: Rate tables
This part of the documentation includes information for project managers about creating rate tables to calculate costs, overhead, and profit for projects.
You can create employee and position rate tables to calculate pay and overhead for individual employees and position codes. You also can create equipment rate tables to calculate cost and profit for specific equipment.
The following topics are discussed:
Create an employee rate table
Create a position rate table
Create an equipment rate table
Copy information from another rate table
Include all employees in a rate table
Include all position codes in a rate table based on pay code
Include all equipment in a rate table
Update pay rates in an employee rate table based on pay codes
Create an employee rate table
You can create an employee rate table, which is a list of employees and the cost and profit for each employee. You can assign employee rate tables to Time and Materials projects and to cost categories in Time and Materials project budgets. See Specify billing settings for a project on page 71 and Assign a rate table to a cost category in a project budget on page 85 for more information.
- Open the PA Employee Rate Table Maintenance window. Cards > Project > Employee Rate Table
PACM 10.JPEG
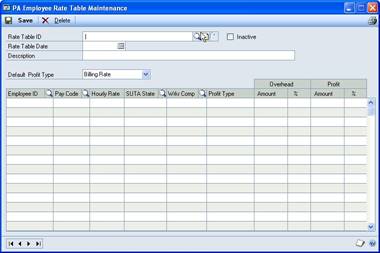
Enter a rate table ID, date, and description. The date is for information only.
You can click the Rate Table ID wizard button to copy information from another rate table or to include all employee records and their corresponding pay codes in the rate table. See Copy information from another rate table and Include all employees in a rate table for more information.
Select the default profit type to be displayed in the Profit Type column when entering line items.
Select an employee to include in the rate table.
Select the default pay code to use for the employee on timesheets.
Note
You must select Use Pay Codes for Unit Cost in the Project Setup window to use pay codes with timesheets. See Configure general settings for all projects for more information.
If the employee is paid hourly, you can modify the hourly rate.
You can modify the SUTA state and workers' compensation code for the employee.
Note
To update pay rates in an existing employee rate table based on pay codes, click the Rate Table ID wizard button. See Update pay rates in an employee rate table based on pay codeS for more information.
See the U.S. Payroll or Canadian Payroll documentation (Help > Printable Manuals) for more information about pay codes and SUTA state and workers' compensation codes.
- Select the profit type for the employee.
Billing Rate You can enter a flat amount for the billing rate in the Amount column for profit.
Markup % You can enter a percentage for the markup in the % column for profit.
See Profit types for calculating billing amounts on page 49 for more information.
Enter overhead information for the employee.
To calculate overhead as a flat amount to be added to the unit cost for each single unit quantity of time, enter the amount in the Amount column for overhead.
To calculate overhead as a percentage of the actual cost for each single unit quantity of time, enter the percentage in the % column for overhead.
Click Save and close the window.
Create a position rate table
You can use the PA Position Rate Table Maintenance window (Cards > Project > Position Rate Table) to create a position rate table, which is a list of position codes and the cost and profit for each position. You can assign position rate tables to Time and Materials projects and to cost categories in Time and Materials project budgets. See Specify billing settings for a project on page 71 and Assign a rate table to a cost category in a project budget on page 85 for more information.
You can select to include all position codes in a position rate table based on a selected pay code. See Include all position codes in a rate table based on pay code on page 27 for more information.
PACM 11. JPEG
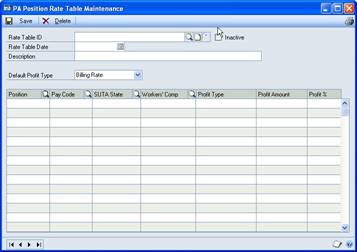
The window is similar to the PA Employee Rate Table Maintenance window. See Create an employee rate table on page 23 for more information.
Create an equipment rate table
You can create an equipment rate table, which is a list of equipment and the cost and profit for each equipment record. You can assign equipment rate tables to Time and Materials projects and to cost categories in Time and Materials project budgets. See Specify billing settings for a project on page 71 and Assign a rate table to a cost category in a project budget on page 85 for more information.
You can select to include all equipment in an equipment rate table. See Include all equipment in a rate table on page 27 for more information.
Open the PA Equipment Rate Table Maintenance window. Cards > Project > Equipment Rate Table
PACM 12.JPEG
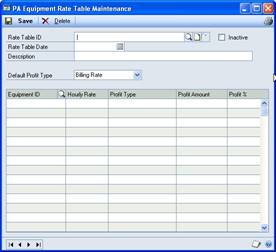
The window is similar to the PA Employee Rate Table Maintenance window.
See Create an employee rate table on page 23 for more information.
Copy information from another rate table
You can create a new rate table by copying information from another rate table. See
Create an employee rate table on page 23, Create a position rate table on page 25, and Create an equipment rate table on page 25 for more information.
- Open the rate table wizard window.
The following table lists the windows and how to open them.
| Rate Table | Choose |
|---|---|
| Employee | Cards > Project > Employee Rate Table > Enter a rate table ID > Rate Table ID wizard button |
| Position | Cards > Project > Position Rate Table > Enter a rate table ID > Rate Table ID wizard button |
| Equipment | Cards > Project > Equipment Rate Table > Enter a rate table ID > Rate Table ID wizard button PACM 13. JPEG |
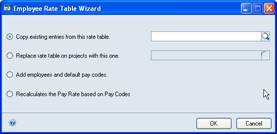
Select Copy existing entries from this rate table and select the rate table.
Click OK.
Include all employees in a rate table
You can select to include all employees in an employee rate table. See Create an employee rate table on page 23 for more information.
- Open the Employee Rate Table Wizard window.
Cards > Project > Employee Rate Table > Enter a rate table ID > Rate Table ID wizard button
Select Add employees and default pay codes.
Click OK.
Include all position codes in a rate table based on pay code
You can select to include all position codes in a position rate table based on a selected pay code. See Create an employee rate table on page 23 for more information.
- Open the Position Rate Table Wizard window.
Cards > Project > Position Rate Table > Enter a rate table ID > Rate Table ID wizard button
Select Add all positions using this pay code and select the pay code.
Click OK.
Include all equipment in a rate table
You can select to include all equipment in an equipment rate table. See Create an equipment rate table on page 25 for more information.
- Open the Equipment Rate Table Wizard window.
Cards > Project > Equipment Rate Table > Enter a rate table ID > Rate Table ID wizard button 2. Select Add all equipment.
- Click OK.
Update pay rates in an employee rate table based on pay codes
You can update pay rates in an employee rate table based on pay codes. See Create an employee rate table on page 23 for more information.
- Open the Employee Rate Table Wizard window.
Cards > Project > Employee Rate Table > Enter a rate table ID > Rate Table ID wizard button
Select Recalculates the Pay Rate based on Pay Codes.
Click OK.
Part 2: Cost budgeting templates
This part of the documentation includes information for project managers about how to create contract and project templates, and how to apply those templates to contract and project records.
Chapter 5, "Contract templates," includes information about how to create contract templates and how to include project templates in contract templates. It also includes information about applying contract templates to contracts.
Chapter 6, "Project templates," includes information for project managers about how to create project templates and apply those templates to projects.
Chapter 5: Contract templates
This part of the documentation includes information for project managers about how to create contract templates and how to include project templates in contract templates. It also includes information about applying templates to contracts.
The following topics are discussed:
Create a contract template
Specify billing settings for a contract template
Apply a contract template to a contract
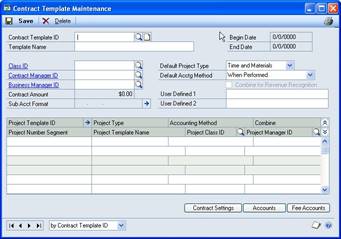
Create a contract template
You can create a contract template and select project templates to include in it.
- Open the Contract Template Maintenance window.
Cards > Project > Templates
PACM 14.JPEG
A screenshot of a cell phone Description automatically generated
This window is similar to the Contract Maintenance window. See Create a contract record on page 62 for more information.
Click Contract Settings to specify billing settings for the contract template. See Specify billing settings for a contract template on page 32 for more information.
Click Accounts to open the Contract Template Accounts window, where you can specify posting accounts for the contract template. The window is similar to the Contract Accounts window. See Specify default posting account numbers for records and classes for cost transactions on page 10 in the Project Accounting Accounting Control Guide for more information.
Click Fee Accounts to open the Contract Template Accounts - Fee window, where you can specify posting accounts for fees for the contract template. The window is similar to the Contract Accounts - Fee window. See Specify default posting account numbers for records and classes for fees on page 13 in the Project Accounting Accounting Control Guide for more information.
Click Save and close the window.
Specify billing settings for a contract template
You can specify billing settings for a contract template.
Open the Contract Template Maintenance window. Cards > Project > Templates
Select a template ID.
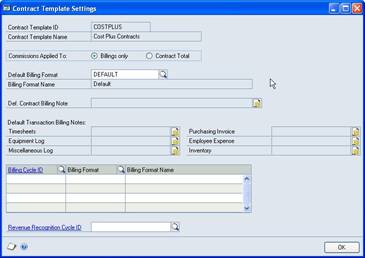
Click Contract Settings to open the Contract Template Settings window.
PACM 15. JPEG
A screenshot of a cell phone Description automatically generated
This window is similar to the Contract Settings window. See Specify billing settings for a contract on page 64 for more information.
Apply a contract template to a contract
You can apply a contract template to a contract.
If you've specified a billing currency other than the functional currency for a contract record, and you copy a template to that contract record, only cost categories with Billing Rate or None profit types in project budgets in the template will be copied. Only fees that use the Fee Amount fee calculation method in projects in the template will be copied.
Open the Contract Maintenance window. Cards > Project > Contract
Enter a customer ID, contract ID, contract name, and number.
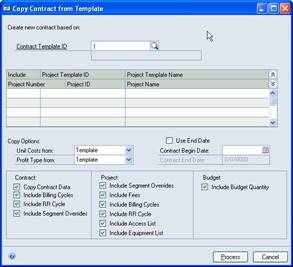
Open the Copy Contract from Template window. Template > Copy from Template
PACM 16. JPEG
A screenshot of a cell phone Description automatically generated
Select the ID of the contract template to apply to the contract.
In the scrolling window, select the project templates to apply.
Select whether to apply unit costs and profit types from the cost categories in the project template budgets or the cost category records.
Enter a contract beginning date. Select Use End Date to enter an ending date for the contract.
Select information to apply from the contract template, project templates, and cost categories in project template budgets.
Click Process. Information from the template will be displayed for the contract.
Chapter 6: Project templates
This part of the documentation includes information for project managers about how to create project templates and apply those templates to projects. Project templates can specify the equipment, employees, cost categories, and fees for projects that you apply the templates to.
The following topics are discussed:
Create a project template
Specify billing settings for a project template
Create a project template from a project record
Apply a template to a project
Create a project template
You can create a project template to apply to project records.
Open the Contract Template Maintenance window. Cards > Project > Templates
Select a contract template ID.
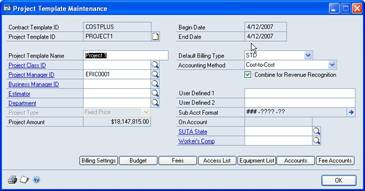
In the scrolling window, enter a project template ID and name, and click the Project Template ID expansion button. The Project Template Maintenance window will open.
PACM 17.JPEG
A screenshot of a cell phone Description automatically generated
This window is similar to the Project Maintenance window. See Create a project record on page 68 for more information.
Click Billing Settings to open the Billing Template Settings window, where you can specify billing settings for the project template. The window is similar to the Project Billing Settings window. See Specify billing settings for a project on page 71 for more information.
Click Budget to open the Budget Template Maintenance window, where you can assign cost categories to the project template budget. The window is similar to the Budget Maintenance window. See Assign cost categories to a project budget on page 80 for more information.
Click Fees to open the Fee Template window, where you can assign fees to the project template. The window is similar to the Fee Entry window. See Assign fees to a project on page 89 for more information.
Click Access List to open the Project Template Access List window, where you can assign employees to the project template. The window is similar to the Employee Access List window. See Assign employees to a project on page 75 for more information.
Click Equipment List to open the Equipment List Template window, where you can assign equipment to the project template. The window is similar to the Equipment List window. See Assign equipment to a project on page 75 for more information.
Click Accounts to open the Project Template Accounts window, where you can specify posting accounts for the project template. The window is similar to the Project Accounts window. See Specify default posting account numbers for records and classes for cost transactions on page 10 in the Project Accounting Accounting Control Guide for more information.
Click Fee Accounts to open the Project Template Accounts - Fee window, where you can specify posting accounts for fees for the project template. The window is similar to the Project Accounts - Fee window. See Specify default posting account numbers for records and classes for fees on page 13 in the Project Accounting Accounting Control Guide for more information.
Click OK.
Specify billing settings for a project template
You can specify billing settings for a project template.
Open the Contract Template Maintenance window. Cards > Project > Templates
Select a contract template ID.
In the scrolling window, select a project template ID and click the Project Template ID expansion button. The Project Template Maintenance window will open.
Click Billing Settings to open the Billing Template Settings window.
PACM 18.JPEG

A screenshot of a cell phone Description automatically generated
This window is similar to the Project Billing Settings window. See Specify billing settings for a project on page 71 for more information.
Create a project template from a project record
You can create a project template based on a project record and include the project template in a contract template.
If you create a project template based on a project record that you've specified a billing currency ID for, the billing currency ID will not be copied to the template. Project templates use the currency ID that you specified in the Functional Currency field in the Multicurrency Setup window (Microsoft Dynamics GP menu > Tools > Setup > Financial > Multicurrency).
Open the Project Maintenance window. Cards > Project > Project
Select a project number.
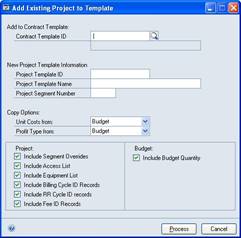
Open the Add Existing Project to Template window. Template > Add to Template
PACM 19.JPEG
A screenshot of a cell phone Description automatically generated
Select the contract ID to include the project template in.
Enter a project template ID, name, and project number segment for the new template.
Select whether to include unit costs and profit types from cost categories in the project budget or from cost category records.
Select information to include from the project and project budget.
Click Process.
Apply a template to a project
You can select a project template to apply to a project record.
If you're using a billing currency other than the functional currency for the project record that you're applying a template to, only cost categories with Billing Rate or None profit types in the template will be copied. Only fees that use the Fee Amount fee calculation method in the template will be copied.
Forecast budget amounts in the project template that you're applying to the project record will be converted to the billing currency specified for the project record, using the exchange rate that you specified for the billing currency for the project record. If the project record status is Estimate, the exchange rate specified for baseline budget amounts will be used. If the project status is Open or On Hold, the exchange rate for forecast budget amounts will be used.
Open the Project Maintenance window. Cards > Project > Project
Select a contract number. Enter a project ID, number, and name.
Open the Copy Project from Template window. Template > Copy from Template
PACM 20.JPEG
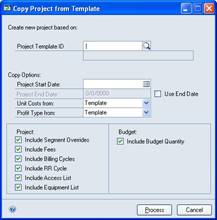
A screenshot of a cell phone Description automatically generated
Enter a project beginning date. Select Use End Date to enter an ending date for the project.
Select whether to copy profit types and unit costs from cost categories in the project template budget or from cost category records.
Select the project and budget information to be copied from the template.
Click Process.
Part 3: Cost budgeting
This part of the documentation includes information for project managers about how to set up fees and how to set up the cost categories that you can include in project budgets to calculate costs, billing amounts, revenue, and profits. The documentation also includes information about how to enter contract and project records, and how to assign employees, equipment, cost categories, and fees to projects.
Chapter 7, "General cost management setup," includes information about how to configure general settings for managing project costs. It also includes information about contract, project, and cost category statuses and about the various lists of records and transactions that you can complete common tasks from.
Chapter 8, "Profit types," includes information about how billing amounts and profit are calculated based on profit types.
Chapter 9, "Cost categories," includes information about how to set up cost categories that you can include in project budgets to track expenses.
Chapter 10, "Benefit Allocation," includes information about how you can allocate employee benefits to specific projects.
Chapter 11, "Fees," includes information about fees, including Project, Retainer, Retentions, and Service fees, and how to create fee records for them.
Chapter 12, "Contracts," includes information about how to enter contract records and how to create third-party customer lists for billing
Chapter 13, "Projects," includes information about how to enter project records and how to copy information between projects.
Chapter 14, "Project resources," includes information about how to assign equipment and employees to projects.
Chapter 15, "Project budgets," includes information about how to assign cost categories to project budgets and how to enter baseline, forecast, and actual project budget amounts for cost categories.
Chapter 16, "Project fees," includes information about how to assign fees to projects, how to modify the fee frequency, fee calculation method, and other settings for fees in projects. You also can enter baseline, forecast, and actual amounts for fees in a project budget. You also can modify a fee schedule for a fee that uses the Scheduled fee frequency.
Chapter 7: General cost management setup
This part of the documentation includes information for project managers about how to configure general settings for managing project costs. It also includes information about contract, project, and cost category statuses and about the various lists of records and transactions that you can complete common tasks from.
The following topics are discussed.
Configure general settings for all projects
Contract, project, and cost category statuses
Enter names for user-defined statuses for tracking Open projects
Enter names for user-defined field labels
Lists of records and transactions
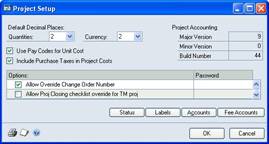
Configure general settings for all projects
You can configure general settings for all projects, such as the number of decimal places to use for quantities and currencies and whether to use employee pay codes to determine unit cost for employees on timesheets. You also can specify whether to include taxes that are calculated for cost transactions in the total cost amounts for the projects that they are entered for, and whether to allow users to modify the default change order number when entering change orders. You can specify whether to allow users to close a Time and Materials project, even though the checklist of project closing requirements isn't complete.
- Open the Project Setup window.
Microsoft Dynamics GP menu > Tools > Setup > Project > Project
PACM 21.JPEG
A screenshot of a cell phone Description automatically generated
Select the number of decimal places to use for quantities and currencies.
Select Use Pay Codes for Unit Cost to use employee pay codes to determine unit cost for employees on timesheets.
You can update U.S. Payroll or Canadian Payroll using timesheets. You must select Post to Payroll and the correct payroll module in the Timesheet Setup window. See Set up timesheets for tracking project costs and billing customers on page 120 for more information.
Select Include Purchase Taxes in Project Costs to include taxes that are calculated for cost transactions in the total cost amounts for the projects that they are entered for. Taxes also will be included in calculating billing amounts and revenue.
Select Allow Override Change Order Number to allow users to modify the default change order number when entering change orders. You also can require a password to limit user access. See Chapter 18, "Project change control," for more information.
Select Allow Proj Closing checklist override for TM proj to allow users to close a Time and Materials project, even though the checklist of project closing requirements isn't complete. You also can require a password to limit user access. See Close projects on page 114 and Project closing checklist on page 115 for more information.
Click Status to set up statuses for contracts, projects, and cost categories. See Enter names for user-defined statuses for tracking Open projects on page 46 for more information.
Click Labels to specify user-defined field labels. See Enter names for user-defined field labels on page 47 for more information.
Click Accounts to specify how posting accounts will be selected for cost transactions. See Specify default posting account numbers for cost categories in project budgets on page 11 in the Project Accounting Accounting Control Guide for more information.
Click Fee Accounts to specify how posting accounts will be selected for fees. See Specify default posting account numbers for fees assigned to projects on page 14 in the Project Accounting Accounting Control Guide for more information.
Click OK.
Contract, project, and cost category statuses
The status of a contract, project, or cost category determines whether you can enter cost or billing transactions, recognize revenue, or close a project. Except for the Closed status, you can change the status of a project from any status to another at any time.
You can use up to 10 statuses, including five default statuses and up to five userdefined statuses. See Enter names for user-defined statuses for tracking Open projects on page 46 for more information.
There are five default statuses.
Estimate
When you create a new contract or project, or when you assign a cost category to a project budget, the default status will be Estimate because it prevents users from entering cost transactions. When a project has an Estimate status, you can assign new cost categories to project budgets and enter baseline budget amounts. You also can delete cost categories from project budgets.
When you're ready to enter cost transactions, bill customers, and recognize revenue, change the status to Open.
Because the Estimate status prevents users from entering cost transactions, you also can use the status to suspend cost accrual for a entire project or for an individual cost category in a project budget. You can enter change orders for contracts and projects that have an Estimate status, however.
You can change the status of a contract to Estimate or Open at any time, even after changing the status of the contract to Closed.
Open
You typically select the Open status after you've entered baseline amounts for a project budget and you're ready to enter cost transactions for the project.
When you change the status of a contract from Estimate to Open, you will be asked whether to change the status of all projects in the contract to Open.
If you select the Open status, you can't modify baseline budget amounts or delete cost categories from project budgets. You can modify forecast budget amounts and, as you post cost transactions, actual amounts will be updated. You can enter new projects for contracts that are in the Open status. You also can bill customers and recognize revenue.
On Hold
To temporarily prevent cost and billing transactions from being entered and to prevent revenue recognition, select the On Hold status. You can enter change orders, however.
Completed
When you change the status of a project to Completed, you will be asked whether to change the statuses of all cost categories in the project budget to Completed.
If you change the status of a cost category in a Fixed Price project budget to Completed, the cost category will become 100% complete.
You can continue to enter cost and billing transactions and recognize revenue.
Closed
When all cost and billing transactions have been posted, all customer payments received, and all revenue has been recognized for a project, you can close the project. You can close only projects that have a Completed status. After you close a project the status will be Closed. See Close projects on page 114 for more information.
When all projects in a contract have been closed, the status of the contract will be Closed.
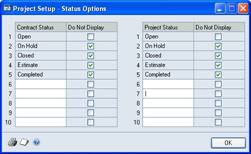
Enter names for user-defined statuses for tracking Open projects
You can enter names for up to five additional statuses to be used for contracts, projects, and cost categories in project budgets. The statuses that you name will be equivalent to the Open status. You can use these named statuses to track the status of Open projects according to your business processes.
- Open the Project Setup – Status Options window.
Microsoft Dynamics GP menu > Tools > Setup > Project > Project > Status button
PACM 24.JPEG
A screenshot of a computer Description automatically generated
In fields 6 through 10, enter names for contract and project statuses.
For each status, select whether to display contracts or projects with the status in transaction entry lookup windows.
Click OK.
Enter names for user-defined field labels
You can name labels that will be displayed for user-defined fields in various record and transaction entry windows. You can use these user-defined fields to track additional information according to your business processes.
- Open the Project Setup – Label Options window.
Microsoft Dynamics GP menu > Tools > Setup > Project > Project > Labels button
PACM 25.JPEG

A screenshot of a cell phone Description automatically generated
- Enter labels for user-defined fields.
The following table lists windows with user-defined fields.
| Fields | The fields are displayed in this window |
|---|---|
| Contract | Contract Maintenance |
| Cost Category | Cost Category Maintenance |
| Customer | PA Customer Options |
| Employee | PA Employee Options |
| Equipment | Equipment Maintenance |
| Fee | Fee Maintenance |
| Miscellaneous | Miscellaneous Maintenance |
| Project | Project Maintenance |
| Vendor | PA Vendor Options |
- Click OK.
Lists of records and transactions
You can use lists of records and transactions in the navigation pane to complete common tasks. See the System User's Guide (Help > Printable Manuals) for more information.
Project Accounting lists
You can use the Project Accounting series button to display the following lists.
Contracts Use the Contracts list to enter, modify, and view contract records and to enter project records.
Projects Use the Projects list to enter, modify, and view projects, to enter inventory transfers and billing invoices, and to view transactions.
Cost Categories Use the Cost Categories list to enter, modify, and view cost categories.
Billings Use the Billings list to enter, modify, and view billing invoices and returns.
Timesheets Use the Timesheets list to enter, modify, and view timesheets.
Employee Expenses Use the Employee Expenses list to enter, modify, and view employee expense transactions.
Other lists
You can use the Sales, Purchasing, and Payroll buttons to display the following lists.
Customers Use the Customers list from the Sales button to enter contracts, projects, and billing invoices.
Purchasing Use the All Purchasing Transactions list from the Purchasing button to enter purchase orders, shipment receipts, shipment/invoice receipts, and invoice receipts.
Employees Use the Employees list from the Payroll button to enter timesheets and employee expense transactions.
Chapter 8: Profit types
This part of the documentation includes information for project managers about how billing amounts and profit are calculated based on profit types.
The following topics are discussed:
Profit types for calculating billing amounts
Default profit types
Profit types for calculating billing amounts
Profit types are used to determine profit and calculate billing amounts.
Profit types for all project types
You can use the following profit types for Time and Materials, Cost Plus, and Fixed Price projects.
None Billing amounts are always zero.
Price Level Billing amounts are calculated using price levels for inventoried items included in cost categories.
Profit types for Time and Materials projects only
You can use the following profit types for Time and Materials projects.
Billing Rate You can enter a flat amount for the billing rate. Billing amounts will be calculated using quantities and the billing rate.
Markup % You can enter a percentage for the markup. Billing amounts will be calculated using actual cost, plus a percentage markup of actual cost.
Profit types for Cost Plus projects only
You can use the following profit type for Cost Plus projects.
Profit/Unit - Variable You can enter a flat amount for profit. Billing amounts will be calculated using actual cost, plus the profit for each unit quantity. You can change the flat amount for profit when the project is Open.
Profit types for Cost Plus and Fixed Price projects
You can use the following profit types for Cost Plus and Fixed Price projects.
% of Actual You can enter a percentage. Billing amounts will be calculated using a percentage of actual cost.
% of Baseline You can enter a percentage. Billing amounts will be calculated using a percentage of the baseline budget amount.
Profit/Unit - Fixed You can enter a flat amount. Billing amounts will be calculated using actual cost plus the flat amount for each unit quantity.
Total Profit You can enter a flat amount. The billing amount will be the flat amount.
Default profit types
When you set up cost transactions for tracking project costs, you can select the default profit type to use for cost transactions.
Employee Use the profit type for the employee record. See Set up an employee record for tracking project costs and billing customers on page 14 for more information.
Budget Use the profit type for the cost category in the project budget. See Enter project budget settings for a cost category on page 81 for more information.
Cost Category Use the profit type for the cost category record. See Create a cost category record on page 51 for more information.
Equipment Use the profit type for the equipment record. See Set up an equipment record for tracking project costs and billing customers on page 20 for more information.
Miscellaneous Use the profit type for the miscellaneous record. See Set up a miscellaneous record for tracking project costs and billing customers on page 22 for more information.
If you enter a line item for a cost transaction and you select a project that uses a billing currency ID that is not for the functional currency, the profit type for that line item will be based on the profit type that you specified for the cost category in the project budget.
See Part 5, Project cost tracking for more information.
Chapter 9: Cost categories
This part of the documentation includes information for project managers about how to set up cost categories that you can include in project budgets to track expenses.
The following topics are discussed:
Create a cost category class
Create a cost category record
Associate benefits with a cost category or cost category class
Allocate benefits to accounts
Create a cost category class
You can create a cost category class. If you assign a cost category to the class, the cost category will inherit information from the class. See Create a cost category record on page 51 for more information.
- Open the Cost Category Class Setup window.
Microsoft Dynamics GP menu > Tools > Setup > Project > Cost Category Class
PACM 26.JPEG
Enter a class ID and description.
Select Default to make the settings for this cost category class the default settings for new cost category classes.
The remaining entries are the same for creating a cost category record. See Create a cost category record for more information.
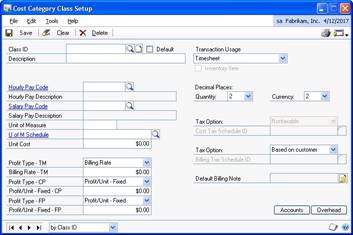
Create a cost category record
You can create a cost category record that you can assign to project budgets to track project costs.
If you don't have permission to create cost categories, you can use the Cost Category Inquiry window (Inquiry > Project > Maintenance > Cost Category) to view them.
- Open the Cost Category Maintenance window. Cards > Project > Cost Category
PACM 27.JPEG
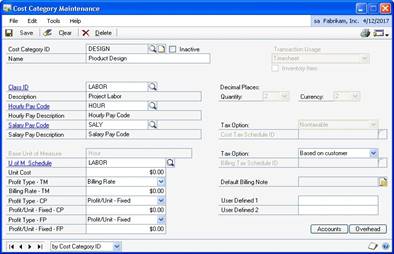
A screenshot of a computer Description automatically generated
Enter a cost category ID and name.
You can select a cost category class ID. If you assign a cost category to the class, the cost category will inherit information from the class.
Select the transaction type that the cost category will be used for. See Cost categories and cost transactions on page 79 for more information.
If you select Purchases/Material, indicate whether the cost category is for inventoried items.
If you selected Timesheets, select pay codes for hourly or salaried pay. See the U.S. Payroll or Canadian Payroll documentation (Help > Printable Manuals) for information about entering pay codes.
Select a unit of measure schedule. The base unit of measure will be displayed in the Unit of Measure field. See Create a unit of measure schedule on page 9 for more information.
Enter a unit cost.
Select profit types for cost category for Time and Materials, Cost Plus, and Fixed Price projects and enter amounts or percentages in the corresponding fields. See Profit types for calculating billing amounts on page 49 for more information.
Select the number of decimal places to display for quantities and currencies. Your selections must match the settings for the unit of measure schedule.
For cost and billing transactions, select whether cost and billing amounts for the cost category are taxable, non-taxable, or based on the tax settings for the vendor or customer. The tax schedule for cost transactions is for employee expense transactions, purchase orders, shipment receipts, shipment/invoice receipts, invoice receipts, and inventory transfers with non-inventoried items.
Click the billing note button to enter a billing note. See Billing notes for invoices on page 16 in the Project Accounting Billing Guide for more information.
Click the Go To button and choose Benefits to open the Benefit Setup window and associate employee benefits to a cost category or cost category class. This button is available only when the transaction type is Timesheet. See Associate benefits with a cost category or cost category class for more information.
Click Accounts to specify posting accounts for the cost category. See Specify default posting account numbers for records and classes for cost transactions on page 10 in the Project Accounting Accounting Control Guide for more information.
Click Overhead to specify how overhead will be calculated for the cost category. See Overhead calculation methods on page 11 for more information.
Click Save and close the window.
Associate benefits with a cost category or cost category class
You can associate employee benefits with a cost category code or cost category class ID in the Benefit Setup window, if the transaction usage specified is Timesheet.
- Open the Benefit Setup window.
Cards > Project > Cost Category > select a Cost Category ID > Go To button > Benefits
Microsoft Dynamics GP menu > Tools > Setup > Project > Cost Category Class > Go To button > Benefits
PACM 28.JPEG
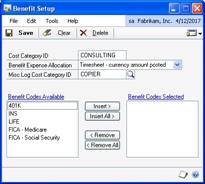
Select whether to allocate benefits based on currency amounts or hours posted.
Enter or select a value in the Misc. Log Cost Category ID field. This value is used in the Miscellaneous Log Entry window to calculate the benefit amount for the project.
To add a benefit, select it in the Benefit Codes Available list and click Insert.
If you want to assign an account for the benefit other than the one set up for the cost category or cost category class, see Allocate benefits to accounts for more information.
Click Save.
Allocate benefits to accounts
You can use the Benefit Cost Category Accounts window to assign a different account to the benefit other than the one set up for the cost category or cost category class.
- Open the Benefit Cost Category Accounts window.
Cards > Project > Cost Category > Go To button > Benefits > Go To button >
Accounts
Microsoft Dynamics GP menu > Tools > Setup > Project > Cost Category Class > Go To button > Benefits > Go To button > Accounts
PACM 29.JPEG
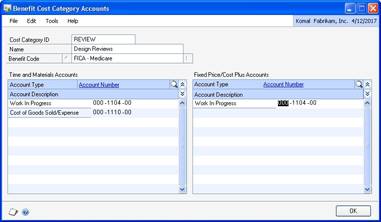
Select a benefit code.
Select the accounts to be used for time and materials projects, and for fixed price/cost plus projects.
Click OK.
Chapter 10: Benefit Allocation
This part of the documentation includes information on how employee benefits are allocated to a project to reflect the true cost of the work performed. The following topics are discussed:
Understanding benefit allocation
Process the benefit allocation
Understanding benefit allocation
You can use benefit allocation to allocate expenses incurred on employee benefits to specific projects. Each benefit in Payroll that has an employer expense component is assigned to a Project Accounting cost category. The cost of the benefit is allocated to the project based on hours or currency units. The allocation of a benefit to a project is determined on the basis of the project timesheet that is transferred to a payroll batch. Benefits entered directly in a payroll batch are not allocated to projects.
When you post a payroll batch with the benefits allocated in the project accounting timesheet, a benefit allocation process should be run. This process splits the benefits proportionately among the projects that the employee worked on.
For related information, see Associate benefits with a cost category or cost category class on page 53, and Allocate benefits to accounts on page 54.
Process the benefit allocation
You can process the allocation of benefits to the project using the Benefit Allocation window.
- Open the Benefit Allocation window.
Microsoft Dynamics GP menu > Tools > Routines > Projects > Benefit Allocation
PACM 30.JPEG
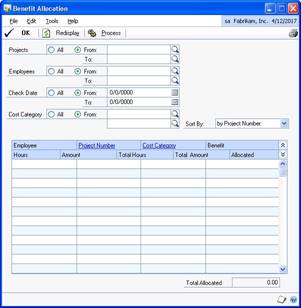
Enter or select ranges of projects, employees, check dates, or cost categories.
Select a sorting option for information in the scrolling window.
Click Redisplay to display details of the benefits to be allocated, based on the ranges you selected.
In the scrolling window, review details of each proposed allocation.
Click OK to save your selection.
Click Process to run the benefit allocation process and to allocate the selected benefit amounts to the project. A miscellaneous log batch is created with a transactions. See Enter a miscellaneous log on page 135 for more information.
After processing is complete, a report will be printed, listing any errors that occurred.
Chapter 11: Fees
This part of the documentation includes information for project managers about fees, including Project, Retainer, Retentions, and Service fees, and how to create fee records for them.
The types of fees that you can include in a project depends on whether you're using a Cost Plus, Fixed Price, or Time and Materials project. Various fee frequencies and fee calculation methods can be used for fees, depending on the fee type.
The following topics are discussed:
Types of fees
Create a Project fee
Create a Retainer fee
Create a Retentions fee
Create a Service fee
Types of fees
There are four types of fees that you can bill customers for.
Project A flat amount billed using a fee schedule, or a percentage of total baseline project costs or revenue that you can bill during each billing cycle using a fee schedule or after the project is complete.
Retainer A flat amount billed using a fee schedule. Retainer fee amounts are held on account and can be applied to billing amounts. See Enter payments, taxes, and other charges for a billing invoice on page 36 in the Project Accounting Billing Guide for more information.
Retentions A percentage of total baseline project costs that isn't billed until the project status is Completed. This fee is for Cost Plus and Fixed Price projects only. You also can hold a portion of a Project fee in retention.
Service An flat amount billed using a fee schedule. This fee is for Time and Materials projects only.
Create a Project fee
You can create a Project fee record that you can assign to a project. See Assign fees to a project on page 89 for more information.
- Open the Fee Maintenance window. Cards > Project > Fee
PACM 31.JPEG
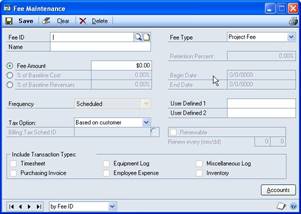
A screenshot of a cell phone Description automatically generated
Enter a fee ID and name.
Select the Project fee type. See Types of fees on page 57 for more information.
Select the fee calculation method and fee frequency.
If the fee is to be a flat amount billed using a fee schedule, select Fee Amount and enter the amount.
If the fee is to be a percentage of total baseline project costs that you can bill using a fee schedule, first select % of Baseline Cost and enter a percentage, then select Scheduled in the Frequency list. Select the transaction types to include in the calculation of total project cost.
If the fee is to be a percentage of total baseline project costs that you can bill during each billing cycle, first select % of Baseline Cost and enter a percentage, then select Per Invoice in the Frequency list. Select the transaction types to include in the calculation of total project cost.
If the fee is to be a percentage of total baseline project costs that you can bill during each billing cycle, first select % of Baseline Cost and enter a percentage, then select At Project Completion in the Frequency list. Select the transaction types to include in the calculation of total project cost.
If the fee is to be a percentage of total baseline project revenue that you can bill using a fee schedule, first select % of Baseline Cost and enter a percentage, then select Scheduled in the Frequency list. Select the transaction types to include in the calculation of total project revenue.
If the fee is to be a percentage of total baseline project revenue that you can bill during each billing cycle, first select % of Baseline Revenue and enter a percentage, then select Per Invoice in the Frequency list. Select the transaction types to include in the calculation of total project revenue.
- If the fee is to be a percentage of total baseline project revenue that you can bill during each billing cycle, first select % of Baseline Revenue and enter a percentage, then select At Project Completion in the Frequency list. Select the transaction types to include in the calculation of total project revenue.
Select whether the fee amount is taxable, non-taxable, or based on the tax settings for the customer. If the fee is Taxable, select a tax schedule.
Click Accounts to specify posting accounts for the fee. See Specify default posting account numbers for records and classes for fees on page 13 in the Project Accounting Accounting Control Guide for more information.
Click Save and close the window.
Create a Retainer fee
You can create a fee record that you can assign to a project. See Assign fees to a project on page 89 for more information.
Open the Fee Maintenance window. Cards > Project > Fee
Enter a fee ID and name.
Select the Retainer fee type. See Types of fees on page 57 for more information.
Enter the fee amount.
Select whether the fee amount is taxable, non-taxable, or based on the tax settings for the customer. If the fee is Taxable, select a tax schedule.
Click Accounts to specify posting accounts for the fee. See Specify default posting account numbers for records and classes for fees on page 13 in the Project Accounting Accounting Control Guide for more information.
Click Save and close the window.
Create a Retentions fee
You can create a fee record that you can assign to a project. See Assign fees to a project on page 89 for more information.
Open the Fee Maintenance window. Cards > Project > Fee
Enter a fee ID and name.
Select the Retentions fee type. See Types of fees on page 57 for more information.
Enter a retention percentage and select the transaction types to include in the calculation of total project cost.
Select whether the fee amount is taxable, non-taxable, or based on the tax settings for the customer. If the fee is Taxable, select a tax schedule.
Click Accounts to specify posting accounts for the fee. See Specify default posting account numbers for records and classes for fees on page 13 in the Project Accounting Accounting Control Guide for more information.
Click Save and close the window.
Create a Service fee
You can create a fee record that you can assign to a project. See Assign fees to a project on page 89 for more information.
Open the Fee Maintenance window. Cards > Project > Fee
Enter a fee ID and name.
Select the Service fee type. See Types of fees on page 57 for more information.
Enter the fee amount.
Enter the beginning date and ending date for the fee. To make the fee recurring, you must select a beginning and ending date that are exactly one year apart, then select Renewable and enter the month and day that the fee will recur.
Select whether the fee amount is taxable, non-taxable, or based on the tax settings for the customer. If the fee is Taxable, select a tax schedule.
Click Accounts to specify posting accounts for the fee. See Specify default posting account numbers for records and classes for fees on page 13 in the Project Accounting Accounting Control Guide for more information.
Click Save and close the window.
Chapter 12: Contracts
This part of the documentation includes information for project managers about how to enter contract records.
A contract might include more than one project, and you can view baseline, forecast, and actual costs and quantities for the various projects in a contract.
The following topics are discussed:
About contracts, projects, and cost categories
Set up a contract class for billing customers
Create a contract record
Specify billing settings for a contract
Create a third-party customer list for billing
About contracts, projects, and cost categories
A cost category determines how costs, billing amounts, revenue, and profits are calculated for a specific activity. You can assign cost categories to a project budget and use the budget to estimate and track project performance. You also can assign fees to a project.
A contract includes one or more projects that you're carrying out for a customer. You can create multiple contracts for a customer. You can't create a contract for multiple customers, but you can create a third-party customer list for billing. See Create a third-party customer list for billing on page 65 for more information.
Set up a contract class for billing customers
You can set up a contract class for billing customers. If you assign a contract to the class, the contract will inherit information from the class. See Create a contract record on page 62 for more information.
- Open the Contract Class Setup window.
Microsoft Dynamics GP menu > Tools > Setup > Project > Contract ClasS
PACM 32.JPEG
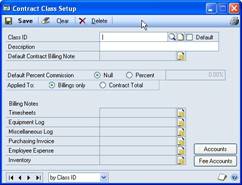
Enter a class ID and description.
Select Default to make the settings for this contract class the default settings for new contract classes.
The remaining entries are the same for setting up a contract record for billing customers. See Specify billing settings for a contract on page 64 for more information.
Click Accounts to specify posting accounts for the contract class. See Specify default posting account numbers for records and classes for cost transactions on page 10 for more information.
Click Fee Accounts to specify posting accounts for fees for the contract class. See Specify default posting account numbers for records and classes for fees on page 13 for more information.
Click Save and close the window.
Create a contract record
You can create a contract to group and track various projects for a customer. See About contracts, projects, and cost categories on page 61 for more information.
If you're using Multicurrency Management, you can specify the billing currency to use when billing customers for project costs for the contract. You can use billing currency IDs with Time and Materials projects that use the When Performed or When Billed accounting methods and that include cost categories with the Billing Rate or None profit types in project budgets. You also can use billing currency IDs with Fixed Price projects that include cost categories with the None profit type in project budgets.
You can apply a template to the contract. See Apply a contract template to a contract on page 32 for more information.
If you don't have permission to enter contracts, you can use the PA Contract Inquiry window (Inquiry > Project > Maintenance > Contract) to view them.
- Open the Contract Maintenance window. Cards > Project > Contract
PACM 33.JPEG
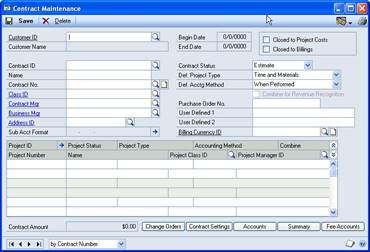
A screenshot of a computer Description automatically generated
Select a customer ID.
Enter a contract ID, name, and number.
You can select a class ID. The contract will inherit settings from the class.
Select a contract manager and business manager. Only employees specified as Project Manager or Business Manager in the PA Employee Options window can be specified as the contract manager or business manager for a contract. See Set up an employee record for tracking project costs and billing customers on page 14 for more information.
Click the Sub Acct Format expansion button to modify account segment numbers for the contract. See Specify account segment numbers to use when posting amounts for a contract on page 16 in the Project Accounting Accounting Control Guide for more information.
You can select Closed to Project Costs or Closed to Billings to prevent the accrual of costs or to prevent billing for projects in the contract.
Select the contract status. See Contract, project, and cost category statuses on page 44 for more information.
Select a default project type and accounting method for new projects for the contract. See Accounting methods and recognizing revenue on page 27 in the Project Accounting Accounting Control Guide for more information.
If the default project type is Cost Plus or Fixed Price, you can select Combine for Revenue Recognition to combine revenue from various projects in the same contract. See Percentage complete and revenue recognition calculations on page 28 in the Project Accounting Accounting Control Guide for more information.
If you select Combine for Revenue Recognition and the contract includes projects with varying project types, the Choose Accounting Method window will open. Use this window to specify the accounting method to be used when recognizing revenue for projects in the contract.
Enter the purchase order number from the customer for the contract.
In the Billing Currency ID field select the currency to use when billing customers for project costs for the contract.
The default currency ID is the currency ID that you specified for the customer the contract is for using the Customer Maintenance Options window (Cards > Sales > Customer > Options button). If you haven't specified a currency ID for the customer, the default currency will be the functional currency.
You can choose commands in the View > Currency menu to enter or view amounts using the functional or originating currency if Multicurrency Management is registered.
After you've entered a project for a contract, you can't change the billing currency ID for the contract.
You can enter a project ID and name and click the Project ID expansion button to enter a new project for the contract. See Create a project record on page 68 for more information.
Click Change Orders to enter change order settings for the contract. See Enter change order settings for a contract on page 102 for more information.
The Change Orders button will not be available if the currency ID specified in the Billing Currency ID field is not for the functional currency.
Click Contract Settings to specify billing settings for the contract. See Specify billing settings for a contract on page 64 for more information.
Click Accounts to specify posting accounts for the contract. See Specify default posting account numbers for records and classes for cost transactions on page 10 in the Project Accounting Accounting Control Guide for more information.
Click Summary to view baseline, forecast, and actual amounts for the project budgets in the contract.
Click Fee Accounts to specify posting accounts for fees for the contract. See Specify default posting account numbers for records and classes for fees on page 13 in the Project Accounting Accounting Control Guide for more information.
Click Save and close the window.
Specify billing settings for a contract
You can specify billing settings for a contract.
If you don't have permission to specify billing settings for a contract, you can use the Contract Settings-Inquiry window (Inquiry > Project > Maintenance > Contract > Contract Settings button) to view the billing settings.
Open the Contract Maintenance window. Cards > Project > Contract
Enter or select a contract ID.
Click Contract Settings to open the Contract Settings window.
PACM 34.JPEG
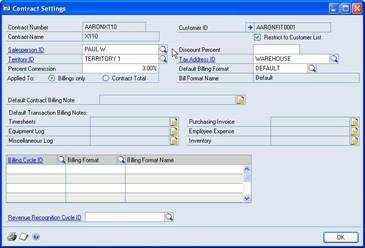
A screenshot of a social media post Description automatically generated
Select the salesperson and sales territory for the contract. Enter the commission percentage that the salesperson will be paid for the contract. Select Contract Total to base the commission on the total billing amount for the contract, including taxes and discounts, or Billings only to base the commission on amounts billed for each project in the contract.
Click the Customer ID expansion button to create a third-party customer list for the contract. See Create a third-party customer list for billing on page 65 for more information.
Select Restrict to Customer List to indicate that only customers that are included on a third-party customer list for the contract can be billed for projects in the contract.
If you're giving the customer a discount for the contract, enter the percentage in the Discount Percent field.
In the Tax Address ID field select the customer address that billing invoices for the contract will be sent to.
Select the default billing format to use for billing the customer for projects in the contract. See Group invoice formats into a billing format on page 16 in the Project Accounting Billing Guide for more information.
Select the default billing note for the contract and for cost transactions for the contract. See Specify information to include on an invoice format on page 11 in the Project Accounting Billing Guide for more information.
Select billing cycles to use for billing the customer for projects in the contract. You can select a billing format to use with each billing cycle. See Create a billing cycle on page 9 in the Project Accounting Billing Guide for more information.
Select a revenue recognition cycle to use for recognizing revenue for projects in the contract. See Create a revenue recognition cycle record on page 25 in the Project Accounting Accounting Control Guide for more information.
Click OK.
Create a third-party customer list for billing
You can create a third-party customer list for a contract or project. Then, when you create billing invoices for projects, you can bill third-party customers for project amounts directly instead of billing the customer that the contract is for.
- Open the Third Party Customer List window.
For a contract, choose Cards > Project > Contract > Contract Settings button > Customer ID expansion button
For a project, choose Cards > Project > Project > Billing Settings button > Customer ID expansion button
PACM 35.JPEG
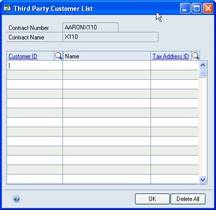
Select customers to include on the third-party customer list for the contract.
In the Tax Address ID column, select the customer addresses that billing invoices for the contract will be sent to.
Click OK.
Chapter 13: Projects
This part of the documentation includes information for project managers about how to enter project records and how to copy information between projects.
The following topics are discussed:
Set up a project class for billing customers
Project types
Billing types
Create a project record
Specify billing settings for a project
Replace a rate table used with projects
Copy information between projects
Set up a project class for billing customers
You can set up a project class for billing customers. If you assign a project to the class, the project will inherit information from the class. See Create a project record on page 68 for more information.
- Open the Project Class Setup window.
Microsoft Dynamics GP menu > Tools > Setup > Project > Project Class
PACM 36.JPEG
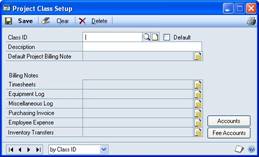
Enter a class ID and description.
Select Default to make the settings for this project class the default settings for new project classes.
The remaining entries are the same for setting up a project record for billing customers. See Specify billing settings for a project on page 71 for more information.
Click Accounts to specify posting accounts for the project class. See Specify default posting account numbers for records and classes for cost transactions on page 10 in the Project Accounting Accounting Control Guide for more information.
Click Fee Accounts to specify posting accounts for fees for the project class. See Specify default posting account numbers for records and classes for fees on page 13 in the Project Accounting Accounting Control Guide for more information.
Click Save and close the window.
Project types
You can specify default project types for contracts, and you can select project types for specific projects.
Cost Plus
The customer pays for actual project costs plus a fee. Each billing invoice is for a percentage of the final total that is calculated using forecast budget amounts. As costs rise for the project, your company's profit remains the same.
Fixed Price
The customer pays a predetermined amount for the entire project. Each billing invoice is for a percentage of the predetermined total billing amount. As costs rise for the project, your company's profit decreases.
Time and Materials
The customer is billed for project costs as they are incurred. The amount that the customer is billed is based on billing rates or markup percentages for time and materials used for the project. Time includes the time that employees spend working on a project and for equipment used for the project. Materials include inventoried and non-inventoried items used for the project.
Billing types
Billing types determine whether details from cost transactions and billing amounts can be printed on billing invoices.
Standard
The Standard billing type is sometimes abbreviated STD. If you use this billing type, details from cost transactions and the billing amounts can be printed on billing invoices.
No Charge
The No Charge billing type is sometimes abbreviated N/C. If you use this billing type, details from cost transactions can be printed on billing invoices. The billing amounts will be zero.
Non-billable
The Non-billable billing type is sometimes abbreviated N/B. If you use this billing type, neither details from cost transactions nor billing amounts will be printed on billing invoices. Cost transaction line items that use this billing type will not be displayed in the Time and Materials Billing window. See Select line items to bill and modify billing amounts for a Time and Materials project on page 32 in the Project Accounting Billing Guide for more information.
Create a project record
You can create a project record to estimate, manage, and track project costs.
You can apply a template to a project. See Apply a template to a project on page 38 for more information.
If you don't have permission to enter project records, you can use the Project Inquiry window (Inquiry > Project > Maintenance > Project) to view them.
- Open the Project Maintenance window. Cards > Project > Project
PACM 37.JPEG
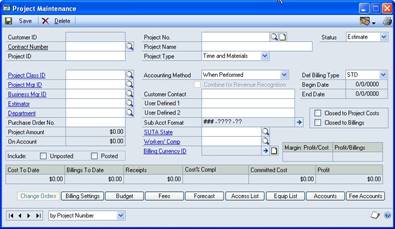
A screenshot of a computer Description automatically generated
Select a contract number. The status for the contract you select must be Estimate or Open.
Enter a project ID, number, and name.
Select a project type.
Select the status Estimate.
You can select a class ID. The project will inherit settings from the class.
Select a project manager, business manager, and estimator. Only employees specified as Project Manager or Business Manager in the PA Employee Options window can be specified as the project manager or business manager for a project. See Set up an employee record for tracking project costs and billing customers on page 14 for more information.
Select the department that will complete the project.
Enter the purchase order number from the customer for the project. The default number is from the contract. See Create a contract record on page 62 for more information.
Select an accounting method. See Accounting methods and recognizing revenue on page 27 in the Project Accounting Accounting Control Guide for more information.
For a Cost Plus or Fixed Price project you can select Combine for Revenue Recognition to combine revenue from the cost categories in the project budget. See Percentage complete and revenue recognition calculations on page 28 in the Project Accounting Accounting Control Guide for more information.
Enter the customer contact person.
Click the Sub Acct Format expansion button to modify account segment numbers for the project. See Specify account segment numbers to use when posting amounts for a project on page 17 in the Project Accounting Accounting Control Guide for more information.
Select the default billing type for cost transactions for the project. See Billing types on page 68 for more information.
You can select Closed to Project Costs or Closed to Billings to prevent the accrual of costs or to prevent billing for the project.
If you're using Project Accounting with U.S. Payroll, assign a SUTA code for the project. See the U.S. Payroll documentation (Help > Printable Manuals) for more information.
If you're using Project Accounting with U.S. Payroll or Canadian Payroll, assign a workers' compensation code for the project. See the U.S. Payroll or Canadian Payroll documentation (Help > Printable Manuals) for more information.
If you're using Multicurrency Management, the Billing Currency ID field will display the currency ID that you specified using the Contract Maintenance window (Cards > Project > Contract) for the contract that the project is for.
You can use billing currency IDs with Time and Materials projects that use the When Performed or When Billed accounting methods and that include cost categories with the Billing Rate or None profit types in project budgets. You also can use billing currency IDs with Fixed Price projects that include cost categories with the None profit type in project budgets.
When you enter a cost transaction, if you don't have a billing currency specified for a project, the currency ID that you select for the cost transaction will be used to calculate billing rates and accrued revenue for the project.
You can click the Billing Currency ID expansion button to open the PA Baseline Exchange Rate Entry window or the PA Forecast Exchange Rate Entry window, where you can specify the exchange rate to use for the billing currency for the project.
- Select whether to display values in the Margin: Profit/Cost, Profit/Billings, Cost to Date, Billings to Date, Receipts, Cost% Compl, Committed Cost, and Profit fields, based on Posted or Unposted (saved) transactions.
If you're using Multicurrency Management, you can choose commands in the View > Currency menu to enter or view amounts using the functional or originating currency.
- Click Change Orders to enter change order settings for the project. See Enter change order settings for a project on page 103 for more information.
The Change Orders button will not be available if the currency ID specified in the Billing Currency ID field is not for the functional currency.
Click Billing Settings to specify billing settings for the project. See Specify billing settings for a project on page 71 for more information.
Click Budget to assign cost categories to the project budget. See Assign cost categories to a project budget on page 80 for information.
Click Fees to assign fees to the project. See Assign fees to a project on page 89 for information.
Click Forecast to modify project budget amounts. See Modify project budget amounts on page 87 for more information.
Click Access List to assign employees to the project. See Assign employees to a project on page 75 for information.
Click Equip List to assign equipment to the project. See Assign equipment to a project on page 75 for information.
Click Accounts to specify posting accounts for the project. See Specify default posting account numbers for records and classes for cost transactions on page 10 in the Project Accounting Accounting Control Guide for information.
Click Fee Accounts to specify posting accounts for fees for the project. See Specify default posting account numbers for records and classes for fees on page 13 in the Project Accounting Accounting Control Guide for information.
Click Save and close the window.
Specify billing settings for a project
You can specify billing settings for a project.
If you don't have permission to specify billing settings for a project, you can use the Project Billing Settings Inquiry window (Inquiry > Project > Maintenance > Project > Billing Settings button) to view billing settings.
- Open the Project Billing Settings window.
Cards > Project > Project > Billing Settings button
PACM 38.JPEG
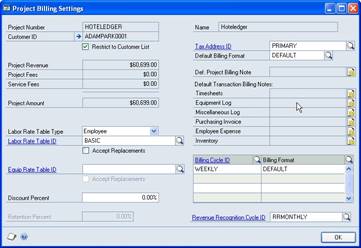
- Click the Customer ID expansion button to create a third-party customer list for the project. See Create a third-party customer list for billing on page 65 for more information.
Select Restrict to Customer List to indicate that only customers that are included on a third-party customer list for the project can be billed for the project.
You can select to use rate tables with the project.
Select to use an employee or position rate table to calculate cost and profit for employees assigned to the project.
Select to use an equipment rate table to calculate cost and profit for equipment assigned to the project.
Select Accept Replacements to allow users to update the rate table for the project after the rate table record has been updated. See Replace a rate table used with projects on page 72 for more information.
See Chapter 4, "Rate tables," for more information.
If you don't assign a rate table to a project, you can't assign a rate table to a cost category in the project budget. See Assign a rate table to a cost category in a project budget on page 85 for more information.
If you're giving the customer a discount for the project, enter the percentage in the Discount Percent field.
In the Tax Address ID field select the customer address that billing invoices for the project will be sent to.
Select the default billing format to use for billing the customer for the project. See Chapter 2, "Invoice and billing formats," in the Project Accounting Billing Guide for more information.
Select the default billing note for the project and for cost transactions for the project. See Specify information to include on an invoice format on page 11 in the Project Accounting Billing Guide for more information.
Select billing cycles to use for billing the customer for the project. You can select a billing format to use with each billing cycle. See Create a billing cycle on page 9 in the Project Accounting Billing Guide for more information.
Select a revenue recognition cycle to use for recognizing revenue for the project. See Create a revenue recognition cycle record on page 25 in the Project Accounting Accounting Control Guide for more information.
Click OK.
Replace a rate table used with projects
You can replace the rate table used in projects with another rate table. See Create an employee rate table on page 23, Create a position rate table on page 25, and Create an equipment rate table on page 25 for more information.
Accept Replacements must be selected in the Project Billing Settings window to allow users to update the rate table for the project. See Specify billing settings for a project on page 71 for more information.
- Open the rate table wizard window.
For an employee rate table, choose Cards > Project > Employee Rate Table > Enter a rate table ID > Rate Table ID wizard button
For a position rate table, choose Cards > Project > Position Rate Table > Enter a rate table ID > Rate Table ID wizard button
For an equipment rate table, choose Cards > Project > Equipment Rate Table >
Enter a rate table ID > Rate Table ID wizard button
Select Replace rate table on projects with this one and select the rate table to use as a replacement.
Click OK.
Copy information between projects
You can create a new project record based on an existing project record. For example, if you've been asked by a customer to complete a new project that is similar to an existing project, you can copy the existing project and then modify the new project as necessary.
If you're using a billing currency ID other than the functional currency for the project record that you're copying information to, only cost categories with Billing Rate or None profit types will be copied. Only fees that use the Fee Amount fee calculation method will be copied.
Open the Project Maintenance window. Cards > Project > Project
Select a contract number.
Enter a project ID, number, and name.
Open the Duplicate Existing Project window. Template > Copy Existing Budget
PACM 39.JPEG
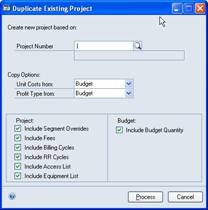
A screenshot of a cell phone Description automatically generated
Select the project to copy information from.
Select whether to include unit costs and profit types from cost categories in the project budget or from cost category records.
Select information to include from the project and project budget.
Click Process.
Chapter 14: Project resources
This part of the documentation includes information for project managers about how to assign equipment and employees to projects.
You can specify the employees who can enter timesheet and employee expense transactions for a project.
The following topics are discussed:
Assign equipment to a project
Assign employees to a project
Assign an employee to projects
Assign equipment to a project
You can assign equipment to a project. Use the Equipment Maintenance window to set up equipment records. See Set up an equipment record for tracking project costs and billing customers on page 20 for more information.
If you don't have permission to assign equipment records to a project, you can use the Equipment List Inquiry window (Inquiry > Project > Maintenance > Project > Equip List button) to view the assignments.
- Open the Equipment List window.
Cards > Project > Project > Equip List button
PACM40.JPEG
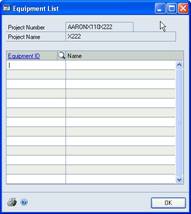
Select the equipment records for the project.
Click OK.
Assign employees to a project
You can assign employees to a project. Use the PA Employee Options window to set up employee records for projects. See Set up an employee record for tracking project costs and billing customers on page 14 for more information.
If you don't specify employees for a project, all employees can enter timesheets and employee expense transactions for the project.
If you don't have permission to assign employees to a project, you can use the Employee Access List Inquiry window (Inquiry > Project > Maintenance > Project > Access List button) to view the assignments.
- Open the Employee Access List window.
Cards > Project > Project > Access List button
PACM 41.JPEG
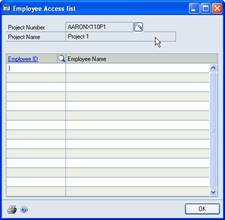
Select the employees for the project.
You can click the wizard button to open the Employee Access List Wizard window, where you can select the following options.
Select an Employee Class to add Employees to the access
list Select an employee class and click OK. The employees in the class will be displayed in the Employee Access List window.
Copy all PA Employees to this access list Include all active employees. Select Include Inactive to include inactive employees. Click OK. The employees will be displayed in the Employee Access List window.
Remove all Employees in this access list Remove all employees. Click OK. All employees will be deleted from the Employee Access List window.
Remove all inactive Employees in this access list Remove all inactive employees. Click OK. All inactive employees will be deleted from the Employee Access List window.
- Click OK.
Assign an employee to projects
You can assign an employee to projects.
- Open the Project Access List window. Cards > Project > Project Access List
PACM 42.JPEG
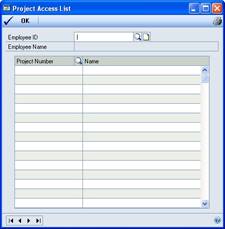
A screenshot of a computer Description automatically generated
Select an employee ID.
Select the projects the employee is assigned to.
Click OK.
Chapter 15: Project budgets
This part of the documentation includes information for project managers about how to assign cost categories to project budgets and how to enter baseline, forecast, and actual project budget amounts for cost categories.
You also can assign inventoried items to cost categories in project budgets.
The following topics are discussed:
Cost category statuses and baseline, forecast, and actual budget amounts
Cost categories and cost transactions
Assign cost categories to a project budget
Enter project budget settings for a cost category
Update project budget lines with a new cost category
Assign a rate table to a cost category in a project budget
Assign inventoried items to a cost category in a project budget
Modify project budget amounts
Modify project budget amounts for a cost category by fiscal period
Cost category statuses and baseline, forecast, and actual budget amounts
The status of a cost category determines whether you can enter baseline, forecast, or actual budget amounts.
Baseline You can modify the baseline when the status is Estimate.
Forecast You can modify the forecast when the status is Open or On Hold.
Actual Actual amounts are updated when you post cost transactions and the status is Open or Completed.
If you modify baseline budget amounts and then select to update forecast amounts to match baseline amounts, the exchange rate that you specified for the baseline amounts will be used for forecast amounts.
Cost categories and cost transactions
You must select the type of cost transaction that a cost category will be used for. Abbreviations are used and some transactions are grouped together.
| Abbreviation | Represents these cost transactions |
|---|---|
| EE | Employee expense transactions |
| EL | Equipment logs |
| IV | Purchase orders, shipment receipts, shipment/invoice receipts, invoice receipts, and inventory transfers with inventoried items |
| ML | Miscellaneous logs |
| PM | Purchase orders, shipment receipts, shipment/invoice receipts, invoice receipts, and inventory transfers with non-inventoried items. PM is sometimes referred to as purchases/materials. |
| TS | Timesheets |
Assign cost categories to a project budget
You can assign cost categories to a project budget to estimate, manage, and track project costs.
If you don't have permission to assign cost categories to a project budget, you can use the Budget Inquiry window (Inquiry > Project > Maintenance > Project > Budget button) to view them.
Open the Project Maintenance window. Cards > Project > Project
Select a project number.
Click Budget to open the Budget Maintenance window.
PACM 44.JPEG
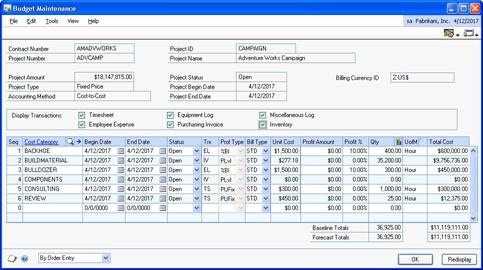
A screenshot of a cell phone Description automatically generated
Select the cost transactions to display cost categories for in the scrolling window.
You can select a new cost category for the project budget. You can modify cost category information in the scrolling window.
In the Begin Date and End Date columns, specify the scheduled utilization for a cost category.
You can change the status for a cost category. See Contract, project, and cost category statuses on page 44 for more information.
If you change the status from Estimate to Open or On Hold, the values in the fields in the scrolling window will be converted from baseline to forecast values.
If you modify baseline amounts and then select to update forecast amounts to match the baseline, the exchange rate that you specified for the baseline will be used for the forecast.
The cost transaction that the cost category record is used for is displayed in the Trx column. See Create a cost category record on page 51 and Cost categories and cost transactions on page 79 for more information.
You can change the profit type for a cost category. See Profit types for calculating billing amounts on page 49 for more information.
In the Bill Type column, specify the billing type for the cost category. See Billing types on page 68 for more information.
You can modify the unit cost for the cost category.
You can't modify the amount in the Unit Cost column if you used the Extras > View > Currency menu or the Currency list button in the Project Maintenance window to select to view amounts using the originating currency.
- The Profit Amount column displays the profit for the cost category.
If the profit type for the cost category is Markup %, % of Actual, or % of Baseline, you can modify the percentage in the Profit % column.
If you used the Extras > View > Currency menu or the Currency list button in the Project Maintenance window to select to view amounts using the functional currency for a Time and Materials project, you can't modify the amount in the Profit Amount column in this window unless the currency ID displayed in the Billing Currency ID field is the functional currency.
- You can modify the quantity for the cost category in the Qty column. The total cost for the cost category will be calculated using the following formula.
Total cost = ((Qty amount) x (Unit Cost amount)) + overhead
You can't modify the amount in the Total Cost column if you used the Extras > View > Currency menu or the Currency list button in the Project Maintenance window to select to view amounts using the originating currency.
You can modify the unit of measure for the cost category in the UofM column.
Click OK.
Enter project budget settings for a cost category
You can create a budget for each cost category in a project budget.
If you used the Extras > View > Currency menu or the Currency list button in the Project Maintenance window to select to view amounts using the functional currency for a Time and Materials project, you can't modify the amount in the Billing Rate field in the Budget Detail Entry window unless the currency ID displayed in the Billing Currency ID field is the functional currency.
If you don't have permission to enter budget amounts for cost categories in a project budget, you can use the Budget Detail Inquiry window (Inquiry > Project > Maintenance > Project > Budget button > Cost Category expansion button) to view the budget amounts.
Open the Project Maintenance window. Cards > Project > Project
Select a project number.
Click Budget to open the Budget Maintenance window. In the scrolling window, select a new line, then click the Cost Category expansion button. The Budget Detail Entry window will open.
PACM 45.JPEG
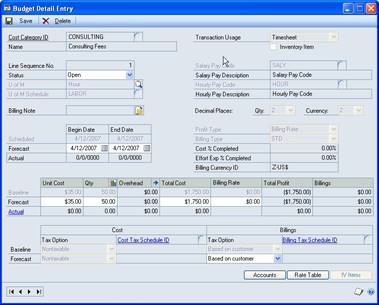
A screenshot of a computer Description automatically generated
Select a cost category. Select the Estimate status to enter a new budget.
Select a unit of measure schedule and a unit of measure.
If the cost category is for timesheets, select hourly and salary pay codes. See the U.S. Payroll or Canadian Payroll documentation (Help > Printable Manuals) for more information.
You can click the billing note button to enter a billing note. See Billing notes for invoices on page 16 in the Project Accounting Billing Guide for more information.
Enter baseline values for the cost category. See Cost category statuses and baseline, forecast, and actual budget amounts on page 79 for more information.
In the Begin Date and End Date fields, specify the scheduled utilization for the cost category.
Select a profit type. See Profit types for calculating billing amounts on page 49 for more information.
Specify the billing type for the cost category. See Billing types on page 68 for more information.
Enter the unit cost.
You can't modify the amount in the Unit Cost column if you used the Extras > View > Currency menu or the Currency list button in the Project Maintenance window to select to view amounts using the originating currency.
- Enter the quantity in the Qty column. The total cost for the cost category will be calculated using the following formula.
Total cost = ((Qty amount) x (Unit Cost amount)) + Overhead amount
You can't modify the amount in the Total Cost column if you used the Extras > View > Currency menu or the Currency list button in the Project Maintenance window to select to view amounts using the originating currency.
- Click the Overhead expansion button to specify how overhead will be calculated for the cost category. See Overhead calculation methods on page 11 for more information.
You can't modify the amounts in the Billings, Overhead, Total Cost, Total Profit, and Unit Cost columns if you used the Extras > View > Currency menu or the Currency list button in the Project Maintenance window to select to view amounts using the originating currency.
Inventory Item will be selected if the cost category is for inventoried items. Enter the total cost for the items and the billing amount.
Depending on the profit type for the cost category, you can enter an amount or percentage in the field that is named for the profit type. See Profit types for calculating billing amounts on page 49 for more information.
The Total Profit column will display the calculated profit for the cost category.
For cost and billing transactions, select whether cost and billing amounts for the cost category are taxable, non-taxable, or based on the tax settings for the vendor or customer. The tax schedule for cost transactions is for employee expense transactions, purchase orders, shipment receipts, shipment/invoice receipts, invoice receipts, and inventory transfers with non-inventoried items.
Click Accounts to specify posting accounts for the cost category in the project budget. See Specify posting account numbers for a cost category in a project budget on page 12 in the Project Accounting Accounting Control Guide for more information.
If the cost category is for a Time and Materials project budget, click Rate Table to assign a rate table to the cost category. See Assign a rate table to a cost category in a project budget on page 85 for more information.
Inventory Item will be selected if the cost category is for inventoried items. Click IV Items to assign inventoried items to the cost category. See Assign inventoried items to a cost category in a project budget on page 86 for more information.
Click Save and close the window.
Update project budget lines with a new cost category
You can add a new cost category to existing budget lines for multiple projects or project templates. This is useful when you create a new cost category after creating your project budgets.
For example, if each department in your company has its own cost category and you add a new department, then you must add the cost category for that department to the relevant projects.
- Open the Update Budget Lines window.
Microsoft Dynamics GP menu > Tools > Routines > Project > Budget Line Update
PACM 446.JPEG
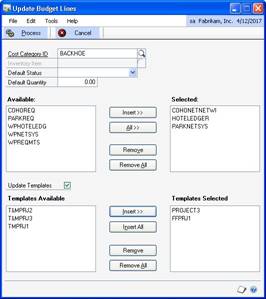
Enter or select the cost category to add to the budget lines.
Select an item if you selected the Inventory Item check box in the Cost Category Maintenance window.
Enter the default quantity for the project budget line or the budget detail inventory line.
In the Available field, select the project to update the budget lines for. Only projects with Open, Estimate, or a user-defined status will be listed.
Click Insert to move the selected project to the Selected list, or click All to move all the projects to the Selected list, from the Available list.
Select the default status for budget lines in the selected projects: Open, Estimate, or On Hold. This selection is not applied to budget lines in templates.
Select Update Templates to update the project template budget lines with the selected cost category. If you do not select this check box, the Templates Available field and the Templates Selected field will not be available.
In the Templates Available field, select the project templates to update the budget lines for.
Click Insert to add the selected project template to the Templates Selected list, or click Insert All to move all the project templates to the Templates Selected list.
Click Process to update the budget lines of the selected projects or project templates with the cost category.
Assign a rate table to a cost category in a project budget
You can select to use a rate table with a cost category. See Chapter 4, "Rate tables," for more information.
You must assign a rate table to a project to assign a rate table to a cost category in the project budget. See Specify billing settings for a project on page 71 for more information.
If you don't have permission to assign a rate table to a cost category in a project budget, you can use the Budget Rates Inquiry window (Inquiry > Project > Maintenance > Project > Budget button > Cost Category expansion button > Rate Table button) to view the assignment.
Open the Project Maintenance window. Cards > Project > Project
Select a project number.
Click Budget to open the Budget Maintenance window. In the scrolling window, select a cost category and click the Cost Category expansion button. The Budget Detail Entry window will open.
Click Rate Table to open the Budget Rates window.
PACM 46. JPEG
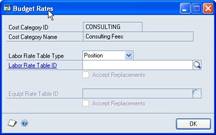
A screenshot of a cell phone Description automatically generated
If the cost category is for timesheets, select whether to use an employee or position rate table and select the rate table.
If the cost category is for equipment logs, select the rate table.
See Cost categories and cost transactions on page 79 for more information.
Select Accept Replacements to allow users to update the rate table for the cost category in the project budget after the rate table record has been updated. See Replace a rate table used with projects on page 72 for more information.
Click OK.
Assign inventoried items to a cost category in a project budget
You can select the inventoried items for a cost category in a project budget.
If you don't have permission to select inventoried items for cost categories in a project budget, you can use the Budget Detail IV Items Inquiry window (Inquiry > Project > Maintenance > Project > Budget button > Cost Category expansion button > IV Items button) to view the items that have been selected.
Open the Project Maintenance window. Cards > Project > Project
Select a project number.
Click Budget to open the Budget Maintenance window. In the scrolling window, select a cost category that is for inventoried items, then click the Cost Category expansion button. The Budget Detail Entry window will open.
Click IV Items. The Budget Detail IV Items window will open.
PACM 47.JPEG

A screenshot of a computer Description automatically generated
Select an item number.
Specify the billing type for the item. See Billing types on page 68 for more information.
Enter baseline values for the item. See Cost category statuses and baseline, forecast, and actual budget amounts on page 79 for more information.
If you modify baseline budget amounts and then select to update forecast amounts to match baseline amounts, the exchange rate that you specified for the baseline amounts will be used for forecast amounts.
Select a unit of measure for the inventoried item.
Select a price level.
Enter the date that the item is required for the project.
You can modify the unit price.
Click OK.
Modify project budget amounts
You can modify baseline, forecast, and actual amounts for cost categories used for a project.
If you don't have permission to modify budget amounts for cost categories in a project budget, you can use the Forecasting Inquiry window (Inquiry > Project > Maintenance > Project > Forecast button) to view the budget amounts.
Open the Project Maintenance window. Cards > Project > Project
Select a project number.
Click Forecast to open the Forecasting window.
PACM 48.JPEG
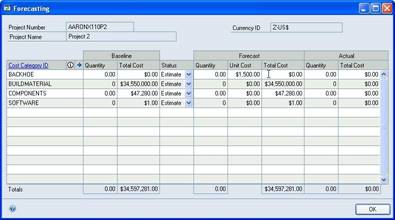
A screenshot of a cell phone Description automatically generated
Amounts in this window always will be displayed using the functional currency.
To view budget amounts for inventoried items, select a cost category for inventoried items in the Forecasting window, then click the Item information button.
The budget amounts that you can modify depend on the status of the cost category. See Cost category statuses and baseline, forecast, and actual budget amounts on page 79 for more information.
Click OK.
Modify project budget amounts for a cost category by fiscal period
You can modify project budget amounts for a cost category by fiscal period.
If you don't have permission to enter budget amounts by fiscal period for a cost category in a project budget, you can use the Project Periodic Budget Inquiry window (Inquiry > Project > Maintenance > Project > Budget button > Qty periodic budget button) to view budget information by fiscal period.
Open the Project Maintenance window. Cards > Project > Project
Select a project number.
Click Budget to open the Budget Maintenance window. In the scrolling window, select a cost category, then click the Cost Category expansion button. The Budget Detail Entry window will open.
In the Budget Detail Entry window, click the Qty periodic budget button. The Project Periodic Budget window will open.
PACM 49.JPEG

A screenshot of a computer Description automatically generated
Select the fiscal year to display budget amounts for.
The budget amounts that you can modify depend on the status of the cost category. See Cost category statuses and baseline, forecast, and actual budget amounts on page 79 for more information.
If you modify baseline budget amounts and then select to update forecast amounts to match baseline amounts, the exchange rate that you specified for the baseline amounts will be used for forecast amounts.
- Click OK.
Chapter 16: Project fees
This part of the documentation includes information for project managers about how to assign fees—including Project, Retainer, Retentions, and Service fees—to projects. It also includes information about how to modify the fee frequency, fee calculation method, and other settings for fees in projects, and how to enter baseline, forecast, and actual amounts for fees in a project budget. You also can modify a fee schedule.
The following topics are discussed:
Assign fees to a project
Modify settings for a fee in a project
Modify fee amounts by fiscal period
Modify a fee schedule
Assign fees to a project
You can assign fees to a project.
If you don't have permission to assign fees to a project, you can use the Fee Inquiry window (Inquiry > Project > Maintenance > Project > Fees button) to view the assignments.
- Open the Fee Entry window.
Cards > Project > Project > Fees button
PACM 50.JPEG
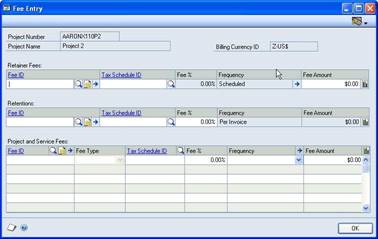
Select the fees to include in the project. The fees that you can assign depend on the project type and project status.You can assign fees to a project if the project status is Estimate, Open, or On Hold. See Types of fees on page 57 for more information.
Depending on the fee you assign, you can modify information in the Fee %, Frequency, and Fee Amount fields. See Chapter 11, "Fees," for more information.
If you used the View > Currency menu or the Currency list button in the
Project Maintenance window to select to view amounts using the functional
currency, you can't modify the amount in the Fee Amount field, unless the functional currency is the same as the billing currency.
Click the Fee ID expansion button to modify settings for a fee in the project. See Modify settings for a fee in a project on page 90 for more information.
Click the Fee Amount periodic budget button to modify fee amounts by fiscal period. See Modify fee amounts by fiscal period on page 91 for more information.
Click the Frequency expansion button to modify the schedule for a fee. See Modify a fee schedule on page 91 for more information.
Click OK.
Modify settings for a fee in a project
You can modify the settings for a fee in a project.
- Open the Fee Details window.
Cards > Project > Project > Fees button > Fee ID expansion button
PACM 51.JPEG
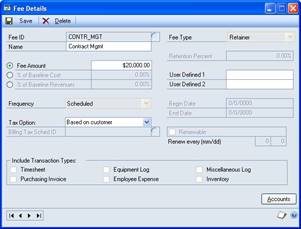
- The information you can modify depends on the fee type. See Chapter 11,"Fees," for more information.
If you used the View > Currency menu or the Currency list button in the Project Maintenance window to select to view amounts using the currency ID that you specified in the Functional Currency field in the Multicurrency Setup window (Microsoft Dynamics GP menu > Tools > Setup > Financial >
Multicurrency), you can't modify the amount in the Fee Amount field, unless the functional currency is the same as the billing currency.
Click Accounts to open the Project Fee Accounts window, where you can specify posting accounts for the fee in the project. The window is similar to the Fee Accounts window.
Click Save and close the window.
Modify fee amounts by fiscal period
You can modify actual fee amounts by fiscal period. Actual fee amounts are amounts that have been billed.
You also can modify baseline fee amounts if the following conditions are true.
For Project, Retainer, and Service fees, the project status must be Estimate.
The fee frequency is Per Invoice.
There are no actual amounts for the fee.
If you don't have permission to modify budget amounts for a fee by fiscal period, you can use the Project Periodic Fee Inquiry window (Inquiry > Project > Maintenance > Project > Fees button > Fee Amount periodic budget button) to view the budget amounts.
- Open the Project Periodic Fee window.
Cards > Project > Project > Fees button > Fee Amount periodic budget button
PACM 52.JPEG
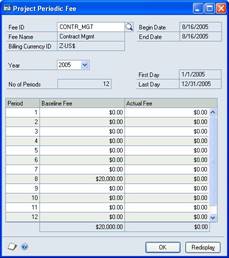
- Select the fiscal year to display fee amounts for. Modify fee amounts, as necessary. 3. Click OK.
Modify a fee schedule
You can modify the scheduled billing for a Project, Retainer, or Service fee that uses the Scheduled fee frequency.
If you don't have permission to modify a fee schedule, you can use the Fee Schedule Inquiry window (Inquiry > Project > Maintenance > Project > Fees button > Frequency expansion button) to view a fee schedule.
- Open the Fee Schedule window.
Cards > Project > Project > Fees button > Frequency expansion button
PACM 53.JPEG
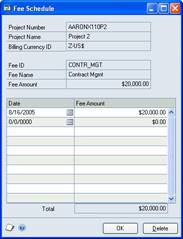
- You can modify the dates to bill the fee, and the amounts to bill.
If you used the View > Currency menu or the Currency list button in the Project Maintenance window to select to view amounts using the functional currency, you can't modify the amount in the Fee Amount field, unless the functional currency is the same as the billing currency.
- Click OK.
Part 4: Cost control
This part of the documentation includes information for project managers about how to control what data users can enter when they enter cost transactions, how to control the use of change orders for projects, and how to close customer, contract, and project records to control the accrual of project costs.
Chapter 17, "Cost transaction entry control," includes information about how to grant data entry permissions for cost transactions.
Chapter 18, "Project change control," includes information about how to specify whether change orders can be entered for contracts and projects, and how to enter change orders.
Chapter 19, "Cost suspension and project closure," includes information about how to close customer records and contracts to suspend project cost accrual and how to close projects to end project cost accrual.
Chapter 17: Cost transaction entry control
This part of the documentation includes information for project managers about how to grant specific users and user classes permission to various transaction and record entry options.
It also includes information about how to grant all users permission to various transaction data entry options. You can require a password for each data entry option to limit user access.
The following topics are discussed:
Grant user class permissions
Grant user permissions
Grant cost transaction data entry permissions
Grant purchasing document and transaction data entry permissions
Grant user class permissions
You can grant a user class permission to various data entry options. If you assign a user to the class, the user will inherit permissions from the class. See Grant user permissions on page 95 for more information.
- Open the User Class Project Accounting Settings window.
Microsoft Dynamics GP menu > Tools > Setup > Project > User Classes
PACM 54.JPEG
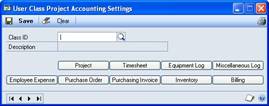
The window is similar to the User Project Accounting Settings window. See Grant user permissions on page 95 for more information.
Grant user permissions
You can grant individual users permission to various data entry options.
- Open the User Project Accounting Settings window.
Microsoft Dynamics GP menu > Tools > Setup > Project > User
PACM 55.JPEG
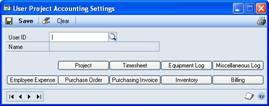
Select the user to grant permissions to.
Click Project to grant the following permissions.
Allow Set Closed to Project Costs Allow the user to select an option in a record entry window to suspend cost accrual for all projects for a customer or contract or for a specific project. See Chapter 19, "Cost suspension and project closure," for more information.
Allow Set Closed to Project Billings Allow the user to select an option in a record entry window to suspend billings for all projects for a customer or contract or for a specific project. See Chapter 6, "Billing suspension," in the Project Accounting Billing Guide for more information.
Allow Change Status Allow the user to change the status of a project. See Contract, project, and cost category statuses on page 44 for more information.
Click one of the following buttons to grant permissions for transactions.
Timesheet for timesheets
Equipment Log for equipment logs
Miscellaneous Log for miscellaneous logs
Employee Expense for employee expense transactions
Purchase Order for purchase orders
Purchasing Invoice for shipment/invoice receipts and invoice receipts
Inventory for inventory transfers and return from project transactions
Billing for billing invoices and returns
Select the data entry tasks to grant permissions for.
Allow Entry For Select the employees, equipment, miscellaneous records, vendors, or customers that the user can enter timesheets, equipment logs, miscellaneous logs, employee expense transactions, purchase orders, billing invoices, or billing returns for.
Allow Transaction Posting Allow the user to post a timesheet, equipment log, miscellaneous log, employee expense transaction, shipment/invoice receipt, invoice receipt, inventory transfer, billing invoice, or billing return.
Allow Batch Posting Allow the user to post a batch of timesheets, equipment logs, miscellaneous logs, employee expense transactions, shipment/ invoice receipts, invoice receipts, inventory transfers, billing invoices, or billing returns. See Review and modify posting account distributions for transactions on page 20 in the Project Accounting Accounting Control Guide for more information.
Allow Billing Notes Entry Allow the user to modify the billing note for a line item on a timesheet, equipment log, miscellaneous log, employee expense transaction, purchase order, shipment/invoice receipt, invoice receipt, or inventory transfer. See Specify information to include on an invoice format on page 11 in the Project Accounting Billing Guide for more information.
Allow Change in Billing Type Allow the user to modify the billing type for a line item on a timesheet, equipment log, miscellaneous log, employee expense transaction, shipment/invoice receipt, invoice receipt, or inventory transfer. See Billing types on page 68 for more information.
Allow Change in Billing Rate/Markup on T&M Allow the user to
modify the billing rate or markup percentage for calculating the billing amount for a cost category on a timesheet, equipment log, miscellaneous log, employee expense transaction, shipment/invoice receipt, invoice receipt, or inventory transfer.
Allow Entry of New Budget Items Allow the user to include a cost category on a timesheet, equipment log, miscellaneous log, or employee expense transaction that hasn't been assigned to the project budget.
Allow Entry of None Project Allow the user to press TAB to enter <NONE> or type <NONE> for the project number on a timesheet, equipment log, miscellaneous log, employee expense transaction, or inventory transfer to enter a line item that isn't for a project.
Allow Change of Pay Code Allow the user to modify the pay code for a line item on a timesheet.
Allow Change of Position Allow the user to modify the position code for a line item on a timesheet.
Allow Change of Department Allow the user to modify the department for a line item on a timesheet.
Allow PO Printing Allow the user to print purchase orders that include line items for projects.
Allow PO Closing Allow the user to close purchase orders that include line items for projects.
Allow Entry of New Budgets/Materials Allow the user to include a cost category or inventoried item on a purchase order, shipment/invoice receipt, invoice receipt, or inventory transfer that hasn't been assigned to the project budget.
Allow blank Project and Cost Category Allow the user to press TAB to leave the project number and cost category fields blank on purchase orders, shipment/invoice receipts, and invoice receipts.
Default to assigned projects in lookup In the project lookup window for timesheets, employee expense transactions, or equipment logs, display only projects that the employee or equipment record has been assigned to.
Default Document Date Select whether to use the user date or the date entered for the previous transaction when entering timesheets, equipment logs, miscellaneous logs, employee expense transactions, inventory transfers, billing invoices, and billing returns.
Default Line Date For transactions that use reporting periods, including timesheets, equipment logs, miscellaneous logs, and employee expense transactions, select whether to use the beginning date or ending date for the reporting period.
- Click Save and close the window.
Grant cost transaction data entry permissions
You can grant all users permission to various data entry options for timesheets, employee expense transactions, equipment logs, miscellaneous logs, and inventory transfers. You also can require a password for each data entry option to limit user access.
Open the window for the transaction that you're granting data entry permissions for.
Timesheets Open the Timesheet Setup Options window (Microsoft Dynamics GP menu > Tools > Setup > Project > Timesheet > Options button).
Employee expense transactions Open the Employee Expense Setup Options window (Microsoft Dynamics GP menu > Tools > Setup > Project > Employee Expense > Options button).
Equipment logs Open the Equipment Log Setup Options window (Microsoft Dynamics GP menu > Tools > Setup > Project > Equipment Log > Options button).
Miscellaneous logs Open the Miscellaneous Log Setup Options window (Microsoft Dynamics GP menu > Tools > Setup > Project > Miscellaneous Log > Options button).
Inventory transfers Open the Inventory Transfer Setup Options window (Microsoft Dynamics GP menu > Tools > Setup > Project > Inventory > Options button).
Return from project transactions Open the Inventory Transfer Setup Options window (Microsoft Dynamics GP menu > Tools > Setup > Project > Inventory > Options button).
- Select the data entry tasks to grant permission for.
Allow Add Access on the fly Allow users to include an employee or equipment record that isn't on the employee or equipment access list for the project when entering a timesheet, employee expense transaction, or equipment log.
Allow Entry by Time Allow users to enter a range for tracking employee time on a timesheet or equipment usage time on an equipment log.
Allow Entry by Units Allow users to enter a quantity on a timesheet or equipment log.
Allow Period Entry Allow users to change the reporting period on a timesheet or equipment log.
Allow Zero Quantity Allow users to enter 0 in the Quantity field on a timesheet, employee expense transaction, equipment log, or miscellaneous log.
Allow Zero Unit Costs Allow users to enter 0 in the Unit Cost field on a timesheet, employee expense transaction, equipment log, or miscellaneous log.
Exceed Total Budget Costs Allow users to enter a total cost that exceeds the total cost specified for the cost category in the project budget when entering a timesheet, employee expense transaction, equipment log, miscellaneous log, or inventory transfer. See Enter project budget settings for a cost category on page 81 for more information.
Exceed Total Budget Quantity Allow users to enter a total quantity that exceeds the total quantity specified for the cost category in the project budget when entering a timesheet, employee expense transaction, equipment log, miscellaneous log, or inventory transfer. See Enter project budget settings for a cost category on page 81 for more information.
Exceed Total Budget Revenue/Profit Allow users to enter an amount that exceeds the total revenue specified for the cost category in a Time and Materials project budget when entering a timesheet, employee expense transaction, equipment log, miscellaneous log, or inventory transfer. See Enter project budget settings for a cost category on page 81 for more information.
Override Document Number Allow users to modify the default document number for a timesheet, employee expense transaction, equipment log, miscellaneous log, inventory transfer, or return from project transaction.
Allow Prices Below Cost Allow users to enter a billing rate that is less than the unit cost specified for the inventoried item when entering an inventory transfer or return from project transaction.
Auto-Assign Lot Numbers Automatically assign available lot numbers to inventoried items when entering an inventory transfer.
Auto-Assign Serial Numbers Automatically assign available serial numbers to inventoried items when entering an inventory transfer.
Override Price Levels Allow users to modify the price level for an inventoried item when entering an inventory transfer or return from project transaction.
- Click OK.
Grant purchasing document and transaction data entry permissions
If you're using Project Accounting with Purchase Order Processing, you can grant users permission to various data entry options for purchase orders, shipment/ invoice receipts, and invoice receipts. See the Purchase Order Processing documentation (Help > Printable Manuals) for more information.
Chapter 18: Project change control
This part of the documentation includes information for project managers about how to specify whether change orders can be entered for contracts and projects, and how to enter change orders.
You can enter change orders for contracts, and you can use change orders to revise budgets and enter quote information for projects. You also can use change orders to modify project budget settings for a cost category and modify fee assignments for a project.
You can use various inquiry windows and reports to view change order information, such as change order approval and revision history.
The following topics are discussed:
Contract totals and change orders
Enter change order settings for a contract
Enter change order settings for a project
Change order types
Change order statuses
Enter a change order for a contract
Use a change order to revise project budgets in a contract
Use a change order to enter quote information for a project
Enter a change order to modify budget settings for a cost category in a project budget
Enter a change order to modify fee assignments for projects in a contract
View a list of change orders
View approval history for a change order
View revision history for a change order
Contract totals and change orders
The following contract totals can be viewed in change order entry windows.
Original Contract Amount The total forecast billing amount for the contract, including Project fees and Service fees, not including change orders.
Revised Budget Total Amt The sum of the variance billing amounts for all projects in the change order.
Revised Fee Total Amt The sum of Project and Service fees in the change order.
Change Order Total Amount The sum of the variance billing amounts for all projects in the change order, including the sum of Project and Service fees in the change order.
Margin The sum of the variance billing amounts for all projects in the change order, including the sum of Project and Service fees in the change order, minus the sum of the total cost for all projects in the change order.
Change Order Total Cost The sum of the total cost for all projects in the change order.
Change Order Total Billings The sum of the total billing amounts for all projects in the change order.
Total Variance Cost The sum of the variance total cost for all projects in the change order.
Total Variance Billings The sum of the variance billing amounts for all projects in the change order.
Total Variance Quantity The sum of variance quantities for all projects in the change order.
Enter change order settings for a contract
You can specify change order settings for a contract.
If you specified a billing currency ID for a contract that is not the functional currency, you can't specify change order settings for the contract.
- Open the Change Order Contract Information window.
Cards > Project > Contract > select a contract number > Change Orders button
PACM 56.JPEG
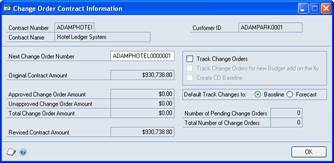
Enter the next document number to use for change orders for the contract.
Select Track Change Orders to begin using change orders for new projects for the contract. Select Track Change Orders for new Budget add on the fly to have change orders created when you include a new cost category for a project in the contract when entering cost transactions.
For existing projects in the contract, you must select change order options in the Change Order Project Information window. See Enter change order settings for a project on page 103 for more information.
Select Create CO Baseline to create baseline and forecast budget amounts when you include a new cost category for a project in the contract when entering cost transactions. If this option is not selected, only forecast amounts will be created.
Select whether to update baseline or forecast budget amounts when entering change orders.
Click OK.
Enter change order settings for a project
You can specify change order settings for a project.
The billing currency ID specified for the project must be the functional currency to specify change order settings for the project.
- Open the Change Order Project Information window.
Cards > Project > Project > select a project number > Change Orders button
PACM 57.JPEG
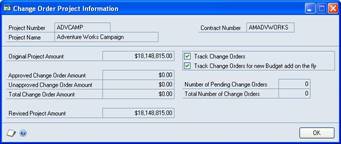
Select Track Change Orders to begin using change orders for the project. Select Track Change Orders for new Budget add on the fly to have change orders created when you include a new cost category for the project when entering cost transactions.
Click OK.
Change order types
Change orders include Internal, Company, and Customer change orders. Change order types differ only in the way they are approved. To change the status of a change order from Pending or Unapproved to Approved, you must enter the name of the person approving the change order and the approval date.
You can select an employee to approve Internal and Company change orders. The names Internal and Company are used for information only. There is no technical difference between Internal and Company change orders.
You can select a customer to approve Customer change orders.
You can view the approval history for change orders. See View approval history for a change order on page 111 for more information.
Change order statuses
Change order statuses determine whether you can enter cost, billing, and revenue recognition transactions for cost categories and projects on the change order, and whether you can modify budget settings and fee assignments for the projects.
Pending
The default status for a new change order.
You can't include a cost category on a cost, billing, or revenue recognition transaction for a project if you've entered change order amounts for the cost category and project. You also can't modify budget settings for the cost category using the Budget Detail Entry window.
You can't modify fee assignments for the project using the Fee Entry window if you've entered a change order to modify fee assignments for the project.
Clicking Process in the Change Order Entry window will not update project budget amounts.
You can delete the change order.
Unapproved
You can't include a cost category on a billing transaction for a project if you've entered change order amounts for the cost category and project.
You also can't modify fee assignments for the project using the Fee Entry window if you've entered a change order to modify fee assignments for the project.
Approved
After a change order is Approved, you can enter cost, billing, and revenue recognition transactions for cost categories and projects on the change order. You also can modify budget settings and fee assignments for the projects.
You can't delete the change order.
Canceled
You can't modify budget settings for the cost category using the Budget Detail Entry window.
Completed
Change order amounts have been billed. You can't modify the change order.
You can't include a cost category on a cost or billing transaction for a project if you've entered change order amounts for the cost category and project. You also can't modify budget settings for the cost category using the Budget Detail Entry window.
You can't modify fee assignments for the project using the Fee Entry window if you've entered a change order to modify fee assignments for the project.
You can, however, recognize revenue for the cost categories and projects on the change order.
Enter a change order for a contract
You can enter a change order for a contract. You first must specify change order settings for the contract. See Enter change order settings for a contract on page 102 for more information.
The billing currency ID specified for the contract must be the functional currency to enter a change order for the contract.
- Open the Change Order Entry window. Cards > Project > Change Order Entry
PACM 58.JPEG
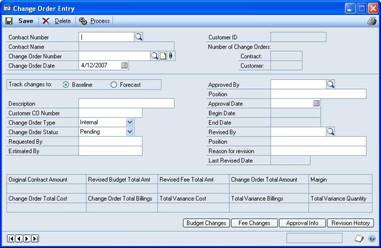
A screenshot of a computer Description automatically generated
Select a contract number. Enter a change order number and date.
Indicate whether to apply the change order to baseline or forecast amounts for the projects in the contract.
You can enter a description and a change order number provided by the customer.
Select a change order type and status. See Change order types on page 103 and Change order statuses on page 103 for more information.
You can enter the names of the people who requested and estimated the change order.
To approve the change order, select the employee or customer who is approving it in the Approved By field and enter the approval date. Select the Approved change order status.
After you change the status of a change order to Approved, you can't cancel it. You must enter another change order to make revisions.
In the Revised By field select the employee who is entering the change order, and enter the employee's title in the Position field. Enter the reason for the change order.
You can view contract totals for the change order. See Contract totals and change orders for more information.
Click Budget Changes to revise budgets for projects in the contract. See Use a change order to revise project budgets in a contract on page 106 for more information.
Click Fee Changes to modify fee assignments for projects in the contract. See Enter a change order to modify fee assignments for projects in a contract on page 109 for more information.
Click Approval Info to view approval history for the change order. See View approval history for a change order on page 111 for more information.
Click Revision History to view revision history for the change order. See View revision history for a change order on page 111 for more information.
Click Process to apply change order amounts to the projects in the contract, or click Save to save the change order without applying change order amounts.
Use a change order to revise project budgets in a contract
You can enter a change order to revise project budgets in a contract.
- Open the Budget Changes Entry window.
Cards > Project > Change Order Entry > Budget Changes Button
PACM 59.JPEG
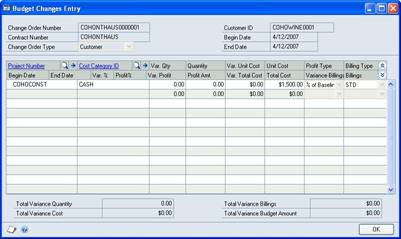
- Select the project and cost category to enter a budget change for.
You can select a new cost category for a project. The new cost category will be included in the project budget after you click Process to process the change order when it has an Unapproved or Approved status.
When you select a cost category to enter a budget change for, you can't modify budget settings for the cost category using the Budget Detail Entry window until you click Process in the Change Order Entry window to apply change order amounts. See Enter project budget settings for a cost category on page 81 and Enter a change order for a contract on page 104 for more information.
You can modify the scheduled utilization for the cost category in the Begin Date and End Date columns.
The Profit Amt. column displays the profit for the cost category. You can enter a positive or negative variance amount in the Var. Profit column. The Profit Amt. column will be updated, based on the variance amount.
If the profit type for the cost category is Markup %, % of Actual, or % of Baseline, you can enter a positive or negative variance percentage in the Var. % column. The Profit% column will be updated based on the variance percentage.
How profit is determined depends on the profit type and project type. See Profit types for calculating billing amounts on page 49 for more information.
You can enter a positive or negative variance amount in the Var. Qty column. The Quantity column will be updated based on the variance amount.
You can enter a positive or negative variance amount in the Var. Unit Cost column. The Unit Cost column will be updated based on the variance amount.
The total cost for the cost category will be calculated using the following formula.
Total cost = ((Quantity amount) x (Unit Cost amount)) + overhead
- Click OK.
Use a change order to enter quote information for a project
You can use a change order to enter quote information for a project.
- Open the Change Order Budget Information window.
Cards > Project > Change Order Entry > Budget Changes button > Project Number expansion button
PACM 60.JPEG
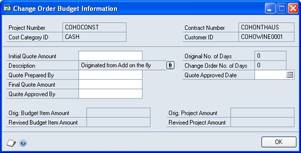
You can enter initial and final quote amounts and enter the names of the people who prepared and approved the quote. You can click the Description attachment button to attach a document to the project record.
Click OK.
Enter a change order to modify budget settings for a cost category in a project budget
You can enter a change order to modify budget settings for a cost category in a project budget.
Open the Change Order Entry window. Cards > Project > Change Order Entry
Click Budget Changes to open the Budget Changes Entry window.
Select a project and cost category. Click the Cost Category ID expansion button to open the Change Order Budget Detail Entry window.
PACM 61.JPEG
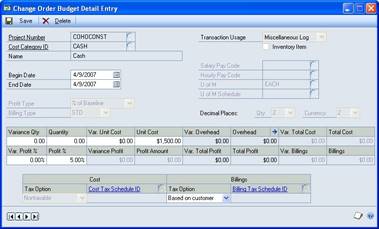
A screenshot of a cell phone Description automatically generated
You can modify the scheduled utilization for the cost category in the Begin Date and End Date fields.
If the cost category is for timesheets, you can change the salary and hourly pay codes for the cost category. See the U.S. Payroll documentation (Help > Printable Manuals) for information about pay codes.
The Profit Amount field displays the profit for the cost category. You can enter a positive or negative variance amount in the Variance Profit field. The Profit Amount field will be updated, based on the variance amount.
If the profit type for the cost category is Markup %, % of Actual, or % of Baseline, you can enter a positive or negative variance percentage in the Var. Profit % field. The Profit % field will be updated, based on the variance percentage.
How profit is determined depends on the profit type and project type. See Profit types for calculating billing amounts on page 49 for more information.
You can enter a positive or negative variance amount in the Variance Qty field. The Quantity field will be updated, based on the variance amount.
You can enter a positive or negative variance amount in the Var. Unit Cost field. The Unit Cost field will be updated, based on the variance amount.
The total cost for the cost category will be calculated using the following formula.
Total cost = ((Quantity amount) x (Unit Cost amount)) + overhead
Click the Overhead expansion button to enter variance amounts for overhead for the cost category. See Overhead calculation methods on page 11 for more information.
If the cost category is for purchases/material (referring collectively to purchase orders, shipment receipts, shipment/invoice receipts, invoice receipts, and inventory transfers with non-inventoried items) or employee expense transactions, select whether amounts for the cost category are taxable, nontaxable, or based on the tax settings for the vendor. If amounts are taxable, select a tax schedule.
For billing transactions, select whether billing amounts for the cost category are taxable, non-taxable, or based on the tax settings for the customer. If billing amounts are taxable, select a tax schedule.
Click Save and close the window.
Enter a change order to modify fee assignments for projects in a contract
You can enter a change order to modify fee assignments for a project.
- Open the Change Order Project Fee window.
Cards > Project > Change Order Entry > Fee Changes
- Select a project. Click the Project Number expansion button to open the Change Order Fee Entry window.
PACM 62.JPEG
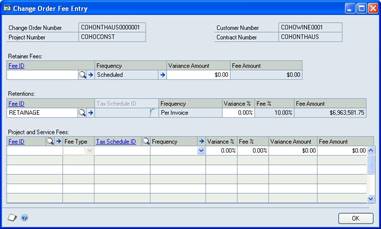
A screenshot of a social media post Description automatically generated
Modify fee information or select new fees to include in the project. The fees that you can assign depend on the project type and project status. See Types of fees on page 57 for more information.
For a Retainer fee, you can enter a positive or negative variance amount in the Variance Amount field. The Fee Amount field will be updated, based on the variance amount.
For a Retentions fee, you can enter a positive or negative variance percentage in the Variance % field. The Fee % field will be updated based on the variance percentage.
For Project and Service fees, you can enter a positive or negative variance percentage in the Variance % field. The Fee % field will be updated based on the variance percentage. You can enter a positive or negative variance amount in the Variance Amount field. The Fee Amount field will be updated based on the variance amount.
The information that you can enter for a fee depends on the fee type. See Chapter 11, "Fees," for more information.
Click the Fee ID expansion button to open the PA Change Order Fee Details window, where you can modify settings for the fee in the project. The window is similar to the Fee Details window. See Modify settings for a fee in a project on page 90 for more information.
Click the Frequency expansion button to open the Change Order Fee Schedule window, where you can modify the schedule for a fee. The window is similar to the Fee Schedule window. See Modify a fee schedule on page 91 for more information.
Click OK.
View a list of change orders
You can view a list of change orders.
- Open the Change Order Inquiry window. Inquiry > Project > Change Order
PACM 63.JPEG
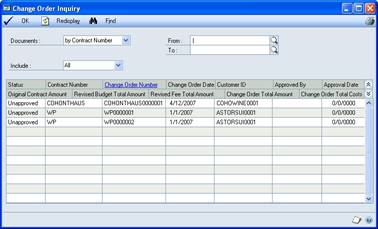
A screenshot of a cell phone Description automatically generated
Select the change orders to view a list of. Click Redisplay to update the window.
Click OK.
View approval history for a change order
You can view approval history for a change order.
- Open the Change Order Approval Info window.
Cards > Project > Change Order Entry > Approval Info button
PACM 64.JPEG
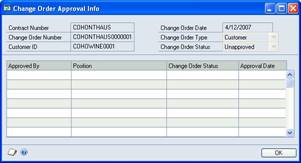
You can view the employee or customer who approved the change order and when they approved it.
Click OK.
View revision history for a change order
You can view revision history for a change order.
- Open the Change Order Revision Info window.
Cards > Project > Change Order Entry > Revision History button
PACM 65.JPEG
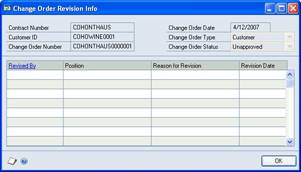
You can view the names of the people who revised the change order and when and why they revised it.
Click OK.
Chapter 19: Cost suspension and project closure
This part of the documentation includes information for project managers about how to suspend project cost accrual for customers, contracts, and projects, and how to close projects to end project cost accrual.
The following topics are discussed:
Suspend cost accrual for a customer
Suspend cost accrual for a contract
Suspend cost accrual for a project
Close projects
Project closing checklist
Suspend cost accrual for a customer
You can suspend the accrual of costs for a customer. After you close a customer record to project costs, cost transactions can't be entered or posted for projects for the customer.
- Open the PA Customer Options window.
Cards > Sales > Customer > select a Customer ID > Project button
PACM 66.JPEG
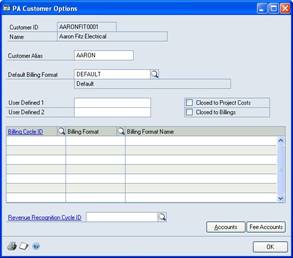
Select Closed to Project Costs.
Click OK.
Suspend cost accrual for a contract
You can suspend the accrual of costs for a contract. After you close a contract to project costs, cost transactions can't be entered or posted for projects for the contract.
Open the Contract Maintenance window. Cards > Project > Contract
Select a customer ID.
Enter a contract ID.
Select Closed to Project Costs.
Click Save and close the window.
Suspend cost accrual for a project
You can suspend the accrual of costs for a project. After you close a project to project costs, cost transactions can't be entered or posted for the project.
Open the Project Maintenance window. Cards > Project > Project
Select a project number.
Select Closed to Project Costs.
Click Save and close the window.
Close projects
You can close projects to end project cost accrual.
To close a project, the following conditions must be met.
The project must be Completed. See Contract, project, and cost category statuses on page 44 for more information.
All cost and billing transactions for the project must be posted or deleted, and all purchase orders for the project must be Closed.
All customer payments must be applied to the project. See Apply payments, credits, and returns to billing invoices and project balances on page 43 in the Project Accounting Billing Guide for more information.
- Open the Project Closing window.
Transactions > Project > Project Closing
PACM 67.JPEG
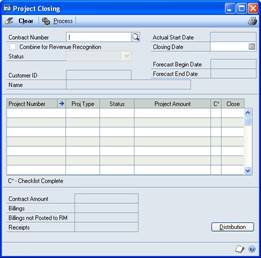
- Select a contract number. Completed projects for the contract will be listed in the scrolling window.
The closing date must be no later than the date that the last transactions were entered for the projects that you're closing.
If all requirements for closing a project have been met, the check box in the C* column will be selected for the project. You can select a project and click the Project Number expansion button to view project totals and the closing checklist for the project. See Project closing checklist on page 115 for more information.
Select the check box in the Close column for each project to close.
Click Distribution to modify posting account distributions for the project closing transaction. See Review and modify posting account distributions for transactions on page 20 in the Project Accounting Accounting Control Guide for more information.
Click Process and close the window.
After you've closed all projects in a contract, the contract status will be changed to Closed.
Project closing checklist
Before you close a project, you can use the Project Closing More Info window (Transactions > Project > Project Closing > Project Number expansion button) to view the project closing checklist for the project.
PACM 68.JPEG
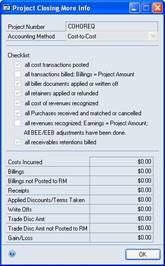
All options in the Checklist area of the window will be selected if all requirements for closing the project have been met.
All cost transactions posted All cost transactions entered for the project have been posted.
All transactions billed; Billings = Project Amount The customer has been billed for all project costs.
All biller documents applied or written off All customer payments for the project have been applied to the project and any outstanding project balances have been written off.
All retainers applied or refunded All Retainer fee amounts have been applied or refunded on billing invoices for the project.
All cost of revenues recognized All cost transactions for the project have been posted and revenue has been recognized for those cost transactions.
All Purchases received and matched or cancelled All purchase orders for the project are Closed or Canceled.
All revenues recognized; Earnings = Project Amount; All BEE/EEB adjustments have been done All revenue has been recognized for a project and the amount of revenue recognized is equal to the total project amount. If you have more revenue than you have billed or you have billed more than you have revenue, the balance of your Billings in Excess of Earnings and Earnings in Excess of Billings posting accounts must be zero.
All receivables retentions billed All Retentions fee amounts for the project have been billed. This checklist requirement is for Cost Plus and Fixed Price projects only.
Part 5: Project cost tracking
This part of the documentation includes information for project managers about how to set up and enter cost transactions for tracking project costs and billing customers. It also includes information about how to view detailed information about cost, billing, revenue, and profit amounts for contracts, projects, and cost categories.
Chapter 20, "Timesheets," includes information about how to set up and enter timesheets for tracking project costs and billing customers. It also includes information about how to specify payroll posting options.
Chapter 21, "Employee expense transactions," includes information about how to set up and enter employee expense transactions for tracking project costs and billing customers. It also includes information about how to specify a personal expense and how to enter payments and additional charges.
Chapter 22, "Equipment logs," includes information about how to set up and enter equipment logs for tracking project costs and billing customers.
Chapter 23, "Miscellaneous logs," includes information about how to set up and enter miscellaneous logs for tracking project costs and billing customers.
Chapter 24, "Purchasing documents and transactions," includes information about how to set up purchase orders, shipment/invoice receipts, and invoice receipts for tracking project costs and billing customers.
Chapter 25, "Inventory transfers," includes information about how to set up and enter inventory transfers for tracking project costs and billing customers.
Chapter 26, "Item returns," includes information about how to return items from projects to vendors.
Chapter 27, "Cost, billing, revenue, and profit inquiries," includes information about how to view detailed information about cost, billing, revenue, and profit amounts for contracts, projects, and cost categories.
Chapter 28, "Project cost allocation," includes information about how you can allocate costs from one project to other projects.
Chapter 20: Timesheets
This part of the documentation includes information for project managers about how to set up and enter timesheets for tracking project costs and billing customers. It also includes information about how to specify payroll posting options.
The following topics are discussed:
Update U.S. Payroll or Canadian Payroll using timesheets
Default pay codes for timesheets
Set up timesheets for tracking project costs and billing customers
Enter a timesheet
Specify how to update payroll for salaried employees when posting timesheets
Transfer a previously posted timesheet to Payroll
Update U.S. Payroll or Canadian Payroll using timesheets
To update U.S. Payroll or Canadian Payroll using timesheets, you first must complete the following tasks.
Select Post to Payroll and the correct payroll module in the Timesheet Setup window. See Set up timesheets for tracking project costs and billing customers on page 120 for more information.
Select Use Pay Codes for Unit Cost in the Project Setup window. See Configure general settings for all projects on page 43 for more information.
Select Company in the Employed By list in the PA Employee Options window for the employees that you're posting timesheets to payroll for. See Set up an employee record for tracking project costs and billing customers on page 14 for more information.
For Canadian Payroll, select YES for the Enable UPR Synchronization option in the Enable UPR Synchronization window (Microsoft Dynamics GP menu > Tools > Routines > Payroll - Canada > Setup Palette > Control > Control > Enable UPR Synchronization).
Default pay codes for timesheets
If you selected Use Pay Codes for Unit Cost in the Project Setup window, you can select the default pay code for timesheets. See Configure general settings for all projects on page 43 for more information.
Employee
The pay code for the employee record that the timesheet is for. See Set up an employee record for tracking project costs and billing customers on page 14 for more information.
If you select an employee or position rate table for a project, the default pay code for timesheets will depend on the pay codes selected for the employees or position codes in the rate tables. See Specify billing settings for a project on page 71 and Create an employee rate table on page 23, and Create a position rate table on page 25 for more information.
If a pay code hasn't been selected for the employee, the pay code for the cost category in the project budget will be used. If a pay code hasn't been selected for the cost category in the project budget, the pay code for the cost category record will be used.
Budget
The pay code for the cost category in the project budget that the timesheet is for. See Enter project budget settings for a cost category on page 81 for more information.
If you select an employee or position rate table for a cost category in a project budget, the default pay code for timesheets will depend on the pay codes selected for the employees or position codes in the rate tables. See Assign a rate table to a cost category in a project budget on page 85, Create an employee rate table on page 23, and Create a position rate table on page 25 for more information.
If a pay code hasn't been selected for the cost category in the project budget, the pay code for the cost category record will be used. If a pay code hasn't been selected for the cost category record, the pay code for the employee record will be used.
Cost Category
The pay code for the cost category record. See Create a cost category record on page 51 for more information.
If a pay code hasn't been selected for the cost category record, the pay code for the employee record will be used. If a pay code hasn't been selected for the cost category in the project budget, the pay code for the cost category record will be used.
Set up timesheets for tracking project costs and billing customers
You can specify how to track project costs and bill customers for timesheets.
- Open the Timesheet Setup window.
Microsoft Dynamics GP menu > Tools > Setup > Project > Timesheet
PACM 69.JPEG
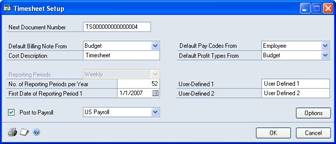
Enter the next document number to use for timesheets.
Select the default billing note for timesheet line items. See Billing notes for invoices on page 16 in the Project Accounting Billing Guide for more information.
You can enter a cost description, which is a user-defined name for timesheets.
The cost description will be displayed as a selection for timesheets in the Budget Maintenance window and other windows.
Select the default pay code or unit cost to use for timesheets.
If you selected Use Pay Codes for Unit Cost in the Project Setup window, select the default pay code for timesheets. See Default pay codes for timesheets on page 119 for more information.
If didn't select Use Pay Codes for Unit Cost in the Project Setup window, select the default unit cost for timesheets. See Default unit costs on page 10 for more information.
See Configure general settings for all projects on page 43 for more information.
Select the default profit type for timesheets. See Default profit types on page 50 for more information.
Specify the frequency and number of reporting periods in a year and specify the first day of the first reporting period for timesheets.
If you're using Project Accounting with U.S. Payroll or Canadian Payroll, select whether to post timesheets to payroll and then select US Payroll or Canadian Payroll. Post to Payroll will not be available unless you selected Use Pay Codes for Unit Cost in the Project Setup window. See Configure general settings for all projects on page 43 for more information.
You can enter names for user-defined fields that you can use in the Timesheet
Entry window. You must use Modifier to display user-defined fields in the Timesheet Entry window and you must use Report Writer to include information entered in those fields on reports. See the Modifier and Report Writer documentation (Help > Printable Manuals) for more information.
Click Options to grant timesheet data entry permissions. See Grant cost transaction data entry permissions on page 98 for more information.
Click OK.
Enter a timesheet
You can enter a timesheet to track the cost of time for an employee on a project. The data that you can enter depends on the permissions that you've been granted. See Grant cost transaction data entry permissions on page 98 for more information.
You can use the Timesheet Inquiry window (Inquiry > Project > PA Transaction Documents >Timesheet) to view posted or saved timesheets or you can use the TimesheetDetail Inquiry window (Inquiry > Project > PA Transaction Documents > TimesheetDetail) to view timesheet line item details.
- Open the Timesheet Entry window.
Transactions > Project > Timesheet Entry
PACM 70.JPEG
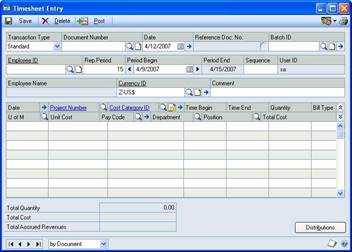
- Select the Standard transaction type to enter a new timesheet.
Select the Referenced transaction type to enter a Referenced timesheet to modify amounts from a Standard timesheet. In the Reference Doc. No. field, enter the document number for the Standard timesheet that you're modifying amounts for.
Enter a document number and date.
Enter or select a batch ID. See Manually create a batch for transactions on page 19 in the Project Accounting Accounting Control Guide for more information.
Select the employee that the timesheet is for.
You can modify the reporting period for the timesheet. A sequence number will be displayed if there are multiple timesheets for the same employee in the same reporting period.
If you're using Multicurrency Management, you can select a currency ID for the timesheet. The functional currency is used by default.
For each line item on the timesheet, enter the date.
Click the Date expansion button to modify the exchange rate for the line item if you've specified a billing currency for the project that the line item is for.
If you don't have a billing currency specified for the project, the currency ID that you selected for the timesheet will be used.
- Select the project and cost category that the time entry is for.
You can enter a line item that isn't for a specific project. Press TAB to enter <NONE> for the project number.
Enter the beginning and ending time for the task, or enter the amount oEnter the time in the Quantity column.
Select the billing type for the time entry. See Billing types on page 68 for more information.
You can modify the billing note for the line item. See Set up timesheets for tracking project costs and billing customers on page 120 for more information.
If you have permission, you can modify the unit of measure used for time and also the unit cost. Modify the pay code, department, and position code for the employee.
If you're posting timesheets to payroll, click the Pay Code expansion button to specify how to update payroll accounts. See Specify how to update payroll for salaried employees when posting timesheets on page 123 for more information.
Click Distributions to modify the allocation of transaction amounts to specific posting accounts. See Review and modify posting account distributions for transactions on page 20 in the Project Accounting Accounting Control Guide for more information.
If the transaction is in a batch, click Save. Otherwise, click Post.
If you click Post and you're posting timesheets to payroll, the Payroll Batch IDs window will open, where you must select the payroll batch to update payroll accounts. See Set up timesheets for tracking project costs and billing customers on page 120 for more information.
Specify how to update payroll for salaried employees when posting timesheets
If you're posting timesheets to payroll, you can specify how to update payroll information for salaried employees when you post. See Set up timesheets for tracking project costs and billing customers on page 120 for more information.
U.S. Payroll
You can select the following U.S. Payroll posting options for salaried employees in the Salary Posting window.
No Post Don't post timesheet information to payroll. This is the default option.
Reallocate Dollars If you're using U.S. Payroll to track the departments that employees are working in, pay employees using payroll accounts for the departments that the employees worked for, relative to time entered on timesheets.
Reallocate Hours If you're using U.S. Payroll to track the number of hours that salaried employees work, update the hours worked for employees based on time entered on timesheets.
Additional Amount Pay employees additional amounts based on the total cost entered on timesheets.
Canadian Payroll
You can select the following Canadian Payroll posting options for salaried employees in the Salary Posting window.
No Post Don't post timesheet information to payroll. This is the default option.
Additional Amount Pay employees additional amounts based on the total cost entered on timesheets.
Transfer a previously posted timesheet to Payroll
If a Payroll batch containing timesheet transactions posted from Project Accounting is deleted for some reason, you can easily transfer the timesheet data to Payroll again. If you do this, Project Accounting prevents duplicate timesheet information from being transferred. You cannot transfer an unposted timesheet to Payroll if a check is already created for the selected timesheet. You can transfer posted timesheets only to U.S. Payroll.
In the navigation pane, click the Project button, and then choose the Timesheets list.
In the Restrictions group, click Include Historic Transactions.
Select the timesheets to transfer to Payroll.
In the Actions group, click Transfer.
Click OK in the message to go to the Payroll Batch Selection window. Select an existing batch or create a new batch to complete the transfer.
Chapter 21: Employee expense transactions
This part of the documentation includes information for project managers about how to set up and enter employee expense transactions for tracking project costs and billing customers. It also includes information about how to specify a personal expense and how to enter payments and additional charges.
The following topics are discussed:
Set up employee expense transactions for tracking project costs and billing customers
Enter an employee expense transaction
Specify a personal expense on an employee expense transaction
Enter additional information for an employee expense transaction
Set up employee expense transactions for tracking project costs and billing customers
You can specify how to track project costs and bill customers for employee expense transactions.
- Open the Employee Expense Setup window.
Microsoft Dynamics GP menu > Tools > Setup > Project > Employee Expense
PACM 71. JPEG

Enter the next document number to use for employee expense transactions.
Select the default billing note for employee expense transaction line items. See Billing notes for invoices on page 16 in the Project Accounting Billing Guide for more information.
You can enter a cost description, which is a user-defined name for employee expense transactions. The cost description will be displayed for employee expense transactions as a selection in the Budget Maintenance window and other windows.
Select the default unit cost for employee expense transactions. See Default unit costs on page 10 for more information.
Select the default profit type for employee expense transactions. See Default profit types on page 50 for more information.
Select the default payment method for expenses on employee expense transactions.
You can enter names for user-defined fields that you can use in the Employee Expense Entry window. You must use Modifier to display user-defined fields in the Employee Expense Entry window and you must use Report Writer to include information entered in those fields on reports. See the Modifier and Report Writer documentation (Help > Printable Manuals) for more information.
Indicate whether to specify individual tax options for freight and miscellaneous charges on employee expense transactions or to use a single tax schedule for all charges.
Advanced Specify whether freight and miscellaneous charges are taxable, non-taxable, or based on the tax schedule for the vendor record for the employee. If you select Taxable, select a tax schedule.
Single Schedule Select a tax schedule.
Indicate whether to post employee expense transactions to Payables Management.
Click Options to grant employee expense transaction data entry permissions.
See Grant cost transaction data entry permissions on page 98 for more information.
- Click OK.
Enter an employee expense transaction
You can enter an employee expense transaction to track expenses, such as for travel and meals, that an employee incurs while working on a project. The data that you can enter depends on the permissions that you've been granted. See Grant cost transaction data entry permissions on page 98 for more information.
You can use the Employee Expense Inquiry window (Inquiry > Project > PA Transaction Documents > Employee Expense) to view posted and saved employee expense transactions or you can use the Employee Expense-Detail Inquiry window (Inquiry > Project > PA Transaction Documents > Employee Expense-Detail) to view employee expense transaction line item details.
- Open the Employee Expense Entry window.
Transactions > Project > Employee Expense
PACM 72.JPEG
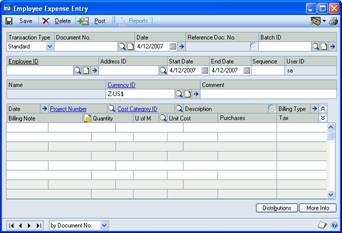
- Select the Standard transaction type to enter a new employee expense transaction.
Select the Referenced transaction type to enter a Referenced employee expense transaction to modify amounts from a Standard employee expense transaction. In the Reference Doc. No. field, enter the document number for the Standard employee expense transaction that you're modifying amounts for.
Enter a document number and date.
Enter or select a batch ID. See Manually create a batch for transactions on page 19 in the Project Accounting Accounting Control Guide for more information.
Select the employee that the employee expense transaction is for. To reimburse an employee for employee expenses, the employee must also be a vendor. Therefore, Files Employee Expense must be selected for the employee in the PA Employee Options window. See Set up an employee record for tracking project costs and billing customers on page 14 for more information.
Select the address for the employee.
Enter the starting and ending date for the employee expense transaction. You can enter a sequence number if there are multiple employee expense transactions for the same employee within the same starting and ending dates.
If you're using Multicurrency Management, you can select a currency ID for the employee expense transaction. The functional currency is used by default.
Begin entering line items in the scrolling window.
To enter a line item for a personal expense, you must first select the Date field for the line item and then click the Billing Type expansion button to open the Employee Expense Detail Entry window. See Specify a personal expense on an employee expense transaction on page 129 for more information.
- For each line item on the employee expense transaction, enter the date.
Click the Date expansion button to modify the exchange rate for the line item if you've specified a billing currency for the project that the line item is for.
If you don't have a billing currency specified for the project, the currency ID that you selected for the employee expense transaction will be used.
- Select the project and cost category that the line item is for.
You can enter a line item that isn't for a specific project. Press TAB to enter <NONE> for the project number. If you enter a line item that isn't for a project, you also can press TAB to enter <NONE> for the cost category ID.
You can enter a description for the line item.
Select the billing type for the line item. See Billing types on page 68 for more information.
You can modify the billing note for the line item. See Set up employee expense transactions for tracking project costs and billing customers on page 125 for more information.
Enter the quantity for the expense. The Purchases column will be updated, based on the quantity and unit cost. If you have permission, you can update the unit of measure and unit cost, or the amount in the Purchases column.
Tax will be calculated based on the tax schedule selected for cost transactions for the cost category in the project budget. See Enter project budget settings for a cost category on page 81 for more information.
Click Distributions to modify posting account distributions for the employee expense transaction. See Review and modify posting account distributions for transactions on page 20 in the Project Accounting Accounting Control Guide for more information.
Click More Info to select a tax schedule and shipping method for the employee expense transaction. You also can enter freight and miscellaneous charges and cash, check, and credit card payments. See Enter additional information for an employee expense transaction on page 130 for more information.
If the transaction is in a batch, click Save. Otherwise, click Post.
Specify a personal expense on an employee expense transaction
You can specify a personal expense on an employee expense transaction.
- Open the Employee Expense Detail Entry window.
Transactions > Project > Employee Expense > Billing Type expansion button
PACM 73.JPEG
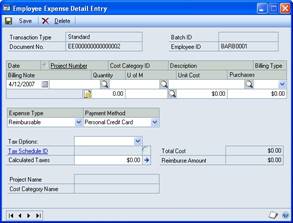
If you're viewing the transaction amounts in their originating currency in the Employee Expense Entry window, the Employee Expense Detail Entry window also will display the amounts in their originating currency.
Enter the date that the line item is for.
Press TAB to enter <NONE> for the project number and cost category ID.
You can enter a description for the line item.
The Billing Type field will display N/B for Non-billable. See Billing types on page 68 for more information.
You can modify the billing note for the line item. See Set up employee expense transactions for tracking project costs and billing customers on page 125 for more information.
Enter the quantity for the expense. The Purchases field will be updated, based on the quantity and unit cost. If you have permission, you can update the unit of measure and unit cost, or the amount in the Purchases field.
Select Personal Expense in the Expense Type field and select the payment method.
Specify whether the expense is taxable, non-taxable, or based on the tax schedule for the vendor record for the employee. If you select Taxable, select a tax schedule.
Click Save and close the window.
Enter additional information for an employee expense transaction
You can select a tax schedule and shipping method for an employee expense transaction. You also can enter freight and miscellaneous charges and cash, check, and credit card payments.
- Open the Employee Expense Entry – More Info window.
Transactions > Project > Employee Expense > More Info button
PACM 74.JPEG
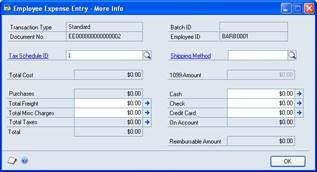
If you're viewing the transaction amounts in their originating currency in the Employee Expense Entry window, the Employee Expense Entry - More Info window also will display the amounts in their originating currency.
- The default tax schedule and shipping method are for the vendor record for the employee. If you haven't specified them for the vendor record, you can select them in this window.
To reimburse an employee for employee expenses, the employee also must be a vendor.
Therefore, Files Employee Expense must be selected for the employee in the PA Employee Options window. See Set up an employee record for tracking project costs and billing customers on page 14 for more information.
You can enter freight and miscellaneous charges for the employee expense transaction.
Enter payment amounts that the employee has made for the employee expense transaction using cash, checks, or credit cards.
Click OK.
Chapter 22: Equipment logs
This part of the documentation includes information for project managers about how to set up and enter equipment logs for tracking project costs and billing customers.
The following topics are discussed:
Set up equipment logs for tracking project costs and billing customers
Enter an equipment log
Set up equipment logs for tracking project costs and billing customers
You can specify how to track project costs and bill customers for equipment logs.
- Open the Equipment Log Setup window.
Microsoft Dynamics GP menu > Tools > Setup > Project > Equipment Log
PACM 75.JPEG
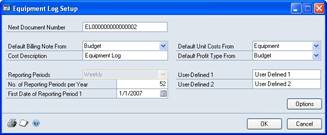
Enter the next document number to use for equipment logs.
Select the default billing note for equipment log line items. See Billing notes for invoices on page 16 in the Project Accounting Billing Guide for more information.
You can enter a cost description, which is a user-defined name for equipment logs. The cost description will be displayed for equipment logs as a selection in the Budget Maintenance window and other windows.
Select the default unit cost for equipment logs. See Default unit costs on page 10 for more information.
Select the default profit type for equipment logs. See Default profit types on page 50 for more information.
Specify the frequency and number of reporting periods in a year and specify the first day of the first reporting period for equipment logs.
You can enter names for user-defined fields that you can use in the Equipment Log Entry window. You must use Modifier to display user-defined fields in the Equipment Log Entry window and you must use Report Writer to include information entered in those fields on reports. See the Modifier and Report Writer documentation (Help > Printable Manuals) for more information.
Click Options to grant equipment log data entry permissions. See Grant cost transaction data entry permissions on page 98 for more information.
Click OK.
Enter an equipment log
You can enter an equipment log to track when equipment is used for a project so that you can bill customers for using the equipment. The data that you can enter depends on the permissions that you've been granted. See Grant cost transaction data entry permissions on page 98 for more information.
You can use the Equipment Log Inquiry window (Inquiry > Project > PA Transaction
Documents > Equipment Log) to view posted or saved equipment logs or you can use the Equipment Log-Detail Inquiry window (Inquiry > Project > PA Transaction Documents > Equipment Log-Detail) to view equipment log line item details.
- Open the Equipment Log Entry window.
Transactions > Project > Equipment Log Entry
PACM 76. JPEG
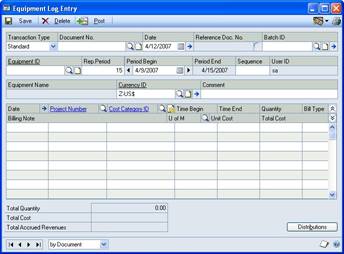
- Select the Standard transaction type to enter a new equipment log.
Select the Referenced transaction type to enter a Referenced equipment log to modify amounts from a Standard equipment log. In the Reference Doc. No. field, enter the document number for the Standard equipment log that you're modifying amounts for.
Specify a document number and date.
Enter or select a batch ID. See Manually create a batch for transactions on page 19 in the Project Accounting Accounting Control Guide for more information.
Select the equipment that the equipment log is for.
You can modify the reporting period for the equipment log. A sequence number will be displayed if there are multiple equipment logs for the same equipment in the same reporting period.
If you're using Multicurrency Management, you can select a currency ID for the equipment log. The functional currency is used by default.
For each line item on the equipment log, enter the date that the equipment was used.
Click the Date expansion button to modify the exchange rate for the line item if you've specified a billing currency for the project that the line item is for.
If you don't have a billing currency specified for the project, the currency ID that you selected for the equipment log will be used.
- Select the project and cost category that the time entry is for.
You can enter a line item that isn't for a specific project. Press TAB to enter <NONE> for the project number.
Enter the beginning and ending time that the equipment was used, or enter the amount of time in the Quantity column.
Select the billing type for the time entry. See Billing types on page 68 for more information.
You can modify the billing note for the line item. See Set up equipment logs for tracking project costs and billing customers on page 131 for more information.
If you have permission, you can modify the unit of measure used for time and also the unit cost.
Click Distributions to modify the allocation of transaction amounts to specific posting accounts. See Review and modify posting account distributions for transactions on page 20 in the Project Accounting Accounting Control Guide for more information.
If the transaction is in a batch, click Save. Otherwise, click Post.
Chapter 23: Miscellaneous logs
This part of the documentation includes information for project managers about how to set up and enter miscellaneous logs for tracking project costs and billing customers.
The following topics are discussed:
Set up miscellaneous logs for tracking project costs and billing customers
Enter a miscellaneous log
Set up miscellaneous logs for tracking project costs and billing customers
You can specify how to track project costs and bill customers for miscellaneous logs.
- Open the Miscellaneous Log Setup window.
Microsoft Dynamics GP menu > Tools > Setup > Project >Miscellaneous Log
PACM 77.JPEG
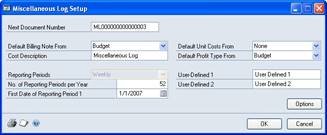
This window is similar to the Equipment Log Setup window. See Set up equipment logs for tracking project costs and billing customers on page 131 for more information.
Enter a miscellaneous log
You can enter a miscellaneous log to track miscellaneous expenses and benefit allocations for a project that can't be tracked using other cost transactions. The data that you can enter depends on the permissions that you've been granted. See Grant cost transaction data entry permissions on page 98 for more information.
You can use the Miscellaneous Log Inquiry window (Inquiry > Project > PA Transaction Documents > Miscellaneous Log) to view posted and saved miscellaneous logs or you can use the Miscellaneous Log-Detail Inquiry window (Inquiry > Project > PA Transaction Documents > Miscellaneous Log-Detail) to view miscellaneous log line item details.
- Open the Miscellaneous Log Entry window.
Transactions > Project > Miscellaneous Log Entry
PACM 78.JPEG
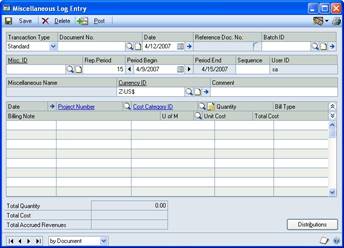
- Select the Standard transaction type to enter a new miscellaneous log.
Select the Referenced transaction type to enter a Referenced miscellaneous log to modify amounts from a Standard miscellaneous log. In the Reference Doc. No. field, enter the document number for the Standard miscellaneous log that you're modifying amounts for.
Specify a document number and date.
Enter or select a batch ID. See Manually create a batch for transactions on page 19 in the Project Accounting Accounting Control Guide for more information.
In the Misc ID field, select the miscellaneous expense type that the miscellaneous log is for.
You can modify the reporting period for the miscellaneous log. A sequence number will be displayed if there are multiple miscellaneous logs for the same miscellaneous expense type in the same reporting period.
If you're using Multicurrency Management, you can select a currency ID for the miscellaneous log. The functional currency is used by default.
For each line item on the miscellaneous log, enter the date that the miscellaneous expense was incurred.
Click the Date expansion button to modify the exchange rate for the line item if you've specified a billing currency for the project that the line item is for.
If you don't have a billing currency specified for the project, the currency ID that you selected for the miscellaneous log will be used.
- Select the project and cost category the miscellaneous expense is for.
You can enter a line item that isn't for a specific project. Press TAB to enter <NONE> for the project number.
Enter the quantity.
Select the billing type for the miscellaneous expense. See Billing types on page 68 for more information.
You can modify the billing note for the line item. See Set up miscellaneous logs for tracking project costs and billing customers on page 135 for more information.
If you have permission, you can modify the unit of measure and also the unit cost.
Click Distributions to modify the allocation of transaction amounts to specific posting accounts. See Review and modify posting account distributions for transactions on page 20 in the Project Accounting Accounting Control Guide for more information.
If the transaction is in a batch, click Save. Otherwise, click Post.
Chapter 24: Purchasing documents and transactions
This part of the documentation includes information for the project manager about how to set up purchase orders, shipment/invoice receipts, and invoice receipts for tracking project costs and billing customers.
To enter purchase orders, use the Purchase Order Entry window (Transactions > Purchasing > Purchase Order Entry).
To enter shipment/invoice receipts, use the Receivings Transaction Entry window (Transactions > Purchasing > Receivings Transaction Entry).
To enter invoice receipts, use the Purchasing Invoice Entry window (Transactions > Purchasing > Enter/Match Invoices).
See the Purchase Order Processing documentation (Help > Printable Manuals) for more information.
The following topics are discussed:
Set up purchase orders for tracking project costs
Set up purchasing receipts for tracking project costs and billing customers
When purchased items are billable
View a list of shipment, shipment/invoice, and invoice receipts
Set up purchase orders for tracking project costs
You can use the PA Purchase Order Processing Setup Options window to set up purchase orders for tracking project costs. See the Purchase Order Processing documentation (Help > Printable Manuals) for more information.
Set up purchasing receipts for tracking project costs and billing customers
You can use the PA Purchase Order Processing Setup Options window to set up invoice receipts for tracking project costs and billing customers. See the Purchase Order Processing documentation (Help > Printable Manuals) for more information.
When purchased items are billable
You can enter a drop-ship purchase order for an item for a project using Purchase Order Processing. When you enter the corresponding invoice receipt, the item will be tracked as a cost for the project and you can bill customers for the item.
You can enter a standard purchase order for an item for a project using Purchase Order Processing. When you enter the corresponding shipment receipt or shipment/invoice receipt, inventory will be updated. You must then enter an inventory transfer to track the item as a cost for the project and to make the item billable. See Chapter 25, "Inventory transfers," for more information.
View a list of shipment, shipment/invoice, and invoice receipts
You can use the Purchases Materials Inquiry window (Inquiry > Project > PA Transaction Documents > Purchases Materials) to view project-related information about saved and posted shipment, shipment/invoice, and invoice receipts.
Chapter 25: Inventory transfers
This part of the documentation includes information for project managers about how to set up and enter inventory transfers for tracking project costs and billing customers.
The following topics are discussed:
Set up inventory transfers for tracking project costs and billing customers
Enter an inventory transfer
Enter lot numbers for lot quantities on an inventory transfer
Enter serial numbers for items on an inventory transfer
Specify bins for item quantities on an inventory transfer
Set up inventory transfers for tracking project costs and billing customers
You can specify how to track project costs and bill customers for inventory transfers.
- Open the Inventory Transfer Setup window.
Microsoft Dynamics GP menu > Tools > Setup > Project > Inventory Transfer
PACM 79.JPEG
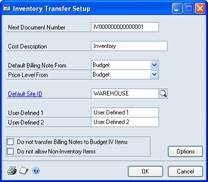
Enter the next document number to use for inventory transfers.
You can enter a cost description, which is a user-defined name for inventory transfers. The cost description will be displayed for inventory transfers as a selection in the Budget Maintenance window and other windows.
Select the default billing note for inventory transfer line items. See Billing notes for invoices on page 16 in the Project Accounting Billing Guide for more information.
Select the default price level for items.
None Don't use default price levels.
Budget Use the price level selected for the cost category in the project budget.
Item Use the price level selected for the item record.
Select the default site ID that identifies the store, warehouse, or other location that items are sold from.
You can enter names for user-defined fields that you can use in the Inventory Transfer Entry window. You must use Modifier to display user-defined fields in the Inventory Transfer Entry window and you must use Report Writer to include information entered in those fields on reports. See the Modifier and Report Writer documentation (Help > Printable Manuals) for more information.
You can select Do not transfer Billing Notes to Budget IV Items to prevent the billing note entered for a cost category in a project budget from being assigned to individual items in the cost category. See Billing notes for invoices on page 16 in the Project Accounting Billing Guide for more information.
You can select Do not allow Non-Inventory Items to prevent users from including cost categories that aren't for inventoried items on inventory transfers. Inventory Item must be selected for a cost category in the Cost Category Maintenance window if it is for inventoried items. See Create a cost category record on page 51 for more information.
Click Options to grant inventory transfer data entry permissions. See Grant cost transaction data entry permissions on page 98 for more information.
Click OK.
Enter an inventory transfer
You must enter an inventory transfer to make inventoried items that you've purchased for projects available for those projects. You also can enter an inventory transfer to return items from projects to inventory. See the Inventory Control documentation (Help > Printable Manuals) for more information.
You can enter an inventory transfer to make any inventoried item available for projects, not just inventoried items that you've purchased for projects.
You also can enter an inventory transfer to correct project or cost category information for a non-inventoried item that was entered on a shipment/invoice receipt or an invoice receipt. When you transfer a non-inventoried item using an inventory transfer, information about the vendor that you purchased the noninventoried item from and related purchasing accounts will be unaffected.
The data that you can enter depends on the permissions that you've been granted. See Grant cost transaction data entry permissions on page 98 for more information.
You can use the Inventory Transfer Inquiry window (Inquiry > Project > PA Transaction Documents > Inventory Transfer) to view posted and saved inventory transfers or you can use the Inventory Transfer-Detail Inquiry window (Inquiry > Project > PA Transaction Documents > Inventory Transfer-Detail) to view inventory transfer line item details.
- Open the Inventory Transfer Entry window.
Transactions > Project > Inventory Transfer
PACM 80. JPEG
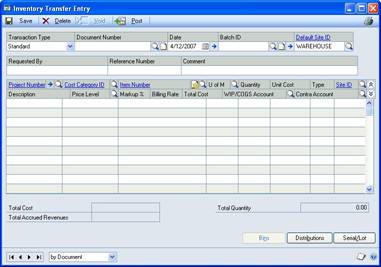
- Select the Standard transaction type to enter an inventory transfer to make inventoried items that you've purchased for projects available for those projects.
Select the Return transaction type to enter a Return inventory transfer to return items from projects to inventory.
Enter a document number and date.
Enter or select a batch ID. See Manually create a batch for transactions on page 19 in the Project Accounting Accounting Control Guide for more information.
Enter the site ID that will be used for line items.
If you're entering a Standard inventory transfer, the site ID will be where you obtain your items from.
If you're entering a Return inventory transfer, the site ID will be where you send the items to.
For each line item on the inventory transfer, select the project and cost category that the item is for.
You can enter a line item that isn't for a specific project. Press TAB to enter <NONE> for the project number.
Click the Project Number expansion button to modify the exchange rate for the line item if you've specified a billing currency for the project that the line item is for.
Select the inventoried item to transfer, or type the name of a non-inventoried item.
You can modify the billing note for the line item. See Set up inventory transfers for tracking project costs and billing customers on page 141 for more information.
Enter the unit of measure, quantity, and unit cost for the item that you're transferring.
Select the billing type for the item. See Billing types on page 68 for more information.
Select the site ID for the item to identify the store, warehouse, or other location that the item is sold from.
Select the price level for the item. You must select a price level before you can enter information in the Billing Rate or Markup % columns.
If the item is a non-inventoried item for a Time and Materials project that uses the Markup % profit type, you can modify the markup percentage. See Profit types for calculating billing amounts on page 49 for more information.
If the item is for a Time and Materials project that uses the Billing Rate profit type, you can modify the billing rate. See Profit types for calculating billing amounts on page 49 for more information.
Select the Work In Progress, Cost of Goods Sold, and Contra Account to update when you post the inventory transfer.
Click Distributions to modify the allocation of transaction amounts to specific posting accounts. See Review and modify posting account distributions for transactions on page 20 in the Project Accounting Accounting Control Guide for more information.
If you're tracking units or lot quantities of the item, you can click Serial/Lot to enter a serial number for each unit of the item or to enter lot numbers for various lot quantities of the item. See Enter lot numbers for lot quantities on an inventory transfer on page 144 and Enter serial numbers for items on an inventory transfer on page 145 for more information.
If Auto-Assign Serial Numbers or Auto-Assign Lot Numbers is selected in the Inventory Transfer Setup Options window, serial or lot numbers automatically will be assigned to items in the transaction. See Grant cost transaction data entry permissions on page 98 for more information.
Click Bins to specify bins for item quantities. See Specify bins for item quantities on an inventory transfer on page 146 for more information.
If the transaction is in a batch, click Save. Otherwise, click Post.
Enter lot numbers for lot quantities on an inventory transfer
If you're tracking lot quantities of an item using lot numbers, you can enter lot numbers for various lot quantities on an inventory transfer.
See the Inventory Control documentation (Help > Printable Manuals) for more information.
Open the Inventory Transfer Entry window. Transactions > Project > Inventory Transfer
Enter an inventory transfer. See Enter an inventory transfer on page 142 for more information.
Click Serial/Lot to open the PA Item Lot Number Entry window.
PACM 81. JPEG
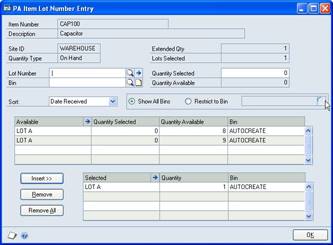
A screenshot of a cell phone Description automatically generated
Enter or select a lot number.
If you're using multiple bins for inventoried items, select a bin number.
The lot quantities that are available will be displayed in the upper scrolling window. If you're using multiple bins for inventoried items, you can select Restrict to Bin and select a bin number to limit the available lot quantities to lots in the selected bin.
Enter the quantities to transfer from lots in the Quantity Selected column.
Click Insert to add the lot number and quantity to the lower scrolling window.
Continue selecting lots and bins and entering quantities until the amount in the Lots Selected field equals the amount in the Extended Qty field.
- Click OK.
Enter serial numbers for items on an inventory transfer
If you're tracking an item using serial numbers, you can enter a serial number for each unit of the item on an inventory transfer.
See the Inventory Control documentation (Help > Printable Manuals) for more information.
Open the Inventory Transfer Entry window. Transactions > Project > Inventory Transfer
Enter an inventory transfer. See Enter an inventory transfer on page 142 for more information.
Click Serial/Lot to open the PA Item Serial Number Entry window.
PACM 82.jpeg
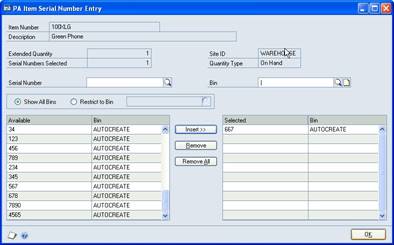
A screenshot of a computer Description automatically generated
The serial numbers that are available will be displayed in the leftmost scrolling window. If you're using multiple bins for inventoried items, you can select Restrict to Bin and select a bin number to limit the available serial numbers to items in the selected bin.
- Select a serial number and click Insert to include the serial number in the rightmost scrolling window.
Continue selecting serial numbers until the amount in the Serial Numbers Selected field equals the amount in the Extended Quantity field.
- Click OK.
Specify bins for item quantities on an inventory transfer
You can specify bins for item quantities on an inventory transfer.
See the Inventory Control documentation (Help > Printable Manuals) for more information.
Open the Inventory Transfer Entry window. Transactions > Project > Inventory Transfer
Enter an inventory transfer. See Enter an inventory transfer on page 142 for more information.
Click Bins to open the PA Bin Quantity Entry window.
PACM83. JPEG
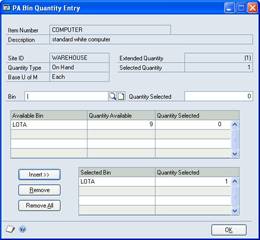
A screenshot of a cell phone Description automatically generated
Select a bin.
Enter the quantity for the bin.
Click Insert to add the information to the lower scrolling window.
Continue selecting bins and entering quantities until the amount in the Selected Quantity field equals the amount in the Extended Quantity field.
- Click OK.
Chapter 26: Item returns
This part of the documentation includes information for project managers about how to return items from projects to vendors or to inventory.
The following topics are discussed:
About returning items to vendors or inventory
Set up return from project transactions for tracking project costs and billing customers
Return items from projects to vendors
About returning items to vendors or inventory
When you receive an item for a project using a purchasing transaction in Purchase Order Processing, the item is tracked as a cost for the project. To remove the item from the project, you can return the item to the vendor, or you can return the item to inventory to make it available for other projects.
Projects to vendors You can return items from projects to vendors using the
Returns From Project Entry window (Transactions > Project > PA Purchasing > Returns from Project Entry) in Project Accounting. See Return items from projects to vendors on page 149 for more information.
Projects to inventory You can return items from projects to inventory using the Inventory Transfer Entry window (Transactions > Project > Inventory Transfer) in Project Accounting. See Enter an inventory transfer on page 142 for more information.
Inventory to vendors You can return items from inventory to vendors using the
Returns Transaction Entry window (Transactions > Purchasing > Returns Transaction Entry) in Purchase Order Enhancements. See the Purchase Order Enhancements documentation (Help > Printable Manuals) for more information.
Set up return from project transactions for tracking project costs and billing customers
You can use the Inventory Transfer Setup window to specify how to track project costs and bill customers for return from project transactions. See Set up inventory transfers for tracking project costs and billing customers on page 141 for more information.
Return items from projects to vendors
You can return items from projects to vendors. The data that you can enter depends on the permissions that you've been granted. See Grant cost transaction data entry permissions on page 98 for more information.
You can use the Inventory Transfer Inquiry window (Inquiry > Project > PA Transaction Documents > Inventory Transfer) to view posted and saved return from project transactions or you can use the Inventory Transfer-Detail Inquiry window
(Inquiry > Project > PA Transaction Documents > Inventory Transfer-Detail) to view return from project line item details.
- Open the Returns From Project Entry window.
Transactions > Project > PA Purchasing > Returns from Project Entry
PACM 84.JPEG
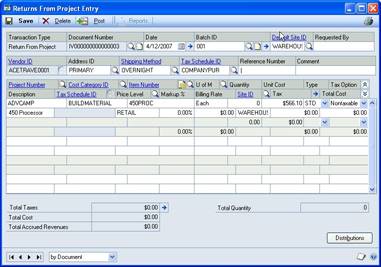
Enter a document number and date.
Enter or select a batch ID. See Manually create a batch for transactions on page 19 in the Project Accounting Accounting Control Guide for more information.
Enter the site ID that will be used for line items.
Select the vendor and the address for the vendor to return the items to. Select the shipping method and tax schedule for the return.
For each line item on the transaction, select the project and cost category that the item is for.
You can enter a line item that isn't for a specific project. Press TAB to enter <NONE> for the project number.
Select the inventoried item to return, or type the name of a non-inventoried item.
You can modify the billing note for the line item. See Set up return from project transactions for tracking project costs and billing customers on page 149 for more information.
Enter the unit of measure, quantity, and unit cost for the item to return.
Select the billing type for the item. See Billing types on page 68 for more information.
In the Tax Option column, select whether the item is taxable, non-taxable, or to use the vendor's tax schedule for calculating taxes for the item. If you select Taxable, select a tax schedule in the Tax Schedule ID column.
Select the price level for the item. You must select a price level before you can enter information in the Billing Rate or Markup % columns.
You can modify the markup percentage or billing rate.
If the item is for a Time and Materials project that uses the Markup % profit type, you can modify the markup percentage.
If the item is for a Time and Materials project that uses the Billing Rate profit type, you can modify the billing rate.
See Profit types for calculating billing amounts on page 49 for more information.
Select the site ID that identifies the store, warehouse, or other location that the item is returned to.
Enter or modify the tax amount.
Click Distributions to modify the allocation of transaction amounts to specific posting accounts. See Review and modify posting account distributions for transactions on page 20 in the Project Accounting Accounting Control Guide for more information.
If the transaction is in a batch, click Save. Otherwise, click Post.
Chapter 27: Cost, billing, revenue, and profit inquiries
This part of the documentation includes information for project managers about how to view detailed information about cost, billing, revenue, and profit amounts for contracts, projects, and cost categories.
The following topics are discussed:
View forecast and actual amounts for cost categories in project budgets
View costs, billings, revenue, and profits by customer
View costs, billings, revenue, and profits by contract
View costs, billings, revenue, and profits by project
View costs, billings, revenue, and profits by cost category for a project
View billings, revenue, and profits for fees assigned to a project
View committed costs for a project based on purchasing documents and transactions
View total cost and revenue for projects
Assemble information for viewing cost transaction line items by date
Billing statuses and viewing cost transaction line items by date
View costs, billings, and revenue for cost transaction line items by date
Limit information for viewing cost transaction line items by date
View more information about cost transaction line items
View forecast and actual amounts for cost categories in project budgets
You can view forecast and actual cost and billing amounts for cost categories in project budgets.
- Open the Budget-Detail Inquiry window. Inquiry > Project > Budget-Detail
PACM 85. JPEG
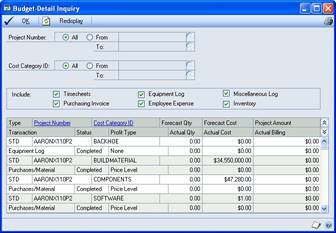
A screenshot of a cell phone Description automatically generated
Select the projects and cost categories to view amounts for.
Select the cost transactions to view amounts for.
Click Redisplay to update the scrolling window.
Click OK to close the window.
View costs, billings, revenue, and profits by customer
You can view information about total cost, billing, revenue, and profit amounts accrued for projects for a list of customers.
- Open the Corporate Inquiry window. Inquiry > Project > Corporate
PACM 86.JPEG
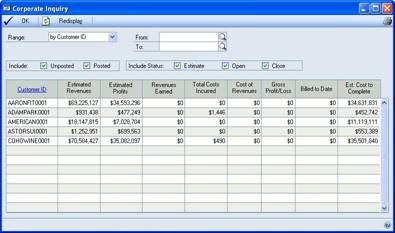
A screenshot of a cell phone Description automatically generated
Select the customers to view amounts for.
Select whether to view amounts for Unposted (saved) or Posted transactions.
Select whether to view amounts for contracts with Estimate, Open, or Closed statuses
Click Redisplay to update the scrolling window.
Click OK to close the window.
View costs, billings, revenue, and profits by contract
You can view information about total cost, billing, revenue, and profit amounts accrued for projects for a list of contracts.
- Open the Customer Inquiry window. Inquiry > Project > Customer
PACM 87. JPEG
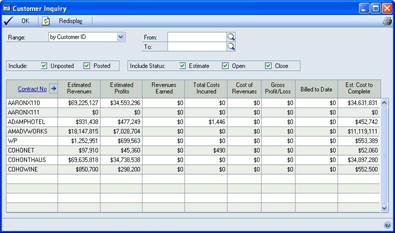
A screenshot of a computer Description automatically generated
Select the contracts to view amounts for.
Select whether to view amounts for Unposted (saved) or Posted transactions.
Select whether to view amounts for contracts with Estimate, Open, or Closed statuses.
Click Redisplay to update the scrolling window.
Click OK to close the window.
View costs, billings, revenue, and profits by project
You can view information about total cost, billing, revenue, and profit amounts accrued for a list of projects.
- Open the Contract Inquiry window. Inquiry > Project > Contract
PACM 88. JPEG
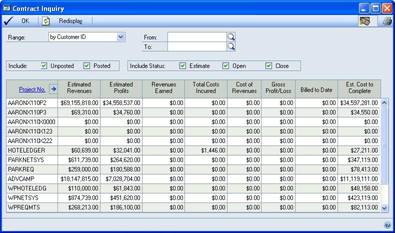
A screenshot of a computer Description automatically generated
Select the projects to view amounts for.
Select whether to view amounts for Unposted (saved) or Posted transactions.
Select whether to view amounts for projects with Estimate, Open, or Closed statuses.
Click Redisplay to update the scrolling window.
Click OK to close the window.
View costs, billings, revenue, and profits by cost category for a project
You can view information about total cost, billing, revenue, and profit amounts accrued for the cost categories in a project budget.
- Open the Project Inquiry window. Inquiry > Project > Project
PACM 89. JPEG
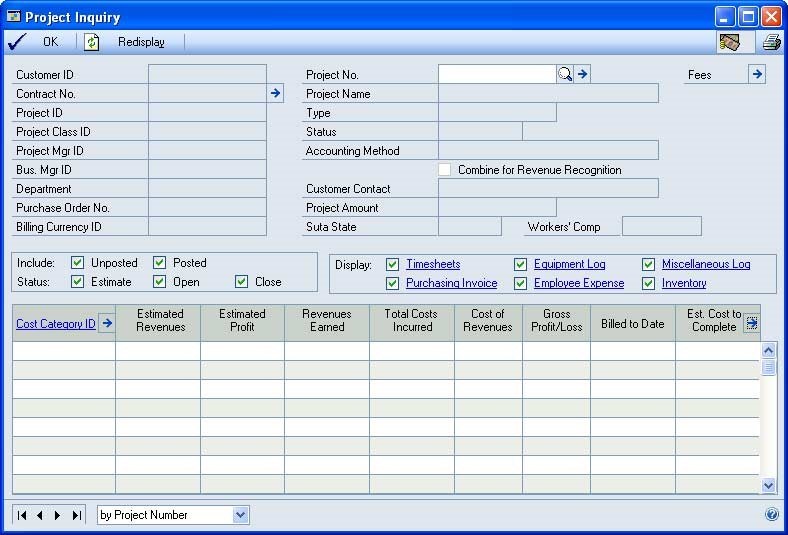
A screenshot of a cell phone Description automatically generated
Select the project to view cost categories for.
Select whether to view amounts for Unposted (saved) or Posted transactions.
Select whether to view amounts for cost categories with Estimate, Open, or Closed statuses.
Select the cost transactions to view cost categories for.
Click Redisplay to update the scrolling window.
Click OK to close the window.
View billings, revenue, and profits for fees assigned to a project
You can view information about billing, revenue, and profit amounts for the fees that are assigned to a project.
Open the Project Inquiry window. Inquiry > Project > Project
Select a project.
Click the Fees expansion button to open the Project Inquiry-Fees window.
PACM 90. JPEG
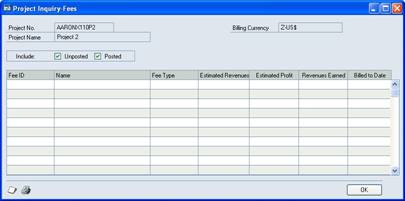
A screenshot of a cell phone Description automatically generated
Select whether to view amounts for Unposted (saved) or Posted transactions.
Click OK to close the window.
View committed costs for a project based on purchasing documents and transactions
You can view the committed costs for a project based on the purchase orders, shipment/invoice receipts, and invoice receipts that you've entered for the project.
Committed costs include the cost for items on purchase orders that haven't been received.
This window also includes information about actual costs. These actual costs reflect the cost for items that have been received for purchase orders. However, they don't affect the actual costs incurred for a project. You must enter an inventory transfer to make inventoried items available for projects, which will increase the actual costs for the projects. See Enter an inventory transfer on page 142 for more information.
Open the Project Inquiry window. Inquiry > Project > Project
Select a project.
Click the Est. Cost to Complete expansion button to open the Committed Cost Detail window.
PACM 91.JPEG
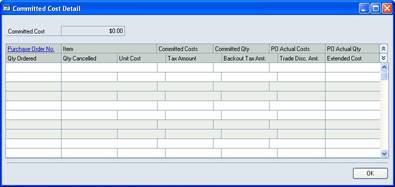
A screenshot of a cell phone Description automatically generated
- Click OK to close the window.
View total cost and revenue for projects
You can view total cost and revenue for a list of projects.
- Open the Project-Detail Inquiry window. Inquiry > Project > Project-Detail
PACM 92. JPEG
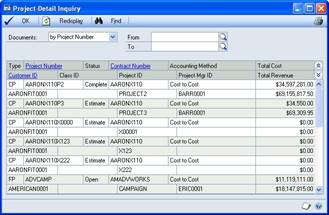
A screenshot of a computer Description automatically generated
Select the projects to view amounts for.
Click Redisplay to update the scrolling window.
Click OK to close the window.
Assemble information for viewing cost transaction line items by date
To view information about cost, billing, and revenue for line items on cost transactions for a range of dates, you first must assemble the information. See View costs, billings, and revenue for cost transaction line items by date on page 159 for more information.
- Open the Combined History Utility window.
Microsoft Dynamics GP menu > Tools > Utilities > Project > Create Combined History
PACM 94. JPEG
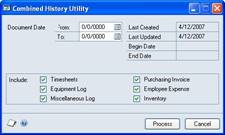
Enter the dates to assemble information for.
Select the transactions to assemble information for.
Click Process.
Billing statuses and viewing cost transaction line items by date
When you use the Combined History Inquiry window to view information about cost, billing, and revenue for line items on cost transactions for a range of dates, you can select to limit the line items to view by billing status.
Billable Cost transaction line items for Time and Materials projects that haven't been billed.
In Process Cost transaction line items for Time and Materials projects that are included on transactions that have been saved in batches but haven't been posted.
Closed Cost transaction line items for Time and Materials projects that have been billed.
Non-Billable Cost transaction line items for Time and Materials projects that have been specified as non-billable. See Billing types on page 68 for more information.
Fixed Fee Trx Cost transaction line items for Cost Plus or Fixed Price projects.
View costs, billings, and revenue for cost transaction line items by date
You can view information about cost, billing, and revenue for line items on cost transactions for a range of dates.
You first must use the Combined History Utility window to assemble information. See Assemble information for viewing cost transaction line items by date on page 158 for more information.
- Open the Combined History Inquiry window. Inquiry > Project > Combined History
PACM 95. JPEG
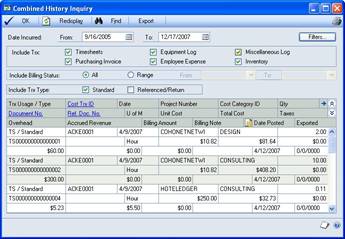
A screenshot of a computer Description automatically generated
Enter a range of posting dates to view cost transaction line item information for.
Select the transactions to view line item information for.
You can limit the transactions to view line item information for by billing status. See Billing statuses and viewing cost transaction line items by date on page 159 for more information.
Select the type of transactions to view.
Standard View information for Standard cost transaction line items. These are regular cost transactions.
Referenced/Return View information for Referenced cost transaction line items and for Return inventory transaction line items.
Click Filters to limit the transactions to view line item information for by customer, contract, project, salesperson, cost category, document, date, userdefined, employee, equipment, miscellaneous, or item information. See Limit information for viewing cost transaction line items by date on page 160 for more information.
Click Redisplay to update the scrolling window.
Click OK to close the window.
Limit information for viewing cost transaction line items by date
You can limit the transactions to view line item information for in the Combined History Inquiry window. See View costs, billings, and revenue for cost transaction line items by date on page 159 for more information.
- Open the Combined History Inquiry Filters window.
Inquiry > Project > Combined History > Filters button
PACM 96.JPEG
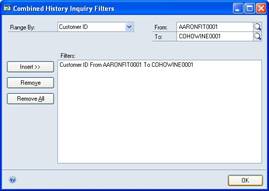
Select the information to limit viewing cost transaction line items by.
Click Insert to include the limitation.
Click OK.
View more information about cost transaction line items
You can view more information about cost transaction line items when using the Combined History Inquiry window to view line item information by date.
- Open the Combined History Detail window.
Inquiry > Project > Combined History > Qty expansion button
PACM 97. JPEG
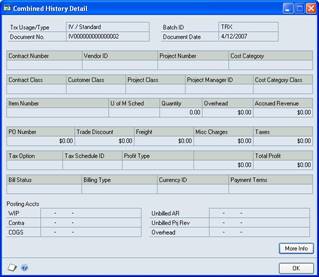
Click More Info to view additional information about the line item.
Click OK to close the window.
Chapter 28: Project cost allocation
This part of the documentation includes information about how you can allocate costs from one project to other projects. You can allocate cost by units, percentage, or amount. A miscellaneous log is created for the project that you are allocating costs to. You can create a negative miscellaneous log for the project that you are allocating costs from to reduce the cost of the project.
The following topics are discussed:
- Set up allocation IDs * Allocate project costs
Set up allocation IDs
You can allocate the project cost to multiple projects. You can view the allocations that you have set up in the PA Allocations SmartList.
- Open the Project Allocation Maintenance window. Cards > Project > Project Allocation
PACM 98. JPEG

A screenshot of a social media post Description automatically generated
Enter the allocation ID and a description.
In the From section of the scrolling window, enter or select an open or completed project ID that the costs are allocated from. You can select multiple projects in the scrolling window, or you can select the same project multiple times with different options.
Enter or select the cost category to allocate costs from.
Enter or select the miscellaneous ID to use for the miscellaneous log transaction that is created during the allocation process.
Enter or select the Miscellaneous Log Cost Category to use for the miscellaneous log transaction that is created during the allocation process.
In the To section of the scrolling window, enter or select an open or completed project ID that the costs are allocated to. You can select multiple projects in the scrolling window, or you can select the same project multiple times with different options.
Enter or select the cost category to base the cost allocation on.
Enter or select the miscellaneous ID to use for the miscellaneous log transaction that is created during the allocation process.
Select whether to allocate costs based on the percentage, amount, or units.
Enter a value in the Amount field if you have selected percentage or amount as the method.
Click Save to save the record.
Allocate project costs
You can select allocation IDs and a range of dates to process for allocation.
- Open the Project Allocation window. Transactions > Project > Allocation
PACM 99. JPEG
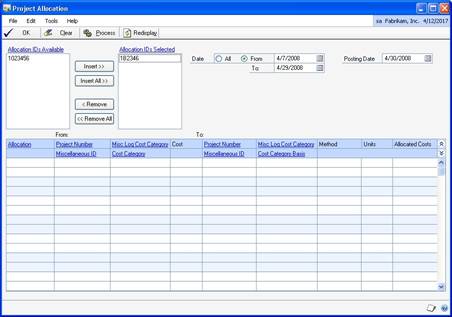
A screenshot of a social media post Description automatically generated
In the Allocation IDs Available list, select the allocation ID to process for cost allocation.
Click Insert; the ID is inserted in the Allocation IDs Selected list.
Click Redisplay to display the values of the project from and to which costs are allocated.
Select All or select a date range to process the allocation for.
Select the posting date that will appear on the miscellaneous log transactions.
Click Process to process the allocation based on your selection and create the miscellaneous logs.
Click OK to close the window.
Glossary
access list
An employee access list or an equipment access list. The list of employees who can enter transactions for a specific project, or the list of equipment that can be used when entering equipment log transactions for a specific project.
account
The type of record—asset, liability, revenue, expense or owner's equity—traditionally used for recording individual transactions in an accounting system.
account balance
The difference between the debit amount and the credit amount of an account.
account format
The structure defined for account numbers, including the number of segments in the format and the number of characters in each segment.
account number
The identifying alphanumeric characters that have been assigned to an account.
account segment
A portion of the account format that can be used to represent a specific aspect of a business. For example, accounts can be divided into segments that represent business locations, divisions, or profit centers.
account segment number
A number that represents a particular area of a business or an account category. Using account 01-200-1100, for example, account segment number 01 might represent a particular site, 200 might represent a department located at that site, and 1100 might represent the Cash account for that site and that department. Descriptions can be entered for each account segment number and appear on General Ledger reports.
accounting method
A method used to calculate revenue for a project or contract. Accounting methods include: Completed, Cost-to-Cost, EffortExpended, Effort-Expended Labor Only, When Billed, and When Performed.
accrued revenue
Revenue that has been earned for actual project costs, but not collected. For Time and Materials projects, accrued revenue is based on forecast billing amounts for both saved and posted cost transactions. For Cost Plus and Fixed Price projects, revenue is accrued when you recognize revenue.
active employee
An employee whose records are active and that you can include in transactions that require employee IDs.
actual
A project budget amount that represents cost and billing amounts based on the transactions that you've entered. You can use actual amounts to measure project performance against forecast and baseline budget amounts.
adjusting transaction
A transaction that you can enter to reverse— or to reverse and correct—line item entries on posted timesheets, employee expense transactions, equipment logs, or miscellaneous logs.
adjustment
Increases or decreases to inventory quantities based on receivings or allocations.
age
To subtract the document date from the date you're aging from to determine the age of the document.
aging
The process that determines the maturity of a document or account, or the number of days that the document or account has been outstanding. Aging places each transaction in the appropriate current or past-due aging category.
analysis
The process of evaluating the condition of an accounting record and possible reasons for discrepancies.
applying
The process of linking the payment amount to amounts from one or more documents that are being paid.
audit trail
A series of permanent records used to track a transaction to the point where it was originally entered in the accounting system. The audit trail can be used to verify the accuracy of financial statements by outside accountants or auditors.
bank card
A type of credit card whose payments may be treated as cash by the business receiving the payment. Bank cards differ from charge cards, whose payments must be collected from the company issuing the card before they can be considered received.
base unit of measure
Typically, the smallest quantity on a Unit of Measure schedule in which items can be bought or sold. The base unit of measure is common to all named quantities entered for a Unit of Measure schedule. For example, for the item "soda," the base unit of measure might be "Can" because all the other units of measure are multiples of a single can.
baseline
A project budget amount used as a basis for comparison to measure project performance. Baseline amounts are entered to estimate cost and billing amounts for a project. You can measure project performance by comparing forecast and actual amounts against the baseline. Project managers typically refer to the cost baseline, which is created during cost budgeting. Baseline amounts for billing also are calculated in Project Accounting.
batch
A group of transactions identified by a unique name or number. Batches are used to conveniently group transactions, both for identification purposes and to speed the posting process.
batch posting
An option used to post a group of transactions identified by a unique name or number.
begin date
The date that you can begin entering cost transactions using a specific cost category in a project budget.
billable amount
An amount that you can bill customers for.
The default billing type for a cost category is STD, or Standard, meaning that transaction amounts that you enter using the cost category will be billable.
billing
To generate and print invoices to charge customers for items or services that have not been paid for.
billing currency
The currency used on a billing invoice.
billing cycle
A record that identifies when and how often to bill customers for projects. Billing invoices can be generated using billing cycles.
billing discounts
A percentage that is deducted from the overall billing amount for a contract or project.
billing format
A group of invoice formats that have been selected to be printed together when billing customers.
billing frequency
The frequency that a billing cycle will be used to create billing invoices for a customer.
billing invoice
A transaction that you can use to charge customers for items purchased and services rendered for a project. Also refers to the document that you print to send to the customer to bill them.
billing note
The information that you can type in the Billing Note window for contracts, projects, cost categories, fees, and cost transactions that will appear on billing invoices. You can click the billing note button adjacent to a field to enter a billing note.
billing rate
The amount that a customer is billed for a single unit quantity of an item or time.
billing return
A transaction that you can use to credit customers for amounts that have been billed using a billing invoice. You only can enter billing returns to credit customers for billed amounts for Time and Materials projects.
billing transaction
A billing invoice or billing return.
billing type
A selection that specifies whether and how a project cost will be billed. Billing types include Standard, Non-billable, and No Charge. They are abbreviated STD, N/B, and N/C.
business manager
A person who manages the business functions for a project, such as contracting, planning, scheduling, budgeting, and so forth.
cash
Ready money or its equivalent that a bank will accept at face value. Cash includes coins; paper money; certain deposited negotiable instruments such as checks, bank drafts, and money orders; amounts in checking and savings accounts; and demand certificates of deposit.
cash budget
A budget that presents expected cash flow— both in and out—for a designated time period.
cash receipt
A document used to record payments and deposits received from customers.
change order
A transaction that you can use to modify project budgets and fee assignments and to enter quote information for projects. Change order types include Internal, Company, and Customer.
change order status
Indicates the progress of a change order.
Change order statuses include Approved, Canceled, Completed, Pending, and Unapproved.
check
A written order on a bank to pay a sum of money from funds in an account. Checks show the name of the company or individual receiving payment, the signature and account number of the person issuing the check, the payment amount and the current date. Checks usually are numbered in sequence.
checkbook
An account used to maintain a currency balance and to track cash that is received and disbursed.
class
A group of records that share common characteristics.
close
To suspend or end cost accruals for a customer, contract, or project.
combined revenue
The result of adding together revenue from a group of projects within a contract, or from separate cost categories within a project budget.
commission
The amount, usually a percentage of the sale amount, paid to the salesperson making the sale.
contract
A group of projects that a contractor completes for a customer, and for which the contractor bills the customer for various costs.
contract amount
The sum of the project amounts in a contract. The original contract amount is the sum of the project amounts in the contract, not including change orders. The revised contract amount is the sum of the project amounts in the contract, including change orders. The contract amount also includes taxes, trade discounts, freight, and miscellaneous charges.
contract class
A group of contracts. You can use contract classes to define parameters for contracts within the group.
contract manager
The person who oversees all aspects of contract preparation and administration.
contract status
The progress of a contract. Contract statuses include Closed, Completed, Estimate, On Hold, Open, and additional statuses that you can name.
contract template
A framework that contains information for creating a new contract record.
contract total
See contract amount.
cost category
The framework used to track and group expenses by kind for a project budget. You must select the type of cost transaction that a cost category will be used for and whether or not inventoried items will be used with the cost category.
cost category class
A group of cost categories. You can use cost category classes to define parameters for cost categories within a group.
cost category status
The progress of a cost category in a project budget. Cost category statuses include Closed, Completed, Estimate, On Hold, and Open.
cost description
A user-defined name for a cost transaction type that will be displayed for the transaction in various windows.
cost of revenue
An amount that is calculated as total cost minus overhead.
Cost Plus project
A type of project in which the customer pays for actual project costs plus a fee. Each billing invoice is for a percentage of the final total that is calculated using forecast budget amounts.
cost transaction
A transaction that you enter to track project costs. Cost transactions include timesheets, employee expense transactions, equipment logs, miscellaneous logs, inventory transfers, return from project transactions, shipment receipts, and shipment/invoice receipts.
credit
To enter an amount that decreases the balance of an asset or expense account or increases a liability, owners' equity, or revenue account; the right side of any T account.
credit card
Cards used to pay for items instead of a check, cash, or other method. The amount due is then billed by the credit card company. Using the Credit Card Setup window, cards used to make payments can be classified as credit cards or check cards. Cards accepted as payment by a company can be classified as bank cards or charge cards.
credit memo
A document that credits a customer's or vendor's account and explains the reason for the credit.
currency
Any form of money, including bills and coins, used as a medium of exchange.
customer
The entity with which a business unit conducts a business transaction.
customer alias
A string of up to five characters for a specific customer used as the basis for creating a contract number for the customer.
customer class
A group of customers that you can define parameters for.
customer payment
A transaction to track money that is paid by a customer for goods or services.
debit
To enter an amount that increases an asset or expense account, or decreases the balance of a liability, owners' equity or income account; the left side of any T account.
department
A business division that incurs costs and/or generates revenue.
department code
A unique alphanumeric name used to identify a department.
details
Individual amounts that you enter in a transaction, as opposed to summary, which is the calculated total amounts.
discount available
A reduction in the amount payable, typically offered if the payment is made by a certain date.
discount date
The date an invoice must be paid for a discount to be valid.
distribution accounts
Accounts designated to receive a percentage or part of a posted transaction, or accounts assigned to a fixed or variable allocation account that will receive a percentage of posted transaction amounts. distributions The manner in which amounts from a transaction are divided up among posting accounts.
document
All the information entered for a single, complete transaction, including distribution amounts (if any).
document date
The date when a document or transaction is created.
document number
A number that identifies a group of entries that have been posted as a single, complete transaction.
earned value analysis
A method for measuring project performance. It indicates how much of the budget should have been spent in view of the amount of work completed so far and the baseline cost for the project.
earnings
The net income for a contract or project.
employee
A person who works for your company and receives payment for work performed.
employee access list
The list of employees who can enter transactions for a specific project.
employee class
A group of employees that you can define parameters for.
employee expense transaction
A transaction that you enter to track project costs that are incurred by an employee while working on a project, for example, travel expenses.
employee rate table
A list of employees and the cost and profit for whenever an employee works on a project.
end date
The last day that you can enter cost transactions using a specific cost category in a project budget.
equipment
Machines, tools, or other equipment used for a project.
equipment access list
The list of equipment that can be used when entering equipment log transactions for a specific project.
equipment class
A group of equipment records that you can define parameters for.
equipment log
A transaction used to track the cost for using equipment for a project.
equipment rate
The amount that you bill a customer per unit of time for using a piece of equipment for a project.
equipment rate table
A list of equipment and the cost and profit for whenever the equipment is used for a project.
fee
An amount that a customer pays for services over and above project costs. Also, an amount that is paid in advance or an amount that is withheld until project completion. Fees include Project, Service, Retainer, and Retentions.
fee calculation method
A method of determining how a fee is calculated and the fee frequencies that you can select for a fee. Fee calculation methods include % of Baseline Cost, % of Baseline Revenues, Fee Amount, and Retention Percent.
fee frequency
A framework for when and how often a customer is billed for a fee. Fee frequencies include At Project Completion, Per Invoice, and Scheduled.
fee template
A framework that contains information for creating a new fee record.
Fixed Price project
A type of project in which the customer pays a predetermined amount for the entire project. Each billing invoice is for a percentage of the predetermined total billing amount.
fiscal period
Divisions of the fiscal year, usually monthly, quarterly, or semiannually, when transaction information is summarized and financial statements are prepared.
fiscal year
An accounting cycle composed of up to 30 consecutive periods, spanning the number of days in a year. In Australia and New Zealand, the fiscal year is referred to as a financial year.
forecast
A project budget amount that you can modify as a project progresses to represent expected results. Forecast amounts are subjective. You can use forecast amounts to measure project performance against baseline and actual amounts.
freight
An amount paid to a carrier for transporting goods.
functional currency
The primary currency in which a company maintains its financial records. Typically, the functional currency is the currency for the country/region where the company is located.
history
A record of transactions for previous and current years.
inactive employee
An employee record that is unavailable to use.
inventoried item
An item that quantities are tracked for.
inventory
Goods produced or purchased to be used or sold at a later time.
inventory transfer
A transaction to move items from inventory to a project, or from a project to inventory.
invoice format
A framework that contains information for the layout and content of a printed billing invoice.
invoice receipt
A transaction that tracks the receipt of an invoice from a vendor for items that have been received or are expected to be received from the vendor for a purchase order for a project.
item
The name for a product or service. Items include inventoried and non-inventoried items.
item number
A number that identifies one type of inventoried item. Inventoried items can be used in transaction entry only if item numbers have been assigned.
journal entry
A transaction recorded in a formalized manner by entering an account and debit and credit amounts.
labor list
See employee access list.
labor rate table
A generic term for an employee rate table or position rate table.
line item
A single entry in a transaction that typically includes an item, quantity, and cost.
lookup window
A window that displays a list of accounts, customers, jobs, or other items in the accounting system. Lookup windows for a specific field are displayed by choosing the lookup button next to the field.
lot number
A number provided by the manufacturer that can be used for tracking quantities of a specific item (for example, a roll of carpet or a roll of wire).
main segment
The segment of posting accounts that has been designated as the sorting option for accounts on financial statements. Typically, the main segment is used to indicate whether the account is an asset, liability, owners' equity, revenue or expense account.
miscellaneous class
A group of miscellaneous records. You can use miscellaneous classes to define parameters for miscellaneous records within the group.
miscellaneous expense
An additional expense for a project that can't or shouldn't be tracked using timesheets, employee expense transactions, equipment logs, inventory transfers, shipment receipts, or shipment/invoice receipts.
miscellaneous log
A transaction to track additional expenses for a project that can't or shouldn't be tracked using timesheets, employee expense transactions, equipment logs, inventory transfers, shipment receipts, or shipment/ invoice receipts.
non-inventoried item
An item that quantities aren't tracked for.
<NONE> cost category
Used to indicate that a line item on a transaction is not to be tracked using a cost category.
<NONE> project number
Used to indicate that a line item on a transaction is not to be tracked for a specific project.
originating currency
The foreign currency that a multicurrency transaction was conducted in.
overhead
An indirect project cost, such as electricity, administration, and insurance.
overhead calculation method
A method of calculating overhead for employees and vendors, and when entering timesheets, employee expense transactions, equipment logs, and miscellaneous logs. Also determines how overhead is calculated for projects, cost categories, and cost categories in project budgets. Overhead calculation methods include Amount per Unit and Percentage of Actual Cost.
path name
A location on a computer or in a network where files are created and stored.
pay code
A code used to identify a specific type and rate of pay.
pay rate
The amount an employee is paid for working a period of time.
payment method
The form of payment. Examples include check, cash, or credit card.
payment terms
Conditions for payment that are extended to customers and that vendors may extend to a company.
periodic budget
A budget for estimating and tracking costs, quantities, and billing amounts for a project by fiscal period.
position code
A unique alphanumeric name used to identify a defined role within an organization.
position rate table
A list of positions and the cost and profit for whenever an employee works in a specific position on a project.
posting
A procedure to make temporary transactions a part of a business's permanent records; to update accounts by transaction amounts. In manual accounting, posting transfers journal entries to the proper accounts in a general ledger.
posting account
A financial account that tracks assets, liabilities, revenue or expenses. These accounts will appear on financial statements and other reports.
posting date
The date that a transaction is recorded in General Ledger.
pre-billing worksheet
A report that includes detailed information and space to include comments about the billing invoices that you plan to generate. There are two types of pre-billing worksheets: in-process worksheets that include saved billing invoices; and billable worksheets, which include all billing invoices.
price level
Used to specify different prices for an item or group of items, depending upon who it's being sold to. For example, you might charge one price if you're selling to a retail customer and another price to a wholesale customer. You don't need to assign all price levels to all units of measure; be sure that each unit of measure can be used with every price level at which you might want to sell it.
profit type
A method of calculating profit based on project type. Profit types include % of Actual, % of Baseline, Billing Rate, Markup %, None, Price Level, Profit/Unit - Fixed, Profit/Unit - Variable, and Total Profit.
progress billing
A method of billing customers for the percentage of project completion, based on either cost or quantity, for a Cost Plus or Fixed Price project.
project
A task with a budget to complete a deliverable for a contract.
project amount
The total cost for a project. The project amount calculation depends on whether the project is a Cost Plus, Fixed Price, or Time and Materials project.
project budget
The planned revenue and expenses for a project categorized by cost. You can include various cost categories in the budget, and then specify baseline and forecast amounts for each cost category. You then can compare actual costs to budgeted costs.
project budget totals
The baseline, forecast, and actual total revenue and expense amounts for a project and its various cost categories.
project class
A group of projects defined by parameters within the group.
project manager
The person who leads a project team and is responsible for completing projects and meeting objectives using project management.
project number
An alphanumeric name used to identify a project.
project status
The progress of a project. Project statuses include Closed, Completed, Estimate, On Hold, Open, plus additional statuses that you can name.
project template
A framework that contains information to create a new project record.
project type
A project classification used to determine how project costs are calculated and how customers are billed. Project types include Cost Plus, Fixed Price, and Time and Materials.
purchase order
A document that authorizes you to purchase items from vendors for projects.
purchase order format
A framework that contains information for the layout and content of a printed purchase order.
purchases/material
Refers collectively to purchase orders, shipment receipts, shipment/invoice receipts, invoice receipts, and inventory transfers with non-inventoried items.
purchasing document
A purchase order that you enter to purchase items from vendors for projects. General ledger accounts and inventory quantities aren't updated when you enter a purchase order, which is why it is referred to as a document and not a transaction.
purchasing transaction
A transaction that you enter to track the receipt of items and invoices from vendors for purchase orders for projects. Purchasing transactions include shipment receipts, shipment/invoice receipts, and invoice receipts.
rate table
A list of employees, equipment, or positions used to calculate cost and profit for whenever they are used for a project.
reconcile
A procedure that compares corresponding data in different logical tables and removes any "orphan" records. Reconciling also verifies that information stored in two different tables is the same, and if there are discrepancies, changes the information in the table being reconciled to match the information in the table it's being compared to.
recurring batch
A batch that will be posted repeatedly, according to the selected frequency. An example of a recurring batch would be one to record monthly rent expense. In Australia and New Zealand, transactions entered in a recurring batch are referred to as standing transactions.
reference document number
A number that identifies a transaction that a Referenced transaction has been posted for.
referenced transaction
A transaction used to correct the quantities on a posted cost transaction.
report option
A collection of entries that specify the amount of information or the type of information that appears on a report.
Multiple report options can be created.
reporting currency
A currency that is used to convert functional currency amounts to another currency on inquiries and reports. This calculation uses a spot exchange rate entered when the inquiry or report is generated.
return from project transaction
A transaction used to return items from projects to vendors.
revenue
The income generated as the result of activities related to a project or contract.
revenue recognition
A feature that allows you to recognize revenue for Cost Plus and Fixed Price projects. When you bill customers for these projects, the billing amounts are not recognized as revenue on Profit and Loss Statements. Revenue recognition will update the financial statement.
revenue recognition calculation method
The method of determining revenue amounts when recognizing revenue using revenue recognition transactions.
revenue recognition cycle
A record that identifies when and how often to recognize revenue for contracts and projects. Revenue recognition cycles can be used to automatically generate revenue recognition transactions.
revenue recognition transaction
A transaction used to recognize earnings from projects as revenue for the company.
salary pay
A pay code that's used for employees who are paid a specific amount each pay period.
salesperson
A person who sells a company's goods or services.
serial number
A number assigned to a specific inventory item to identify it and differentiate it from similar items with the same item number.
shipment receipt
A transaction used to record merchandise received from a vendor.
shipment/invoice receipt
A transaction used to record merchandise received from a vendor, accompanied by an invoice.
shipping method
A method of transportation for goods or services. Default shipping methods are provided with the accounting system and can be modified for a specific business.
single-use batch
A batch that is created, posted once and then automatically deleted from the system after all transactions in the batch are posted.
site
A store, warehouse or other location from which business or store items are sold.
standard transaction
A basic timesheet, employee expense transaction, equipment log, or miscellaneous log.
summary
The calculated total amounts for a transaction.
SUTA
An acronym for "state unemployment tax." This is the state unemployment tax paid by an employer to provide for payments of unemployment compensation to workers who have lost their jobs.
tax detail
A definition of a tax that may apply to sales or purchases. Tax details are grouped into tax schedules.
tax schedule
Groups of tax details that define each tax that may apply to sales or purchases. When tax schedules are assigned to vendors, the applicable taxes will be calculated during transaction entry.
template
A framework that contains information for creating a new contract, project, or fee record.
territory
A division of the regions in which a company's products are sold, often separated from other divisions by geographical location.
third-party customer
A customer who is the customer of an individual or business that you are billing for a contract.
third-party customer list
A list that you can use to bill a customer who is the customer of the individual or business that you are billing for a contract.
Time and Materials project
A type of project in which the customer is billed for project costs as they are incurred. The amount that the customer is billed is based on billing rates or markup percentages for time and materials used for the project. Time includes the time that employees spend working on a project and for equipment used for the project. Materials include inventoried and non-inventoried items used for the project.
timesheet
A transaction entered to track the cost of time for an employee on a project.
total billings
The sum of the amounts billed for a contract or project.
total cost
The sum of the actual cost amounts incurred for a contract or project.
total revenue
The sum of the revenue amounts recognized for a contract or project.
trade discount
A discount given by a vendor or received by a customer. The rate is calculated at the time of a purchase or sale and is added to payment term discounts that also may be offered. Trade discounts only can be applied to Time and Materials projects.
transaction
An event or condition that is recorded in asset, liability, expense, revenue and/or equity accounts.
transaction date
The date when a transaction occurred; not necessarily the date that it was entered into the system.
transaction history
A record of transactions for a previous year or a record of a fully applied transactions.
transaction owner
The type of record that a transaction is entered for. For example, an employee is the transaction owner for timesheets and employee expense transactions.
unbilled revenue
Revenue that has been realized for Time and Materials projects but hasn't been billed, or revenue that has been recognized for Cost Plus and Fixed Price projects but hasn't been billed.
unit
A single quantity of an item.
unit cost
The amount per unit that you paid for an item you're planning to sell or consume.
unit of measure
The quantities in which your business buys or sells an item.
unit of measure schedule
A group of related named quantities.
user
A person working with software on a computer; a computer operator.
user class
A group of users. You can use user classes to define parameters for users within the group.
user-defined field
A field that can be used to track information specific to your company.
user-defined field label
The name for a user-defined field.
valuation method
The method by which you track the cost of an item from the time you receive it until you sell it. Different businesses and industries typically use different valuation methods, which are sometimes specified by law. In most locations, strict legal limits are in place concerning changing the valuation method once you've begun using a particular one. Valuation methods include FIFO Perpetual, FIFO Periodic, LIFO Perpetual, LIFO Periodic, and Average Perpetual.
vendor
A person or company providing goods or services in return for payment.
vendor class
A group of vendors. You can use vendor classes to define parameters for vendors within the group.
WIP (Work In Progress)
The project costs that customers haven't been billed for.
workers' compensation tax
Taxes paid by the employer for insurance covering injuries incurred on the job. Workers' compensation is paid to the state government.
write down
To arbitrarily reduce a calculated billing amount on a billing invoice.
write up
To arbitrarily increase a calculated billing amount on a billing invoice.
writeoff
A process used to adjust small differences between an invoice amount and a payment or an amount that a business chooses not to pay on a vendor account. A writeoff is deducted from the account total.
See also
Project Accounting Administrator's Guide
Project Accounting Billing Guide
Project Accounting - Accounting Control Guide