Note
Access to this page requires authorization. You can try signing in or changing directories.
Access to this page requires authorization. You can try changing directories.
This part of the sales order processing documentation explains allocating and fulfilling items, and creating or linking to purchase orders for items with quantity shortages.
The following topics are discussed:
Chapter 19, “Allocating item quantities,” describes how items areIf there is a shortage on a sales line item allocated and fulfilled on orders, fulfillment orders, and invoices.
Chapter 20, “Separate fulfillment,” describes the fulfillment methods if you have chosen to fulfill items separately from allocation.
Chapter 21, “New purchase orders,” describes how to preview, modify, and create purchase orders from sales orders and back orders.
Chapter 22, “Links to existing purchase orders,” explains how to add or remove a link from a sales order or back order to a purchase order.
Chapter 23, “Receiving purchase orders,” describes the allocation and fulfillment of sales documents that are linked to purchase orders.
Chapter 19: Allocating item quantities
When you allocate an item, it is reserved in inventory and the quantity available for the item and for the site is reduced in inventory. You must allocate items before you can fulfill them.
If the order ID, fulfillment order/invoice ID, or invoice ID you’re using was not set up to use a separate fulfillment process, item quantities also will be fulfilled when they’re allocated. For more information about setting up an order ID or an invoice ID, see Setting up orders or Setting up invoices.
This information contains the following sections:
Setup options and allocation
Quantity shortage indicators
Quantity shortage options
Quantity shortages and bins
Selling an item from another site
Substituting an item
Processing kit shortages
Allocating by line item
Allocating items by document or batch
Allocating back-ordered items for orders and fulfillment orders
Quantity allocation problems
Setup options and allocation
You can allocate order, fulfillment order, and invoice documents using several methods—by line item, by document or batch, or none. The allocation options you select when setting up document IDs determine how item quantities will be allocated during transaction entry.
Line item
When you allocate by line item, quantities are reserved in inventory when you enter the item and item quantity in the Sales Transaction Entry window. You must handle each quantity shortage as it arises.
Document/Batch
Allocating by document/batch allows for faster data entry because the quantity available isn’t checked as the items are entered in the Sales Transaction Entry window. When you allocate by document or batch, the quantities aren‘t set aside in inventory for the line items and the quantity available isn’t checked for shortages until you allocate the entire document or batch.
When you allocate item quantities for a document, each item on the document is checked for the quantity available. If there is a shortage, you can select a quantity shortage option for each item.
When you allocate item quantities for an entire batch, you can select a quantity shortage option that will be used for all quantity shortages in the batch.
If documents are set up to be allocated by document or batch, additional items entered on the document after you have allocated the document will be allocated by line, and you must address quantity shortages as they arise.
Note
If you’re entering a repeating order, you must allocate by document/batch.
None
You can choose not to allocate items on orders. Item quantities will be allocated according to the selection you make when you transfer the order to an invoice. Quantity shortages are addressed based on the allocation option selected for the invoice ID used.
For more information about setup options, see Setting up orders or Setting up invoices. For more information about allocating items, see Allocating by line item or Allocating items by document or batch.
Quantity shortage indicators
If there is a quantity shortage and allocation is unsuccessful, an icon appears on the quantity field. When the icon appears, the Quantity Alert button will become available.
Quantity Alert icon
The quantity alert icon appears next to a quantity field, indicating that allocation has been attempted but the quantity entered for the item is greater than the quantity that was successfully allocated. The Quantity Alert icon will also appear if you selected None as the default quantity shortage option and allocation is unsuccessful.
Quantity Alert button
The Quantity Alert button opens the Sales Quantity Shortage Options window, where you can select quantity shortage options such as selling the balance, overriding the shortage or back ordering the balance.
If you’re working with a kit item, this button opens the Sales Kit Options window, where you can attempt allocation again, substitute components, or decrease component quantities.
Quantity shortage options
Depending on how Sales Order Processing was configured, you may be able to enter a quantity greater than the quantity that’s available in inventory. Item quantities are checked when an item is allocated. If there is a quantity shortage, the Sales Quantity Shortage Options window will open and you can select how to treat the quantity shortage. You can select from the following options.
Sell Balance The quantity available in inventory for the site will be allocated to the document. For example, if you entered 5 for the quantity ordered on a sales order but have 3 available in inventory, the quantity ordered and the quantity invoiced for the item is set to 3. The quantity available in inventory for the item will be zero.
Override Shortage The shortage will be ignored and the entire quantity will be sold. The quantity available in inventory will be negative. This option isn’t available if you are selling discontinued items.
Important
You shouldn’t override a shortage on an item that is tracked by serial or lot numbers. Your inventory will be overstated when the quantity is replenished.
Back Order All The entire quantity will appear in the Quantity to Back Order field. To create the back order document, you must transfer the document to a back order.
Depending on how Purchase Order Processing is set up, you may be able to link back-ordered quantities on sales documents to existing purchase order line items with uncommitted quantities.
For more information about setting up Purchase Order Processing, see the Purchase Order Processing documentation.
Back Order Balance The quantity shortage will appear in the Quantity to Back Order field and the quantity you have available will be sold. To create the back order document, you must transfer the document to a back order.
Note
The Back Order All and Back Order Balance options are not available for the item if the item isn not marked to allow back orders. To mark this option, choose Inventory >> Cards >> Items >> Options.
Depending on how Purchase Order Processing is set up, you may be able to link back-ordered quantities on sales documents to existing purchase order line items with uncommitted quantities.
Cancel All The entire quantity for the item will be canceled.
Cancel Balance The quantity shortage amount will be canceled and the quantity you have available at the site will be sold. For example, if you entered 5 for the quantity ordered for an item but have 3 available in inventory, the quantity ordered remains at 5, the quantity invoiced is set to 3, the quantity canceled is set to 2.
Distribute When you select Distribute and close the Sales Quantity Shortage Options window, the Sales Item Quantity Distribution Entry window opens. In this window, you can substitute items and sell items from another site. For more information, see Selling an item from another site or Substituting an item.
If you’re using extended pricing and you choose to distribute the shortage, and if a promotion exists for the item and quantity you entered, the Promotion Alert window will open, where you can accept or reject the promotion. If the promotion is for a free item, the Promotion Alert window will not open.
The Distribute option appears in the Sales Quantity Shortage Options window only if one of the following conditions is true.
The item is not a kit or a kit component.
The quantity previously back ordered equals zero.
The quantity previously invoiced equals zero.
You opened the Sales Quantity Shortage Options window from the Sales Transaction Entry window or the Sales Item Detail Entry window, or you pressed TAB on a line with an item that needed to be allocated.
You didn’t open the Sales Quantity Shortage Options window from the Sales Allocation-Fulfillment Options window.
Quantity shortages and bins
Bin selections are needed to keep bin quantity information up-to-date, but they don’t affect posting. From an accounting perspective, it doesn’t matter if you have 100 widgets at the North site in one bin or in 100 bins: what matters is that you have 100 widgets at the North site.
Because of this, quantity overrides at the bin level are allowed, even if you haven’t marked the option to allow overrides.
If you’re using multiple bins and you override a quantity shortage at the site, the system automatically allocates the default sales order fulfillment bin’s quantity available, and the Bin Quantity Entry window opens so you can make additional bin selections.
If there is not a quantity shortage at the site but there is a shortage at the default bin, and you choose to override the bin shortage, the default bin’s quantity available is allocated and the Bin Quantity Entry window opens so you can make additional bin selections.
If you override a serial- or lot-numbered item’s quantity shortage, you must enter serial or lot numbers for the additional item quantity. Because allocation happens at the site, and fulfillment allocates quantities at the bin, selecting serial or lot numbers and bins does not cause additional site allocations.
Note
You shouldn’t override a shortage on an item that is tracked by serial or lot numbers. Your inventory will be overstated when the quantity is replenished.
For more information on multiple bins functionality, see the Inventory Control documentation.
Selling an item from another site
When you enter a document in the Sales Transaction Entry window, you select a default site. If there is a quantity shortage for an item at the default site, the Sales Quantity Shortage Options window will open and you can choose the Distribute shortage option to check the quantity available at other sites and allocate the item from other sites.
To sell an item from another site
In the Sales Quantity Shortage Options window, select Distribute to open the Sales Item Quantity Distribution Entry window.
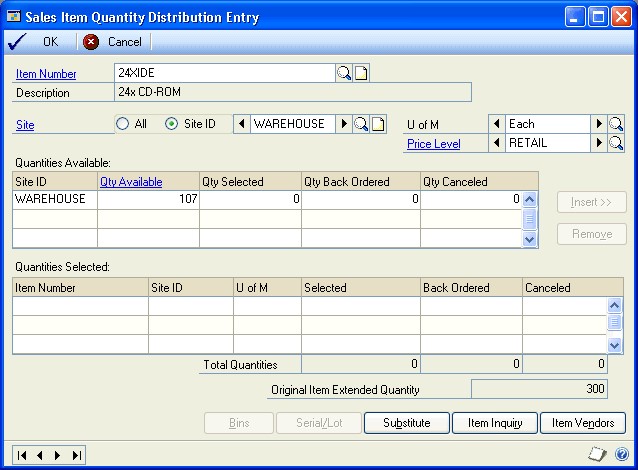
Change the Site ID.
In the Quantities Available section of the window, see if there is a quantity available for that site. If there is, enter the quantity needed for the document in the Quantity Selected field.
Choose Insert. An entry will appear in the Quantities Selected section of the window.
If you’re using extended pricing and a promotion exists for the item and quantity you entered, the Promotion Alert window will open, where you can accept or reject the promotion.
Repeat the process to choose additional sites to fill the quantity needed. The total quantity selected less the quantity back ordered and quantity canceled should equal the Original Item Extended Quantity.
Choose OK to close the window and save your entries.
Substituting an item
When you enter a document in the Sales Transaction Entry window, you select a default site. If there is a quantity shortage for an item at the default site, the Sales Quantity Shortage Options window will open and you can select the Distribute shortage option and choose a substitute item. Substitute items must be set up in inventory and you can set up two substitute items for each inventory item. For more information about substitute items, see the Inventory Control documentation.
To substitute an item
In the Sales Quantity Shortage Options window, select the Distribute option to open the Sales Item Quantity Distribution Entry window.
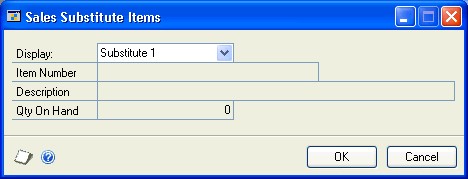
Choose Substitute to open the Sales Substitute Item window. Select a substitute item from the drop-down list and choose OK.
In the Quantities Available section of the Sales Item Quantity Distribution Entry window, check the site to see the quantity available for the substitute item. Enter an amount for the quantity selected. You can also enter a quantity canceled and quantity back ordered.
Choose Insert. An entry will appear in the Quantities Selected section of the window.
If you’re using extended pricing and a promotion exists for the item and quantity you entered, the Promotion Alert window will open, where you can accept or reject the promotion.
Repeat the process to choose an additional substitute item or site to fill the quantity needed. The total quantity selected less the quantity back ordered and quantity canceled must equal the Original Item Extended Quantity.
Choose OK to close the window and save your entries.
Processing kit shortages
When you allocate a kit item and there is a quantity shortage for a component of the kit, the Sales Quantity Shortage Options window will open and you can choose how to treat the quantity shortage. When you’re allocating a kit, you’re actually allocating the kit components because kit quantities are tracked for the components, not the kit item as a whole.
Note
You shouldn’t override a shortage on a component item that is tracked by serial or lot numbers. Your inventory will be overstated when the quantity is replenished.
The shortage options available for a kit are different than those for other inventory items. For a kit item, you can’t split the quantities; therefore, Back Order Balance and Cancel Balance aren’t shortage options for a kit.
Note
You can invoice a kit item and back order some of the components. For example, if you’re selling a computer kit, and have all of the kit components except the mouse pad, you can bill the customer for the entire kit and back order the mouse pad. To do so, create an invoice for the kit item, and in the Sales Kit Options window, enter a quantity to back order for the mouse pad. You won’t be able to post the invoice until a back order document has been created. If you invoice the kit without creating a back order, you won’t be able to change any of the components.
The Back Order All option won’t be available for the kit item or component item if the item isn’t marked to allow back orders. You can mark the Allow Back Orders option in the Item Maintenance Options window (Inventory >> Cards >> Items >> Options).
The following shortage options are available for kit items.
| Shortage option | Description |
|---|---|
| Sell Balance | The balance you have in inventory will be allocated. For example, if you entered two for the quantity ordered for kit items on an order but have components to fill only one kit, the quantity ordered on the kit will be reduced to one and the components needed for one kit will be allocated in inventory. |
| Override Shortage | The quantity shortage for every component will be overridden. The quantity available in inventory will be a negative number for each component with a quantity shortage. This option isn’t available if you are selling discontinued items. The quantity allocated for discontinued items will be the balance of the quantity in inventory. |
| Back Order All | The entire quantity will be back ordered, including each kit component. |
| Cancel All | The entire quantity will be canceled, including each kit component. |
| Allocate Available | All components that can be allocated will be allocated. A Quantity Alert icon will appear next to the quantities for each component that has a quantity shortage. You can then handle each component shortage individually with the following shortage options: Sell Balance — The quantity you have available in inventory for the site will be sold. Override Shortage — The shortage will be ignored and the entire quantity will be sold. The quantity available in inventory will be negative. This option isn’t available if you are selling discontinued items. Back Order All — The entire quantity will appear in the Quantity to Back Order field. To create the back order document, you must transfer this document to a back order. Cancel All — The entire quantity for the item will be canceled. |
Allocating by line item
In the Sales Transaction Entry window, when you enter an amount in the Quantity Ordered field (on an order) or the Quantity Invoiced field (on an invoice) for each item, the quantity entered will be allocated. If the order ID or invoice ID is not set up to use a separate fulfillment process, the item also will be fulfilled at this time.
If Sales Order Processing is not set up to automatically assign serial and lot numbers, you can enter or select a serial or lot number. When the item is fulfilled, the Sales Serial Number Entry or Sales Lot Number Entry window will open and you can assign the serial or lot number to the item sold. If a lot-numbered item is fulfilled and your system is set up to automatically assign lot numbers, a message won’t be displayed if the expiration date for the lot number has expired.
If there is a quantity shortage on the item, the Sales Quantity Shortage Option window will open and you must select a shortage option for the item. For more information about shortages, see Quantity shortage options.
If you back order or cancel a quantity, the quantity that was allocated will be reduced by the quantity back ordered or canceled.
If a Sales Order Processing line item is contained on a purchase order that hasn’t been received against, the line item cannot be allocated. (You would have to break the link between the sales line item and the purchase order line item in order to allocate prior to receiving the goods.)
Allocating items by document or batch
If you select to allocate by document/batch for order IDs and invoice IDs, you’ll use the Sales Allocation-Fulfillment Options window to allocate all the item quantities for a document or a batch. If the order ID or invoice ID is not set up to use a separate fulfillment process, the item also will be fulfilled at this time. For more information about setting up allocation options, see Chapter 3, “Document setup.”
If the items on a document have been allocated and you allocate again, the allocated line items won’t be affected. For example, if the items on a document were previously allocated and the document is assigned to a batch that you select to allocate, the items on the document won’t be reallocated.
If you back order or cancel an item quantity after you have allocated the document or batch, the quantity that was allocated will be reduced by the quantity back ordered or canceled.
If you mark the Override Billed Quantity with Quantity Fulfilled option in the Sales Invoice Setup window, the billed quantity on a fulfillment order will always be equal to the quantity fulfilled when the quantity fulfilled is greater than zero.
If an order, invoice, or fulfillment order exceeds the customer’s credit limit and you are using customer credit limit override workflow, the document must be approved before you can allocate items. Orders, invoices, and fulfillment orders that don’t need approval can be allocated. You can allocate items for orders, invoices, and fulfillment orders in the Sales Transaction Entry window that are pending approval if you are the current approver of the documents.
To allocate items by document or batch
Open the Sales Allocation-Fulfillment Options window. (Sales >> Transactions >> Sales Transaction Entry >> select a transaction >> Options >> Allocate or Fulfill) (Sales >> Transactions >> Sales Batches >> select a batch >> Options >> Allocate or Fulfill)
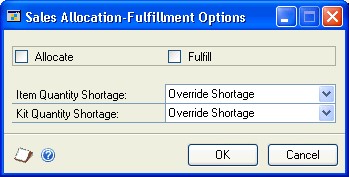
Mark Allocate. If you aren’t using a separate fulfillment process, the item will be fulfilled when it is allocated.
If you are using a separate fulfillment process, you can mark Fulfill in this window or fulfill the document quantities at a later time. For more information about separate fulfillment, see Chapter 20, “Separate fulfillment.”
Select a default quantity shortage option for items and kits. The kit quantity shortage option will be used for all shortages on kit items on the document. You can change the option for each item shortage on the document.
Choose OK to close the window and complete the allocation.
Allocating back-ordered items for orders and fulfillment orders
Use the Sales Automatic Order Allocation window to select the documents with items on back order to allocate. Use the Sales Automatic Order Allocation Preview window to allocate the items.
If you’re using sales fulfillment workflow, you can select a group of documents and then allocate items for those documents at the same time. To allocate items for only one document, refer to Allocating items by document or batch.
If an order or fulfillment order exceeds the customer’s credit limit and you are using customer credit limit override workflow, the document must be approved before you can allocate items. Orders and fulfillment orders that don’t need approval can be allocated. You can allocate items for orders and fulfillment orders in the Sales Transaction Entry window that are pending approval if you can approve the documents.
You also can select to allocate items by customer priority or requested ship date. For more information, refer to the Receivables Management documentation.
To allocate back-ordered items for orders and fulfillment orders
Open the Sales Automatic Order Allocation window. (Sales >> Transactions >> Automatic Order Allocation)
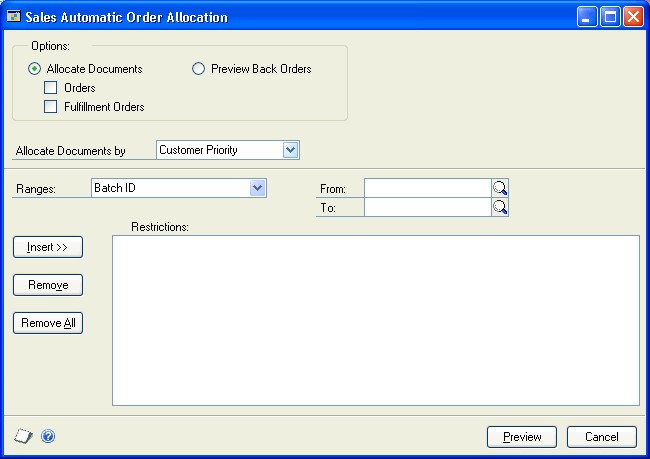
Select to allocate documents or preview back orders. To allocate documents, mark to allocate orders, fulfillment orders, or both.
Select how to allocate documents.
Priority Select to allocate documents by customer priority. A priority of None is the lowest priority and a priority of 1 is the highest priority.
Requested Ship Date Select to allocate documents by the date in the Req Ship Date field in the Sales Transaction Entry window.
Enter or select a range of documents to allocate items for and choose Insert.
Choose Preview to open the Sales Automatic Order Allocation Preview window and view the documents that match the selected range.
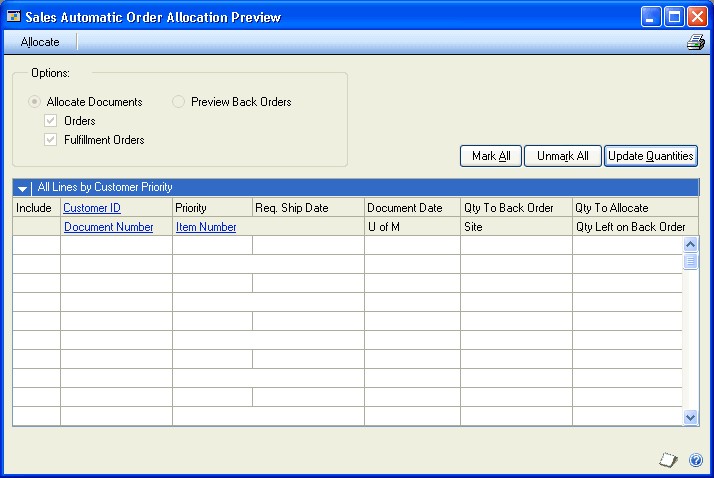
The documents with items to be allocated will be displayed, depending on whether you selected Customer Priority or Requested Ship Date in the Sales Automatic Order Allocation window.
Mark the Include option to select additional documents with items to allocate.
Unmark the Include option for documents with items that shouldn’t be allocated.
Choose Update Quantities to update the quantity to allocate and the quantity left on back order fields.
Choose Allocate to allocate items and update item information.
Quantity allocation problems
Items on orders and invoices must be successfully allocated before they can be fulfilled. The quantity alert icon indicates that the quantity entered for an item is greater than the quantity that was successfully allocated. For example, if a customer ordered 20 answering machines, but only 12 were successfully allocated, the quantity alert icon will appear next to the quantity ordered.

If a quantity alert appears, choose the quantity alert icon button to allocate the item again. If the allocation is unsuccessful, the Sales Quantity Shortage Options window will open and you can determine how to handle the shortage. For more information about quantity shortages, see Quantity shortage options.
If you enter a kit item and the quantity alert icon appears, choose the quantity alert icon button to open the Sales Kit Options window where you can allocate the kit again, substitute components, or decrease component quantities.
Chapter 20: Separate fulfillment
Fulfillment is the process of verifying that the correct number of items are taken out of inventory to fill item requests on an order or invoice after they have been allocated. You must fulfill an invoice completely before it can be posted.
How items quantities are fulfilled is determined when you set up the order ID and invoice ID. If the order ID or invoice ID you’re using doesn’t use a separate fulfillment process, item quantities will be fulfilled automatically when they are allocated. For more information about setup options, see Chapter 3, “Document setup.”
Before you attempt to fulfill item quantities, the items must be allocated. For more information about allocation, see Chapter 19, “Allocating item quantities.”
If you’ve selected to use a separate fulfillment process, you can fulfill item quantities in one of three ways. These methods are explained in the following sections:
Fulfillment and bins*
Fulfilling quantities for individual items
Fulfilling quantities for all items on a document
Fulfilling quantities for items on previously entered documents
Fulfillment and bins
When you fulfill a sales order or invoice (by line, by document, by batch, or as part of a document transfer), quantities are allocated at the default sales order fulfillment bin for the item-site or the site. If the default bin’s quantity available is greater than or equal to the quantity to be fulfilled, the default bin is automatically selected and the quantity to be fulfilled is allocated at the bin.
If you fulfill by line and the line item’s quantity to be fulfilled is greater than the quantity available at the bin, the default bin’s quantity available is allocated and the Bin Quantity Entry window opens, where you must manually select additional bins. If a serial- or lot-numbered item’s quantity to be fulfilled is greater than the bin’s quantity available, you must select bins and serial or lot numbers at the same time.
In the Bin Quantity Entry window, bin selections are made in the base unit of measure; when you leave the Bin Quantity Entry window, quantities are updated according to the unit of measure for the transaction.
If you fulfill by document or batch and a line item’s quantity to be fulfilled is greater than the quantity available at the bin, the default bin’s quantity available is allocated, and the Allocation/Fulfillment Exception report notifies you that you must select additional bins.
If a default bin can’t be found, the line quantity isn’t fulfilled. The Allocation/ Fulfillment Exception report notifies you that you must select additional bins.
Fulfilling quantities for individual items
You can fulfill item quantities using the Sales Transaction Entry window when you add items to an order or invoice by entering the quantity in the Quantity Fulfilled field for the each item. You must allocate items before they can be fulfilled.
If a serial- or lot-numbered item is fulfilled and your system isn’t set up to automatically assign serial numbers and lot numbers, the Sales Lot Number Entry or Sales Serial Number Entry window will open when you fulfill the item. You’ll be asked to select serial or lot numbers for the item. If a lot-numbered item is fulfilled and your system is set up to automatically assign lot numbers, a message won’t be displayed if the expiration date for the lot number has expired.
If you’re using multiple bins and the quantity for a serial-numbered or lotnumbered item to be fulfilled is greater than the bin’s quantity available, the Sales Serial Number Entry window or Sales Lot Number Entry window will open automatically. You must select serial or lot numbers and bins at the same time. If you’re using multiple bins and further bin selections are necessary for an item not tracked by serial or lot numbers, the Bin Quantity Entry window will open automatically, and you’ll be required to enter bins.
With multiple bins, a line’s quantity fulfilled must equal the total quantity allocated at bins. If the quantity allocated at bins is less than the quantity to be fulfilled and you leave the Bin Quantity Entry window or the serial or lot number entry window, the quantity fulfilled changes to equal the actual bin quantity selected.
Fulfilling quantities for all items on a document
You can enter all the items on a document and then use the Allocation-Fulfillment Options window to fulfill all item quantities on the document at once. You also can use the Allocation-Fulfillment Options window to fulfill all the items in a batch at once.
If you fulfill by document or batch and a line item’s quantity to be fulfilled is greater than the quantity available at the bin, the default bin’s quantity available is allocated, and the Allocation/Fulfillment Exception report notifies you that you must select additional bins.
To fulfill quantities for all items on a document
Open the Sales Allocation-Fulfillment Options window. (Sales >> Transactions >> Sales Transaction Entry >> select a transaction >> Options >> Allocate or Fulfill) (Sales >> Transactions >> Sales Batches >> select a batch >> Options >> Allocate or Fulfill)
Mark Fulfill and choose OK to fulfill the item and close the window. The Allocation/Fulfillment Exception Report will be printed.
If a lot-numbered item is fulfilled and your system is set up to automatically assign lot numbers, a message won’t be displayed if the expiration date for the lot number has expired.
If you are fulfilling a document and Sales Order Processing isn’t set up to automatically assign serial or lot numbers, you’ll be asked to select serial or lot numbers.
If you are fulfilling a batch and Sales Order Processing is not set up to automatically assign serial or lot numbers, an alert message will appear on the Allocation/Fulfillment Exception Report. You must manually assign the serial and lot numbers and fulfill the item.
Fulfilling quantities for items on previously entered documents
You can use the Sales Order Fulfillment window to fulfill items on orders, fulfillment orders, or invoices after they’ve been entered and saved. This is useful if one person in your organization is responsible for data entry and someone else is responsible for recording the fulfillment of items from inventory.
However, if you don’t fulfill the entire order quantity and don’t want the entire quantity displayed on the invoice, you must change the billed quantity in the Sales Transaction Entry window.
If you are using customer credit limit override workflow, orders, fulfillment orders, and invoices must be approved before you can fulfill items. Orders and fulfillment orders that don’t need approval can be fulfilled. You can fulfill items for orders and fulfillment orders that are pending approval in the Sales Transaction Entry window if you can approve the documents.
To fulfill quantities for items on previously entered documents
Open the Sales Order Fulfillment window. (Sales >> Transactions >> Order Fulfillment)

Select Order, Invoice, or Fulfillment Order as the Type.
Enter or select a document number. The items from the document will be displayed in the window.
Tip
To add or remove an attachment to the item, select the item and choose the Attachment Management icon to open the Document Attachment Management window.
Verify the date fulfilled and actual ship date. The default date is the user date, but you can change it. The dates you enter will update the Date Fulfilled and Actual Ship Date fields in the Sales Date Entry window and Sales Item Detail Entry window.
If the sales document is linked to a purchase order, the default date is the date you received the purchase order.
Enter a Quantity Fulfilled for each item. The quantity entered can’t be greater than the amount in the Quantity Ready to Fulfill field. To fulfill all item quantities on the document, choose Fulfill All.
If a lot-numbered item is fulfilled and your system is set up to automatically assign lot numbers, a message won’t be displayed if the expiration date for the lot number has expired.
Lot numbers are assigned automatically by receipt date or the expiration date, depending on how you selected to automatically assign lot numbers in the Inventory Control Setup window.
If the quantity fulfilled is less than the quantity ordered, you can change the billed quantity, if necessary. For example, if the order is for 10 items, but only seven items were fulfilled, you could change the billed quantity to “7” if you’re not going to fulfill the other three items.
If you marked the Enable Quantity to Back Order in Sales Order Fulfillment option or the Enable Quantity Canceled in Sales Order Fulfillment option in the Sales Order Setup window or the Sales Fulfillment Order/Invoice Setup window you could also change the quantity back ordered or canceled to “3”.
If a serial- or lot-numbered item is fulfilled and Sales Order Processing is not set up to automatically assign serial or lot numbers, you’ll be asked to select serial or lot numbers.
Note
If you select serial or lot numbers that aren’t equal to the quantity you entered in the Quantity Fulfilled field, the quantity fulfilled will be changed to the number of serial or lot numbers you entered. For example, if you enter a quantity fulfilled of 3 and only enter two serial numbers, the quantity fulfilled will be changed to 2.
If you’re using multiple bins and you want to view or change bin information for an item not tracked by serial or lot numbers, choose the Bins button to open the Bin Quantity Entry window.
If further bin selections are necessary, the Bin Quantity Entry window will open automatically. With multiple bins, a line’s quantity fulfilled must equal the total quantity allocated at bins. If the quantity allocated at bins is less than the quantity to be fulfilled and you leave the Bin Quantity Entry window, the quantity fulfilled changes to equal the actual bin quantity selected.
Choose the Attachment Management icon to attach documents to or remove documents from the order, invoice, or fulfillment order, if applicable.
Choose the Holds button to open the Sales Process Holds Entry window, where you can assign holds to or remove holds from the document. A stop icon will appear on the Holds button if a hold has been assigned to the document.
Choose the User-Defined button to open the Sales User-Defined Fields Entry window, where you can enter user-defined information for this document.
Choose the Serial/Lot button to open the Sales Serial Number Entry window or the Sales Lot Number Entry window, where you can assign numbers and bins to serial- or lot-numbered items.
For more information about serial- or lot-numbered items, see Serial- or lotnumbered items or the Inventory Control documentation.
Choose Save and close the window. The Order Fulfillment Status Report will be printed.
Chapter 21: New purchase orders
If there is a shortage on a sales line item or an item is back ordered, you can generate a purchase order for the item. You also can generate purchase orders for drop-ship and non-inventoried items. You can create purchase orders from orders or back orders in Sales Order Processing or you can link sales documents to existing purchase orders.
This information is divided into the following sections:
Purchase orders from sales documents
Parts of the Purchase Orders Preview window
Pending purchase order errors and warnings
The tree view
Purchase Order Preview window tabs
Changing a vendor
Modifying a purchase order in the tree view
Modifying a purchase order using the tabs
Generating a purchase order from a single sales document
Generating purchase orders from multiple sales documents
Purchase orders from sales documents
You can use the Purchase Orders Preview window to view and modify pending purchase orders or to generate purchase orders from orders or back orders. You can also link sales documents to existing purchase orders, if Sales Order Processing is set up to allow it.
For example, suppose you enter a sales order with three line items. One of the line items is in stock but you need to order the other two. If you back order the quantities for the two items, you can create a purchase order using the back-ordered quantity from the sales order instead of reentering the items on a purchase order in Purchase Order Processing. You can review the purchase order information and make changes before generating the purchase order for the items.
If you already have entered a purchase order for the back-ordered items, you can link the sales line items to the purchase order. For more information on linking sales documents to existing purchase orders, see Chapter 22: Links to existing purchase orders.
When the items on the purchase order are received, they are allocated or fulfilled on the sales document automatically. For more information, see Chapter 23: Receiving purchase orders
Note
For information on setup options related to linking sales orders and purchase orders, see Setting up taxes and options.
View pending purchase orders In the Purchase Orders Preview window, you can view the purchase orders that could be created from the sales documents you chose.
Modify pending purchase orders You can make changes to the purchase orders shown in the Purchase Orders Preview window before you generate the purchase orders. You can also modify any pending purchase orders that contain errors or warnings.
Generate purchase orders You can generate some or all of the purchase orders shown in the Purchase Orders Preview window.
You can generate more than one purchase order from a sales order or back order. For example, if you need to order several items for a sales order and you need to use different vendors for different items, you can generate a purchase order for each vendor from the sales order.
You can’t generate more than one purchase order for each sales line item. For example, if you have an item back ordered on a sales order, you can’t order the item from two vendors. You can generate only one purchase order for one vendor for that sales line item.
If the sales document contains a drop-ship item, you can create a separate dropship purchase order for that item. Drop-ship items will always be on separate purchase orders because they won’t be received into inventory.
You can’t generate a purchase order for a kit item but you can generate a purchase order for the kit components. Quantities won’t be tracked for the kit but will be tracked for the components.
If a sales document contains a shortage for a discontinued item, you can’t create a new purchase order for that item from Sales Order Processing, but you can link the item to an existing purchase order that contains the discontinued item.
If a sales document contains an inactive item, no purchase order will be created for the item.
Link items to existing purchase orders You can manually link sales line items to existing purchase orders in the Purchase Orders Preview window. For more information, refer to Chapter 22, “Links to existing purchase orders.”
A sales line item can be linked to only one purchase order line item. For example, you can’t split the sales line item quantity between two vendors.
Parts of the Purchase Orders Preview window
The Purchase Orders Preview window shows the pending purchase orders that can be created from selected sales documents. You can view information about the vendor, purchase order, item, or sales document.
If you open the Purchase Orders Preview window from a sales document in the Sales Transaction Entry window, you will see the purchase orders that can be generated from that sales document.
If you open the Purchase Orders Preview window from the Sales Range Inquiry window, you will see the purchase orders that can be generated from the sales documents that are defined in the inquiry window and that have a Needs purchase commitment status. For more information about commitment statuses, see Checking the commitment status.
There are several views you can use to display information in the Purchase Orders Preview window. You can use these views to examine the information on the pending purchase orders and make changes before generating the purchase orders. Each option includes a tree view and a window. For more information, see Purchase Order Preview window tabs and The tree view.
The Purchase Orders Preview window contains several buttons and icons to help you view and change information in the window. These buttons and icons are listed below.
| Button or icon | Description |
|---|---|
| ./media/image47.jpg | Error—Appears beside objects in the tree view. You must correct the error before you can create the purchase order. For more information on errors, see Pending purchase order errors and warnings. |
| ./media/image48.jpg | Warning—Appears beside objects in the tree view. You can create a purchase order even if it contains a warning. For more information on warnings, see Pending purchase order errors and warnings. |
| ./media/image49.png | Expand all objects—Choose to expand the tree view to display all objects. |
| ./media/image50.png | Collapse all objects—Choose to collapse the tree view to display only the purchase order objects. |
| ./media/image51.png | Add vendor—Choose to add a new vendor in the tree view. A new purchase order will be created under the new vendor and you can assign line items to the new purchase order. |
| ./media/image52.jpg | Organize—Choose to move objects in the tree view. For example, you can move an item from one vendor to another. |
| ./media/image53.png | Ascending/Descending sort button—Use to sort documents in ascending or descending order in the window view. |
Pending purchase order errors and warnings
If a problem is detected on a pending purchase order, an error or warning icon will appear next to the object in the tree view and an alert message will be displayed when you attempt to generate the purchase orders. Additional information about the error or warning will be at the bottom of the window.
For more information about the tree view, see The tree view.
Errors A pending purchase order that contains an error won’t be generated. You must correct the error before generating the purchase order. Examples of errors include no vendor ID, an inactive vendor or no purchasing unit of measure.
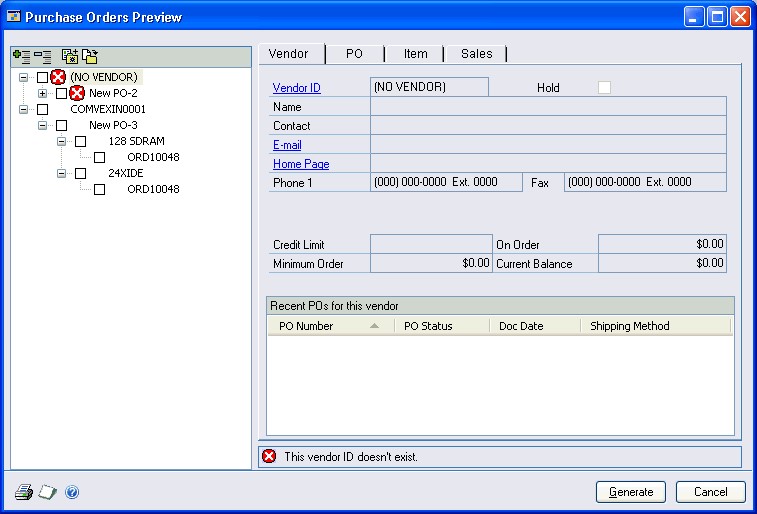
If a primary vendor is not assigned to the item in Item Quantities Maintenance window, an error and (NO VENDOR) will be displayed in the tree view for the vendor in the Purchase Orders Preview window. You must assign a vendor to the pending purchase order by using the purchase order or item tab before you can generate the purchase order.
If you select a vendor and the item is not assigned to the vendor, an error will be displayed and you can add the vendor item number. For more information about assigning vendors to items and assigning a primary vendor to an item, see the Inventory Control documentation.
Warnings Pending purchase orders that contain warnings will be generated or can be linked to existing purchase orders. The warnings will appear on the Purchase Orders Preview list. For example, you will receive a warning if a vendor is on hold or if the quantity to purchase is more than the maximum order quantity for the item.
The tree view
The Purchase Orders Preview window uses a tree view to show pending or existing purchase orders. Each line in the tree is an object—and the objects are organized first by vendor, then by purchase order, then item, and finally sales document.
A check mark next to the object—vendor, purchase order, item, or sales document— means that the object will be included when purchase orders are generated. You can mark or unmark an object before generating the purchase orders. If you mark or unmark an object, all of the objects associated with that object will be marked or unmarked also. For example, if you unmark a vendor, all of the purchase orders listed under the vendor in the tree view will be unmarked.
If an error or warning icon appears next to an object in the tree view, additional information will be displayed at the bottom of the window. In the Purchase Orders Preview window, you can modify the pending purchase orders to address the errors and warnings. For more information, see Pending purchase order errors and warnings.
You can print the Purchase Orders Preview list before generating purchase orders by choosing the Print icon button or by choosing File >> Print in the Purchase Orders Preview window. This report will list all of the pending purchase order information in the tree view, as well as any errors and warnings.
Purchase Order Preview window tabs
The Purchase Orders Preview window uses tabs to organize the information relating to the pending purchase orders. Each tab contains a window that displays information about the pending purchase order. You can choose the tab or choose an object in the tree view to display the information you want.
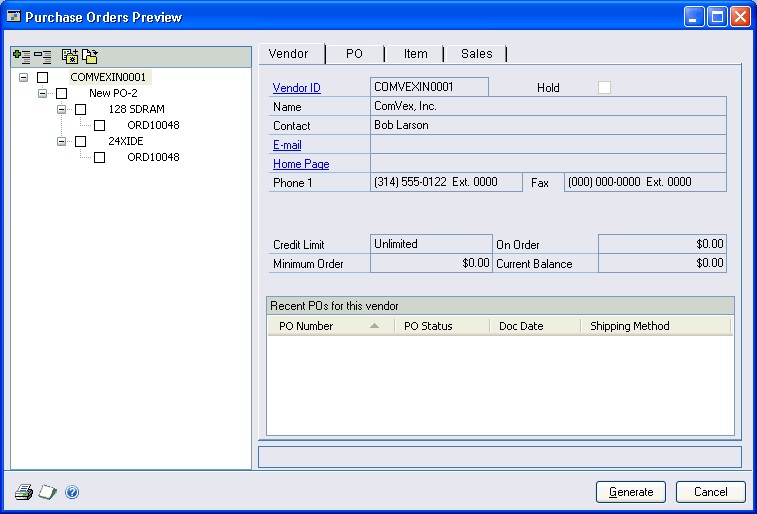
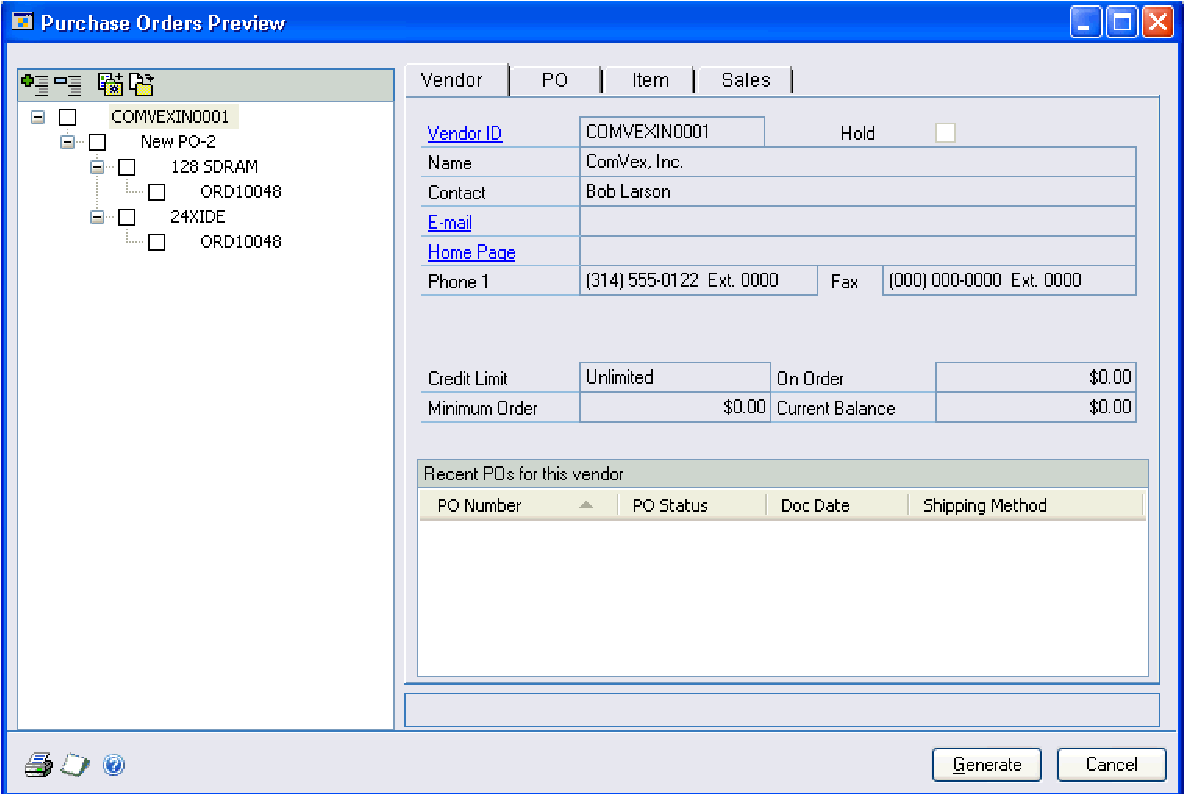
Vendor tab
Use the Vendor tab to view information about the vendor that is highlighted in the tree view. You can’t change the information in this view.

If a primary vendor isn’t assigned to an item, (NO VENDOR) will appear in the vendor ID and an error will appear next to the vendor in the tree. You must assign a vendor using either the PO tab or Item tab before a purchase order can be generated. For information about assigning a vendor, see Modifying a purchase order using the tabs.
The most recent purchase orders for this vendor are listed at the bottom of the window. You can sort the purchase orders in ascending or descending order by clicking the column heading. The ascending/descending sort option can be used in any column.
Purchase Order tab
Use the purchase order tab to view information about the pending purchase order that is highlighted in the tree view, including the vendor ID, purchase order date, currency, and shipping method.
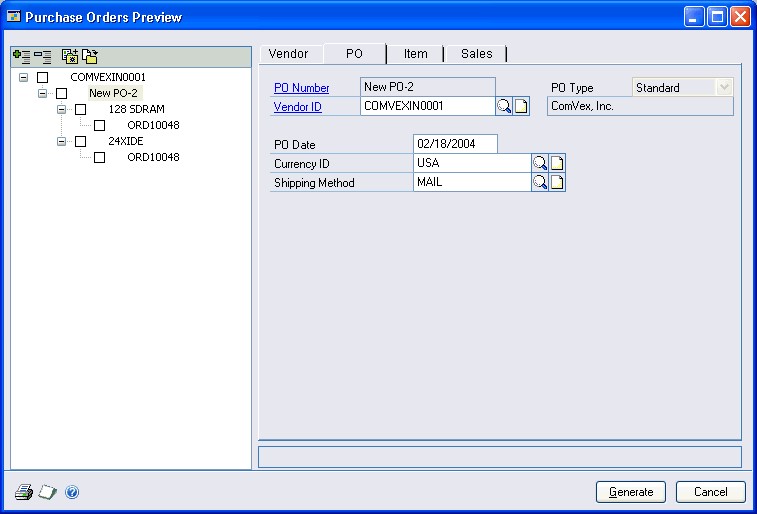
If a primary vendor wasn’t assigned to an item, the vendor ID will be blank. You must assign a vendor before a purchase order can be generated.
You can change the information in this window. For more information, see *Modifying a purchase order using the tabs.
Item tab
Use the item tab to view information about the item that is highlighted in the tree view. You can change the quantity to purchase, vendor ID, vendor item, unit cost, extended cost, and required date on the pending purchase order. You also can link the item to an existing purchase order by using the purchase order lookup button. For more information, see Modifying a purchase order using the tabs.
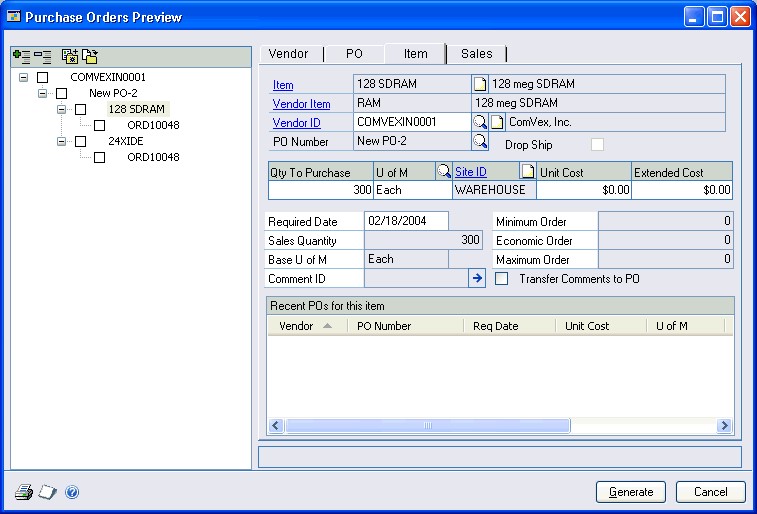
If a primary vendor wasn’t assigned to an item, the vendor ID will be blank. You must assign a vendor before a purchase order can be generated.
The most recent purchase orders for this item are listed by vendor at the bottom of the window. You can sort the vendors in ascending or descending order by clicking the column heading. The ascending/depending sort option can be used in any column.
Sales tab
Use the sales tab to view information about the sales document that is highlighted in the tree view. You can’t change the information in this view.
Changing a vendor
You can add a vendor to the tree using the tree view, regardless of which tab you are viewing in the Purchase Orders Preview window. A new purchase order will be created for the new vendor and you can transfer the items from existing pending purchase orders in the tree view to the new vendor.
Note
If you make changes to a pending purchase order in the Purchase Orders Preview window, your changes won’t be saved when you close the window. You must generate purchase orders that include your changes before closing the window.
To change a vendor
Open the Sales Transaction Entry window. (Sales >> Transactions >> Sales Transaction Entry)
Enter or select a sales document with a back-ordered quantity and choose the Purchase button to open the Purchase Orders Preview window.
Choose the add vendor icon button. A message will be displayed and you’ll have the option to create a standard or drop-ship purchase order.
A new vendor object will be inserted into the tree view and the vendor ID will be (NO VENDOR). A new purchase order object with no line items will be inserted in the tree view for the new vendor.
In the purchase order tab, enter or select a vendor ID for the new vendor object in the tree view.
Use the Organize button to move line items from other pending purchase orders to the new purchase order. You can also move items using the vendor or the item tab. For more information about the Organize button, see Modifying a purchase order in the tree view.
Modifying a purchase order in the tree view
You can move items from one pending purchase order to another or change the vendor on a pending purchase order using the tree view. For example, if the vendor you usually order an item from is unable to deliver the product by the requested date, you can add a different vendor to the tree view and reassign the item to the new vendor.
Use the Organize button to move objects in the tree view. It doesn’t matter what tab you are viewing in the Purchase Orders Preview window. You can move the objects as follows:
Purchase order You can move a pending purchase order from one vendor to another. A new pending purchase order with a new PO number will be created for the vendor and all items associated with the pending purchase order will move to the new pending purchase order.
Item You can move an item from one vendor to another. A new pending purchase order will be created for the vendor and the item will be added to the new purchase order.
You can move an item from one pending purchase order to another. The item will be added to the existing pending purchase order.
Sales document You can move a sales document from one vendor to another. A new pending purchase order will be created for the vendor and the items associated with the sales document will be added to the new purchase order.
You can move a sales document to a different pending purchase order. New items will be created on the pending purchase order for the items associated with the sales document.
To modify a purchase order in the tree view
Open the Sales Transaction Entry window. (Sales >> Transactions >> Sales Transaction Entry)
Enter or select the sales document and choose the Purchase button to open the Purchase Orders Preview window.
Choose the organize icon button above the tree view. A message will appear telling you to select a source and destination object.
Select the source object you want to move.
Select the destination object in the tree that you want to move the object to.
When you have made all the needed changes, choose Generate.
Note
If you make changes to a pending purchase order in the Purchase Orders Preview window, your changes won’t be saved when you close the window. You must generate purchase orders that include your changes before closing the window.
Modifying a purchase order using the tabs
Use the Purchase Orders Preview window tabs to modify information such as vendor ID and quantity to purchase on pending purchase orders. The tree view will be updated with the changes automatically.
For example, assume you are short ten items to satisfy a sales order. The pending purchase order will show 10 as the default quantity to purchase. If you want to stock some extra items, you can increase the quantity to purchase on the Item tab.
If there are errors or warnings in the tree view relating to a pending purchase order, you can make corrections to the information before generating the purchase order. For more information about errors and warnings, see Pending purchase order errors and warnings.
You can change the information on the PO tab and the Item tab, but not the Vendor tab or the Sales tab.
Purchase order tab You can change the vendor ID, purchase order date, currency ID, and the shipping method used for the purchase order.
Item tab You can change the quantity to purchase, vendor ID, vendor item, unit of measure, unit cost, extended cost, and required date. The primary vendor will be the default vendor ID.
To modify a purchase order using the tabs
Open the Sales Transaction Entry window. (Sales >> Transactions >> Sales Transaction Entry)
Enter or select a sales document with a back-ordered quantity and choose Purchase to open the Purchase Orders Preview window. Only sales documents that contain items with a Needs Purchase commitment status appear in the Purchase Orders Preview window.
Select either the Item or PO tab and make the changes.
When you have made all the needed changes, choose Generate.
Note
If you make changes to a pending purchase order in the Purchase Orders Preview window, your changes won’t be saved when you close the window. You must generate purchase orders that include your changes before closing the window.
Generating a purchase order from a single sales document
After you have viewed and modified a pending purchase order, you must generate the purchase order in the Purchase Orders Preview window.
To generate a purchase order from a single sales document
Open the Sales Transaction Entry window. (Sales >> Transactions >> Sales Transaction Entry)
Enter or select a sales document with a back-ordered quantity.
Choose Purchase to open the Purchase Orders Preview window. Only sales documents that contain items with a Needs Purchase commitment status appear in the Purchase Orders Preview window.
Review the information and make any changes to the pending purchase order information.
Review the objects in the tree view. A check mark next to an object means that the object will be included when purchase orders are generated. Click the check mark to remove objects you don’t want to include when generating purchase orders.
To preview the marked pending purchase order information before you generate purchase orders, print the Purchase Orders Preview list by choosing File >> Print. The list also shows any errors and warnings.
Note
The purchase order numbers listed in the Purchase Orders Preview window are temporary. When purchase orders are generated, the system will assign the next purchase order number from the Purchase Order Processing Setup window.
Choose Generate.
Taxes will be automatically calculated when you generate purchase orders from the Purchase Orders Preview window.
Generating purchase orders from multiple sales documents
After you have viewed and modified pending purchase orders, you must generate the purchase orders in the Purchase Orders Preview window. Depending on how Sales Order Processing is set up, like items may be combined on the same purchase order.
To generate purchase orders from multiple sales documents
Open the Sales Document Range Inquiry window. (Sales >> Inquiry >> Sales Range Inquiry)
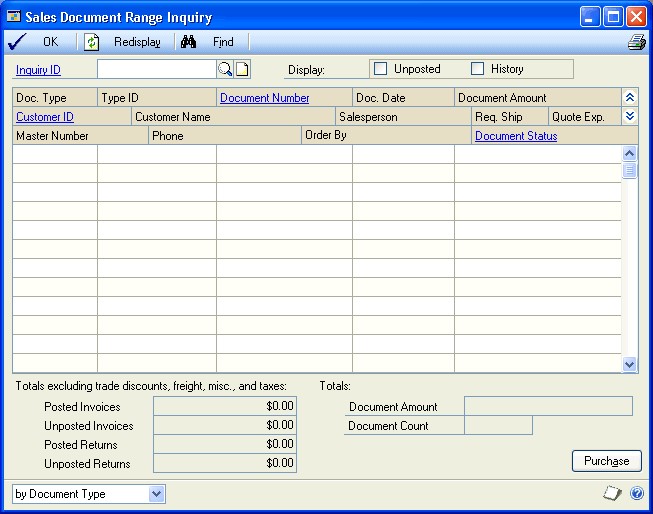
Choose an existing Inquiry ID or create a new Inquiry ID to select a range of sales documents. For more information about creating an inquiry ID, see Creating inquiries for sales documents.
Choose Redisplay to update the window.
Choose Purchase to open the Purchase Orders Preview window. Only sales documents that contain items with a Needs Purchase commitment status appear in the Purchase Orders Preview window. For more information about commitment status, see Checking the commitment status.
Review the information and make any changes to the pending purchase order information.
Review the objects in the tree view. A check mark next to an object means that the object will be included when purchase orders are generated. Click the check mark to remove objects you don’t want to include when generating purchase orders.
To preview the marked pending purchase order information before you generate purchase orders, print the Purchase Orders Preview list by choosing File >> Print. The list also shows any errors and warnings.
Choose Generate. The Purchase Orders Generation Register will be printed. This report will list the purchase orders created and the items and quantities included on the purchase orders.
You can view and print the purchase orders by choosing Purchasing >> Transactions >> Purchase Order Entry.
Taxes will be automatically calculated when you generate purchase orders from the Purchase Orders Preview window.
Chapter 22: Links to existing purchase orders
Depending on how Purchase Order Processing was set up, the system can attempt to link sales line items with quantity shortages to existing purchase orders. If a purchase order exists for the line item, the purchase order will be listed in the Purchase Orders Preview window. If an existing purchase order doesn’t contain the line item, a pending purchase order will be created.
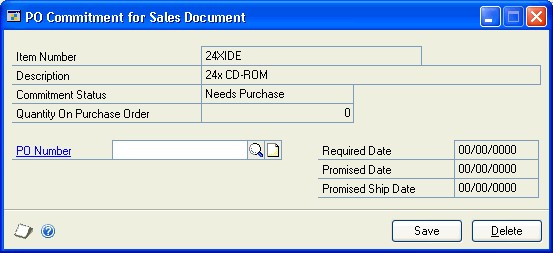
You also can manually link a sales line item to an existing purchase order, change existing links or delete existing links. Once a sales line item has been linked to a purchase order, you can check the status of that purchase order in the PO Commitment for Sales Document window.
This information is divided into the following sections:
Linking an item to an existing purchase order
Removing an existing link to a purchase order
Changing the link to a purchase order
Checking the commitment status
Linking an item to an existing purchase order
You can manually link a line item to an existing purchase order in the PO Commitment for Sales Document window or PO Assignment for Sales Document window if the following conditions are met:
The purchase order line item has an uncommitted quantity.
The purchase order allows commitments. Allow Sales Documents Commitments must be marked for the purchase order in the Purchase Order Entry window.
The uncommitted quantity on the purchase order must be equal to or greater than the quantity needed for the sales document.
The item numbers match.
The site IDs match (unless Sales Order Processing is set up to use a single site for all purchase orders).
For drop-ship items, the ship-to address on the sales order matches the ship-to address on the purchase order.
For drop-ship items, the ship-to address and shipping method on the sales order line item matches the ship-to address and shipping method on the purchase order line item.
You can link drop-ship line items to existing drop-ship purchase orders. You can link non-inventoried items and discontinued items to existing purchase orders. You must commit the entire line item quantity to one purchase order.
To link a line item from the Purchase Orders Preview window
Open the Sales Transaction Entry window. (Sales >> Transactions >> Sales Transaction Entry)
Enter or select the sales document and highlight a line item to link.
Choose Purchase to open the Purchase Orders Preview window.
Select the Item tab.
Use the PO Number lookup button to open the PO Assignment for Sales Document window.
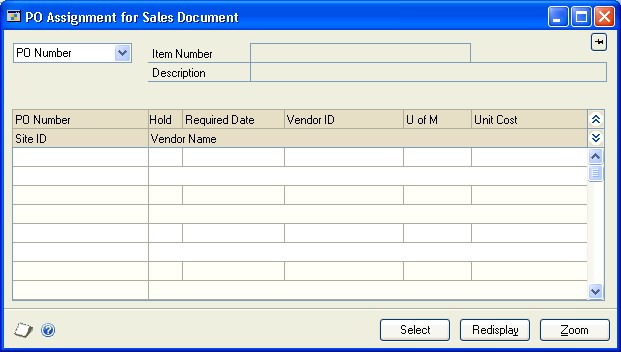
Highlight an existing purchase order to link to the sales line item.
Note
Only purchase orders that allow sales order commitments and have an uncommitted quantity equal to or greater than the quantity to purchase on the sales document will appear in the window, because you can only link one purchase order to a sales line item.
Choose Select to close the PO Assignment for Sales Document window.
Choose Generate.
Note
If you make changes to the pending purchase orders in the Purchase Orders Preview window, your changes won’t be saved when you close the window. You must generate the purchase orders that include your changes before closing the window.
To link a line item from the sales document
Open the Sales Transaction Entry window. (Sales >> Transactions >> Sales Transaction Entry)
Enter or select a sales document with a back-ordered quantity and highlight the line item to link.
Choose the link purchase order button next to the Quantity Ordered prompt to open the PO Commitment for Sales Document window.
Enter or select the existing purchase order to link to the sales line item.
Note
Only purchase orders that allow sales order commitments and have an uncommitted quantity equal to or greater than the quantity to purchase on the sales document will appear in the window, because you can only link one purchase order to a sales line item.
Choose Save to save the link and close the window. When the link has been added, the link purchase order icon will appear next to the line item quantity in the Sales Transaction Entry window and the Purchase Order Entry window.
To link a line item from the purchase order
Open the Purchase Order Entry window.
(Purchasing >> Transactions >> Purchase Order Entry)
Enter or select a purchase order that allows sales order commitments and highlight the line item you want to link.
Choose the link purchase order button next to the Quantity Ordered prompt to open the Sales Commitments for Purchase Order window.
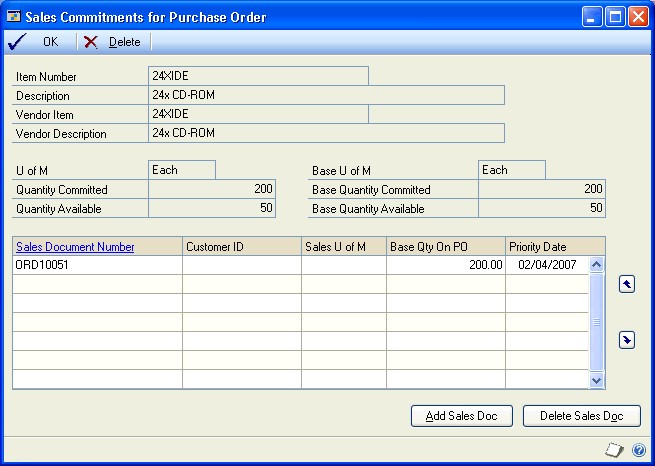
Choose Add Sales Doc to open the Sales Assignments for Purchase Order window.
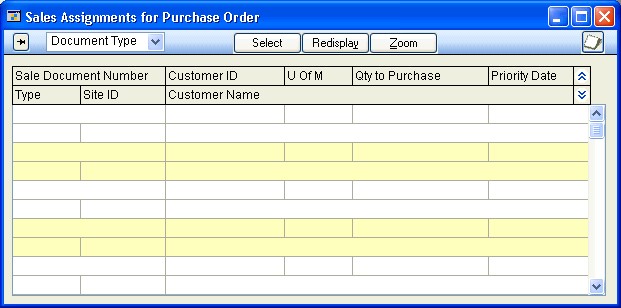
Highlight the existing sales document to link to the purchase order line item and choose Select.
Note
Only sales documents with a quantity to purchase that is equal to or less than the uncommitted quantity on the purchase order will appear in the window because you can only link one purchase order to a sales line item.*
Choose OK to save the link and close the window. When the link has been added, the link purchase order icon will appear next to the line item in the Purchase Order Entry window and the Sales Transaction Entry window.
Removing an existing link to a purchase order
Once you link a sales line item to a purchase order, the link purchase order icon will be displayed next to the quantity for the sales line item in the Sales Transaction Entry window. There are two ways to remove a link to a purchase order:
You can remove the link from Purchase Order Processing using the Sales Commitments for Purchase Order window.
You can remove the link from Sales Order Processing using the PO Commitment for Sales Document window if Sales Order Processing is set up to allow deletion of commitments. For more information on setup options, see Setting up taxes and options.
Note
If the purchase order has been received against, the item will still be allocated on the sales order after you remove the link.
To remove a link in Purchase Order Processing
Open the Purchase Order Entry window.
(Transactions > Purchasing > Purchase Order Entry)
Enter or select the purchase order and highlight the line item for which you want to remove the link.
Choose the link purchase order button next to the Quantity Ordered field to open the Sales Commitments for Purchase Order window.
Select the sales document and choose Delete Sales Doc. Once the link is removed, the link icon will be removed from the line item in the Sales Transaction Entry window and the Purchase Order Entry window.
To remove a link in Sales Order Processing
Open the Sales Transaction Entry window.
(Transactions > Sales > Sales Transaction Entry)
Enter or select the sales document and highlight the line item for which you want to remove the link.
Choose the link purchase order button next to the Quantity Ordered field to open the PO Commitment for Sales Document window.
Verify the purchase order number and choose Delete. Once the link is removed, the link icon will be removed from the line item in the Sales Transaction Entry window and the Purchase Order Entry window.
Changing the link to a purchase order
You can change the link to an existing purchase order by deleting the existing link and then adding a link to a different purchase order using the PO Commitment for Sales Document window. To delete the existing link in this window, Sales Order Processing must be set up to allow deletion of purchase order commitments.
You can also delete the link from the Sales Commitments for Purchase Order window in Purchase Order Processing. For more information, see Removing an existing link to a purchase order.
To change the link to a purchase order
Open the Sales Transaction Entry window.
(Transactions > Sales > Sales Transaction Entry)
Enter or select the sales document and highlight the line item for which you want to change the link.
Choose the link purchase order button next to the Quantity Ordered field to open the PO Commitment for Sales Document window.
The purchase order that is linked to the item will be displayed. Choose Delete to remove this link.
Enter or select a different purchase order to link to the sales line item.
Choose Save.
Checking the commitment status
For any item on a sales order or back order, you can check the commitment status, which indicates if the item is committed to a purchase order and what the status of the purchase order is. The commitment status types are:
None The line item has neither a commitment nor a pending commitment on a purchase order.
Needs purchase The line item is available for commitment and the purchase order hasn’t been generated.
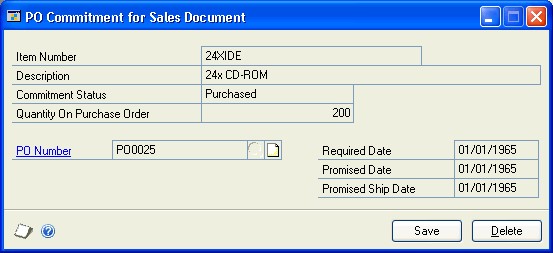
Purchased The line item has a commitment on a purchase order that has been generated, but no receipts have been posted for the purchase order.
Partially received The line item has a commitment on a purchase that has been generated and receipts have been posted for the purchase order, but the quantity received on the purchase order is less than the quantity needed for the sales document.
Fully received The line item has a commitment on a purchase order that has been generated and receipts have been posted for the purchase order. The quantity received on the purchase order is enough to complete the sales document.
To check the commitment status
Open the Sales Transaction Entry window. (Sales >> Transactions >> Sales Transaction Entry)
Enter or select the sales document in the Sales Transaction Entry window and highlight the line item you want to link.
Choose the link purchase order button next to the Qty Ordered field to open the PO Commitment for Sales Document window, where the commitment status appears.

Close the window.
Chapter 23: Receiving purchase orders
If you have created a purchase order from a sales document or have linked a sales line item to an existing purchase order, the quantities can be automatically allocated or fulfilled on the sales order when a shipment or shipment/invoice is posted for the purchase order. Whether the item is allocated and fulfilled depends on what type of item it is—an inventory item, a non-inventoried item, or a drop-ship item.
For more information about creating purchase orders or linking to existing purchase orders, see Chapter 21, “New purchase orders,” or Chapter 22, “Links to existing purchase orders.”
The information is divided into the following sections:
Allocating and fulfilling inventory items
Fulfilling non-inventoried items
Fulfilling drop-ship items
Purchase orders created from back orders
Printing the Back-Ordered Items Received report
Allocating and fulfilling inventory items
When you post a shipment or shipment/invoice that has a commitment to a sales order line item, the site ID will be checked. If the site IDs match, the sales order line item will be allocated for the quantity shipped. If the order ID doesn’t use a separate fulfillment process, the line item also will be fulfilled. Also, the quantity back ordered is decreased and quantity to invoice is increased on the sales order, based on the quantity shipped.
If the purchase order shipment and the sales order site IDs don’t match, the items will not be allocated. You must transfer the item from the site ID where you received the item to the site where you are selling the item and then allocate the item manually. For more information about transferring items to a different site, see the Inventory Control documentation. Any allocation problems will be listed on the Back-Ordered Items Received report. For more information about this report, see Printing the Back-Ordered Items Received report or the Purchase Order Processing documentation.
If an item on the sales order can’t be allocated, the Quantity Alert icon will appear for the item when you select the sales document in the Sales Transaction Entry window. If the item is fully received in Purchase Order Processing, you can choose the quantity alert icon button and complete the allocation. For more information about the quantity alert icon button, see Quantity allocation problems.
When a shipment or shipment/invoice is posted in Purchase Order Processing for service, flat fee, or miscellaneous charge items, the quantity fulfilled is updated on the sales order based on the quantity shipped on the purchase order. However, if the sales order ID uses separate fulfillment, you will have to fulfill the item manually.
If you’re using separate fulfillment, service, flat fee, and miscellaneous charge items will not be fulfilled when the items are received on the purchase order. For more information about separate fulfillment, see Chapter 20: Separate fulfillment.
The unit cost for a service, flat fee, or miscellaneous charge item on the sales order is updated when an invoice or shipment/invoice is posted in Purchase Order Processing.
When a purchase order shipment or shipment/invoice is posted and Sales Order Processing is not set up to automatically assign serial or lot numbers, you must manually fulfill the item.
When a shipment or shipment/invoice is posted in Purchase Order Processing for service, flat fee, or miscellaneous items, if the item is received at a site that is different from the site on the sales document, the item is fulfilled and a message regarding the location of the item appears on the Back-Ordered Items Received report.
Note
If a sales line item is committed to a purchase order and the purchase order hasn’t been received against, the sales line item can’t be allocated.
Fulfilling non-inventoried items
When you post a shipment or shipment/invoice that is linked to a non-inventoried item on a sales document, the quantity fulfilled for the item will be updated on the sales order, based on the quantity shipped on the purchase order. Also, when you select the document in the Sales Transaction Entry window, the quantity back ordered will be decreased and quantity to invoice will be increased on the sales order, based on the quantity shipped.
If you are using separate fulfillment for the document ID, the non-inventoried items will not be fulfilled when the items are received on the purchase order. You must use the Separate Fulfillment window to fulfill these items.
The unit cost for a non-inventoried line item on the sales order is updated when a shipment or shipment/invoice is posted in Purchase Order Processing.
When a shipment or shipment/invoice is posted for a non-inventoried item, if the item is received at a site that is different from the site chosen on the sales document, the item is fulfilled on the sales document and a message regarding the location of the item appears on the Back-Ordered Items Received report.
If a non-inventoried line item is contained on a purchase order that hasn’t been received against, the sales line item cannot be fulfilled automatically by the system. You must use a separate fulfillment process to fulfill these items. For more information about separate fulfillment, see Chapter 20, “Separate fulfillment.”
Fulfilling drop-ship items
When you post an invoice for a drop-ship purchase order, the quantity fulfilled will be updated on the sales order based on the quantity invoiced on the purchase order. The drop-ship item won’t be allocated because the item is never received into your inventory. Also, when you select the document in the Sales Transaction Entry window, the quantity back ordered will be decreased and quantity to invoice will be increased on the sales order based on the quantity shipped.
The unit cost for a drop-ship line item on the sales order is updated when an invoice is posted in Purchase Order Processing, if the item does not use a periodic valuation method.
For more information about valuation methods, see the Inventory Control documentation.
If a drop-ship item is contained on a purchase order that hasn’t been received against, the sales line item cannot be fulfilled automatically by the system. You must use a separate fulfillment process to fulfill these items. If you’re using separate fulfillment, drop-ship items will not be fulfilled when the items are invoiced on the purchase order. For more information about separate fulfillment, see Chapter 20, “Separate fulfillment.”
Purchase orders created from back orders
For a purchase order created from a back order, use the Back-Ordered Items Received report to determine which back orders can be transferred to orders or invoices. After you transfer the back order to an order or invoice, you must manually allocate and fulfill the items on the new order or invoice. For more information, see Printing the Back-Ordered Items Received report and Chapter 27: Transferring documents.
Printing the Back-Ordered Items Received report
The Back-Ordered Items Received report is an important resource for tracking the items received on a purchase order. This Purchase Order Processing report shows the open sales documents that contain the items received on each purchase order.
The Back-Ordered Items Received report shows updated costs and the quantities successfully allocated and fulfilled on sales orders. The report also shows any problems encountered when allocating and fulfilling items that are linked to sales orders. If you encounter errors when you print the Back-Ordered Items Received report, you should reconcile Sales Order Processing records.
The sales documents shown on this report will depend on where the report was printed. If it’s printed from the Purchasing Invoice Entry window (File >> Print), the report will display only invoiced quantities for sales documents that were linked with a purchase order.
If you print the report from the reports menu, the report will show receiving information for sales documents that were linked to purchase orders and then sales documents that were not linked to purchase orders.
You also can print the report for all unposted receipts in Purchase Order Processing from the Purchasing Analysis Reports window.
To print the Back-Ordered Items Received report
Open the Purchasing Analysis Reports window.
(Purchasing >> Reports >> Analysis)
Select the Back-Ordered Items Received report and choose New to open the Purchasing Analysis Report Options window.
Enter an option name and create a report option to sort and restrict the report.
Choose Destination to specify a printing destination and choose Print.
You can print the report from either the Purchasing Analysis Report Options window or the Purchasing Analysis Reports window. You also can save the report option and print it later.
See Also
Sales Order Processing Part 1: Setup
Sales Order Processing Part 2: Transaction entry
Sales Order Processing Part 4: Transaction activity
Sales Order Processing Part 5: Inquiries and reports
Sales Order Processing Part 6: Utilities
Glossary