Note
Access to this page requires authorization. You can try signing in or changing directories.
Access to this page requires authorization. You can try changing directories.
You can use Intercompany Processing to set up, enter, and maintain relationships between companies so revenues or expenses incurred in one company (the originating company) can be tracked as “due to” or “due from” amounts in other companies (destination companies).
This manual is designed to give you an understanding of how to use the features of Intercompany Processing, and how it integrates with the Microsoft Dynamics GP system.
To make best use of Intercompany Processing, you should be familiar with systemwide features described in the System User’s Guide, the System Setup Guide, and the System Administrator’s Guide.
Some features described in the documentation are optional and can be purchased through your Microsoft Dynamics GP partner.
To view information about the release of Microsoft Dynamics GP that you’re using and which modules or features you are registered to use, choose Help >> About Microsoft Dynamics GP.
The manual is divided into the following parts:
Part 1, Setup walks you through setting up company relationships for Intercompany Processing.
Part 2, Transactions provides a step-by-step guide for recording transactions in one company that will create transactions in the General Ledger of another company. It also describes the process of posting intercompany transactions so they become permanent records.
Part 3, Inquiries and Reports describes procedures that help you analyze intercompany financial information.
Part 1: Setup
Use this part of the documentation to familiarize yourself with Intercompany Processing terms and set up intercompany relationships.
The following information is discussed:
- Chapter 1, “Intercompany Processing setup” describes what to do before you set up Intercompany Processing and provides steps to set up an intercompany relationship.
Chapter 1: Intercompany Processing setup
Before you can begin entering intercompany transactions, you must set up the relationships between companies. You can also use the setup procedures whenever you add Intercompany Processing relationships.
This information is divided into the following sections:
Intercompany Processing terms
Before you set up Intercompany Processing
Setting up intercompany relationships
Intercompany Processing terms
Intercompany Processing uses terms not used elsewhere in Microsoft Dynamics GP. They are defined here and used throughout Intercompany Processing documentation.
Destination company A company that will be the recipient of an intercompany transaction.
Due to/due from accounts General Ledger accounts used by Microsoft Dynamics GP to track amounts to be paid or to be collected among companies.
The due to/due from accounts are often called Intercompany Payable and Intercompany Receivable in the chart of accounts.
Breakout of due to/due from accounts Detail created by Dynamics GP showing the distribution account you enter and the offsetting due to account or due from account for each intercompany distribution.
This breakout prints only on edit lists (in Payables Management) and posting journals (in General Ledger and Payables Management).
Intercompany transaction Any transaction that contains distributions to another company.
Originating company The company in which you initiate an intercompany transaction.
Before you set up Intercompany Processing
Before you begin setting up Intercompany Processing, be sure you’ve completed the setup procedures for System Manager, General Ledger, and Payables Management.
When you’ve completed setting up those modules and the Intercompany Processing setup tasks, you’ll be ready to begin performing the tasks described in Chapter 3, “Intercompany transactions.”.
Setting up intercompany relationships
Use the Intercompany Setup window to define relationships between companies that can have intercompany transaction interaction. Setting up an intercompany relationship enables you to record transactions in General Ledger or Payables Management for the originating company that will create transactions in the General Ledger for the destination company.
Note
If you’re not using Multicurrency Management, originating and destination companies must have the same functional currency.
To set up an intercompany relationship:
Open the Intercompany Setup window. (Microsoft Dynamics GP menu >> Tools >> Setup >> System >> Intercompany)
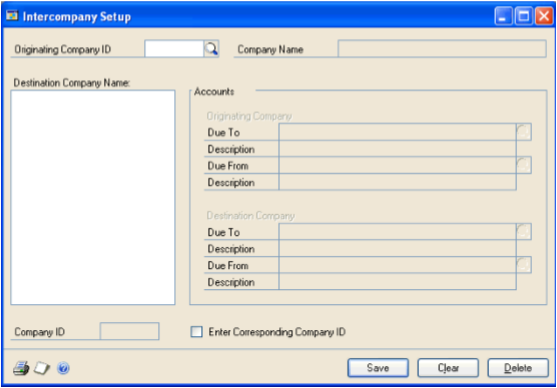
Enter or select an Originating Company ID. When you select an originating company ID, other companies you have access to appear in the Destination Company Name list.
Once you've chosen an originating company ID, that field is locked; that is, you must save or clear the intercompany relationship before you can enter another originating company ID.
Select a Destination Company Name. This is the company you establish an intercompany relationship with. The Company ID for the company you select appears below the list box.
Enter or select Originating Company Due To/Due From accounts. If you enter the account number, enter it as an unformatted string. Intercompany Processing automatically formats the account according to the account format of the specified company.
For example, if the Originating Company Due To account number is 1000-00000000-2101, you would enter it as 1000000000002101; Intercompany Processing adds the correct account separators for your account format when you leave the field.
Note
For each intercompany relationship, you can specify only one due to/due from account for each company.
The Originating and Destination Due To/Due From accounts cannot be inactive accounts, unit accounts, or unit allocation accounts.
Enter or select Destination Company Due To/Due From accounts.
Mark the Enter Corresponding Company ID option if you enter Corresponding Company IDs when you enter intercompany transactions.
Choose Save.
To print the Intercompany Setup List for all the intercompany relationships for this originating company, enter or select the same Originating Company ID and choose File >> Print.
You can also print the Intercompany Setup List in the General System Reports window by choosing Reports >> System >> General >> select Intercompany Setup from the Reports drop down list. All intercompany relationships established for the selected range of companies will print on the Intercompany Setup List when you print the report from this window.
Part 2: Transactions
Use this part of the documentation to record transactions in the General Ledger or Payables Management module of one company that will create transactions in the General Ledger of another company.
The following information is discussed:
Chapter 2, “Multicurrency transactions” explains how multicurrency functionality affects Intercompany Processing.
Chapter 3, “Intercompany transactions” describes how to enter and void intercompany transactions.
Chapter 4, “Posting” contains information about posting intercompany transactions.
Chapter 2: Multicurrency transactions
If you’re using Multicurrency Management with Intercompany Processing, you can choose the currency to enter on transactions.
This information is divided into the following sections:
Viewing multiple currencies
Exchange rate and document date
Multicurrency account distributions
Viewing multiple currencies
You can choose whether to view multicurrency transactions in the originating or the functional currency. Choose View >> Currency >> Functional or Originating while entering an intercompany transaction. The option will be saved on a per user, per window basis.
You also can use the Currency list button in the windows that support changing the currency view. The View menu and Currency list button are available in the following types of windows:
Transaction Entry windows
Journal Entry Inquiry windows
The first time you open these windows after registering Multicurrency Management, all the transactions will be displayed in the originating currency. If you change the currency view, the option you last used will be the default view the next time you open that window.
Note
You also can enter a multicurrency transaction in the Payables Transaction Entry window, but the View menu and Currency list button are not available.
Exchange rate and document date
If the currency ID for a transaction is not in the functional currency, a rate type and associated exchange rate table are assigned to the transaction. The rate type is based on the rate type you’ve assigned to the selected vendor. If one isn’t assigned to the vendor, the default rate type specified in the Multicurrency Setup window is used. You also can choose the currency expansion button to open the Exchange Rate Entry window to view or modify the default exchange rate.
The document date assigned to a transaction determines which exchange rate is used, based on the currency ID and associated rate type that’s entered for the transaction. Each time you change the document date on a multicurrency transaction, the system searches for a valid exchange rate. If a valid rate doesn’t exist, you can enter an exchange rate using the Exchange Rate Entry window. If you’ve entered a General Ledger posting date that’s different from the document date, the exchange rate expiration date must be after the posting date.
Multicurrency account distributions
For multicurrency transactions, distribution amounts are displayed in both the functional and originating currencies. However, you can change only the originating amounts.
When you’re entering a multicurrency transaction, the originating debit and credit amounts must balance. If the functional equivalents don’t balance, the difference is posted automatically to a Rounding Difference account and a distribution type of Round identifies the distribution amount in the Purchasing Distribution Entry window.
For example, assume you’ve entered a transaction in the euro currency, with a sale amount of 28,755.42 EUR, a trade discount of 586.84 EUR, a discount available of 1544.33 EUR and the exchange rate is 1.0922. The distributions would be calculated as follows:
| Account | Euro debit | Euro credit | US Dollars debit | US Dollars credit |
|---|---|---|---|---|
| Accounts Payable | 28,755.42 EUR | $31,406.67 | ||
| Trade Discount | 586.84 EUR | $640.95 | ||
| Discount available | 1544.33 EUR | $1686.72 | ||
| Accrued Purchases | 30,886.59 EUR | $33,734.33 | ||
| Totals | 30,886.59 EUR | 30,886.59 EUR | $33,734.34 | $33,734.33 |
| Rounding Difference | $0.01 | |||
| Totals | 30,886.59 EUR | 30,886.59 EUR | $33,734.34 | $33,734.34 |
Chapter 3: Intercompany transactions
Intercompany Processing enables you to record transactions in the General Ledger or Payables Management module for one company that will create transactions in the General Ledger of another company.
This information is divided into the following sections:
Understanding intercompany transactions
Entering General Ledger intercompany transactions
Entering Payables Management intercompany transactions
Voiding Payables Management intercompany transactions
Understanding intercompany transactions
Intercompany transactions are like any other transactions in the system, with the following exceptions:
They contain distributions to more than one company.
If you are not using Multicurrency Management, all companies must use the same functional currency.
You cannot enter multidimensional analysis codes for destination company distributions, but you can distribute amounts to destination company accounts that have multidimensional analysis codes set up. To enter analysis information for the codes, you must view and edit the intercompany transaction in the General Ledger of the destination company. For more information about multidimensional analysis codes, refer to the Multidimensional Analysis documentation.
Multicurrency intercompany transactions must be saved to a batch. Standard intercompany transactions are entered in single-use batches or recurring batches. Intercompany multicurrency transactions must be entered in single-use batches.
Intercompany distributions entered in transaction entry windows will not show the due to/due from account breakout; however, this breakout is printed on edit lists and posting journals.
Entering General Ledger intercompany transactions
Use the Transaction Entry window in General Ledger to enter intercompany transactions.
In General Ledger, Batch Total Actual amounts for intercompany debits and intercompany credits are not included in the batch total shown on the Batch Entry window and on edit lists and posting journals. The number of journal entries, however, is updated for intercompany transactions.
Reversing intercompany transactions can be used in situations where cash will be paid or received, or an expense will be realized in the following period. Examples of such accruals include salaries that haven’t been paid or revenues that haven’t been billed.
To enter a General Ledger intercompany transaction:
Open the Transaction Entry window. (Transactions >> Financial >> General)
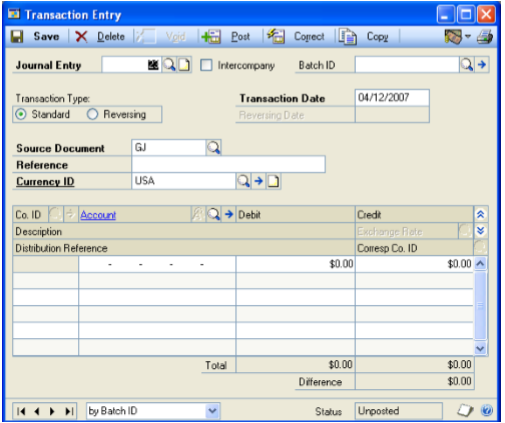
Enter or select a journal entry number.
Mark the Intercompany option.
Tip
You can unmark this option only if you haven’t entered distributions to companies other than the originating company; that is, the one in which you are entering the transactions.
Enter or select a batch. All intercompany transactions must be saved in a batch.
Select a transaction type.
Enter audit trail code information, such as the Transaction Date or Reversing Date, the Source Document and Reference information, and the Currency ID.
Enter company IDs, accounts, transaction amounts, distribution reference, and corresponding company ID.
You’ll be able to enter a corresponding company ID only if the Enter Corresponding Company ID option is marked in the Intercompany Setup window.
Note
Intercompany transactions will not be included in the batch total. Total debit and credit amounts will appear only when viewing the originating currency.
Verify the transaction by printing a General Transaction Edit List.
Choose Save to save the batch.
Use any batch-level posting method to post intercompany batches. See Chapter 4, “Posting,” for more information.
Entering Payables Management intercompany transactions
Use the Payables Transaction Entry window and the Payables Transaction Entry Distribution window to enter and distribute intercompany transactions.
The destination company distributions on an intercompany transaction must be of types PURCH, FNCHG, FREIGHT, MISC, or UNIT. Other distribution types are not supported.
For more information about entering various types of Payables Management transactions, see the Payables Management documentation.
To enter Payables Management intercompany transactions:
Open the Payables Transaction Entry window. (Transactions >> Purchasing >> Transaction Entry)
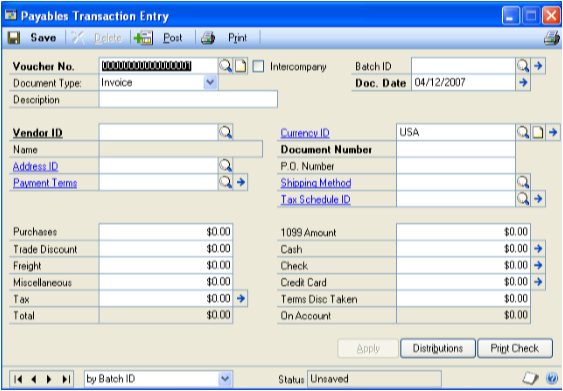
Enter a voucher number and mark the Intercompany option. You can unmark the Intercompany option only if you haven’t entered distributions to companies other than the originating company; that is, the one in which you are entering the transaction.
Select the document type and enter a description.
Enter or select a batch. All intercompany transactions must be saved in a batch.
Enter transaction information including document date, vendor ID, document number, and purchase amounts.
Enter or select a currency ID.
Choose the Distributions button to open the Payables Transaction Entry Distribution window.
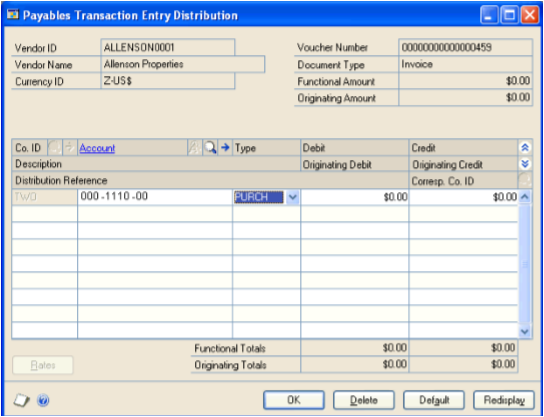
By default, the scrolling window displays the distributions that were created automatically based on the posting accounts assigned to the vendor you chose in the Payables Transaction Entry window or on posting accounts assigned in the Posting Accounts Setup window.
Modify company IDs, accounts, transaction amounts, distribution reference, and corresponding company IDs of the existing distributions, if necessary.
Intercompany transactions must be distributed to Type PURCH, FNCHG, FREIGHT, MISC, or UNIT.
You’ll be able to modify a corresponding company ID only if the Enter Corresponding Company ID option is marked in the Intercompany Setup window.
Note
All intercompany distributions must be entered in the originating currency; that is, the currency specified in the Payables Transaction Entry window. In addition, if Multicurrency Management is not registered, all originating and destination companies must have the same functional currency.
Continue entering distribution accounts until your transaction is fully distributed, and choose OK.
Note
If you’ve entered several distributions to one particular distribution type, you can choose Redisplay to sort the accounts in the scrolling window by distribution type.
Print the Payables Transaction Edit List to verify the transactions.
Save the batch.
Use any batch-level posting method to post intercompany batches. See Chapter 4, “Posting,” for more information.
Voiding Payables Management intercompany transactions
You can void intercompany transactions in Payables Management, but the only entries that are backed out automatically are those in the originating company. You must make adjustments manually in destination companies.
Use the Void Open Payables Transactions window or the Void Historical Payables Transactions window to void the portion of Payables Management intercompany transactions that come from the originating company. You must make manual adjustments in destination companies to account for voided intercompany transactions.
See the Payables Management documentation for more detailed information about voiding vouchers and payments.
Chapter 4: Posting
Posting transfers intercompany transactions to permanent records. Until they’re posted, transactions can be changed or deleted. In General Ledger, posting also updates account balances in the chart of accounts for the originating company.
Posting reports will be printed when you post transactions, either individually or in batches. For more information about posting reports for Intercompany Processing, refer to Chapter 6, “Reports.”
For more information about setting up posting, see the System Setup Guide (Help >> Contents >> select Setting up the System).
This information is divided into the following sections:
Posting intercompany transactions
Intercompany transaction amounts
Intercompany audit trail codes
Distributions to unit accounts
Transactions with errors
Posting intercompany transactions
You can post intercompany batches from the Batch Entry, Series Posting, or Master Posting windows, depending on your access to the system.
When an intercompany transaction is posted, if it is distributed to multiple companies, the information will be posted to the specified destination companies and a General Ledger batch will be created in each company. The destination company batch must then be posted in General Ledger to become a permanent part of the records for that company.
For example, if you enter a standard General Ledger intercompany transaction to record a debit to telephone expense, that information will remain temporary and won’t be reflected in the balances of the accounts in either the originating or destination company until it is posted. After you’ve posted the transaction in both the originating and destination companies, the information will appear as a credit change to the balance of the Cash account and a debit change to the balance of the Telephone Expense account. The transaction also will become part of the permanent records for an open year.
Posting can be performed as a background task while you continue with other tasks; however, posting can’t be performed if year-end closing is in process. In addition, all background tasks must be complete before you exit Dynamics GP. For more information about background processing, see your System Administrator’s Guide (Help >> Contents >> select System Administration).
Intercompany transaction amounts
In General Ledger, Batch Total Actual amounts for intercompany debits and intercompany credits are not included in the batch total shown on the Batch Entry window and on edit lists and posting journals. The number of journal entries, however, is updated for intercompany transactions. In destination companies, the transactions created will not be marked as intercompany and will be included in the batch totals. However, these transactions are assigned an intercompany audit trail code. (The unique intercompany audit trail code gives you the ability to print reports for all intercompany-generated transactions.)
Intercompany audit trail codes
If you are viewing an intercompany transaction in the General Ledger Transaction Entry window of the destination company, the Batch ID assigned is ICTRX, ICTHS, or ICREV, with the next audit trail code number from the originating company appended to it. For example, if the next audit trail code number is 00000002 in Company A and you post an intercompany transaction from company A to company B, the batch ID in company B would be ICTRX00000002.
The ICTRX audit trail code is assigned to transactions posted to open years. The ICTHS audit trail code is assigned to transactions posted to historical years. The ICREV audit trail code is assigned to reversing transactions posted to open years.
Distributions to unit accounts
You might make distributions to unit accounts on intercompany transactions, but they will not generate a breakout of due to/due from accounts during the posting process. They are simply passed into the destination companies. For example, if you enter a distribution of 10 units to account 1000-1000 for company B as an intercompany transaction in company A, this distribution would go to company B as 10 units to account 1000-1000 for company B. (No due to or due from accounts would be specified.)
Transactions with errors
Transactions with errors will remain in the originating company batch if any of the following conditions exist:
A destination company doesn’t exist
An intercompany relationship does not exist with any of the destination companies specified
A due to/due from account is not specified in the Intercompany Setup window for any destination company
Multicurrency Management is not registered and the functional currencies of any destination company is different from that of the originating company
The exchange table does not exist, cannot be accessed, or is not active for the specified Rate ID/Currency ID in any originating or destination company
A valid exchange rate could not be found for any company
During posting, all errors will be found and printed on the posting journal; Dynamics GP will continue posting any remaining transactions after encountering an error.
If the due to or due from accounts for any destination company have been inactivated or deleted, the batch will still be created in the destination company, but if you try to post the transaction in the General Ledger of the destination company, you’ll get a message stating that the account is inactive or does not exist.
Part 3: Inquiries and Reports
This part of the documentation explains how to use inquiries and reports to analyze intercompany activity. The inquiry windows and reports in Intercompany Processing allow you to access information quickly and to display the information either on the screen or on a printed report.
The following information is discussed:
Chapter 5, “Inquiries,” explains how to use the Intercompany Processing inquiry windows to view transaction information.
Chapter 6, “Reports,” describes how to use reports to analyze intercompany activity.
Chapter 5: Inquiries
Inquiry features help you analyze intercompany financial information. Analyzing data contained in your accounting system will let you make reasoned choices about managing your company resources.
This information is divided into the following sections:
About reporting currency
Viewing transactions for a posted General Ledger journal entry
Viewing intercompany information for a transaction in a destination company
Viewing exchange rate information for an intercompany multicurrency voucher
Viewing exchange rate information for all destination companies on a voucher
About reporting currency
A reporting currency is used to convert functional or originating currency amounts to another currency on inquiries and reports. For example, if the German mark is the functional currency for a company, you can set up the euro as your reporting currency to view an inquiry window with currency amounts displayed in the euro currency.
During the reporting currency setup in Multicurrency Management, you’ll set up a reporting currency and enter a default exchange rate and rate calculation method. Depending on how your system is set up, you might be able to override the default reporting currency exchange rate or rate calculation method on inquiries and reports. To change the default reporting currency exchange rate, choose View >> Currency >> Modify Reporting Rate to open the Modify Reporting Rate window.
For more information about the reporting currency, see the Multicurrency Management documentation.
Viewing transactions for a posted General Ledger journal entry
Use the Journal Entry Inquiry window to view transaction detail for General Ledger posted journal entries in an open fiscal year.
Multiple journal entries with the same number might exist if a recurring batch is posted or a reversing transaction is posted. If you enter a journal entry for which multiple entries exist, the journal entry with the oldest posting date in the open year will be displayed. If you use the Journal Entry lookup button, all unique journal entries will be displayed, and you can select the journal entry you’d like to view.
The Intercompany button is enabled only if the currently displayed journal entry originated from an intercompany-generated transaction.
Note
The Journal Entry Inquiry window displays posted journal entries in any open year in General Ledger, so you don’t need to keep transaction history to be able to view journal entries in this window.
To view transactions for a posted General Ledger journal entry:
Open the Journal Entry Inquiry window. (Inquiry >> Financial >> Journal Entry Inquiry)
Enter or select the journal entry number to view.
You can view any posted journal entry number that has not been moved to history with distributions for the company you’re logged into. Audit trail code, transaction date, source document, batch ID, reference, currency ID, account, debit, credit, distribution reference, and difference information are displayed.
Viewing intercompany information for a transaction in a destination company
Use the Intercompany Audit Trail Code Inquiry window in destination companies to view the originating company, originating audit trail code, and journal entry for posted intercompany transactions.
Note
You can view this information only for journal entries that originated in another company.
To view intercompany information for a transaction in a destination company:
Open the Journal Entry Inquiry window. (Inquiry >> Financial >> Journal Entry Inquiry)
Enter or select the journal entry number to view.
If the journal entry is an intercompany-generated transaction, the Intercompany button will be enabled.
Choose the Intercompany button to open the Intercompany Audit Trail Code Inquiry window, where you can view information from the originating company. You can view the originating company ID, originating company name, originating audit trail code, and originating journal entry number.
Viewing exchange rate information for an intercompany multicurrency voucher
Use the Exchange Rate Entry Zoom window to view the exchange rate information for the selected intercompany voucher in Payables Management.
To view exchange rate information for an intercompany multicurrency voucher:
Open the Payables Inquiry - Document window. (Inquiry >> Purchasing >> Transaction by Document)
Select the intercompany multicurrency document to view exchange rate information for, then click the Document Number or Voucher/Payment Number link to open the Payables Transaction Entry Zoom window.
In the Payables Transaction Entry Zoom window, choose the Distribution button to open the Payables Distribution Zoom window.
In the Payables Distribution Zoom window, choose the Co. ID expansion button to open the Exchange Rate Entry Zoom window to view exchange rate information.
Viewing exchange rate information for all destination companies on a voucher
Use the Intercompany Destination Exchange Rate Inquiry window to view the exchange rate information for all destination companies on an intercompany voucher in Payables Management.
To view exchange rate information for all destination companies on a voucher:
Open the Payables Inquiry - Document window. (Inquiry >> Purchasing >> Transaction by Document)
Select the intercompany multicurrency document to view exchange rate information for, then click the Document Number or Voucher/Payment Number link to open the Payables Transaction Entry Zoom window.
In the Payables Transaction Entry Zoom window, choose the Distribution button to open the Payables Distribution Zoom window.
In the Payables Distribution Zoom window, choose the Rates button to open the Intercompany Destination Exchange Rate Inquiry window.
Chapter 6: Reports
You can use Intercompany Processing reports to analyze records of your intercompany transactions in the General Ledger and Payables Management modules.
This information is divided into the following sections:
Intercompany Processing report summary
Creating a report option
Intercompany Processing report summary
You can print several types of reports using Intercompany Processing. Some reports automatically are printed when you complete certain procedures; for example, posting journals can automatically be printed when you post transactions, depending on how your posting options are set up. You can choose to print some reports during procedures; for example, you can print an edit list when entering transactions by choosing the Print button in the batch entry window. In order to print some reports, such as analysis or history reports, you must set up report options to specify sorting options and ranges of information to include on the report. For more information, refer to Creating a report option.
The following table lists the report types available in Intercompany Processing and the reports that fall into those categories. (Reports printed using General Ledger or Payables Management are printed using many of the same windows. See the General Ledger or Payables Management documentation for information about reports printed in those modules.)
| Report type | Report | Printing method |
|---|---|---|
| Setup reports | Intercompany Setup List | Choose File >> Print in the setup window or create report options in the General System Reports window. |
| Edit lists | Transaction Edit List (intercompany information added)* or Payables Transaction Edit List (intercompany information added)* | Choose File >> Print in the window you use to complete the procedure. |
| Posting reports | Transaction Posting Journal*† (intercompany information added) Intercompany Distribution Detail (replaces Distribution Breakdown Register) Intercompany Distribution Breakdown Register – Detail* (replaces Payables Distribution Breakdown Register – Detail) Intercompany Distribution Summary (replaces GL Distribution Summary) Intercompany Distribution Breakdown Register – Summary* (replaces Payables Distribution Breakdown Register - Summary) |
Choose File >> Print in the window you use to complete the procedure or some will be printed automatically when you complete the procedure. |
| Reprint Journals | Intercompany Distribution Detail – Reprint (replaces Payables Distribution Detail – Reprint) Transaction Reprint Journal (intercompany information added) |
Create a report option in the Purchasing Posting Journals window. |
* Indicates reports that can be printed with multicurrency information displayed. † Indicates reports that can be assigned to named printers. See “Printers” in the System Administrator’s Guide (Help >> Contents >> select System Administration) for more information.
Creating a report option
Report options include specifications for sorting options and range restrictions for a particular report. In order to print several Intercompany Processing reports, you must first create a report option. Each report can have several different options so that you can easily print the information you need. For example, you can create report options for the Intercompany Distribution Breakdown Register that show either detailed or summary information.
Note
A single report option can’t be used by multiple reports. If you need identical options for several reports, you must create them separately.
Use the Financial, Purchasing, or System report options windows to create sorting, restriction, and printing options for the reports that have been included with Intercompany Processing.
To create a report option:
Open a Financial, Purchasing, or System reports window. There are separate windows for each report type. (Reports >> System >> General) (for the Intercompany Setup List) (Reports >> Financial >> Bank Posting Journals) (Reports >> Purchasing >> Posting Journals)
Select a report from the Reports list.
Choose New to open the report options window. Your selection in step 2 determines which report options window appears.
Name the option and enter information to define the option. The name you choose for the option won’t appear on the report. The selections available for defining report options vary, depending on the report type you’ve selected.
Enter range restrictions. The Ranges list shows the available options for each report. The available ranges vary, depending on the type of report.
Note
You can enter only one restriction for each restriction type. For instance, you can insert one batch ID restriction (LCM621A to LCM628A) and one audit trail code restriction.
Choose Insert to insert the range in the Restrictions List. To remove an existing range from the list, select the range and choose Remove.
Choose Destination to select a printing destination. Reports can be printed to the screen, to the printer, to a file, or to any combination of these options. If you select Ask Each Time, you can select printing options each time you print this report option.
To print the report option from the report options window, choose Print before saving it. If you don’t want to print the option now, choose Save and close the window. The report window will be redisplayed.