Note
Access to this page requires authorization. You can try signing in or changing directories.
Access to this page requires authorization. You can try changing directories.
The System Administrator's Guide is designed to give an experienced computer user the information that is needed to maintain Microsoft Dynamics GP.
This manual includes detailed information about maintaining data, optimizing databases, setting up printers, using the Distributed Process Server, and solving problems that may arise within Microsoft Dynamics GP.
Some features described in the documentation are optional and can be purchased through your Microsoft Dynamics GP partner.
To view information about the release of Microsoft Dynamics GP that you're using and which modules or features you are registered to use, choose Help >> About Microsoft Dynamics GP.
The manual is divided into the following parts:
Part 1, Customization, describes how to set up the system password, routine checklists, and default printers in Microsoft Dynamics GP.
Part 2, Routine maintenance, describes how data is stored, and explains how to help protect and maintain your data.
Part 3, Distributed Process Server, describes how to set up and use the remote processing features available with Microsoft Dynamics GP.
Part 4, Technical reference, contains information about integrating products, launch files, and defaults files.
Part 5, Troubleshooting, explains how to detect data that needs maintenance, and repair the data if necessary. It also contains solutions to commonly encountered problems with location translations, launch files, process servers, and defaults files.
Part 1: Customization
This part of the documentation describes how to customize the Microsoft Dynamics GP system to fit your needs. The following topics are discussed:
Chapter 1, "System customization," describes how to modify the routine checklists, and default printers in Microsoft Dynamics GP.
Chapter 2, "Printers," describes how to use named printers and how to set up default printers for an entire system, for each user, or for each company.
Chapter 1: System customization
Microsoft Dynamics GP allows you to tailor routine checklists, and report printing to your business's specific needs. This enables you to provide different access levels to Microsoft Dynamics GP and to work more efficiently.
The customization information contains the following sections:
Modifying a routine checklist
Printing reports without dialog boxes
Modifying a routine checklist
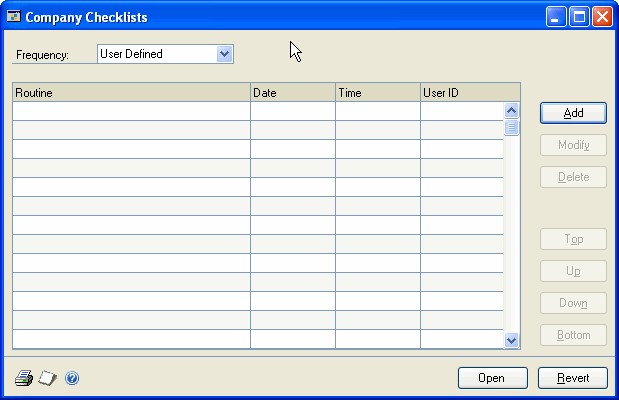
Microsoft Dynamics GP allows you to modify existing checklists and to create customized checklists of routines for each series. You can specify the frequency with which each set of routines should be completed: daily, on payday, at the end of a period, month, quarter, fiscal year or calendar year, during setup, or at a frequency you choose. In addition, you can record macros and add them to your checklists.
Note
While you can open the appropriate windows to perform the tasks from a checklist window, the actual tasks aren't performed automatically.
The checklist of routines acts as a sort of audit trail, recording the time each task was selected, the date the task was completed and the user ID of the user who completed the procedure.
Note
A checklist registers the ID of the user who performed a routine and when it was completed only if a user performed it by selecting the routine in the checklists window and choosing Open. The checklist will not be updated if a user performs a routine by opening a window any other way, such as from a menu.
To modify a routine checklist:
Be sure that you are logged in to the correct company.
Open a checklists window.
(Administration >> Routines >> Company >> Checklists)
Select a module within the series, if necessary.
Select the frequency with which you want the routine to be completed.
Choose whether to add, modify, or delete a checklist. If you want to modify or delete a checklist item, you must first select it in the checklist window.
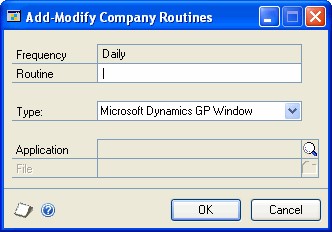
If you are adding a routine, name the routine in the Add-Modify window.
In the Type list, specify the type of routine to add.
Microsoft Dynamics GP window
External task
Microsoft Dynamics GP macro
Choose the Application lookup button to view the options for the type of routine you selected in step 7.
The following table presents subsequent required actions for each option:
| Option | Action |
|---|---|
| Microsoft Dynamics GP Window | The Select Microsoft Dynamics GP Window window appears. To add a window from an integrating product, select it from the Product list. Select the window's series, then select the window to add. |
| Microsoft Dynamics GP Macro | A dialog box appears. Select the macro you want to add. |
| External Task | A dialog box appears. Select the application file. |
- Choose OK to add the item to the list of routines.
Note
Choosing the Revert button in a list of routines removes all the additions and modifications you've made, and resets the list of routines to the Microsoft Dynamics GP default settings. The original settings are denoted by a 0/0/0 in the Date Done column and 12: 00: 00 AM in the Time column. Original settings don't have an entry in the User ID column.
Printing reports without dialog boxes
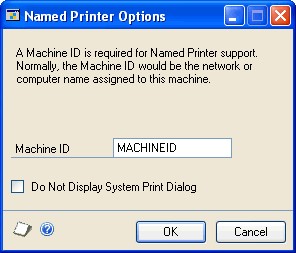
For reports you print to a printer, you can prevent the print dialog boxes from appearing; one copy of the report will be printed to the designated printer. If you print numerous reports to a printer at once, or if you post and print posting journals overnight, you may want to prevent the print dialog box from appearing. The dialog box is shown in the following illustration.
Note
You need to complete these steps on each computer where you don't want print dialog boxes to appear.
To print reports without dialog boxes:
- Open the Named Printer Options window.
(Administration >> Setup >> System >> Named Printers >> Machine ID link)
Mark the Do Not Display System Print Dialog option.
Choose OK.
If you haven't set up the default printer, the Setup Named Printers window will open along with the Microsoft Windows Print Setup window. The default printer is used if there is not a printer specified for the report or company. See *Setting up printers for a workstation for more information about setting up the default printer.
Chapter 2: Printers
Microsoft Dynamics GP uses named printers to automatically print specific reports to assigned printers. You also can set up default printers for an entire system, for each user, or for each company.
This information includes the following sections:
Printer options
Printer classes
How printers are selected
Reports you can use with named printers
Setting up named printers
Setting up printers for a workstation
Adding a printer ID
Assigning named printers to reports
Importing printer settings
Setting up a template user for named printers
Changing printer ID settings
Changing machine ID settings
Changing printer assignments
Removing printer assignments
Printer options
You have many choices when you print reports or documents in Microsoft Dynamics GP.
You can select the printer each time you print a report.
You can specify a default printer for all reports printed from a particular workstation.
You can specify certain printers for certain types of reports or forms. For example, you may have one printer that's only used for printing checks.
To get started, you first need to set up your printers and give them names. Then, you'll assign those printers to the particular functions they'll be used for.
Printer classes
You can use printer classes when you print reports or documents in Microsoft Dynamics GP.
System Printer IDs assigned to the System class will be available to all combinations of users and companies.
User Printer IDs assigned to the User printer class will be available to only a single user for all companies.
Company Printer IDs assigned to a Company class will be available to all users for a single company.
User & Company Printer IDs assigned to a User & Company class will be available only to a specified user and company combination.
How printers are selected
The named printers settings will be used only if you have chosen to print the report to a printer.
For posting journals, you must have either the Ask Each Time or Send to Printer option marked for the report in the Posting Setup window.
For analysis and activity reports that use a report option, one of the destinations must be Printer for the report option.
For example, if you have marked only the Send to Screen option for a posting journal in the Posting Setup window, even though you have selected a printer in the Assign Named Printers window for the posting journal, the report won't be sent to the printer, only to the screen.
In general, the printer class will be checked first. If the printer class is User, Company, or User & Company, the printer class will be used to determine the printer used. If no assigned printer is found, the company default printer is checked, and then the system default printer is checked.
Reports you can use with named printers
You can assign printers to the following documents and reports:
| Module | Report or document |
|---|---|
| General Ledger | Cross reference reports |
| Inventory | Activity reports |
| Invoicing | Analysis reports Invoices and returns |
| Receivables Management | Aged trial balance reports |
| Sales Order Processing | Analysis reports |
| Payables Management | Aged trial balance reports |
Financial statements
Posting journals
Trial balances
Analysis reports Posting journals
Stock Count forms
Posting journals
Analysis reports
Customer statements
Historical aged trial balance reports
Posting journals
Receivables documents
Packing slips and picking tickets
Posting journals
Purchase Orders Generation Register
Quotes, orders, invoices, back orders, and returns
Analysis reports
Computer checks and remittance
Historical aged trial balance reports
Posting journals
Payables documents
Transaction checks and remittance
| Module | Report or document |
|---|---|
| Purchase Order Processing | Analysis reports Posting journals Purchase orders |
| Payroll | 1099-R and 1096 forms Custom reports Direct Deposit Statement of Earnings Paychecks and Direct Deposit forms W-2 and W-3 forms Wages and hours reports |
Setting up named printers
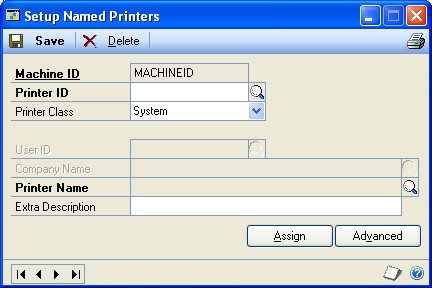
The first time you use named printers on each workstation, the Named Printer Options window will open and you must set up a machine ID for the workstation. Once you do this, the Assign Named Printers window will open when you choose Administration >> Setup >> System >> Named Printers.
After the setup process is complete and you choose to print a report, Microsoft
Dynamics GP will print reports to the named printers assigned to specific tasks.
Setting up printers for a workstation
Use the Named Printer Options window to set up a machine ID for each workstation that will be used to print reports or documents. After setting up named printers, Microsoft Dynamics GP will always print to the named printers default printer, not the workstation's default printer.
To set up printers for a workstation:
- Open the Named Printer Options window.
(Administration >> Setup >> System >> Named Printers)
If you have already set up printers for a workstation, choose Administration >> Setup >> System >> Named Printers >> Machine ID link to open the Named Printer Options window.
- Enter a machine ID. The default ID is the workstation's network or computer name.
The machine ID is used to associate the named printer with the actual workstation, not the user.
You can choose not to display the print dialog box when printing reports. If you print numerous reports to a printer at once, or if you post and print posting journals overnight, you may want to prevent the print dialog box from appearing.
Choose OK in the Named Printer Options window. You will receive an alert message saying you need to select the default printer.
Choose OK. The Setup Named Printers window will open along with the Print Setup window from Windows.
In the Print Setup window, the default printer from Windows will be the initial selection. You can change the printer and its settings. Choose OK to save your changes and close the Print Setup window.
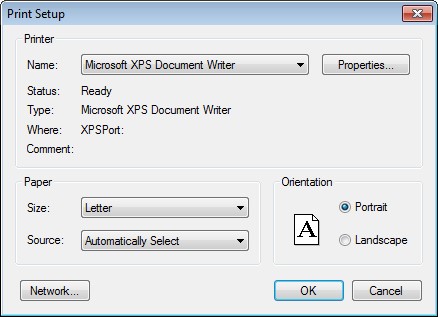
- In the Setup Named Printers window, DEFAULT is entered as the printer ID and the printer name automatically comes from the Print Setup window in Step 5. You can change the printer and enter extra descriptive information for the printer.
- Select a printer class.
For the default printer, the printer class must be System.
- Choose Save. You can continue to set up the printer IDs you will need for this workstation.
Adding a printer ID
You can create an unlimited number of printer IDs. Also, you can create multiple printer IDs with different settings for the same printer. For example, you can create two printer IDs, one with landscape orientation and one with portrait orientation, for the same printer.
To add a printer ID:
- Open the Assign Named Printers window.
(Administration >> Setup >> System >> Named Printers)
Choose Setup to open the Setup Named Printers window.
Enter a printer ID and select one of the four printer classes:
System Printer IDs assigned to the System class will be available to all combinations of users and companies.
User Printer IDs assigned to the User printer class will be available to only a single user for all companies.
Company Printer IDs assigned to a Company class will be available to all users for a single company.
User & Company Printer IDs assigned to a User & Company class will be available only to a specified user and company combination.
If you select User, Company, or User & Company as the printer class, enter a user ID, company name, or both.
Select the printer and settings. You also can enter an extra description for the printer.
If you have the capability to send and receive faxes from a workstation, you can set up the fax machine as a printer in Windows. This printer can be given a Printer ID and used as a named printer.
- Choose Save and close the window.
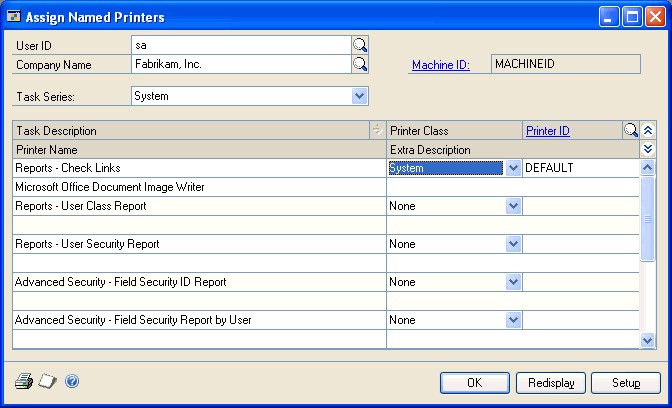
Assigning named printers to reports
Once you have set up the printer IDs for the workstation, you can assign a printer to specific reports.
If you're using advanced picking, you can specify a default printer for a site. This is necessary only if you want a different printer to be used for a specific site.
You must specify a default printer for the System task series. You also can specify a default printer for a company by selecting Company as the task series and selecting the company name. Specifying a default printer for a company is optional and is necessary only if you want a different default printer to be used for a specific user, company, or user and company combination. When choosing the default printer for a company, you can't use Any Printer or Manual Selection for the printer class.
The printer settings will be used only if you print the report to a printer. See *How printers are selected for more information.
To assign named printers to reports:
- Open the Assign Named Printers window.
(Administration >> Setup >> System >> Named Printers)
The user ID and company name you used to log in to Microsoft Dynamics GP appear in the user ID and company name fields, but you can change them.
Tip
You also can assign a printer by choosing the Assign button in the Setup Named Printers window.
- Select a Sales task series.
Printers set up under each task series (such as Sales and Purchasing) will be used for all printing for that series.
Printers set up under the Processes series will be used only by the process server. If you want to send reports to the process server, you must select Process as the task series. You should not leave the printer ID field empty or use the Manual Selection printer class when using the process server. For information about setting up the Distributed Process Server, see Chapter 10, "Remote processing setup.
- Select a task description.
If you select one of the following descriptions, continue with step 4. Otherwise, continue with step 6.
Sales Orders - Bulk Picking Ticket
Sales Orders - Packing Slips Printer - Blank
Sales Orders - Packing Slips Printer - Short
Sales Orders - Packing Slips Printer - Long
Sales Orders - Picking Tickets Printer - Blank
Sales Orders - Picking Tickets Printer - Short
Sales Orders - Picking Tickets Printer - Long
Choose the Task Description expansion button to open the Assign Pick/Pack Named Printers window.
Enter or select a site ID, a printer class, and a printer ID. Choose OK.
Select a printer class.
System If you selected the printer class of System and have assigned printer IDs to this printer class, the Named Printers window will open. Only the printers assigned to the printer class will be listed.
User, Company, or User & Company If you select the printer class of User, Company, or User & Company, the user ID and company name in this window must match the user ID and company name assigned to the printer class, or the printer ID won't be listed.
If you select the printer class of System, User, Company, or User & Company but don't select a printer ID, you can choose from any available printer ID in that class set up on the workstation when you print the report.
Any Printer ID If you select Any Printer ID for the printer class, you can choose from any available printer ID set up on the workstation when you print the report. You can't assign a printer to a task with the Any Printer ID class.
Manual Selection If you select Manual Selection for the printer class, you won't assign a printer to the task. Instead, when you print the report, the Print Setup window will open and you can choose the printer and printer settings.
None This is the default entry, indicating that you haven't selected a default printer for the task.
Select a printer from the list and choose Select.
Continue selecting printers for each task in the series.
Choose OK close the window. The printer assignments are saved as they are entered.
Importing printer settings
You can import the printer settings from one workstation to another. This allows you to set up a machine ID and printer settings on one workstation and duplicate the printer settings on other workstations in your system.
Note
Because printer settings are not always compatible between different Windows platforms, we recommend that you import settings only from workstations that are running the same version of Windows and have identical printer configurations in the control panel settings.
To import printer settings:
- Open the Assign Named Printers window.
(Administration >> Setup >> System >> Named Printers)
- Choose Setup to open the Setup Named Printers window, then choose Advanced to open the Setup Named Printers – Advanced window.
Enter the machine ID of the workstation you want to import the settings from and choose Import.
Choose OK to close the window.
You also can remove the printer for a machine ID. This should be done only if the workstation is removed from the system.
If the workstation is renamed on the network, you can change the machine ID in the Named Printer Options window and all the existing settings will be moved to the new machine ID. You don't need to remove the old machine ID.
Setting up a template user for named printers
If you have many users that print from the same workstation, such as in a Terminal Server system, you can set up a template user. A template is used only for the User and User & Company class printer settings. If a user ID does not have a printer ID assigned, the printer ID from the associated template user ID will be used.
Once you create a template user and set up the named printers for that one user, you can link other users to the template. You also can have multiple templates, so if two sites of 20 people each use a single Terminal Server, instead of setting up 40 users, you need to set up only two.
The template user can be an additional user created only for named printers. This user does not require access to any companies. You also can select an existing user as the template user.
If you link a user to a template user, you can override the printer assignments for the template user by assigning a different printer to the user for a specific task. For example, User A is linked to the template user and will use the printers and settings of the template user except for Sales Order Processing invoices. A different printer is assigned to this task for User A.
To set up a template user for named printers:
Open the Assign Named Printers window.
(Administration >> Setup >> System >> Named Printers)
Choose Setup to open the Setup Named Printers window, then choose Advanced to open the Setup Named Printers – Advanced window.
Select a user ID to use as the template. A list of all other users will appear in the bottom of the window.
Mark the user IDs that will be linked to this template.
Visual cues help you distinguish the different types of users. The following icons are used.
Icon Description The user ID is linked to a template user. The user ID is a template user. Choose OK to save your changes.
Once a user ID has been assigned as the template user or has been linked to a template user, its role can't be changed unless the link is removed. To remove a link, unmark the user ID in the Setup Named Printers – Advanced window.
Changing printer ID settings
Use the Setup Named Printers window to change printer ID settings.
To change printer ID settings:
Open the Assign Named Printers window.
(Administration >> Setup >> System >> Named Printers)
Choose Setup to open the Setup Named Printers window.
Using the lookup button, select the printer ID.
Make your changes and choose Save.
Changing machine ID settings
Use the Named Printer Options window to change machine ID settings.
If a workstation is renamed on the network, you can change the machine ID in the Named Printer Options window and all the existing settings will be moved to the new machine ID. You don't need to remove the old machine ID.
To change machine ID settings:
- Open the Assign Named Printers window.
(Administration >> Setup >> System >> Named Printers)
Choose Setup to open the Setup Named Printers window.
Click the Machine ID link to open the Named Printer Options window.
Make your changes and choose OK.
Changing printer assignments
Use the Assign Named Printers window to change printer assignments.
To change printer assignments:
- Open the Assign Named Printers window.
(Administration >> Setup >> System >> Named Printers)
Select a task series. If you are using the User, Company, or User and Company printer class, verify the user ID and company name.
Select the printer class assigned to the task description. Using the printer ID lookup window, select the printer ID you want to assign to the task.
Choose OK to save changes and close the window.
Removing printer assignments
Use the Assign Named Printers window to remove printer assignments.
To remove printer assignments:
- Open the Assign Named Printers window.
(Administration >> Setup >> System >> Named Printers)
Select a task series. If you are using the User, Company, or User and Company printer class, verify the user ID and company name.
To remove a printer assignment, change the printer class assignment to None.
Choose OK to save changes and close the window.
Part 2: Routine maintenance
Completing the recommended maintenance procedures will help keep Microsoft Dynamics GP running smoothly. Making regular backups will help you to recover your data if an unexpected event occurs. You can use the Manage Automated Client Updates window to set up updates to be installed automatically on your client computers.
The following topics are discussed:
Chapter 3, "Microsoft Dynamics GP tables," provides the basics of data storage in Microsoft Dynamics GP.
Chapter 4, "Maintenance procedures," describes the steps you should take to protect and maintain your data.
Chapter 5, "Database Maintenance Utility," provides information about the Database Maintenance Utility for Microsoft Dynamics GP so you can reload database objects such as stored procedures and triggers.
Chapter 6, "Companies offline," provides information about taking one or multiple companies offline for maintenance or administrative tasks such as a year-end close or an update.
Chapter 7, "Client updates," describes client updates and how to set up updates to be installed automatically on client computers.
Chapter 3: Microsoft Dynamics GP tables
Review the following information about Microsoft Dynamics GP tables before attempting to use table maintenance procedures. This information will familiarize you with the basics of data storage in Microsoft Dynamics GP. Understanding the basic concepts associated with Microsoft Dynamics GP tables will give you better insight into how data is stored and how it flows through Microsoft Dynamics GP.
The tables information contains the following sections:
How records are stored in Microsoft Dynamics GP tables
Table groups and tables
Table names
Main table types
Subtable types
Passive record locking
Effects of denying table access
How records are stored in Microsoft Dynamics GP tables
As you enter transactions, accounts, and customer information in Microsoft Dynamics GP, you'll make entries or selections for many individual fields. These fields represent the smallest unit of information stored by Microsoft Dynamics GP.
All the fields that describe a transaction, account, or customer make up a record. Similar records are stored together in a table.
For example, assume you have a new customer, Blue Yonder Airlines. You'll enter a customer ID, the company name, the city where the company is located, the phone number, and other facts about the company and your business relationship. Each of these facts is entered in a field, and together these fields make up the Blue Yonder Airlines customer record. All your customer records are stored together in a table group called the Receivables Customer Master Files. If you were entering a General Ledger transaction, that information would be stored in the Transaction Work table.

Just as windows you use to make entries (input) are linked to a particular table, the information displayed on reports and documents you'll print (output) is drawn from specific tables.
Table groups and tables
Tables are the basis of Microsoft Dynamics GP; they contain your data. Typically, two or more tables that are used to store related information are combined to make up a table group, also called a logical table.
For example, the General Ledger Transaction Work table is a table group, made up of four tables: Transaction Work, Transaction Amounts Work, Transaction Clearing Amounts Work, and Audit Trail Code Temporary. General information about each transaction, such as the audit trail code and date is stored in the Transaction Work table, and transaction amounts are stored in the Transaction Amounts Work or Transaction Clearing Amounts Work table, depending on whether you've entered a standard transaction or a clearing transaction.
Note that the Transaction Work table group contains a Transaction Work table. Table groups typically include a table with the same name. In some cases, this may be the only table in the table group. In System Manager, for example, almost every table group contains only one table.
Table names
Each Microsoft Dynamics GP table has three names: a technical name, a display name, and a physical name. The technical name is used by the software and will appear instead of a display name in some Microsoft Dynamics GP alert messages. The physical name is the name that will appear for the table when you view it using Microsoft SQL Server Management Studio. The display name is the name that will appear in most alert messages and is the most commonly used name for a given table.
You can review the physical, technical, and display names of each table by choosing Microsoft Dynamics GP menu >> Tools >> Resource Descriptions >> Tables to display the Table Descriptions window. Refer to your Resource Description online documentation for detailed steps that can help you view technical table and field information using the resource description windows.
Tables in the Microsoft Dynamics GP system are divided into different categories based on how they're used by Microsoft Dynamics GP and the information each stores. The purpose of each table can be determined by its name. Technical table names typically are composed of a two-character module abbreviation (such as GL for General Ledger), followed by a descriptive term for the main contents of the table, plus a 3- or 4-character main table type abbreviation (such as HIST for a history table). When appropriate, a subtable type abbreviation or description is used to further define the contents of the table.
The following describes of some of the naming conventions used in the Microsoft Dynamics GP system.
| Main table type | Physical name abbreviation | Technical name abbreviation |
|---|---|---|
| Master | 000 – 099 | MSTR |
| Work | 100 – 199 | WORK |
| Open | 200 – 299 | OPEN |
| History | 300 – 399 | HIST |
| Setup | 400 – 499 | SETP |
| Temp | 500 – 599 | TEMP |
| Relation | 600 – 699 | REL |
| Report Options | 700 – 799 | ROPT |
The following table shows examples of table names in the Microsoft Dynamics GP system.
| Main table type | Physical name example | Technical name example |
|---|---|---|
| Master | GL00100 | GL_Account_MSTR |
| Work | GL10000 | GL_TRX_HDR_WORK |
| Open | GL20000 | GL_YTD_TRX_OPEN |
| History | GL30001 | GL_Account_SUM_ HIST |
| Setup | SY40300 | SY_Class_Normal_SETP |
| Temp | GL50900 | GL_Year_End_Closing_TEMP |
| Relation | SY60100 | SY_User_Company_Access_REL |
| Report Options | SY70200 | SY_Group_Names_ROPT |
Main table types
Most of the information in Microsoft Dynamics GP is stored in one of the following types of tables. Knowing which type of table contains each type of information will help you find the data you need.
Setup tables These tables contain all the default settings and module options you've specified in the setup windows for each series.
Master tables These tables contain all the permanent data about your business, such as information about accounts, vendors, customers, and items.
Work tables Work tables contain unposted batches of transactions entered using windows that can be opened using the Transactions menu on the tool bar. These transactions are temporary and can be changed or deleted until they are posted to an open table.
Open tables Depending on the module, these tables may contain posted transactions for the open year. For example, the open tables in General Ledger contain posted transactions for any open year while the open tables in Payables Management contain unpaid posted transactions. How information in the open tables is moved to the history tables depends on the module as well. Transactions are moved to history when an open year is closed in General Ledger or the transactions are fully applied in Payables Management.
History tables These tables contain paid transactions, or transactions from a previous year.
Subtable types
Subtable types are used to further define the main table types. When used in conjunction with one of the main table type abbreviations, a subtable type indicates the relationship a table has with another table in its table group. The subtable type abbreviation will always appear before the main type abbreviation and is used in instances where several tables are grouped to form a table group. For instance, the General Ledger Transaction Work table group is made up of three work tables, but each one has a specific function that's indicated by its subtable type:
| Table group | Tables |
|---|---|
| Transaction Work table | Transaction Clearing Amounts Work GL_TRX_Clearing_WORK |
| Transaction Work GL_TRX_HDR_WORK | |
| Transaction Amounts Work GL_TRX_LINE_WORK |
The following table lists some of the more common subtable types used for tables. In many instances, a descriptive term is used rather than an abbreviation, such as "Clearing" for the GL_TRX_Clearing_WORK table:
| Subtable type | Abbreviation |
|---|---|
| Table Header | FHDR |
| Batch Header | BHDR |
| Serial Number | SERL |
| Header | HDR |
| Line Item | LINE |
| Tax | HTAX |
| Line Tax | LTAX |
| Address | ADDR |
Use the help to learn more about the type of table information that's available in the resource description windows. Then follow the step-by-step instructions in the help to find the technical table information you need.
Passive record locking
There are a few instances when a single person must have exclusive access to a particular data table, or collection of similar records. Typically this is true only if the individual is performing a table maintenance procedure, such as clearing data.
Microsoft Dynamics GP manages records using optimistic concurrency control or passive record locking. Optimistic concurrency control enables many people to work with the same records—customer accounts, for example—without competing for records. Coworkers update records one field at a time, so two or more people can change a record simultaneously if they're changing different fields. However, if they are changing the same field, the second person to save the record receives a message saying that changes have been made to the record since he or she accessed it. When the second person chooses OK in response to the alert message, the window is updated with the first person's changes.
Effects of denying table access
Some types of information may be available on several reports. For example, the information in the Unit Accounts List also is available in the Accounts List. If you want to restrict access to certain types of information, be sure to restrict access to all of the reports that include that information.
Reports
If you set up security for a table, reports that use that table for printing will be affected by the security option. For example, if you are denied access to the Account Master table, you can still use financial cards and post transactions, but a message indicating a table security error will appear if you attempt to print a report using the Account Master table. If you don't have access to a table, you won't be able to use other applications to write data to that table.
SmartList
Removing access to tables may mean some SmartList objects won't be displayed. Multiple SmartList objects may be affected by removing access to a single logical table. In some cases, multiple logical tables affect a SmartList object and removing access to any one of the logical tables will remove access to the object.
If the SmartList window is already open and access is removed from a table, the changes will not appear until the SmartList window is closed and reopened.
Chapter 4: Maintenance procedures
The Microsoft Dynamics GP system is designed to help ensure maximum accuracy and integrity of your accounting data. Hardware failures, power surges, and other problems might require maintenance procedures to be perform on data tables.
It's necessary to take measures to protect your data. Regularly back up your accounting data and perform table maintenance to help minimize risk of data loss.
Maintenance information is divided into the following sections:
Backups overview
Database backup procedures
When to perform a database backup
Backing up your data
Updating statistics
Recompiling stored procedures
If you discover a problem with your accounting data tables during maintenance or if a problem persists after performing maintenance, see Chapter 16, "Data recovery," for information on resolving the problem.
Backups overview
A backup is a copy of your SQL Server databases on another medium separate from the hard disk where you have the original databases. You can help prevent loss of your company's data by making frequent, regular backups. Having a good set of backups is like having insurance—without it, you risk losing your information and spending a great deal of time reentering it.
Note
If you have Microsoft Dynamics GP installed on a server, you must back up your data on the server.
In addition to making backups of your tables, you should back up your transactions-related information by printing and storing posting journals and reports, or by sending them to a file. Then, if you need to restore a backup, finding and reentering the information that's been entered since the backup will be much simpler and quicker. Also, keep all of the reports that you usually use, either as printed copies or in files. Detailed reports from open tables, tables containing current posted transactions, and history tables contain the most complete information.
To help ensure that you always have current backups, you should design and follow a formal backup schedule or create a schedule for automated backups.
Be sure to incorporate a rotation plan so that you aren't copying over the same backup every day. This will eliminate the loss of data if an issue isn't detected for several days. Backups should be clearly labeled so that you can distinguish one set from another. We also recommend that you label daily, weekly, and monthly backups separately so that they don't become mixed together.
Database backup procedures
You should back up databases and transaction logs frequently, and you should save the backups.
The frequency and type of backups you do depends on two factors: the acceptable amount of work that can be lost due to media or other failure, and the volume of transactions that occur on the SQL server. For systems that have little update activity and that are used primarily for viewing data, weekly database backups might be sufficient. For high-volume environments, database backups are needed daily and transaction logs hourly. The strategy chosen should fit your environment and provide adequate assurance of recovering needed data..
The following is an example of a typical backup schedule:
| Item | When to back up | Minimum time to keep back up |
|---|---|---|
| Transaction log | Hourly | Two weeks |
| Database and Transaction log | Every day | Two months |
The following table lists which resources need to be backed up:
| Item | Items to back up |
|---|---|
| Forms.dic | If your Microsoft Dynamics GP windows have been customized using the Modifier, back up all of your forms dictionaries when you install it, or monthly if you use the Modifier to make additional customizations. |
| Reports.dic | If you use Report Writer to modify or create reports, back up all of your reports dictionaries monthly as part of your system backups, or more frequently as changes are made. |
| Microsoft Dynamics GP database | Back up all tables in the database monthly as part of your system backup, or more frequently as changes are made. |
| Each of your company databases | Back up each company database daily. In addition, the documentation for other procedures, such as table maintenance, may prompt you to make a backup as well. |
| master database | The master database records all the system-level information for a SQL Server system. You should back this database up if you add databases and users to SQL Server. |
| msdb database | This is the database used by SQL Server Agent to store tasks. If you use SQL Server Agent to schedule automatic tasks, back up this database as part of your system backups. |
If database backups are performed online, they should be scheduled for times when the server is not being heavily updated, because the backups will slow the server somewhat. In addition, the backups should be performed on a fixed schedule. By using a fixed schedule, users will always know when the backup is occurring and can expect a slight delay in performance, or they can plan to do other non- serverrelated tasks during that time.
When to perform a database backup
It is important to back up a database either before or after the following procedures:
Creating a database
Each database should be backed up just after it is created, and on a fixed schedule thereafter. For example, if you create a database on Monday and wait until Friday afternoon to back it up, you risk losing a whole week's work if there is a media failure on Friday morning.
Performing an operation that isn't logged
You must back up a database any time you perform an operation that is not logged. If you don't, the transaction log backup isn't useful.
Database maintenance procedures
We recommend that you back up any affected tables before and after performing any database maintenance procedure that could possibly change your data. This includes Database Console Commands (DBCC) as well as the Update Statistics and Recompile functions within Microsoft Dynamics GP. Power fluctuation or hardware failure can cause detrimental damage to your data when performing these tasks.
Data recovery procedures
Back up all affected tables before and after performing data recovery procedures in case of power fluctuations or hardware failure during these processes. Back up data before restoring a backup in case you need to refer to it later or in case your current backup is damaged.
Updating or installing additional products
Back up your entire Microsoft Dynamics GP system before and after updating to a new version of Microsoft Dynamics GP or installing additional products. Power fluctuations and hardware failure can cause detrimental damage during an update. If your data is damaged before you update your system, you'll need to restore the backup to fix any damage.
Backing up your data
Use the Back Up Company window to back up data. You can store the backup file on your local hard drive, local network, or Microsoft Azure storage. Complete this procedure for each company you're backing up and for the system database. You also can use SQL Server Management Studio to back up data.
Only a system administrator can open the Back Up Company window to make backups. The Back Up Company window is only available when using a Microsoft Dynamics GP installation on the SQL Server.
To back up your data:
- Open the Back Up Company window.
(Microsoft Dynamics GP menu >> Maintenance >> Backup)
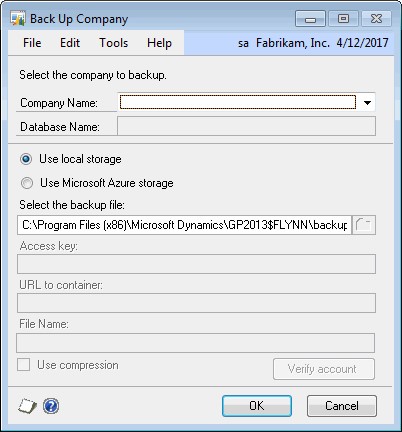
Select the company you want to back up, or System Database to back up system data.
Select the storage location. To use the Use Microsoft Azure storage option, you must be using SQL Server 2012 Service Pack 1 Cumulative Update 2 or later.
Important
Make sure to create a storage account and container if you want to use a Microsoft Azure storage location.
The path and file name of the backup file are displayed. You can modify the path and file name as needed.
If you have marked the Use Microsoft Azure storage option, enter the access key, URL to container, and the file name. Then, choose Verify Account to verify a connection to the Microsoft Azure storage location.
Click OK to make the backup. The window will be closed and a message will appear when the backup is complete.
Updating statistics
Use the SQL Maintenance window to reconfigure your data table keys for better performance.

Microsoft SQL Server updates statistics automatically. For more information, see your SQL Server documentation.
SQL Server and SQL Server Express uses statistics about key values to select which index or indexes to use to process queries. If there is a significant change in the key values in an index, you should update statistics for that index. You should also update statistics if a great deal of data in an indexed column has been added, changed, or removed.
A system administrator can update statistics if there are performance issues.
To update statistics:
- Open the SQL Maintenance window.
(Microsoft Dynamics GP menu >> Maintenance >> SQL)
Select a database and at least one table, and mark the Update Statistics option.
Choose Process.
Recompiling stored procedures
Use the SQL Maintenance window to adapt stored procedures to data tables with significant increases or decreases in data, resulting in better performance.
Note
Microsoft SQL Server recompiles stored procedures automatically. For more information, see your SQL Server documentation.
As you make changes to your database that affect statistics, your stored procedures may lose efficiency. By recompiling the stored procedures that act on a table, you can optimize queries. This optimization happens automatically in some cases. However, if a new index is added, the stored procedure isn't automatically optimized.
You can recompile stored procedures if you are having performance issues.
To recompile stored procedures:
- Open the SQL Maintenance window.
(Microsoft Dynamics GP menu >> Maintenance >> SQL)
Select a database and at least one table, and mark the Recompile option.
Choose Process.
Chapter 5: Database Maintenance Utility
You can use the Database Maintenance Utility for Microsoft Dynamics GP to reload database objects such as stored procedures and triggers.
This chapter contains the following sections.
Database Maintenance Utility overview
Reloading database objects
Database Maintenance Utility overview
You might be directed by the Microsoft Dynamics GP technical support team to reload database objects if, for example, a stored procedure was deleted. You can use the Database Maintenance Utility to reload database objects for selected databases and components.
A database contains tables that store data. A database also contains other database objects such as stored procedures, functions, views, and database triggers. You can use the Database Maintenance Utility to reload the following database objects.
| Database object | Definition |
|---|---|
| View | A view is a virtual table whose contents are defined by a query. Data for a view comes from other tables in the database. |
| Trigger | A database trigger is a special class of SQL stored procedure that executes automatically when an update, insert, or delete statement is issued for a table or view. |
| Stored procedure | A stored procedure is a group of SQL statements that are compiled and stored as a database object. |
| Function | A function is a command that returns a value. |
The process of reloading database objects deletes and reloads the objects in the selected databases and components. Any customizations you've made to objects, including Pre and Post procedures in eConnect for Microsoft Dynamics GP, are removed, as well. Before you reload database objects, you should make a backup of the system (DYNAMICS) and company databases. After reloading the database objects, you should reload your customizations.
Reloading database objects
Use the Database Maintenance Utility to reload database objects for selected databases and components. You might need to reload your database objects if, for example, a stored procedure is deleted.
If you are reloading stored procedures for eConnect for Microsoft Dynamics GP, you must select Microsoft Dynamics GP and Project Accounting, if installed, as the products to reload database objects for.
To reload database objects:
Make a backup of the system (DYNAMICS) and company databases.
Open the Microsoft Dynamics GP Database Maintenance Utility window.
(Choose Start >> All Programs >> Microsoft Dynamics >> GP >> Database Maintenance.)
You must be a member of the sysadmin fixed server role and be the only user connected to the database to reload database objects. For more information about the sysadmin fixed server role, refer to Microsoft SQL Server Books Online.
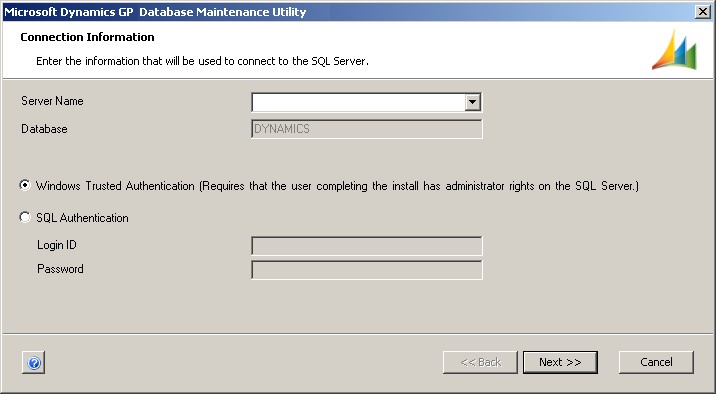
- Enter or select the server you want to access and select the security mode used to authenticate your server connection.
If you select the SQL Authentication option, enter your login ID and password.
Choose Next.
In the Select Database window, mark the databases to reload database objects for, and then choose Next.
In the Select Products window, mark the component or components to reload database objects for, and then choose Next.
In the Select Database Objects window, mark the database objects to reload, and then choose Next.
In the Confirmation window, review the selections you've made, and then choose Next to reload objects.
The Progress window appears, where you can view the status of the database objects.
In the Finish window, review the results of reloading database objects. If there are no errors, close the utility.
After restoring database objects, you will need to reload any database object customizations, such as Pre and Post procedures in eConnect.
If there are errors, such as the connection to SQL Server failed, you should verify that you are the only user connected to the database and select to reload the objects for that database again.
Chapter 6: Companies offline
You can take one or more companies offline for maintenance or administrative tasks, such as a year-end close or an update. As an administrator, you can select the companies that you want to take offline and select the user that will still have access to an offline company. You also can view how many users are currently logged in to the companies that you want to take offline and send a message to those users while they are using Microsoft Dynamics GP.
This information is divided into the following sections:
Assign a user for offline company access
Take a company offline
Sending a message to users currently logged in to an offline company
Assign a user for offline company access
When a company is offline, you might want a user other than the system administrator to be able to log in to the company. You can use the Company Setup window to assign a user who can still log in to the company while it's offline.
To assign a user for offline company access:
- Open the Company Setup window.
(Administration >> Setup >> Company >> Company)
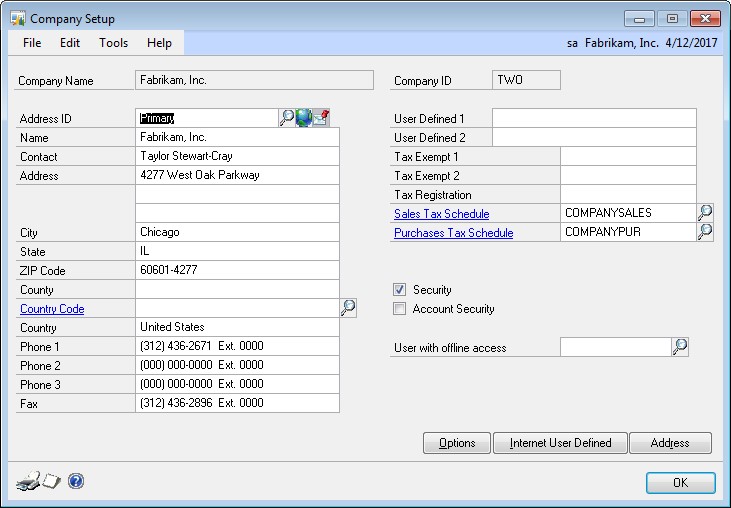
In the User with offline access field, select the user that will have access to the company when it offline.
Choose OK to save your changes and close the Company Setup window.
Take a company offline
You can take one or more companies offline for maintenance or administrative tasks, such as a year-end close or an update. You can use the Take Company Offline for Maintenance window to select the companies that you want to take offline. You also can send a default or custom message to the users who attempt to log in to a company while it's offline.
When a company has been taken offline, the current users can continue working in the company. Once those users log out of the company, they will not be able to log back in to the company unless they have offline access.
You must be an administrator to take a company offline.
To take a company offline:
- Open the Take Company Offline for Maintenance window.
(Administration >> Utilities >> System >> Take Company Offline)
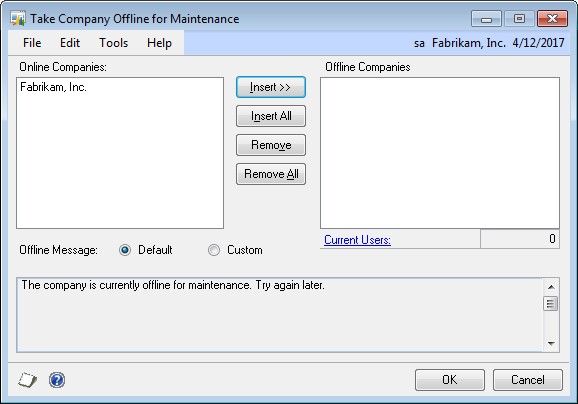
- Select a company and choose Insert to move it to the Offline Companies list. Choose Insert All to move all companies to the Offline Companies list.
To remove a company from the Offline Companies list, select it and choose Remove. Choose Remove All to remove all companies.
Click the Current Users link to open the User Activity window where you can view the users that are currently logged in to the companies that you want to take offline.
Select to send a default or custom message when users attempt to log in to the offline companies.
If you select the Custom option, enter the message that you want to send. For example, the message might state that the Fabrikam company is offline until 2 P.M. because of a year-end close.
- Choose OK to take the companies offline.
If there are uses logged in to the companies that are being taken offline, a message appears asking whether you want to send those users a message using the Send Message window. If you decide to send a message, the Send Message window appears. See Sending a message to users currently logged in to an offline company for more information.
Sending a message to users currently logged in to an offline company
You can use the Send Message window to send messages to users. You can select the users and type of message you would like to send. For example, you can send a task with reminder message of an upcoming event to all users or a "please log out of Microsoft Dynamics GP" notification message to users currently logged into a company that has been taken offline.
You must be an administrator to send messages to your users about an offline company.
To send a message to users currently logged in to an offline company:
- Open the Send Message window.
(Administration >> Utilities >> System >> Send Users Message)
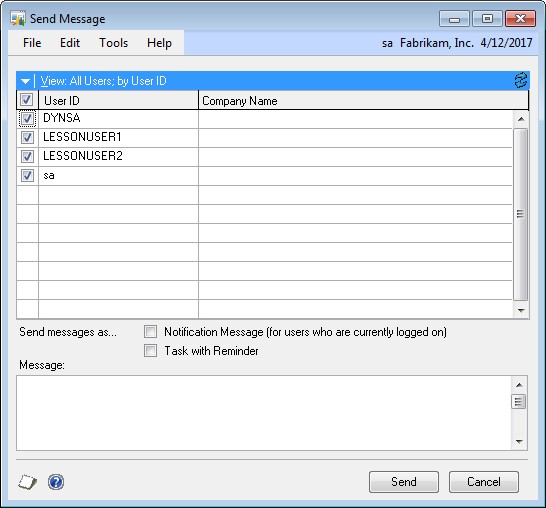
Select the users you want to send a message to.
Select how to send the message. You can send a notification message, a task with a reminder, or both.
Enter the message that you want to send. For example, the message might state that the Fabrikam company is offline while a year-end close is being run. This message is used for the notification message and the task.
Choose Send to send the message.
Chapter 7: Client updates
You can install updates on your client computers automatically by using the Manage Automated Client Updates window. You must be an administrator to use this window.
Client update information is divided into the following sections:
Client update overview
Setting up an update to install on client computers
Troubleshooting logging in to Microsoft Dynamics GP
Client update overview
When an update is available, you must install the update on one computer first before installing it on the client computers. An update can be a Microsoft Dynamics GP service pack or hotfix. An update also can be a .cnk file created by an independent software vendor or a customization developed by you or your partner. If an update is a service pack, you must use Microsoft Dynamics GP Utilities to update the database. If the update is a cnk file, you must start Microsoft Dynamics GP to include code.
If the update should be available to your client computers, you can place the update in a shared network location that each client computer has access to. Then, use the Manage Automated Client Updates window to set up the update to be installed automatically on your client computers. Multiple updates can be set up and applied to the client computers.
When a user logs in to Microsoft Dynamics GP on a client computer, the client version information is checked against the version information for the update. If an update is required, a message will instruct the user to install the update.
By choosing Yes, Microsoft Dynamics GP closes and the update process will begin. If the update has a .msp file extension, a progress window is displayed to show the status of the update. After the update is installed, the user can start Microsoft Dynamics GP again.
By choosing No, the update isn't applied and Microsoft Dynamics GP closes.
You can't use Microsoft Dynamics GP on the client computer until it is updated.
If an update isn't successfully installed on a client, a log file will be created that describes errors in the temporary directory for the client. The log file will use the name of the update file plus a .log extension. For example, if a service pack is named GP_SP1.msp, the log file will be named GP_SP1.log.
Setting up an update to install on client computers
Use the Manage Automated Client Updates window to set up an update to be installed automatically on your client computers. Multiple updates can be set up and applied to client computers. You must be an administrator to use this window.
Before you set up an update to be installed on client computers, you must apply the update to your server.
To set up an update to install on client computers:
- Open the Manage Automated Client Updates window.
(Administration >> Setup >> System >> Client Updates)
Enter or select the update name.
Specify whether the update should be automatically installed on the client computers the next time that users log in to Microsoft Dynamics GP.
Enter the Universal Naming Convention (UNC) path to where the update is located. The update must be located in a shared network location that each client computer has access to.
The file where the update will be installed must have either a .msp or .cnk extension.
- Choose Save.
When a user logs in to Microsoft Dynamics GP on a client computer and an update is required, a message will instruct the user to install the update. When the user chooses Yes, Microsoft Dynamics GP will close and the update process will begin.
Troubleshooting logging in to Microsoft Dynamics GP
If you have issues logging in to Microsoft Dynamics GP after installing an update, review the following information.
Client version information and database setup
You can't log in to Microsoft Dynamics GP on a client computer if a product installed on the client computer has different version information than the server. You can use the GP_LoginErrors.log file in your temporary directory (typically
C:\Documents and Settings\<user>\Local Settings\Temp\ GP_LoginErrors.log) to help resolve the version information issue. The log file will contain the product name, along with the dictionary and database versions.
To log in to Microsoft Dynamics GP or a company, the product must be installed on the server. If the database hasn't been set up, you can use Microsoft Dynamics GP Utilities to complete the database setup. You can use the GP_LoginErrors.log file in your temporary directory to determine which products aren't installed.
The following is an example of a GP_LoginErrors.log file.
GP_LoginErrors.log file
Product Name: Human Resources Error: Product is not installed to the database server Product Name: Fixed Assets Database Version 11.00.07 Client Version: 11.00.10
Updating Microsoft Dynamics GP with a .cnk file
An update for Microsoft Dynamics GP can be a .cnk file created by an independent software vendor or a customization developed by you or your partner. You can use the Manage Automated Client Updates window to set up a .cnk file to be installed automatically on your client computers. If the .cnk file has an .ini file, be sure that there is a carriage return after the build number in the .ini file. If there isn't a carriage return after the build number, you may have problems starting or updating Microsoft Dynamics GP.
Part 3: Distributed Process Server
Review this part of the documentation for information you need to set up and use the distributed processing features available with Microsoft Dynamics GP. The following topics are discussed:
Chapter 8, "Distributed Process Server overview," provides information on how you can use the process server in your Microsoft Dynamics GP system.
Chapter 9, "Process server configuration," provides information to help you decide which computers you'll use as process servers and how to set up your clients, servers, and process servers.
Chapter 10, "Remote processing setup," describes how to set up remote processing.
Chapter 11, "Processing and monitoring remote processes," describes how to start the process server, view tasks being completed, and view logged information about remote processes.
Chapter 8: Distributed Process Server overview
Review this information to become more familiar with what the Distributed Process Server is and how you can use it in your Microsoft Dynamics GP system.
The overview information contains the following sections:
Understanding process servers
Tasks that can be performed remotely
Using the Distributed Process Server
Load balancing and services
How the Distributed Process Manager handles load balancing
Distributed Process Server files
Distributed Process Manager file
Understanding process servers
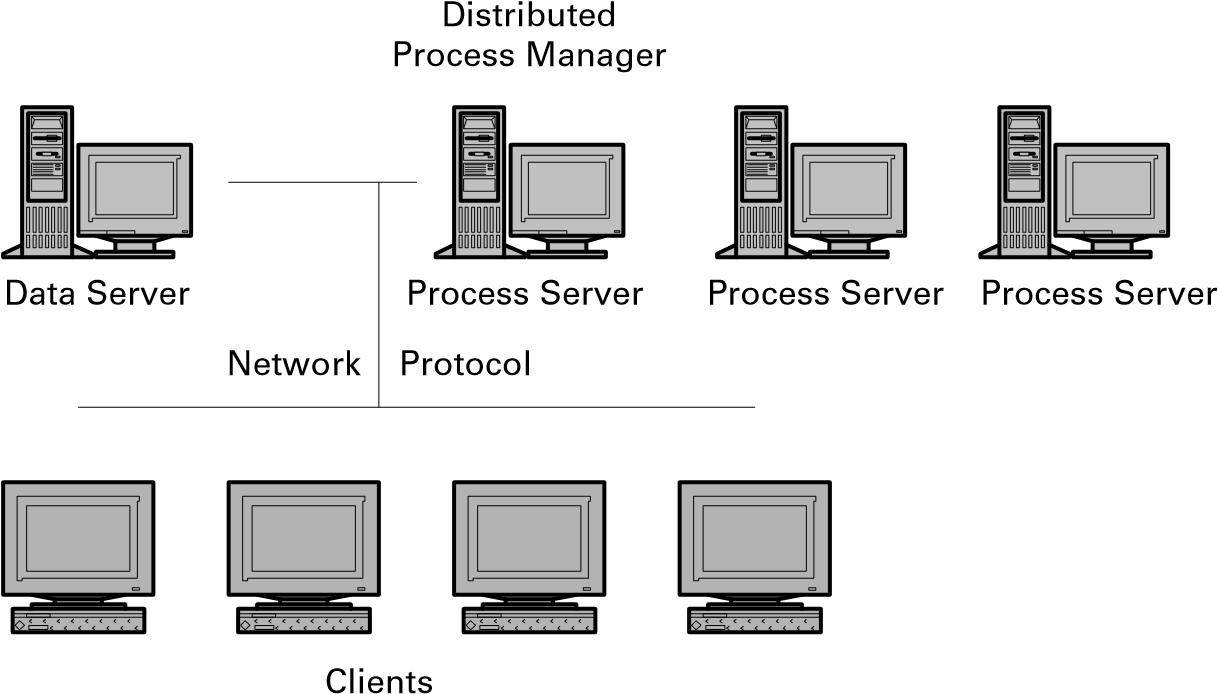
Distributed processing is the ability to send processes to other computers on a network. The Distributed Process Server, or DPS, helps you maximize the use of network processing power by allowing you to perform certain tasks that require a large amount of processing power on separate computers. This reduces the workload of client computers and improves Microsoft Dynamics GP performance. The client computer used for data entry will be immediately available to perform other tasks, so you don't have to wait to continue working while the task is completed, or work more slowly while the task is completed in the background.
The computers where you'll complete these processes are process servers, computers with high processing power. To take advantage of DPS, it's important that your process server be a computer with a fast processor and sufficient RAM, so that tasks can be completed as quickly as possible.
A computer you use as a process server can be a dedicated process server—a computer used only for remote processing—or a client computer that's also used for data entry or other tasks. However, to use the power of the process server as efficiently as possible, we recommend that process servers be dedicated. You can set up as many process servers as necessary, but may be limited by your network protocol.
To set up a computer as a process server, install the standard Microsoft Dynamics GP client applications. (Refer to the Installation Instructions documentation for more information.) Then you'll specify which computers in your system are process servers, and which tasks will be completed on those process servers. Sending a task to a process server is called processing a task remotely, or remote processing.
Verify the data source name in ODBC. You must use the same data source name (DSN) in ODBC for all client workstations and process servers in order for distributed processing to work successfully. (A data source includes the data a user wants to access and the information needed to get to that data. An example of a data source is a SQL Server database.) For more information about setting up ODBC data sources, refer to your Microsoft Dynamics GP Installation Instructions documentation.
Tasks that can be performed remotely
Tasks within Microsoft Dynamics GP that have a specific start and end point and that you don't need to continue monitoring by choosing a response in a dialog box,
or by interacting with the process in other ways, can be processed remotely. Because you can't interact with the process once it's sent to a process server, any alert messages that may be generated during the process will be saved in the Process Server Activity Table.
After you've assigned processes to process servers, each user can then choose to perform remote processes locally, on the designated process server, or on a specified service (a group of one or more process servers).
Tip
To view all the tasks within Microsoft Dynamics GP that can be processed remotely, see the DPS Setup window (Administration >> Setup >> System >> Process Server).
Using the Distributed Process Server
The Dps.exe application is installed on each client computer when you install Microsoft Dynamics GP. If you're using the load balancing feature, be sure the Distributed Process Manager application—Dpm.exe—is running, as well. The Dpm.exe application also is installed automatically on each client computer. For more information see Load balancing and services.
Complete the task, such as posting batches or printing reports, as you typically do.
The task will be processed on the process server you've designated during setup. For more information, see Designating process servers.
In the User Preferences window, you must select Remote as the Distributed Processes option to process tasks remotely. You can use the Process Monitor window on your client computer to view the tasks currently assigned to each process server. You also can use the Process Monitor window on the process server to view all processes being completed on that computer.
You don't need to monitor a process while it's being completed. Instead of displaying any dialog boxes that might appear if you were processing a task locally, DPS records the information about the message in a file, which you can view after the task is completed. If an interruption, such as a power outage, occurs while processing is occurring, DPS will record the error that occurred in an error log file.
If you want to record the start and end times of remote process activity in the
Process Server Activity Table, mark the Track Start and End Times option in the DPS Setup window. If you didn't mark the Track Start and End Times option, only alert messages will be recorded in the table.
Load balancing and services
When several computers on a network are running the process server, maximum processing power is achieved by evenly distributing the processing load to those computers. This concept is called load balancing.
If you use two or more process servers, you can use a service to take advantage of load balancing. A service is simply a group of process servers. When load balancing is implemented, you can send remote processes to a service rather than to a specific server. The Distributed Process Manager (DPM), the application that manages load balancing, will route the process to the server with the lightest processing load in the service.
A process server can be assigned to more than one service. (For more information, see Creating a service on page 57.) This allows you to direct more processes to the most powerful computers running the process server. For example, if a server is part of the Reports service and the Posting service, it will be used for processes sent to either service.
How the Distributed Process Manager handles load balancing
The Distributed Process Manager (Dpm.exe) is the application that manages the interaction between clients and process servers. The Dpm.exe application is installed automatically on the computers in your Microsoft Dynamics GP system. The following is a description of how DPM manages the load balancing process.
DPM is started. You must keep DPM on after you start it.
Process servers are started. When you start each process server, the server is registered with DPM.
Clients are started. When each client machine is started, the setup information for servers and services is read and registered with DPM.
Processes are sent to services. When a client sends a process to a service, it asks DPM which server the process should be sent to. DPM examines the current processing load for the servers in the specified service, and tells the client to send the process to the process server with the lightest load.
If load balancing isn't enabled or DPM isn't operational, the process will be sent to the first server in the specified service. If no process servers are available, the process will be processed locally on the client.
- Process servers and clients are shut down. When a process server is shut down, it tells DPM that it is no longer available. When the process server is restarted, it will re-register with DPM and be available for processing.
Distributed Process Server files
When you install Microsoft Dynamics GP, the Distributed Process Server and the Distributed Process Manager are installed automatically on each computer. The following table lists the components of the process server.
| Application files on each process server |
|---|
| Dynamics.exe (runtime engine) Dynamics.dic Dex.dic Dps.exe (Distributed Process Server engine) Dpm.exe (Distributed Process Manager engine) |
You can delete the Microsoft Dynamics GP runtime engine from the process server; however, we recommend that you leave it so that you can start Microsoft Dynamics GP on the process server, if necessary, to perform table maintenance or other procedures.
Microsoft Dynamics GP will allow multiple instances of the a process server to operate from the same client system. In a high-performance, multiprocessor system, this type of setup can increase performance dramatically. For more information, see Multiple instances of DPS on the same client.
Distributed Process Manager file
The DPM is the application that tracks activity on all clients and process servers. When a process is sent to a service, the DPM application determines which process server has the lightest processing load and assigns the process to that process server. When you install Microsoft Dynamics GP, Dpm.exe is installed automatically on each computer.
To use load balancing with Microsoft Dynamics GP, you must use the Distributed Process Manager application. The DPM computer can be a client, data server, or process server. We recommend that it be extremely reliable and not subject to processing interruptions; if the Dpm.exe application is shut down unexpectedly, all remote processes and process servers can be affected.
For more information on system requirements for the Distributed Process Manager, see the Installation Instructions documentation.
Chapter 9: Process server configuration
Use this information to help you determine the types of computers you'll use as process servers and how to set up your Microsoft Dynamics GP clients, servers, and process servers.
*For information about system requirements for process servers, see Core system requirements for Microsoft Dynamics GP.
The process server configuration information contains the following sections:
Process server configuration guidelines
DPS using services
DPS on dedicated servers
DPS on the data server
DPS on a client
Process server configuration guidelines
The best way to set up process servers depends on a variety of factors, including the processing speed and RAM of all computers in your system, and network traffic. Each system has unique circumstances and requirements. Typically a configuration with one or more services, each containing three or more process servers, results in the fastest and most efficient processing.
The following information describes different ways you can set up process servers. If performance isn't satisfactory in one configuration, you may want to try a different configuration, which may improve performance. You may find that a combination of these configurations works best for your circumstances. You can set up as many process servers as necessary—as many as your network protocol allows.
The possible configurations are as follows:
DPS using services
DPS on dedicated servers
DPS on the data server
DPS on a client
DPS using services
Typically, the best way to process tasks remotely is to use two to three or more process servers to form one or more services. If you simply assign processes to different process servers, one process server may have several processes in its queue while another process server is idle. With a service, you'll use the Distributed Process Manager to determine which process server in a group the remote process should be sent to.
To decide how many computers to use in a service, evaluate the number of users who will be processing tasks remotely, the processing speed of the computers you'll use, and the length of the tasks you want to complete, such as financial reports. In addition, consider whether it's important that the tasks be completed as quickly as possible, or whether you simply want them to be completed on computers other than your client computers.
For instance, if you have two Pentium class 2.8 GHz computers and two Pentium class 3 GHz computers, you may want to create two services, one containing the Pentium class 2.8s and one containing the Pentium 3s. You'd then send tasks that need to be done quickly and which typically take more time to the Pentium class 3 service, and other processes to the Pentium class 2.8 service.
If it doesn't matter which tasks are completed more quickly, then you may want to create one service containing all four computers.
To determine how many process servers you'll need, estimate how many process servers could be kept completely busy by the processes you'll complete remotely, then add one computer to that number, and group them in one or more services.
The following illustration represents one service containing three process servers:
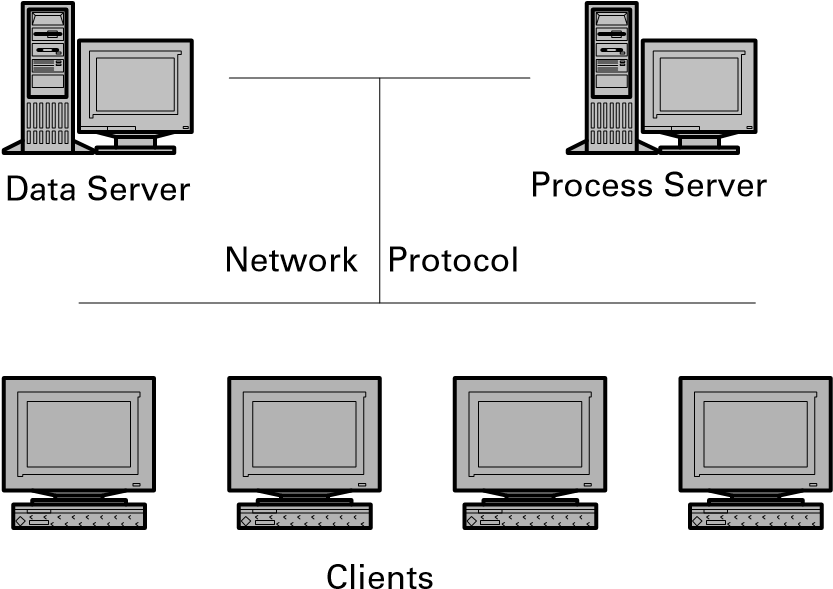
DPS on dedicated servers
If you use one computer for your data server and separate computers for your process servers, processing power won't need to be shared between data processing tasks such as data entry, and remote process tasks such as posting or printing.
The following illustration represents the DPS on a separate process server.
DPS on the data server
Network traffic will be reduced in this configuration, since data processing and remote processing will be performed on the same computer.
If the data server runs at capacity or close to capacity, you should set up separate process servers to decrease the data server load and complete remote processes more quickly.
DPS on a client
You can use any client in your Microsoft Dynamics GP system as a process server, even if you use it for data entry. To make a client a process server, install the DPS engine and assign processes to it.
If you use this configuration, performance will likely be slower than in a system with dedicated process servers. The client you use as a process server shouldn't be used for frequent data entry; if it's used for data entry only during the day, for instance, you can use it for remote processes you complete overnight.
Chapter 10: Remote processing setup
When you set up remote processing for your system, you'll specify which tasks will be completed on the process servers, and which process servers will be grouped in services.
The processing setup information is divided into the following sections:
Multiple instances of DPS on the same client
Designating process servers
Removing a server
Creating a service
Removing a service
Setting up remote processing
Enabling remote processes
Setting up printers for remote processing
Setting up report destinations for remote processing
Setting up reports dictionaries for remote processing
Multiple instances of DPS on the same client
Microsoft Dynamics GP will allow multiple instances of the process server to operate from the same client system. In a high-performance, multiprocessor system, this type of setup can increase performance of the system dramatically.
Each instance of the DPS on the client needs its own separate copy of the Microsoft Dynamics GP client code in its own directory:
First instance of DPS C:\DPS1 Second instance of DPS C:\DPS2 Third instance of DPS C:\DPS3
The following line must be added to the Dex.ini file in each of the above listed directories:
C:\DPS1\Dex.ini DPSInstance=1
C:\DPS2\Dex.ini DPSInstance=2
C:\DPS3\Dex.ini DPSInstance=3
Once these changes are made, define the DPS instances in the DPS Setup window or the DPS Server Setup window. Each instance should be given the host name of the DPS machine, followed by the "#" symbol and the instance number.
Server1#1 (for DPS1) Server1#2 (for DPS2) Server1#3 (for DPS3)
The instances can then be assigned to a specific task, or to one or more services.
Designating process servers
Use the DPS Server Setup window to enter the host names of the computers you'll use as process servers. A host name is the unique name by which a computer is known on a network.
To designate process servers:
- Open the DPS Server Setup window.
(Administration >> Setup >> System >> Process Server >> Servers button)
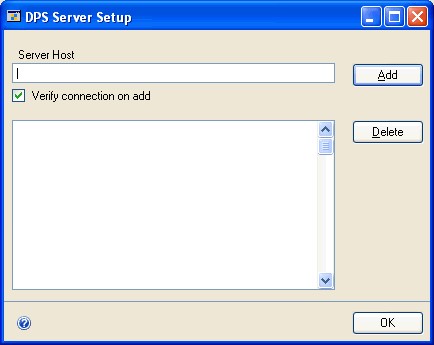
Type the host name (sometimes known as the computer name) of a process server you'll use in the Server Host field.
Mark the Verify Connection On Add option to verify that you can connect to that process server from the computer you're currently using.
Choose Add.
If the connection is working and the process server is active, the server host name will be added to the list. If not, a message will alert you that the computer can't be contacted. Verify that you entered a valid host name; if necessary, refer to the network protocol information in your Installation Instructions documentation and the documentation provided with your network protocol to determine the cause of the problem.
SIf the Verify Connection On Add option isn't marked, the server will be added to the list even if you can't currently contact the process server.
- Repeat these steps to add the host name of each computer you'll use as a process server, then choose OK to return to the DPS Setup window.
Removing a server
To remove a server, select it in the DPS Setup window and choose Delete. It will be removed from the list and from any service it's part of. If you make any modification to a service, such as deleting a server, restart the Distributed Process Manager.
Creating a service
Use the DPS Service Setup window to create groups of process servers called services. Typically, the best way to process tasks remotely is to use two or more process servers to form services. With a service and Microsoft Dynamics GP, you can use the Distributed Process Manager to determine which process server in a service the process should be sent to.
To create a service:
- Open the DPS Service Setup window.
(Administration >> Setup >> System >> Process Server >> Services button)
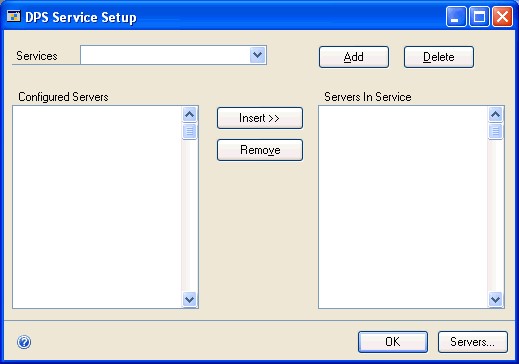
Type the name of the service in the Services field.
Choose the Add button. The names of the process servers you've set up will be listed in the Configured Servers list.
Select each process server you want to add to the service and choose Insert.
You can create as many services as you need. A server can belong to more than one service. To create additional services, repeat steps 2 through 4.
- Choose OK to return to the DPS Setup window.
Removing a service
To delete a service, open the DPS Service Setup window, select the service in the Services list and choose Delete. If you make any modification to a service, such as deleting a server, restart the Distributed Process Manager.
Setting up remote processing
Use the DPS Setup window to specify which processes you want to complete on process servers, such as batch posting and printing reports for each client.
Before you begin, be sure you've set up process servers and services. You can enter servers in the DPS Setup window without setting them up in the DPS Server Setup window, but the existence of those servers won't be verified.
To set up remote processing:
- Open the DPS Setup window.
(Administration >> Setup >> System >> Process Server)
In the DPS Setup window, select the series for the processes you want to set up for remote processing, or select All to display all processes.
Mark the box in the Remote column by each process that you want to assign to a process server. If you want all the available processes for the selected series to be processed remotely, choose Mark All. If you want to deactivate remote processing for all processes, choose Unmark All.
These processes will be processed remotely only if the user has chosen to process them remotely, using the User Preferences window. For more information, see Enabling remote processes on page 59.
- Enter the server ID (host name) or service where each task will be processed.
If you've entered servers in this window without setting up the servers in the DPS Server Setup window, the existence of those servers won't be verified. All services you enter must have been set up already in the DPS Service Setup window.
If more than one instance of Distributed Process Server exists on a process server, specify which instance of DPS you're using on the server. For example:
Server1# (for DPS1) Server1#2 (for DPS2)
For more information about multiple instances of Distributed Process Server, see Multiple instances of DPS on the same client.
- Mark the Track Start and End Times option if you want to record the start and end times of remote process activity in the Process Server Activity Table. If this option isn't marked, only alert messages will be recorded in the table.
Note
The Process Server Activity Table can become large in a short time if you choose to track the start and end times of all processes.
See Chapter 11, "Processing and monitoring remote processes, for information about viewing, printing, and removing the information in the Process Server Activity Table.
- Mark the Enable Load Balancing option if you're using services.
The Manager Host field will appear if Enable Load Balancing is marked; enter the host name of the computer where you are using the Distributed Process Manager. At this point, the DPS Setup window should resemble the following illustration:
When you have finished marking processes and entering server IDs for the selected series, select another series and set up the processes you want to distribute to a remote processor or service.
When you've finished entering setup information for all series, choose OK to save the entries and close the window.
To review the process information you've entered, choose File >> Print while the DPS Setup window is displayed to print the Process Server Setup List.
Enabling remote processes
Use the User Preferences window to enable remote processing for each user. You must complete this procedure for each user who will use remote processes.
If the processes are set to process locally, then the entries in the DPS Setup window are ignored and the processes will occur on the local computer.
To enable remote processes:
- Open the User Preferences window.
(Home >> User Preferences)
Mark Local or Remote for the Distributed Processes option.
Choose OK to save the information you've entered and close the User Preferences window.
Setting up printers for remote processing
Once you begin a remote process, no additional input—such as responding to dialog boxes or specifying print destinations—is required. All processes sent to a printer will be printed to the default printer for the corresponding process server; users can't specify the printer when they begin the process. For this reason, you may want to set up several process servers if it's important that certain processes be sent to a specific printer. For more information about printers, see Chapter 2, "Printers.
Setting up report destinations for remote processing
If any of the following situations apply to your system, be sure your report file locations are set up correctly.
If you print reports to files on process servers, the files should be stored on the process server. If you enter C:\Microsoft Dynamics GP\Report.txt as the report file name, for instance, the report will be stored on the C: drive of the process server, not the C: drive of the client you used to begin the process.
In addition, be sure you don't print reports to the screen if the report will be processed remotely. Typically, the Screen option won't be available if you've set up a process to be performed remotely. However, if you set up a report to be printed to the screen and processed locally, then decide to process it remotely, you must change the report destination, as well.
You might receive a path not valid error if the folder location is on your process server, but not on your client computer.
Use the Posting Setup window to set up report destinations for reports you want to print. For more information refer to your System Setup documentation (Help >> Contents >> select Setting Up the System). Be sure that you set up report destinations in this window according to these guidelines.
Setting up reports dictionaries for remote processing
When you use Report Writer to create a primary copy of a report, it is stored in a dictionary file called Reports.dic. (Reports.dic is the name of the Microsoft Dynamics GP reports dictionary; reports dictionaries for integrating products have different names.) You can process only primary copies of reports on process servers; secondary copies and custom reports can't be processed remotely.
For information about creating primary copies and configuring reports dictionaries, refer to your Report Writer documentation.
If the processes that you complete remotely contain reports that are primary copies—for instance, if you're using a primary copy of a posting journal—the process server must be set up to access the correct reports dictionary. This may be on the client, at a network location, or on the process server.
If you're using two or more reports dictionaries—for instance, if each user has a separate local reports dictionary—you'll need to set up your process servers so that each one accesses the correct reports dictionary.
Modified reports
If you want to process primary copies of reports remotely, the client and server must access the same reports dictionary. For instance, if a user's launch file on a client lists J:\Microsoft Dynamics GP as the location for the reports dictionary, the launch file on the process server must specify that location for the reports dictionary, as well. If the process server can't access the reports dictionary where a primary copy is stored, the original report will be printed instead.
You can allow users to print primary copies remotely by storing a reports dictionary on a process server. If you store the reports dictionary on the process server, printing will be faster than if it's stored at the user's computer.
To be sure the process server is accessing the correct reports dictionary, open the launch file. The launch file, typically called Dynamics.set, contains the location of the application dictionaries, forms dictionaries, and reports dictionaries you're using. In the following example, the reports dictionary is stored at a central network location.
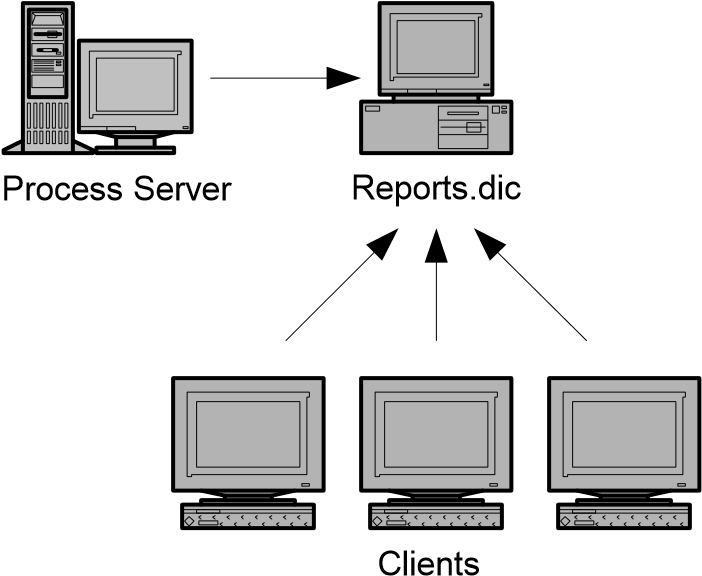
To edit the launch file, you can use the Edit Launch File window in Microsoft
Dynamics GP, or edit the file using a text editor. See Editing a launch file using the Edit Launch File window on page 80 and Editing a launch file using a text editor on page 82 for instructions.
To open the Edit Launch File window: Start Microsoft Dynamics GP (not DPS) on the process server. Choose Administration >> Setup >> System >> Edit Launch File.
To edit using a text editor in Windows, use Notepad.
One reports dictionary that all users access
If you're using one reports dictionary that all users access, be sure that the launch file on each process server contains the location of that reports dictionary. In the following example, all clients and process servers access a dictionary stored at a network location.
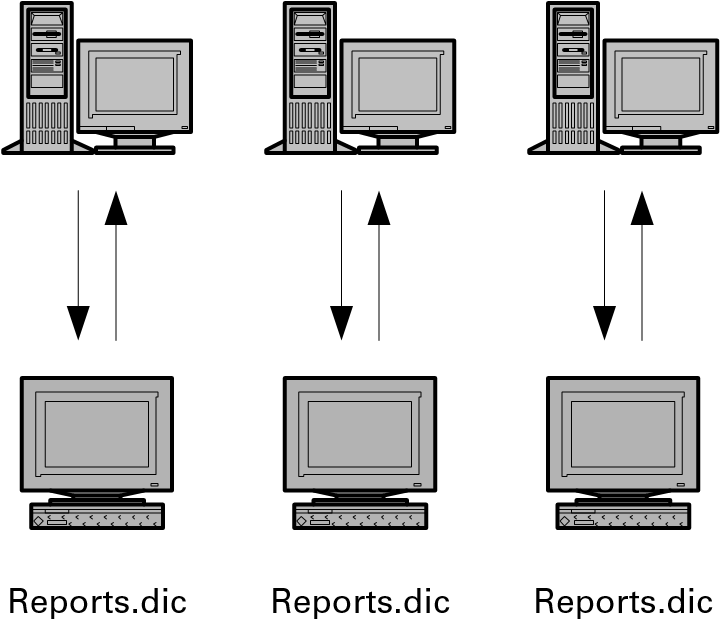
You also can store the reports dictionary on the process server, to reduce network traffic.
Two or more reports dictionaries
If you're using two or more reports dictionaries, you can use one process server for each user, or have some users process tasks only locally (see Enabling remote processes on page 59).
In the following example, each client accesses its own process server, so that the client and process server use the same reports dictionary.
In the next example, the first and third clients process locally all tasks that include primary copies of reports. The second client remotely processes tasks including primary copies, and the process server accesses that client's report dictionary.
Reports.dic Reports.dic Reports.dic
Chapter 11: Processing and monitoring remote processes
Use the following information to learn how to start the Distributed Process Manager, view tasks being completed, and view logged information about remote processes.
The information contains the following sections:
Starting the Distributed Process Manager
Monitoring background processes
Viewing process detail
Viewing process information
Removing and printing remote process information
Starting the Distributed Process Manager
When you've configured your process servers and are ready to begin using your multiuser system, follow the instructions in this procedure to start the components of the system in the correct order.
To start the Distributed Process Manager:
Shut down the computer where you are using the Distributed Process Manager, all process servers, and all client computers.
Start the computer where you are using DPM, and launch the Distributed Process Manager. (On the DPM computer, double-click the DPM icon or drag the Dynamics.set file onto the Dpm.exe file.)
Start each process server computer.
Start each client computer.
Launch Microsoft Dynamics GP on each client computer.
Monitoring background processes
The Process Monitor window displays the Microsoft Dynamics GP processes (such
as printing reports and posting journals) being performed locally in the background, or remotely by process servers.
To monitor background processes:
- Within Process Server, open the Process Monitor window.
(Microsoft Dynamics GP menu >> Process Monitor or drag the Dynamics.set file onto the Dps.exe file on the client.)
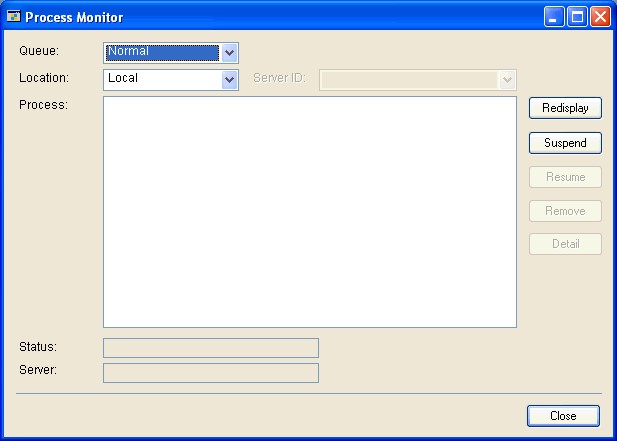
The name of the processes will be displayed in the Process list. The currently active process will appear at the top of the list. The number of steps in each process in the list is displayed in parentheses next to the process name.
Select whether to view Timed or Normal processes. Timed processes are those scheduled to be performed on a particular date and time, or to recur at a predefined interval.
Select a location you want to view processes for. You can select local, remote, or process server.
Local Allows you to view a list of processes initiated from the current workstation that are being performed locally, at the workstation.
Remote Allows you to view a list of processes initiated from the current workstation that are being performed by any of the process servers accessed by the current workstation.
Process Server Allows you to view a list of all processes currently being performed by a specific process server, regardless of which client sent the process to that process server. If you select Process Server as the location, you will not be able to view process details in the Process Detail window.
If you've selected Process Server as the Location, specify the server for which you want to display processes. If you're using the Process Monitor window on the process server computer, you can view only the processes performed on that server—Local.
To view information about any process in the list, highlight the process; the status will be displayed below the list. The name of the server also will be displayed.
The following are possible statuses:
| Status | Description |
|---|---|
| Active | The process is currently processing. |
| Ready | The process is queued and awaiting activation. |
| Error | An error has occurred and the process has been canceled. |
- To pause all processes being performed locally in the background, choose Suspend. To restart all background processes, choose Resume.
You can suspend only the processes being performed locally in the background; not any processes on process servers. If you are using the Process Monitor window on the process server, you can suspend the processes on that server.
- To remove processes, highlight the process and choose Remove. You can remove reports from the queue as long as they aren't currently active.
Processes that can be removed are indicated with a ">" sign:
> General Ledger: Trial Balance Report(2)
To view detailed information about a process, choose the Detail button The Process Detail window will appear, displaying detailed information about the selected process. For more information, see Viewing process detail on page
To update the process list, choose Redisplay.
Viewing process detail
Each process can involve several steps. For example, the check link process involves checking links, checking the error log, and printing an error report. The number of steps in each process in the list will be displayed in parentheses next to the process name in the Process Monitor window.
If you select Process Server as the location in the Process Monitor window, you will not be able to view process details in the Process Detail window.
To view process detail:
To view detailed information about a process, select the process in the Process Monitor window and choose Detail. The Process Detail window will appear, displaying detailed information about the selected process.
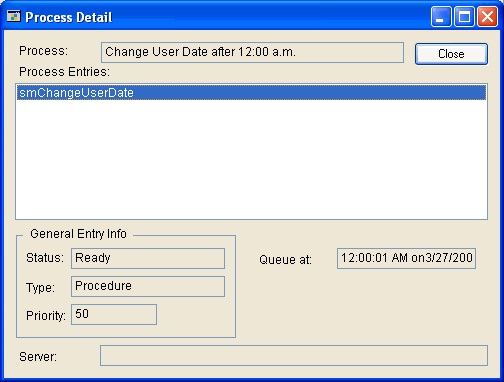
If the process is a procedure, only the name of the procedure will appear in the window. A procedure is a script that can be called from other scripts to perform a common function. If the process is a group of steps, each step in the process group will appear.
To view information about any step in the list, highlight the step; the status of the step and its type (report or procedure) will be displayed below the list.
Timed Entry Info fields only appear if the currently highlighted process entry is a recurring or scheduled process.
Viewing process information
The Process Server Inquiry window shows information about the outcome of processes that have been sent to process servers. Processes that weren't completed because an error occurred will be displayed. For example, as a process is performed by a process server, any alert messages generated by the process are recorded in the Process Server Activity Table.
Processes that are waiting to be performed by process servers will not be displayed; to view these processes, use the Process Monitor window.
To view process information:
- Open the Process Server Inquiry window.
(Administration >> Inquiry >> System >> Process Server)
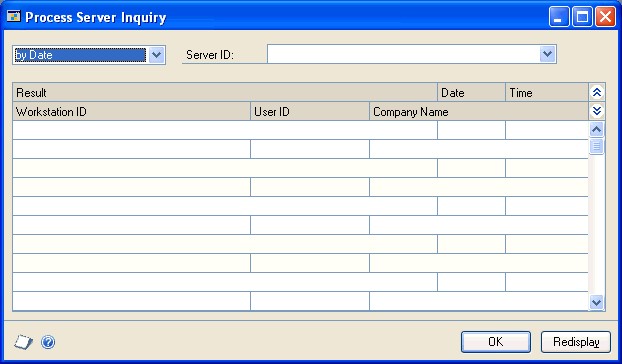
Select a sorting option. You can view information about the processes sent to this server by date or by user ID.
Select the ID of the server.
Choose the Redisplay button to update the list. The start and end times of remote activities will be displayed if you marked the Track Start and End Times option in the DPS Setup window.
You can use the Remove Process Server Detail window to remove or print the information displayed in this window. Only the information that's been written to the Process Server Activity Table since the last time you removed data from the table will be displayed. See Removing and printing remote process information on page 69.
Removing and printing remote process information
Use the Remove Process Server Detail window to remove records from the Process Server Activity Table, print a report detailing the information in the table, or both.
When a process is performed by a process server on your network, information about the outcome of that process is recorded in the Process Server Activity Table. This information includes any alert messages that occurred while the task was processed. The table size can increase very quickly if many activities are performed by process servers, especially if you have the Track Start and End Times option marked in the DPS Setup window, so you may need to remove data from the table periodically.
Before removing process server detail, back up your company's data.
To remove and print remote process information:
- Open the Remove Process Server Detail window.
(Administration >> Utilities >> System >> Process Server)

- Enter server and date restrictions by selecting Server ID or Date from the Ranges listing and enter a range in the From and To fields. Choose Insert and the range will appear in the Restrictions box.
If you don't specify any server or date restrictions, all records will be included. You can enter only one range of dates and one range of server IDs.
Select whether to remove records, print a report, or both. You can print the Process Server Log Report without removing records by selecting only the Print Report option.
Choose Process to print the report and remove records.
Part 4: Technical reference
This part of the documentation contains technical information on how Microsoft Dynamics GP runs. In it, you'll find detailed information about integrating products, launch files, and defaults files.
The following topics are discussed:
Chapter 12, "Integrating products," provides an overview of the multidictionary environment.
Chapter 13, "Launch files," provides information about how to use, create, and edit launch files.
Chapter 14, "Defaults files," describes how to use and edit the Dex.ini file, which contains setup and operating information about Microsoft Dynamics GP.
Chapter 12: Integrating products
Microsoft Dynamics GP can be used with other programs, called integrating products, that work simultaneously with Microsoft Dynamics GP. Integrating products provide an additional application dictionary that works with the Microsoft Dynamics GP engine and other files to present a functioning integrating application. Since two or more application dictionaries can be used, this system is called a multidictionary environment.
The integrating products information is divided into the following sections:
Types of dictionaries
Multidictionary environment example
Modifying reports for an integrating product
Modifying windows for an integrating product
Types of dictionaries
An application dictionary contains all the resources that make a product unique, including its windows, reports, and how it works. In the multidictionary environment of Microsoft Dynamics GP, you'll use two types of application dictionaries:
A main dictionary is used to access resources in integrating dictionaries. The Microsoft Dynamics GP application dictionary (Dynamics.dic) is always considered the main dictionary in a multidictionary environment.
An integrating dictionary contains information about an integrating product and runs simultaneously with the main dictionary. Integrating dictionaries may access Microsoft Dynamics GP resources, such as fields or reports, as well as their own resources. All application dictionaries that operate with Microsoft Dynamics GP in a multidictionary environment are considered integrating dictionaries.
When you install each integrating product, information about it is added to the launch file (typically Dynamics.set) so that the product will be started with Microsoft Dynamics GP. For more information about launch files, see Chapter 13,
"Launch files."
Multidictionary environment example
In this example, the application dictionary for Microsoft Dynamics GP is the main dictionary in a multidictionary environment with two integrating dictionaries.
The runtime engine is used to interpret each dictionary.
The main dictionary in a multidictionary environment.
Integrating dictionaries contain separate resources and also can access resources in the main dictionary.
A launch file lists the application dictionaries.
Modifying reports for an integrating product
Each application dictionary has its own reports dictionary, where reports modified and created using Report Writer are stored. The reports dictionary for Microsoft Dynamics GP is called Reports.dic. Dictionaries for other products can have other names, but must use the extension .DIC. The locations of the reports dictionaries for other products are stored in the launch file, as well.
When you've installed integrating products, you must select which products' reports you want to modify when you use Report Writer. For more information, refer to your Report Writer documentation.
Modifying windows for an integrating product
Each application dictionary has its own forms dictionary, where modified windows are stored. The forms dictionary for Microsoft Dynamics GP is called Forms.dic; dictionaries for other products can have other names, but must use the extension .DIC. The locations of the forms dictionaries for other products are stored in the launch file, as well.
When you've installed integrating products, you must select which products' windows you want to modify when you use the Modifier. For more information about the Modifier and the forms dictionaries, refer to your Modifier User's Guide documentation. For more information about setting access to modified windows and reports, refer to your System Setup Guide (Help >> Contents >> Select Setting up the System).
Chapter 13: Launch files
A launch file is used to list each product and the locations of its application dictionary, forms dictionary, and reports dictionary. The launch file indicates which dictionaries and products should be started when you start Microsoft Dynamics GP.
Launch files are located only on client computers, or data servers that also can be used as clients, because dictionaries are installed only on clients.
The launch files information contains the following sections:
Launch files overview
Where to store dictionaries
Lines in a launch file
Example launch file using integrating products
Example launch file using multiple location IDs
Example launch file using central dictionaries
Creating a launch file
Editing a launch file using the Edit Launch File window
Editing a launch file using a text editor
Troubleshooting launch files
Launch files overview
Launch files are located only on client computers, or data servers that also can be used as clients, because dictionaries are installed only on clients. Each client has a separate launch file for each product you install. This allows each computer to have different instructions for starting Microsoft Dynamics GP, if necessary. You can create additional launch files or modify an existing file.
A launch file for Microsoft Dynamics GP with local dictionary locations is created each time you install Microsoft Dynamics GP or its engine. A launch file for Microsoft Dynamics GP Utilities with local dictionary locations is created each time you install either application.
When you start Microsoft Dynamics GP, you indicate the launch file you're using by double-clicking a program item that lists the Microsoft Dynamics GP engine and the corresponding launch file in its properties. You also can start Microsoft Dynamics GP by dragging the launch file, typically Dynamics.set, over the Microsoft Dynamics GP engine file, Dynamics.exe. The engine reads the launch file to determine which dictionaries will be used, then opens those dictionaries to present the functioning application.
A separate launch file is also created for Microsoft Dynamics GP Utilities and functions the same way, except that integrating products can't be used. When you drag the Dynutils.set file (the launch file for Microsoft Dynamics GP Utilities) over the engine, the resources in the Microsoft Dynamics GP Utilities application dictionary (Dynutils.set) will be used.
If you're using two or more launch files to use Microsoft Dynamics GP in different configurations, you can modify the existing Microsoft Dynamics GP item's or shortcut's properties, create additional items or shortcuts that will access other launch files, and modify the Microsoft Dynamics GP item or shortcut so that you can select the launch file you want to use each time you start Microsoft Dynamics GP.
You can view the contents of any launch file (any file with a .SET extension) using a text editor such as Notepad; make changes, if necessary, then close. Be sure to start Notepad and then open the file, rather than double-clicking the file; double-clicking the launch file will start the corresponding application.
We do not recommend using Write for Windows to open a launch file.
Where to store dictionaries
Depending on the server you are using and how your network is set up, you can store forms and reports dictionaries locally on each client, on the server, or on a network volume. To store dictionaries on a network volume, the necessary volumes must be set up correctly and using the appropriate network software in order to allow the Microsoft Dynamics GP engine on each client to locate forms and reports dictionaries on the network. The Dynamics.dic and the Microsoft Dynamics GP engine must be on the client. Refer to your operating system documentation for information about connecting volumes in a network. If your system hasn't been set up to allow client computers to access files other than Microsoft Dynamics GP tables on the server or network volumes, you must store dictionaries locally on all clients.
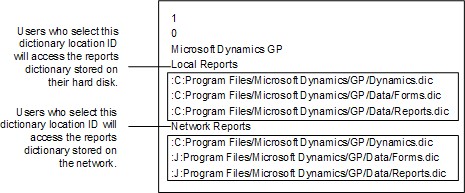
We recommend that you always store application dictionaries locally for best performance; storing forms and reports dictionaries locally improves performance, as well. For more information, see your Report Writer documentation and the Modifier documentation.
Lines in a launch file
A launch file is composed of a number of lines, depending on whether you're using only Microsoft Dynamics GP, or integrating products, as well. In the launch files for Microsoft Dynamics GP and Microsoft Dynamics GP Utilities, the forms and reports dictionary lines must be included, but don't affect how either application works. Some lines in the Microsoft Dynamics GP Utilities launch file may not contain dictionary locations until after you start each application for the first time.
The following information shows all the line information that could appear in the Dynamics.set file.
| Line | Description | When to use | Example |
|---|---|---|---|
| Number of products in the launch file | The number of products listed in the launch file. If you've installed Microsoft Dynamics GP and three integrating products, but want to start only two of them with a particular launch file, list only those products in the launch file. | This line will always appear. | 1 (if only Microsoft Dynamics GP is used) |
| Product ID for Microsoft | This line is always 0 (zero). | This line will always appear. | 0 |
| Product name for Microsoft | This line is always Microsoft Dynamics GP. | This line will always appear. | Microsoft Dynamics GP |
| Integrating products' product IDs | If you've installed an integrating product, its product name will be added to the launch file. | This line will appear only if you're using integrating products. | Lead Tracking |
3 (if Microsoft Dynamics GP and two integrating products are used)
Dynamics GP
Dynamics GP
| Line | Description | When to use | Example |
|---|---|---|---|
| Dictionary location ID | This line identifies the group of dictionary locations that follows it, and is stored in the | This line will always appear. | Windows (this is the default) |
| Location of Forms.dic | This line specifies the location of the Microsoft Dynamics GP forms dictionary, and must be written in generic format. | This line will always appear. | :J:Program Files/Microsoft |
| Location of Reports.dic | This line specifies the location of the Microsoft Dynamics GP reports dictionary, and must be written in generic format. | This line will always appear. | :V:Program Files/Microsoft |
| Location of application dictionary for integrating products | If you're using integrating products, this line specifies the location of the product's application dictionary. | This line will appear only if you're using integrating products. | :C:Program Files/Microsoft |
| Location of forms dictionary for integrating products | If you're using integrating products, this line specifies the location of the product's forms dictionary. | This line will appear only if you're using integrating products. | :J:Program Files/Microsoft |
| Location of reports dictionary for integrating products | If you're using integrating products, this line specifies the location of the product's reports dictionary. | This line will appear only if you're using integrating products. | :VOL1:Program Files/Microsoft |
| Additional dictionary location | This line identifies the group of dictionary locations that follows it. Only one dictionary location ID, typically "Windows," is provided with Microsoft | This line is optional. | Windows Users |
| Dictionary locations for | If you're using an additional dictionary location ID, list another set of locations for the Microsoft Dynamics GP application, forms and reports dictionaries. | This line is optional. | :C:Program Files/Microsoft |
| Dictionary locations for integrating products | If you're using an additional dictionary location ID, list another set of locations for integrating products. You must list the same dictionaries for each dictionary location ID; for instance, don't list the dictionaries for three products under one dictionary location ID, and the dictionaries for only two under another. | This line is optional. | :C:Program Files/Microsoft Dynamics/GP/LEADS.dic |
Workstation2 setting in the Microsoft Dynamics GP defaults file. Typically, the dictionary location ID will be stored in the defaults file. However, if this line is deleted, users will be prompted to select a dictionary location ID from those listed in the launch file used to start that session of Microsoft Dynamics GP. This line is case-sensitive.
Dynamics GP/Forms.dic
Dynamics GP/Data/Reports.dic
Dynamics GP/Leads.dic
Dynamics/GP/Data/4549F.dic
Dynamics/GP/Data/4549R.dic
IDs
Dynamics GP. The ID that's used depends on the ID stored in the Workstation2 setting of the computer's defaults file.
Microsoft Dynamics GP
Dynamics/GP/Dynamics.dic
:J:Program Files/Microsoft
Dynamics/GP/Data/Forms.dic
:J:Program Files/Microsoft
Dynamics GP/Reports.dic
:J:Program Files/Microsoft Dynamics/GP/4549F.dic
:J:Program Files/Microsoft
Dynamics/GP/4549R.dic
Example launch file using integrating products
If you've installed integrating products, dictionary location information will be listed for those products. Each product has a separate application dictionary, forms dictionary, and reports dictionary, and the location for each must be listed in the launch file for each user to access that product.
The following example shows the information in the Dynamics.set file on a Windows client after product information has been added for two integrating products, Lead Tracking and Time and Billing.
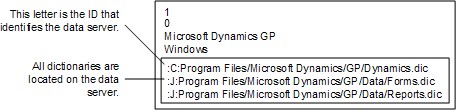
On client computers where the defaults file Workstation2 setting is Windows, all three sets of dictionary locations will be used, so that the Lead Tracking and Time and Billing products can be opened. Since Microsoft Dynamics GP is the main product (indicated by its product ID of 0), it will be opened first. For more information on defaults files, see Chapter 14, "Defaults files."
Example launch file using multiple location IDs
To use more than one forms or reports dictionary for a product, you can add dictionary location IDs and corresponding dictionary locations to a launch file and distribute the launch file to the affected users. In addition, you can control which integrating products users access. For example, you can create a launch file for one group of users listing only Microsoft Dynamics GP, and a launch file for another group of users listing Microsoft Dynamics GP and the integrating products you've installed.
If you add dictionary location IDs to a launch file or change an existing dictionary location ID, you must make the same change in the defaults file where it's stored.
For more information, see How launch files and defaults files work together on page 85.
In the following example, the user will be asked to select a dictionary location ID the first time he or she logs in to Microsoft Dynamics GP. Users who select the Local Reports dictionary location ID will use a reports dictionary stored on their hard disk and create a separate set of reports. Users who select the Network Reports dictionary location ID will access a common reports dictionary on a network volume. You may want to set up launch files in this way if certain users need specialized reports while others use a common set.
Example launch file using central dictionaries
You can store your Microsoft Dynamics GP, forms, and reports dictionaries in a central location and modify the launch files to reflect that.
Use the appropriate operating system tools to be sure the data server or process server is connected correctly, so that each client can access the location where the dictionaries are located. Use the volume ID used when you set up these connections as the volume ID in the dictionary location.
If you store dictionaries on a process server or data server, and the process server or data server and the client use different platforms, you may not be able to access those dictionaries by entering the volume letter of the process server. In this case, place the dictionary on a network volume that the process server and all clients can access. Edit the launch file of the process server so that the location on the network volume is indicated.
The following example shows the launch files for Windows clients accessing dictionaries stored on a data server.
Creating a launch file
Use this checklist to create a launch file. See Editing a launch file using the Edit Launch File window on page 80 and Editing a launch file using a text editor on page 82 for descriptions of how to change the information in a launch file.
To create a launch file:
Be sure the Microsoft Dynamics GP engine is in the same folder with all application dictionaries.
Double-click the Dynamics.exe file. Microsoft Dynamics GP will be started in minimized form; maximize it to display the File menu.
Choose File >> Create Launch File; a dialog box will appear. Dynamics.set will be displayed as the default name for the new launch file.
Accept the name or enter a new one, then choose OK or Save.
If you don't accept the default name, be sure to modify the properties of the Microsoft Dynamics GP program item so that the correct launch file will be used when you start Microsoft Dynamics GP.
To start Microsoft Dynamics GP using the launch file you just created, choose File >> Open Launch File; a dialog box will appear. Select the launch file and choose OK; the Login window will be displayed.
Close Microsoft Dynamics GP. The new launch file will contain the following information:
The number of application dictionaries on your hard disk, the product ID, and the product name corresponding to each application dictionary.
A dictionary location ID, typically "Windows."
The location of the main product's application dictionary, forms dictionary, and reports dictionary (the folder where the Microsoft Dynamics GP engine is located).
If integrating products were installed, their application dictionary, forms dictionary and reports dictionary locations will be listed, as well.
Editing a launch file using the Edit Launch File window
Typically, it's not necessary to edit launch files unless one is damaged or deleted, or if you change the location of your forms or reports dictionaries. If you move dictionaries or create additional launch files, you'll need to enter current information about where your dictionaries are located, or modify the launch file to start only certain products. A launch file is any file with a .SET extension that was installed with Microsoft Dynamics GP or that you've created using the instructions in this section.
Use the following checklist to change dictionary locations in Microsoft Dynamics GP using the Edit Launch File window. You can also edit launch files using a text editor, such as Notepad. See Editing a launch file using a text editor on page 82 for more information.
To edit a launch file using the Edit Launch File window:
- Open the Edit Launch File window.
(Administration >> Setup >> System >> Edit Launch File)
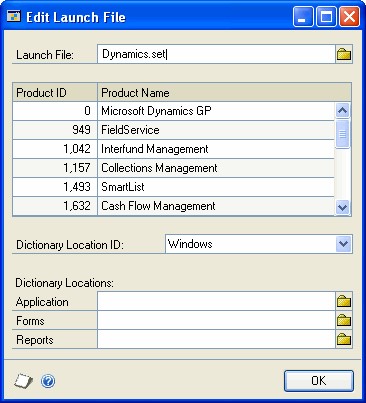
Select a launch file. The launch file used to start the current session of Microsoft Dynamics GP will be displayed in the Launch File field. To select a different launch file to edit, choose the file button to display a dialog box where you can select a launch file. Choose OK.
Select a product. The scrolling window displays the products, including Microsoft Dynamics GP and any integrating products you're using with Microsoft Dynamics GP, that are opened using the launch file displayed in the Launch File field. Select the product you want to edit dictionary location information for.
To remove a product from the launch file, or to restore a product ID and name of an integrating product you deleted from the launch file you're editing, you must use a text editor.
- Select your dictionary location ID. The name displayed corresponds to a set of locations for the selected product's application dictionary, forms dictionary, and reports dictionary. If you're not sure of your dictionary location ID, you can check it by viewing the Workstation2 setting in your Dex.ini file.
The changes you make to the dictionary location ID will affect only the dictionaries opened on your computer.
- Enter dictionary locations. The current location of the application dictionary, forms dictionary, and reports dictionary for the launch file and product you selected are displayed in the Dictionary Locations fields.
To specify a different location for a dictionary, choose the corresponding file button. A dialog box will be displayed; specify the new location and choose OK.
If you want to be able to access windows or reports you've already created, move the dictionary containing them to the new location. If you enter a location for the forms and reports dictionaries where a forms or reports dictionary doesn't exist, a new, empty dictionary will be created there the next time you access Modifier or Report Writer.
- If you're editing the launch file you used to start the current session of Microsoft Dynamics GP, restart Microsoft Dynamics GP to allow the changes to take effect.
Editing a launch file using a text editor
Use the following information to make extensive changes to a launch file using a text editor.
Typically, it's not necessary to edit launch files unless one is damaged or deleted, or if you change the location of your forms or reports dictionaries. If you move dictionaries or create additional launch files, you'll need to edit the launch files to enter current information about where your dictionaries are located, or modify the launch file to start only certain products.
You can add dictionary location IDs so that different locations will be used for a product's dictionaries, depending on which dictionary location ID is selected by the user and stored in the computer's Dex.ini file. If you add dictionary location IDs to a launch file or change an existing dictionary location ID, you must make the same change in the defaults files where it's stored. For more information, see How launch files and defaults files work together on page 85.
If you use more than one dictionary location ID, you must list the dictionaries for every product you're using for each dictionary location ID. If every product isn't listed, Microsoft Dynamics GP won't be opened correctly. If you want two users to access a different number of products, you must create a launch file for each.
To edit a launch file using a text editor:
Make a backup of the launch file or print it before you edit it.
Open the launch file by choosing File >> Open in Notepad or another text editor.
We recommend that you do not edit a launch file using Write for Windows.
Remove integrating products. If you don't want an integrating product to be available to certain users, create a launch file for them without the product's ID, name, dictionary location ID, or dictionary locations. Be sure to modify the number at the beginning of the launch file, which indicates the total number of application dictionaries in the launch file.
Review Lines in a launch file on page 76; be sure to make any additional entries in the correct position in the launch file.
Be sure there are no blank lines in the launch file, then save changes and close it.
If you want to be able to access windows or reports you've already created, move the dictionary containing them to the new location.
If you entered a location for the forms and reports dictionaries where a forms or reports dictionary doesn't exist, a new, empty dictionary will be created there the next time you access Modifier or Report Writer.
- Start Microsoft Dynamics GP using the new launch file. If you removed the dictionary location ID from the Workstation2 setting, you'll be prompted to select a dictionary location ID from the IDs currently in the launch file.
Troubleshooting launch files
If you made changes to a launch file, use these instructions to be sure Microsoft Dynamics GP is working properly.
Product listed in the launch file isn't installed
If a product listed in the launch file isn't installed in the specified location, a dialog box will appear when you start Microsoft Dynamics GP. Choose OK; you'll be able start Microsoft Dynamics GP without installing the product or removing it from the launch file.
Existing dictionary location IDs are modified
If you've modified existing dictionary location IDs, edit the Workstation2 setting of the Dex.ini file for each user's computer. Dictionary location IDs are case-sensitive; if "Windows" appears in your Dex.ini file, for instance, and "windows" appears in your launch file, the dictionary locations for the Windows dictionary location ID won't be used.
If the defaults file Workstation2 setting contains a dictionary location ID that's no longer in the launch file, when you start Microsoft Dynamics GP a message will prompt you to add it to the launch file. If this occurs, don't add the ID; choose No and verify the Workstation2 setting and the dictionary location IDs in the launch file to be sure you edited each correctly. (If you add the ID, that dictionary location ID will be added for all products in the launch file.) Then restart Microsoft Dynamics GP and, if you wish, add the dictionary location ID to the launch file.
If you add dictionary location IDs, change each user's Workstation2 setting in the defaults file to the correct ID, or remove the ID so that each user will be prompted to select from the IDs in the launch file. For more information, see How launch files and defaults files work together on page 85.
Chapter 14: Defaults files
The Microsoft Dynamics GP defaults file contains setup and operating information about Microsoft Dynamics GP. Each line of information, or setting, in the file contains information such as where your files are located, and whether certain functions, such as displaying print dialog boxes, should be performed. The defaults file is named Dex.ini. This type of file is sometimes referred to as an initialization file.
The Dex.ini file is installed in the Microsoft Dynamics GP folder (the folder where the Microsoft Dynamics GP engine is stored).
The defaults files information is divided into the following sections:
How launch files and defaults files work together
Editing defaults files
Damaged defaults files
How launch files and defaults files work together
A launch file (Dynamics.set) works in conjunction with the Workstation2 line in the defaults file (Dex.ini) on each client computer. If you add dictionary location IDs to a launch file or change an existing dictionary location ID, you must make the same change in the defaults file where it's stored.
For example, if you modify the dictionary location ID "Windows" in the launch file and change it to "Windows Users," the "Windows" ID is still stored in the
Workstation2 setting in the defaults file of all Windows computers. In this situation, you would change the Workstation2 setting on each Windows computer from "Windows" to "Windows Users," so that the dictionary locations for the "Windows" dictionary location ID are used.
If you add another dictionary ID to the launch file, you must change the
Workstation2 setting in the intended users' defaults files to reflect the dictionary ID they should use. Alternately, you can delete the Workstation2 setting. Users with no Workstation2 line and launch files with multiple dictionary location IDs must select a dictionary location ID when they start Microsoft Dynamics GP for the first time. A new Workstation2 line is added to the Dex.ini, with the dictionary location ID they selected.
Editing defaults files
To edit the Dex.ini file, use Windows Notepad to open the file, then edit existing parameters or add settings and parameters. Be sure to include an equal sign for each setting, before the parameter.
We recommend that you do not edit the Dex.ini file using Windows Write. The defaults file is essential for Microsoft Dynamics GP to run correctly; always make a backup before you edit it, and don't edit any setting unless you're instructed to do so by your reseller, or by Microsoft Dynamics GP Technical Support.
Damaged defaults files
If your defaults file is damaged or deleted, we recommend that you restore a backup; if you re-create the file, you must reenter several of the settings. Other settings that must be reentered vary, depending on your configuration.
Important
We recommend that you do not delete the defaults file if you want to re-create it. The defaults file is essential for Microsoft Dynamics GP to run correctly; always make a backup before you edit it, and don't edit any setting unless you're instructed to do so by your reseller, or by Microsoft Dynamics GP Technical Support.
Part 5: Troubleshooting
This part of the documentation contains the following information:
Chapter 15, "General troubleshooting," helps you identify common problems and includes a reference to resources where you can get more information.
Chapter 16, "Data recovery," provides information about how to repair data.
Chapter 17, "Process server troubleshooting," provides information to help solve problems that may occur when installing, setting up, or using Distributed Process Server.
Chapter 15: General troubleshooting
This information explains how to troubleshoot problems on your own, where to look for more information, and what information you should gather before calling Microsoft Dynamics GP Technical Support.
You also can visit the Additional Resources for Microsoft Dynamics On-Premise Customers article and look for answers to your most common technical questions including troubleshooting steps, solutions to common issues, and how-to articles.
Note
When you install or use Microsoft Dynamics GP, alert messages may appear that are caused by errors in other applications, such as the file handler or operating system. To deal with errors not caused by Microsoft Dynamics GP, refer to the documentation for the application causing the error.
The troubleshooting information is divided into the following sections:
Troubleshooting resources
Signs that data maintenance is needed
Finding which tables require maintenance
Alert message troubleshooting
Before you call support
Troubleshooting resources
To get more information, you can use the following troubleshooting resources.
Microsoft Dynamics GP documentation
If you've installed Microsoft Dynamics GP, you can use the help to access context-sensitive assistance about windows. You can choose Help >> About This Window or press F1 to access help for the window you're currently viewing. Use the Search tab to find more information on alert messages and procedures.
You can use the manuals (Help >> Printable Manuals) to find a printable version of procedural or overview information for a specific module.
Resource descriptions
Resource descriptions provide detailed technical information about Microsoft Dynamics GP fields, tables, and windows. This utility allows you to learn more about how data is stored in Microsoft Dynamics GP, including the fields that are stored in each table, and the reports containing data from each table.
To open the Table Descriptions window, choose Microsoft Dynamics GP menu >> Tools >> Resource Descriptions >> Tables. Use the Table Descriptions window to find information about a table, such as its names, keys, key segments, and the fields it contains.
To open the Field Descriptions window, choose Microsoft Dynamics GP menu >> Tools >> Resource Descriptions >> Fields. Use the Field Descriptions window to find out which tables contain a particular field.
To open the Window Descriptions window, choose Microsoft Dynamics GP menu >> Tools >> Resource Descriptions >> Windows. Use the Window Descriptions window to find out which windows are contained in a specific product and series, the names assigned to each window, the fields each window contains, and the tables linked to each window.
Microsoft SQL Server troubleshooting resources
SQL Server Books Online is a documentation resource installed with SQL Server.
Use Books Online to troubleshoot SQL error messages and other issues related to SQL Server. Microsoft's web site, www.microsoft.com, is also a good source of information for issues related to SQL Server or your operating system.
Signs that data maintenance is needed
The most common indicator that data maintenance is needed is an alert message that indicates an error in a specific table. However, data problems may not always be this obvious and it may be more difficult to identify in which table or tables it has occurred. Other indicators of data problems include:
Alert messages that you can't explain
Inaccurate data in windows or on reports
Unusual characters in windows or on reports
Windows you're unable to open
Once you've determined that a problem exists, you can use the following questions to direct your troubleshooting effort.
If you are unable to fix the problem yourself, see Before you call support on page 93 to gather information that will help your support technician solve the problem.
Does the error occur for a system administrator user?
If a system administrator user does not receive the same error as other users, a permission problem may exist.
A script called Grant.sql is included on the Microsoft Dynamics GP installation media and is installed automatically during the Microsoft Dynamics GP client/ server installation process. Run this script against the database that produces the error. For more information on running scripts, see the SQL Server documentation.
Does the error occur for all users?
If the error does not occur for all users, a security problem may exist. You should also check customizations, such as modified reports and forms.
Remember that you have security options within SQL Server and within Microsoft Dynamics GP.
Does the error occur in all companies?
If the error occurs in more than one company and is data-related, the problem is likely in the system database. The problem could also exist in one of your dictionaries, such as Dynamics.dic or Reports.dic. If an error occurs in only one company, the problem likely exists in the company database.
Does the error occur on all workstations?
To determine if a problem is data-related or dictionary-related, verify whether the error happens on all workstations. If all workstations produce the same error, the problem is likely on the server rather than on the individual client. The problem could be related to database tables or to shared files. To determine where maintenance is needed, see Finding which tables require maintenance on page 92.
Does the error happen consistently?
If an error occurs consistently, you probably need data maintenance. To determine if a table is corrupt, try isolating records within the tables you're working with.
Is the window or report modified?
If the non-modified version of a window or report does not receive the error, the problem is related to the modifications to the dictionary. If recent modifications have been done, check the modifications for errors. If the modifications have worked in the past, rename the dictionary and restore it from a backup.
Do not delete dictionaries. Renaming files allows you to restore these files later, if necessary.
Are there integrating products or customizations?
If there are customizations or integrating applications, try removing them to see if errors still occur. If integrating applications are present, remove the dictionaries from the Dynamics.set file and rename the associated file extensions in Windows Explorer.
Do not delete these files. Renaming file extensions allows you to restore these files later, if necessary.
If customizations exist on your system, contact the person who made the customizations for troubleshooting assistance.
If you're having printing problems, are you able to print to the screen, a file, or another printer?
When you notice a problem on a report or inquiry window, verify whether the error occurs when you view the information using a different medium, such as printed to the screen or to a different printer. If a report and its associated inquiry window produce the same results, data maintenance is needed. If only the report is incorrect, the problem could be related to a modified report.
Were the transactions imported or keyed?
If imported transactions produce errors, verify whether manually keyed transactions produce the same results. Because some methods of importing data do not require the data to be verified for accuracy, imported data may be corrupt or incomplete.
Does the problem exist if processing is done at the database server?
If the problem does not exist when all processing is performed at the server, the problem may be related to your network, ODBC drivers, or ODBC data sources or a result of differing versions.
Finding which tables require maintenance
Once you've established that a table requires maintenance in Microsoft Dynamics GP, the next step is to find out which table or tables are affected.
If an alert message has appeared stating the name of the table, you can begin the data recovery checklist immediately.
If unusual results on a report indicate that a table requires maintenance, refer to the sample reports provided with the module to see which table groups' data is printed in that report.
If you're having trouble opening a window, use the Window Descriptions window (Microsoft Dynamics GP menu >> Tools >> Resource Descriptions >> Windows) to determine the physical and table groups accessed by a window.
If you still can't determine which table is causing the problem, try to isolate the problem. For example, if you're working in Sales Order Processing, try entering different types of transactions with various items for various customers. If the error occurs only for a specific customer record, you can conclude that the data in the RM Customer MSTR table is corrupt.
Each Microsoft Dynamics GP table has three names: a display name, a technical name, and a physical name. Display names are displayed in the Check Links window and other windows. The table names that appear in alert messages are typically technical names, the names that the system uses to identify tables. For example, a message may state that an error occurred in the GL_Account_MSTR table, but the display name for that table is Account Master.
You may need to use the Table Descriptions window (Microsoft Dynamics GP menu >>Tools >> Resource Descriptions >> Tables) to determine the table group to which a table in an alert message belongs. Some data recovery procedures can be performed only on table groups, while others can be performed on table groups or tables.
Alert message troubleshooting
If you receive an error message that indicates a problem you can't explain, use the following resources for more information. If you are unable to resolve the problem yourself, contact Microsoft Dynamics GP Technical Support for other options.
Microsoft Dynamics GP messages
The best source of information for troubleshooting Microsoft Dynamics GP alert messages is the Knowledge Base database on CustomerSource. Go to the Technical Q&A page, where you can type in the message number or message text to search for the alert message you're receiving.
DBMS messages
Microsoft SQL-related error messages appear as DBMS errors in Microsoft Dynamics GP. Always use the SQL Server Books Online to troubleshoot DBMS errors (Start >> Programs >> Microsoft SQL Server >> Books Online). Select the Search tab and enter the error number, then choose List Topics. Either highlight and select Display or double-click an entry to open the topic. In the description column of the error message table, you'll see more information about the error. You can also use the SQL Query Analyzer to fin the same information.
Before you call support
Have the answers ready to the following questions to help your support specialist quickly narrow down the source of the problem you've experiencing.
What is the exact error message?
When did the error first occur?
What task were you attempting to perform at the time you received the error message?
Has the task been completed successfully in the past?
What is the name of the window you are you working in?
What have you done so far to attempt to fix the problem?
Have you performed any of the table maintenance procedures such as check links?
If have performed table maintenance procedures and received error messages, what kind of messages?
Does the problem occur in another company?
Does the problem occur on another workstation?
Does the problem occur for more than one user?
What versions of software are you using?
Verify the version numbers for Microsoft Dynamics GP, your database software, and Windows. Also note service packs.
Are you using an integrating product with Microsoft Dynamics GP?
Have you imported any data?
How to capture a log or trace
There are many different types of logs and traces that can be gathered to help you resolve the problem in Dynamics GP.
How to use SQL Profiler to create a SQL trace in Microsoft SQL Server
The templates have already been mapped to the fields, which spare you the effort of doing the mapping manually. It is recommended you use the template to capture the correct information that is needed to help resolve the issue.
To use a SQL Trace template, follow these steps:
Determine what version of SQL Server you have and click the link below to download the zip file of SQL templates.
In the zip file, click on the TRACETMPL folder and click on the .tdf file for your version and SQL Profiler will automatically open.
(Take note of the file name as this is the name for the template you will look for in SQL profiler.)Click Yes if prompted to overwrite.
Then you should get a message that the tdf file was imported successfully. Click OK. (Or you can do a Save|Save As and go to that location on click on the tdf file.)
SQL templates for versions 2008, 2008 R2, 2012, 2014, 2016, 2017, 2019, 2022
Within SQL Profiler, click on File > New Trace. (Connect or log in as prompted.)
- In the Trace Properties window, enter a name for Trace Name as desired.
- Click the drop-down icon next to the USE THE TEMPLATE field, and scroll down to the end of the list and select the SQL trace template you imported in. (Should beging with 'MSGP' prefix.)
- Click to mark the SAVE TO FILE checkbox and browse to a location you would like to save the trace file to. Save.
- Also uncheck Enable File Rollover option (Under SAVE TO FILE section).
- In the Events Selection tab, mark the SHOW ALL EVENTS checkbox and SHOW ALL COLUMNS in the lower right corner.
Note
All the fields in Method 2 will automatically be selected in the Events Selection tab.
Click RUN to start the trace and the SQL Profiler window will open and the trace is now running.
Use the icons listed below to help you capture the trace. Be sure to keep the trace file as small as possible and only capture the steps in Dynamics GP to reproduce the problem. Large traces are often not efficient or helpful.
- Use the Red Square icon at the top to stop the trace.
- Use the Green Arrow icon at the top to restart the trace. (This is enabled if the trace is stopped.)
- Use the White Eraser icon (looks like a piece of chalk) to clear out the trace at any time needed.
Note
The trace file should be created at the location selected above. You can then attach the trace to a support case, along with the information of what version of SQL you are using, and the user ID you used when performing the steps in Dynamics GP.
Dex.sql log
This type of log can me used for an upgrade error message or any time you are getting an error message in Dynamics GP. When you receive an error message in Microsoft Dynamics GP, a Dexsql.log file is a helpful tool that can frequently provide more information to troubleshoot issues. If you can re-create the error message, the Dexsql.log file can capture this information.
To create a Dexsql.log file, follow these steps:
Open the Dex.ini file. By default, this file is in the following location:
C:\Program Files\Microsoft Dynamics\GP\Data
Locate the following statements in the Dex.ini file:
SQLLogSQLStmt=FALSE SQLLogODBCMessages=FALSE SQLLogAllODBCMessages=FALSE
If the statements are currently set to FALSE, change the statements to TRUE, as follows:
SQLLogSQLStmt=TRUE SQLLogODBCMessages=TRUE SQLLogAllODBCMessages=TRUE
Start Microsoft Dynamics GP. If Microsoft Dynamics GP is already started, exit Microsoft Dynamics GP, and then restart it.
Re-create the scenario in which you received the error message. Get to the area of Dynamics GP you need, but before you do the steps to generate the error message, you should go clear/delete the dexsql.log that has run to this point (as you only want it to capture generating the error message only, and don't need anything captured up to this point).
To clear/delete the dexsql.log, go to Windows Explorer, open the Microsoft Dynamics GP application folder that you opened in step 1. Locate the Dexsql.log file. Delete or rename this file, as you don't need anything it captured up to this point.
(If you don't see the Dexsql.log file listed, select View, and then select Refresh so that you can see the new file. Or check your path.)
Now back in Microsoft Dynamics GP, continue to do the final steps to re-create the error message.
A new Dexsql.log file will be generated in the Microsoft Dynamics GP application folder again, that contains only the syntax of generating the error message.
When done, turn off the dexsql.log by opening the Dex.ini file, and then resetting the statements to FALSE or to the original settings.
Note
The log continues to run until the user signs out of Microsoft Dynamics GP and back in again. It doesn't hurt to leave it running either, but it may result in the log getting large and causing performance issues down the road.
Fiddler Trace
A Fiddler trace can help with a network issue or a way to capture all HTTP and HTTPS web requests made from an application or web browser.
To run Fiddler, do the follwoing steps:
Open Fiddler.
In Tools->Fiddler Options->HTTPS, choose the Decrypt HTTPS traffic field.
Choose Yes on the prompt for trust Fiddler Root Certificate.
Choose Yes to install the certificate.
Choose Yes to confirm.
Choose OK, and then choose OK to go back.
Reproduce the issue.
Stop the Fiddler trace:
- File->Capture Traffic F12, Save trace: File->Save>All Sessions.
- ave the trace out as .saz file.
For more information, see this blog post.
Dexterity Script Log
Dexterity Scriptlogs are often helpful to give insight into what dexterity code is being called, and helpful to verify if any third-party products are being called during the process that's captured in the log. The default dictionary ID for Microsoft Dynamics GP is (0), so you can review if any other dictionary ID's are listed.
To create a log file, follow these steps:
Exit out of Microsoft Dynamics GP.
Navigate to the GP code folder (default location is C:\Program Files (x86)\Microsoft Dynamics\GP\Data) and right-click on the Dex.ini file and open it with Notepad.
Review if the ScriptDebugger=TRUE trigger exists, and then set it to TRUE, or if it doesn't exist, add the below trigger to the end of the file.
Close the file and save your changes.
Relaunch Microsoft Dynamics GP.
Now you will see a DEBUG item listed in the top menubar of all windows. Open the window you need to recreate the issue in. (Or get to the point you need to be at, right before the issue happens and you want to start the scriptlog at this point.)
Click on DEBUG in the top menubar and click on LOG SCRIPTS to start the script log. Enter a filename and path of where you want to save the scriptlog to and click Save. (This puts a checkmark next to LOG SCRIPTS under the DEBUG menu and the scriptlog is now running.)
Perform the action you want captured in the log. Cancel out of any posting reports (if prompted) and then STOP!
Now click on DEBUG again and click on LOG SCRIPTS again to stop the log. (This removes the checkmark next to LOG SCRIPTS under the DEBUG menu item).
Note
You can stop and start the script log by clicking on DEBUG > LOG SCRIPTS to have the checkmark next to LOG SCRIPTS or not. The checkmark means it is running, and no checkmark means it is not. Clicking on LOG SCRIPTS will add/remove the checkmark to start/stop the scriptlog from running. Each time you start it, it should prompt you for a new filename and path to save the new log to.
Locate the Script.log file in the path you generated it to, and open it with Notepad to ensure it captured the process.
Dynamics GP Workflow specific issue/logs
DynamicsGP_WorkflowGP.log:
In the local workstation temp directory of the user who is logged into GP (for example, C:\Users<USER>\AppData\Local\Temp).
DynamicsGP_WorkflowGP.WorkflowEngine.log:
In the SQL Server machine's temp directory of the user who is running the SQL Server service (for example, C:\Users\MSSQLSERVER\AppData\Local\Temp)
Process Monitor log
A Process Monitor can help track down where there is a security/permission issue.
To create a process monitor you can follow these steps:
- Download the Process Monitor.
- Extract Procmon.exe, but do not click on the exe at this time.
- Get to the point right before the user receives the error message.
- Double-click Procmon.exe to start the application; do not filter anything out if asked.
- Process Monitor will start recording by default.
- Recreate the error message by trying to launch Integration Manager as an example or run an integration through Dynamics GP.
- Once the error occurs then in Process Monitor click File > Capture Events to stop the capture of data.
- Click File > Save to save the output.
- When saving, for "Events to save" leave the defaults and for the "Format" choose Comma-Separated Values (CSV).
- Send the CSV to me when you have a chance (you may need to zip it, they tend to be a bit large).
Chapter 16: Data recovery
The Microsoft Dynamics GP system is designed to ensure maximum accuracy and integrity of your data. Occasionally, however, hardware failures, power surges, and other problems might require you to recover your data. The following information will help you quickly recover your data.
To recover data, you must first determine the table or tables where the issue occurred, then determine the appropriate procedures to complete. For more information on determining the location of tables that need maintenance, see Finding which tables require maintenance on page 92.
It's very important that the data recovery functions be performed carefully by an authorized user. Refer to your System Setup documentation (Help >> Contents >> select Setting Up the System) for information about setting up security to determine users with access to these functions.
The data recovery information contains the following sections:
Recovering data
Checking links
Reconciling tables
Restoring backups
Restoring data
Recovering data
When you've determined the table or tables that are causing the problem, follow the steps in this checklist. If it's possible that one or more tables are need maintenance, but you can't determine which, perform the data recovery procedures on all tables that may be affected.
If you have a current backup that you made before your table issues occurred, you could restore it instead of completing the procedures in the recovering data checklist. The more recent your backup is, the fewer transactions you'll need to reenter.
To recover data:
- Make a backup.
Always be sure you have a current backup of your company's data before performing any table maintenance or utility procedures. These procedures deal directly with the data, and if there is an interruption during processing you will need to restore the current backup.
Update statistics and recompile stored procedures. Updating statistics reconfigures table keys and results in better performance; recompiling stored procedures adapts stored procedures to tables with significant increases or decreases in data. For more information, see Updating statistics and Recompiling stored procedures.
Check links. If you rebuild a table and the report shows that some records were removed, check links for the table. Checking links examines the table, checking corresponding information in related tables and, if possible, changing the data to match the corresponding data in a table. For more information, see Checking links.
If the table is in the System or Company series, do not check links. Instead, continue to the next step: Reconcile data.
Reconcile data. During a reconcile, Microsoft Dynamics GP examines the data within different tables and checks to see whether information that is kept in two different tables has the same value in both. For more information, see Reconciling tables.
Restore a backup. If reconciling is unsuccessful, restore your most recent backup. The more recent your backup, the fewer transactions you'll have to reenter, and if you've printed or saved all of your posting journals, reentering the transactions can be a fairly simple process. For more information, see Restoring backups or Restoring data.
Checking links
Checking links examines tables, checking corresponding information in related tables and, if possible, changing the data to match the corresponding data in a table.
If you were alerted to damage by an alert message indicating damage to a specific table, the name of the table won't be listed in the Check Links window.
If the table is in the System or Company series, see Reconciling tables on page 97.
To check links:
Be sure that no one is using Microsoft Dynamics GP. To view which users are in the Microsoft Dynamics GP system and where, choose Administration >> Utilities >> System >> User Activity.
Make a backup.
Always make a backup before checking links.
- Open the Check Links window.
(Microsoft Dynamics GP menu >> Maintenance >> Check Links)
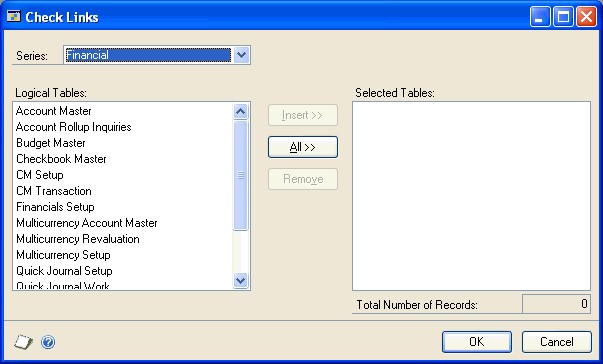
- Select the series containing the tables to check.
If you know the name of the table, but not the table group to which it belongs, refer to the Table Descriptions window (Microsoft Dynamics GP menu >> Tools >> Resource Descriptions >> Tables).
- Select the tables to check links for, and choose Insert.
To remove any table from the Selected Tables list, highlight the table name and choose Remove.
To insert tables from another series, repeat steps 4 and 5.
Choose OK to check links for the selected tables and print the Check Links Report. Checking links is performed as a background process, which means you can perform other tasks while the checking is being done.
Microsoft Dynamics GP checks links in the selected tables.
The Report Destination window will appear, and you can specify where the Check Links Report should be printed. If you mark File, select the appropriate table format and enter the report file name.
The Check Links Report will display any information that was re-created.
We recommend that you send the Check Links Report to the screen, and then print it if necessary, because it may be very large. Each report can only be printed once each time you check links, so it's a good idea to send the report to a file as well.
- To determine what information to reenter, use the Table Descriptions window (Microsoft Dynamics GP menu >> Tools >> Resource Descriptions >> Tables) to view information for the table you checked links for, then use a window that accesses the table to reenter information. Some records are created through processes such as posting or aging, and this information can't be reentered manually in a window.
You may want to create a report using Report Writer that lists all fields included in the table that you checked links for. This report can serve as a valuable reference tool. For more information, refer to the Report Writer documentation.
- If checking links is unsuccessful and the problems continue to occur, go to Reconciling tables on page 97.
Reconciling tables
You should reconcile your data when checking links didn't resolve the problem. Reconciling compares corresponding data in different table groups and removes any lone, or "orphan," records. For example, a report option that was created for a report that no longer exists is an orphan record, and would be removed.
Reconciling also checks to be sure that corresponding or identical information stored in two different tables is the same, and if there are discrepancies, changes the information in the table you're reconciling to match the information in the table it's being compared with.
For example, the number of periods in your fiscal year is stored in the Fiscal Periods Table and the Company Master Table. If you reconcile the Fiscal Periods Table and the number of periods is different than in the Company Master Table, the number of periods in the Fiscal Periods Table will be changed to match the number in the Company Master Table.
Refer to the Table Descriptions window (Microsoft Dynamics GP menu >> Tools >> Resource Descriptions >> Tables) for more information on table groups and tables. Some tables can't be reconciled. If you can't reconcile the table, restore a backup. For more information, see Restoring backups on page 99 or Restoring data on page 99.
To reconcile tables:
Be sure that no one is using Microsoft Dynamics GP. To view which users are in the Microsoft Dynamics GP system and where, choose Administration >> Utilities >> System >> User Activity.
Make a backup.
It's very important that you back up your tables before reconciling or performing any other table maintenance procedure.
- Open the Reconcile window.
(Administration >> Utilities >> System >> Reconcile)
- Highlight each table to be reconciled and choose Insert.
Use the All button to select all of the tables in the List to Reconcile or use the Remove button to remove any table from the list.
- Choose Reconcile to reconcile the selected tables and print the Reconcile Report.
The Report Destination window appears; specify where the reconcile report should be printed. If you mark File, select the appropriate file format and enter a report table location.
Always send the Reconcile Report to the printer, since it can be printed only once. It's a good idea to send the report to a file, as well, in case of a printer malfunction.
The reconcile report will display any information that was changed, and list the number of records removed, if any. Use the information on the reconcile report to determine what information to reenter.
Use the Table Descriptions window (Microsoft Dynamics GP menu >> Tools >> Resource Descriptions >> Tables) to view information for a table, then use a window that accesses that table to reenter information. Some records are created through processes such as posting or aging, and this information can't be reentered manually in a window.
- If the original problem continues to occur, restore backups. For more information, see Restoring backups on page 99 or Restoring data on page 99.
Restoring backups
Always restore the entire database containing the affected table or tables. The information in your Microsoft Dynamics GP system is so interrelated that it's necessary to restore the database; we recommend that you restore a complete backup of your tables, if possible.
To restore backups:
- Back up your current data.
Always make a backup of current data before restoring an earlier backup, in case you need to refer to it later. Your current backup may have become damaged, or may contain the same damage currently in your Microsoft Dynamics GP system. Making an additional backup before you restore a previous backup will ensure that you'll be able to restore your data to its current state, if the backup that you restore is also damaged. Don't make this backup over a backup you have on hand.
Consult your reseller or qualified installer, or the manual for your backup utility, for information on how to restore a backup.
Reenter information entered after the backup was made, because any newer records were erased when the backup was restored.
The Table Descriptions window (Microsoft Dynamics GP menu >> Tools >> Resource Descriptions >> Tables) contains detailed information about each of the tables in Microsoft Dynamics GP. This information can help you reenter data by providing the following:
The display name, technical name, physical name, and table group for each table
The reports containing information from each table. Use the reports listed to determine which data is missing, or as a source of the data you'll need to reenter. The sample reports for each module also lists each report and the tables from which it draws data.
The window used to enter information in the table. To determine the physical and table groups accessed by a window, use the procedures in the Resource Descriptions documentation.
On rare occasions, you may not be able to reenter information into every table. Some records are created through processes such as posting or aging, and this information can't be reentered manually in a window. If you were unable to reenter some of your accounting information, reports using non-editable tables, such as history tables, could be inaccurate until the end of the year, or until the next time you clear history.
- If restoring a backup was unsuccessful and the original problems continue to occur.
Restoring data
Use the Restore Company window to restore data from a backup file.
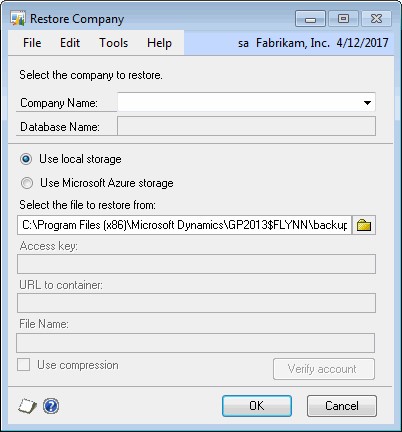
Only the system administrator can open the Restore Company window and restore data. The Restore Company window is only available when using a Microsoft Dynamics GP installation on the SQL Server.
To restore data:
- Open the Restore Company window.
(Microsoft Dynamics GP menu >> Maintenance >> Restore)
Select the company to restore, or select System Database to restore system data.
Select the storage location. To use the Use Microsoft Azure storage option, you must be using SQL Server 2012 Service Pack 1 Cumulative Update 2 or later.
Enter the path and file name of the backup file to restore from.
If you have marked the Use Microsoft Azure storage option, enter the access key, URL to container, and the file name. Then, choose Verify Account to verify a connection to the Microsoft Azure storage location.
Click OK to restore data from the backup. The window will be closed and a message will appear when data has been restored.
Chapter 17: Process server troubleshooting
Use this information to help solve problems that may occur when you're installing, setting up, or using the Distributed Process Server. If the errors continue to occur, review the installation and setup documentation, then contact your designated technical support source.
The process server troubleshooting information includes the following sections:
Process performed locally instead of remotely
Process server information not appearing in Process Server Inquiry window
Report errors
Items to check
Adjusting processing
Process performed locally instead of remotely
Situation: A process was set up to be completed remotely; however, it was processed locally on a client computer instead. A message stating that the process server wasn't available didn't appear.
Solution: An error may have occurred in the network protocol connection between the process server and your computer, before the process was started. Use a "ping" application to be sure that the two computers are connected.
If the network protocol connection is running correctly, restart the DPS application on the process server computer.
Another possible cause of the problem is that the user initiating the process isn't set up to process tasks remotely. Choose Home >> User Preferences to open the User Preferences window and be sure the Remote selection is marked for the Distributed Processes option.
Process server information not appearing in Process Server Inquiry window
Situation: You've entered or selected the process server you want to view information about in the Process Server Inquiry window, but no information is appearing in the scrolling window.
Solution: If you've enabled load balancing, add the "#" symbol at the end of the process server name in the Server ID field in the Process Server Inquiry window. For example, if you've entered Server1 in the Server ID field, add the "#" symbol so the name is Server1#. You don't have to add the "#" symbol for the process server in the DPS Setup window or the DPS Server Setup window.
Report errors
If you're using modified reports, be sure that the client that initiated the remote process and the process server that you sent it to are accessing the same reports dictionary (Reports.dic). For more information, see Chapter 9, "Process server configuration."
If a process includes a report, verify the report destination. For more information, see Setting up report destinations for remote processing on page 60.
Restrictions, calculated fields, additional headers and footers and field types that are set up incorrectly can prevent a report from being printed. Before using a process server to print a report you've modified or created, print it locally first to be sure it can be printed without errors. You'll be able to determine how to correct the error more easily if you print the report locally and view the alert message than if you print it remotely and view the information in the Process Server Activity Table. The alert messages that appear when a report is printed locally typically contain more information than the information recorded in the activity table when an error occurs in a process.
Items to check
Use the Process Server Inquiry window to view the Process Server Activity Table, which contains all available information about errors that have occurred.
Be sure that all servers in each process are operating correctly, that the DPS application is running on each one, that the process is set up to be processed remotely in the Process Server Setup window, and that users are set up to use DPS.
If you're using the Distributed Process Manager application (Dpm.exe), be sure it's running, then restart each process server and client.
Adjusting processing
When you use load balancing, each machine that is running a process server is automatically given a system index. The system index is a number between 1 and 1000 that indicates the relative processing power of the machine. The smaller the system index, the faster the machine.
If you want to modify the processing load of each process server, you must edit the system index by adding it to the Dex.ini file of each process server. The system index will only appear in the Dex.ini file if you add it to the file. For example, if you wanted a process server to use a system index of 150, you would add the following setting to the Dex.ini file:
DPSSystemIndex=150
If the default system index is too high, the machine may be operating below its potential. To increase the load given to a process server, decrease the system index. If you want your process server machines to have an equal balance of processing power, each machine should have the same system index. The default system index is 100. For more information, see *Editing defaults files.
Glossary
Alert message
A message that appears when inappropriate, inadequate, or unclear data or instructions are issued, when data is not accessible, or when a confirmation is sought. Additional information about alert messages and their causes can be found in the TechKnowledge database on CustomerSource.
Background processing
With background processing, you can continue working while Microsoft Dynamics GP posts transactions or prints reports.
Backup
A copy of data made to minimize the difficulty of recovering from data loss, due to a damaged hard disk or power loss. Backups should be performed frequently.
Data
Information that has been entered or selected by a user and that appears on a computer screen and will be stored in a table when saved.
Defaults file
See Dex.ini file.
Dex.ini file
A file that stores preferences, startup information and application settings specific to the current workstation.
Dexterity® dictionary
The Microsoft Dexterity dictionary contains resources, such as fields, tables, windows, text and reports, used by the Dexterity development system. Microsoft Dynamics GP was created using Microsoft Dexterity, so Microsoft Dexterity resources are required to run Microsoft Dynamics GP. The Microsoft Dexterity dictionary also contains the resources used to run Report Writer and the Microsoft Dynamics GP Modifier. The file name is Dex.dic.
DPM
See Distributed Process Manager.
DPS
See Distributed Process Server.
Dictionary
A group of resources that, when interpreted by the runtime engine, present a complete functioning application.
Dictionary location ID
In a launch file, a line that indicates a set of dictionary locations. This set of dictionary locations includes generic pathnames for the locations of the application dictionary, forms dictionary, reports dictionary and any integrating dictionaries. A launch file can contain several sets of dictionary location IDs and dictionary locations. See also Launch file.
Display name
One of the names specified for a table. The display name is used when the name of the table is displayed to the user. See also Technical name.
Distributed Process Manager
An application that manages the interaction
between clients and process servers. The file name is DPM.exe
Distributed Process Server
The application that handles remote processing of Microsoft Dynamics GP processes. In a client/server environment, you can initiate predefined functions from your computer but direct the processing to another computer or server on the network.
The file name is Dps.exe.
Engine
See Logical table.
Field
A field contains a single piece of information used by the application dictionary.
File
See Table.
Forms dictionary
The dictionary that stores user-modified resources. This dictionary is created when the Modifier is accessed for the first time. Only copies of a dictionary's resources are stored in the forms dictionary.
Generic pathnames
A method of indicating a location on a hard disk or network drive. Generic pathnames use a colon (:) before and after DOS and Windows driver letters. The characters that used after each folder or directory in the pathname are forward slashes (/).
Integrating product
An additional application dictionary that works with the Microsoft Dynamics GP engine and other files. The integrating application can use resources from Microsoft Dynamics GP.
Launch file
The file that is used to start Microsoft Dynamics GP; either by double-clicking or dragging and dropping it on the Microsoft Dynamics GP executable (Dynamics.exe). This file stores the location of the dictionaries that will be used, including the Microsoft Dynamics GP dictionary, the forms dictionary and the reports dictionary. The file name is Dynamics.set.
Logical table
See Table group.
Macro
A user-defined series of actions performed within an application, recorded for playback at another time. Macros can be used to automate repeated tasks, such as month-end procedures or printing reports, by recording the procedure, then playing it back whenever the procedure must be performed again. Macros are also referred to as keystrokes.
Microsoft Dynamics GP dictionary
An application that includes the most commonly-used modules in Microsoft Dynamics GP and all resources used by the Microsoft Dynamics GP system, such as field and table definitions, windows text and reports. The file name is Dynamics.dic.
Microsoft Dynamics GP engine
The Microsoft Dynamics GP engine, also known as the runtime or executable, interprets the resources in each application dictionary and presents a functioning application. The engine is the method you'll use to start Microsoft Dynamics GP so you can use the windows, reports and other resources, just as a car engine is used to activate the frame, wheels and other elements of the car. The file name is Dynamics.exe.
The Microsoft Dynamics GP engine is used to run Microsoft Dynamics GP and Microsoft Dynamics GP Utilities.
Microsoft Dynamics GP Utilities
Utility used to set up your account framework and update Microsoft Dynamics GP tables and dictionaries. The file name is Dynutils.dic.
Modifier
A tool that allows users to modify an application's interface. A forms dictionary is used to store the modifications.
Multidictionary
A feature that allows the runtime engine to interpret two or more separate application dictionaries at the same time. The capability allows multiple integrating dictionaries to function with Microsoft Dynamics GP.
G L O S S A R Y
Passive locking
A method of locking a record that allows other users to access and make changes to the record. The lock for the record is released when the user with access to the record moves to another record or closes the table.
Pathname
A specified location on a computer's hard disk or on a network where tables will be created and stored. The pathname for each table in Microsoft Dynamics GP is stored in the Pathnames Table (SY02100).
Physical name
The name under which a table is stored by the operating system or database.
Ping
A procedure that sends a small piece of data from one computer to another to text network connectivity between the two on a TCP/IP network.
Process server
See Distributed Process Server.
Product ID
The ID that's used to uniquely identify an application dictionary.
Read/write
A table access mode that indicates the table can be read from and written to.
Record
A collection of data made up of one instance of each field in a table.
Report Writer
A tool that allows you to design and print reports in your application.
Reports dictionary
The dictionary that stores user-modified resources for reports. This dictionary is created when the Report Writer is accessed for the first time. Only copies of a dictionary's resources are stored in the reports dictionary.
Runtime engine
See Logical table.
Resource descriptions
A utility that allows you to learn technical information about Microsoft Dynamics GP fields, tables and windows. This utility allows you to learn more about how data is stored in Microsoft Dynamics GP, including the fields that are stored in each table, and the reports containing data from each table.
.SET file
See Launch file.
Stored procedure
Queries written in SQL, then compiled and stored in a database. Stored procedures perform server-based processing tasks, and return a status code to the application. In parameters can be passed to stored procedures. In addition to the status code, out parameters also can be returned.
Structured Query Language (SQL)
A language that allows you to define, manipulate and control access to data in a relational database.
Table
A collection of related records, such as transactions or accounts. All of the information that you enter in Microsoft Dynamics GP is stored in tables.
Table group
A group of logically-related tables (also known as a logical table). For example, a customer master table, a customer address table and a customer history table could all compose a table group. Table groups are used for security and table maintenance.
TCP/IP
An acronym for Transmission Control Protocol/Internet Protocol. TCP/IP is a set of transmission protocols used to transfer data between computers on a network.
Technical name
The name used with scripts to refer to a table or window. See Launch file