Note
Access to this page requires authorization. You can try signing in or changing directories.
Access to this page requires authorization. You can try changing directories.
This walkthrough guides you step by step to create a sample extension in AL. New objects and extension objects are added to the base application for a simple reward feature for customers. Every section of this exercise includes code that serves for installing, customizing, or upgrading this sample extension. The final result can be published and installed on your tenants.
About this walkthrough
This walkthrough covers the following tasks:
- Developing a sample extension with a table, a card page, and a list page.
- Deploying the sample extension to your development sandbox environment.
- Using the Business Central Designer to modify visual aspects of the extension.
- Creating extension objects that can be used to modify page and table objects.
- Initializing the database during the installation of the extension.
- Upgrading and preserving data during the upgrade of the extension.
Prerequisites
To complete this walkthrough, you need:
- The Business Central tenant.
- Visual Studio Code.
- The AL Language extension for Microsoft Dynamics 365 Business Central for Visual Studio Code.
For more information on how to get started with your first extension for Business Central, see Getting started.
Rewards extension overview
This extension enables the ability to assign one of the three reward levels to customers: GOLD, SILVER, and BRONZE. Each reward level can be assigned a discount percentage. Different types of objects available within the AL development environment build the foundation of the user interface, allowing the user to edit the information. If you look for another option to update the layout of a page, you can use the Designer drag-and-drop interface. Additionally, this exercise contains the install code that creates the base for the reward levels. The upgrade code is run to upgrade the extension to a newer version and it changes the BRONZE level to ALUMINUM. By following all the steps of this walkthrough, you can publish the extension on your tenant and create a possible new feature for your customers.
Reward table object
The following code adds a new table 50100 Reward for storing the reward levels for customers. The table consists of three fields: Reward ID, Description, and Discount Percentage. For example, the Description field must contain a value of type text and it can't exceed the limit of 250 characters. The second field contains three properties that are used to set the range of the discount percentage assigned to every customer. Properties can be created for every field, depending on the scope.
Tip
Type ttable followed by the Tab key. This snippet will create a basic layout for a table object.
table 50100 Reward
{
    DataClassification = ToBeClassified;

    fields
    {
        // The "Reward ID" field represents the unique identifier
        // of the reward and can contain up to 30 Code characters.
        field(1;"Reward ID";Code[30])
        {
            DataClassification = ToBeClassified;
        }

        // The "Description" field can contain a string
        // with up to 250 characters.
        field(2;Description;Text[250])
        {
            // This property specified that
            // this field cannot be left empty.
            NotBlank = true;
        }

        // The "Discount Percentage" field is a Decimal numeric value
        // that represents the discount that will
        // be applied for this reward.
        field(3;"Discount Percentage";Decimal)
        {
            // The "MinValue" property sets the minimum value for the "Discount Percentage"
            // field.
            MinValue = 0;

            // The "MaxValue" property sets the maximum value for the "Discount Percentage"
            // field.
            MaxValue = 100;

            // The "DecimalPlaces" property is set to 2 to display discount values with
            // exactly 2 decimals.
            DecimalPlaces = 2;
        }
    }

    keys
    {
        // The field "Reward ID" is used as the primary key of this table.
        key(PK;"Reward ID")
        {
            // Create a clustered index from this key.
            Clustered = true;
        }
    }
}
Learn more about table properties in Table properties.
Reward card page object
The following code adds a new page 50101 Reward Card for viewing and editing the different reward levels that are stored in the new Reward table. Pages are the primary object that a user interacts with and have a different behavior based on the type of page that you choose. The Reward Card page is of type Card and it's used to view and edit one record or entity from the Reward table.
Tip
Use the snippet tpage, Page to create the basic structure for the page object.
page 50101 "Reward Card"
{
    // The page will be of type "Card" and will render as a card.
    PageType = Card;

    // The page will be part of the "Tasks" group of search results.
    UsageCategory = Tasks;

    // The source table shows data from the "Reward" table.
    SourceTable = Reward;

    // ApplicationArea sets the application area that applies to the page.
    // Setting the property to All means that all controls
    // will always appear in the user interface.
    ApplicationArea = All;

    // The layout describes the visual parts on the page.
    layout
    {
        area(content)
        {
            group(Reward)
            {
                field("Reward Id"; Rec."Reward ID")
                {
                }

                field(Description; Rec.Description)
                {
                }

                field("Discount Percentage"; Rec."Discount Percentage")
                {
                }
            }
        }
    }
}
Learn more about the types of pages in AL in Pages overview.
Reward list page object
The following code adds the 50102 Reward List page that enables users to view the contents of the Reward table and edit specific records by selecting them and viewing them in the Reward Card page.
Tip
Use the snippet tpage, Page of type list to create the basic structure for the page object.
page 50102 "Reward List"
{
    // Specify that this page will be a list page.
    PageType = List;

    // The page will be part of the "Lists" group of search results.
    UsageCategory = Lists;

    // The data of this page is taken from the "Reward" table.
    SourceTable = Reward;

    // The "CardPageId" is set to the Reward Card previously created.
    // This will allow users to open records from the list in the "Reward Card" page.
    CardPageId = "Reward Card";

    // ApplicationArea is set at the page level so all controls inherit it.
    ApplicationArea = All;

    layout
    {
        area(content)
        {
            repeater(Rewards)
            {
                field("Reward ID"; Rec."Reward ID")
                {
                }

                field(Description; Rec.Description)
                {
                }

                field("Discount Percentage"; Rec."Discount Percentage")
                {
                }
            }
        }
    }
}
After you've created the objects, update the startupObjectId in the launch.json file to 50102, which is the ID of the Reward List page and select the Ctrl+F5 shortcut to see the new page in your sandbox environment. You're asked to sign in to your Business Central, if you haven't already done so.
Tip
Information about your sandbox environment and other environments is stored as configurations in the launch.json file. Learn more in JSON files.
Designer
Business Central Designer works in the browser and allows modifying the current page. It enables users to add existing table fields, move fields around, or remove fields from the page. Users can make changes to display the information they need, where they need it by using drag-and-drop components.
To show how Designer changes the design of a page, you begin by adding one field to the Reward table. This field is used later to exemplify the Designer's properties.
field(4;"Minimum Purchase";Decimal)
{
    MinValue = 0;
    DecimalPlaces = 2;
}
From this point, changes to the Reward Card page can be done either manually by adding the following code in Visual Studio Code or by Use Designer's functions to add the same field. Both ways lead to the same results, but Use Designer speeds up the process.
field("Minimum Purchase";"Minimum Purchase")
{
    ApplicationArea = All;
}
Using the F6 key shortcut in Visual Studio Code launches the browser and enters Designer. You can also use Designer from the Business Central client, by selecting ![]() Designer.
Designer.
Note
Every time you start designing, you create a new extension and the changes you make in Designer will apply to all users.
To add the same fields and customize the Reward Card page, follow the next steps:
- Navigate to the Reward Card page by choosing + new.
- Enter Designer mode from the UI and select More from the Designer bar.
- Select Field from the Designer bar to show the list of available fields.
- Drag the Minimum Purchase field from the list onto the page in the Reward group.
- Choose the Reward in the group caption to enable the value to be edited. Change the caption to Info and select Enter.
After making these adjustments, finish up your design by choosing Stop Designing, which allows you to name the extension with an option to download code, and save the extension for the tenant. If you choose not to download the code at the end, you can still pull the changes via the Alt+F6 key shortcut from Visual Studio Code. You can also uninstall the extension from the Extension Management page. You can find the Extension Management page by choosing the search  icon and typing the page name.
Learn more about Designer in this article Designer.
Customer table extension object
The Customer table, like many other tables, is part of the Business Central's core service and it can't be modified directly by developers. To add new fields or to change properties on this table, developers must create a new type of object by using a table extension.
The following code creates a table extension for the Customer table and adds the Reward ID field.
Tip
Use the snippet ttableext to create a basic structure for the table extension object.
tableextension 50103 "Customer Ext" extends Customer
{
    fields
    {
        field(50100;"Reward ID";Code[30])
        {
            // Set links to the "Reward ID" from the Reward table.
            TableRelation = Reward."Reward ID";

            // Set whether to validate a table relationship.
            ValidateTableRelation = true;

           // "OnValidate" trigger executes when data is entered in a field.
            trigger OnValidate();
            begin

            // If the "Reward ID" changed and the new record is blocked, an error is thrown.
                if (Rec."Reward ID" <> xRec."Reward ID") and
                    (Rec.Blocked <> Blocked::" ") then
                begin
                    Error('Cannot update the rewards status of a blocked customer.')
                end;
            end;
        }
    }
}
Note
While running the code, you might get errors and warnings in Visual Studio Code. Those errors and warnings shouldn't affect the output of this example exercise.
Customer card page extension object
A page extension object can be used to add new functionality to pages that are part of the Business Central's core service. The following page extension object extends the Customer Card page object by adding a field control, Reward ID, to the General group on the page. The field is added in the layout section, while in the related section, find Related by extending the three dots icon, the code adds an action Rewards to open the Reward List page.
Tip
Use the shortcuts tpageext to create the basic structure for the page extension object.
pageextension 50104 "Customer Card Ext" extends "Customer Card"
{
    layout
    {
        // The "addlast" construct adds the field control as the last control in the General
        // group.
        addlast(General)
        {
            field("Reward ID"; Rec."Reward ID")
            {
                ApplicationArea = All;

                // Lookup property is used to provide a lookup window for
                // a text box. It is set to true, because a lookup for
                // the field is needed.
                Lookup = true;
            }
        }
    }

    actions
    {
        // The "addfirst" construct will add the action as the first action
        // in the Navigation group.
        addfirst(Navigation)
        {
            action("Rewards")
            {
                ApplicationArea = All;

                // "RunObject" sets the "Reward List" page as the object
                // that will run when the action is activated.
                RunObject = page "Reward List";
            }
        }
    }
}
At this point, reward levels can be created and assigned to customers. To view recent changes in the code, update the startupObjectId value in the launch.json file to 21. Then, select the Ctrl+F5 key or Run Without Debugging from the Run menu to open the page.
Configure context-sensitive links to Help
This sample app is relatively straightforward, but we want users of your app to be able to get help instantly and learn more in the process of using it. Just like Business Central has help readily available for users, you configure your app to get context-sensitive links to Help.
At an app level, you can specify where the help for your functionality is published in the app.json file. Then, for each page in your app, you specify a relevant Help file on your targeted website for that particular page. For more information, see Configure context-sensitive help.
Open the app.json file, and then change the value of the contextSensitiveHelpUrl property to point at the right location on your website. In this example, you publish help for your app at https://mysite.com/documentation.
"contextSensitiveHelpUrl": "https://mysite.com/documentation/",
Next, you set the ContextSensitiveHelpPage property in your app code for the Reward Card and Reward List pages:
    // The target Help topic is hosted on the website that is specified in the app.json file.
    ContextSensitiveHelpPage = 'sales-rewards';
The following example shows the properties for the Reward List page after you've specified the context-sensitive help page.
page 50102 "Reward List"
{
    // Specify that this page will be a list page.
    PageType = List;

    // The page will be part of the "Lists" group of search results.
    UsageCategory = Lists;

    // The target Help topic is hosted on the website that is specified in the app.json file.
    ContextSensitiveHelpPage = 'sales-rewards';

    // The data of this page is taken from the "Reward" table.
    SourceTable = Reward;

    // The "CardPageId" is set to the Reward Card previously created.
    // This will allow users to open records from the list in the "Reward Card" page.
    CardPageId = "Reward Card";
...

}
Now, if you run your app, you can see the link to help article for Reward List page by pointing over Reward ID and choosing Learn More. The URL of your targeted website is present in the Help section. You can specify the same relative link for Reward Card, Reward List, and the customization of the Customer page, or you can specify different targets. For more information, see Page-level configuration.
Add tooltips
To help users navigate the app interface without any confusion and to add more clarity on the app features, you can use tooltips. Just like the base application of Business Central includes tooltips for all controls and actions. For more information, see Help users get unblocked.
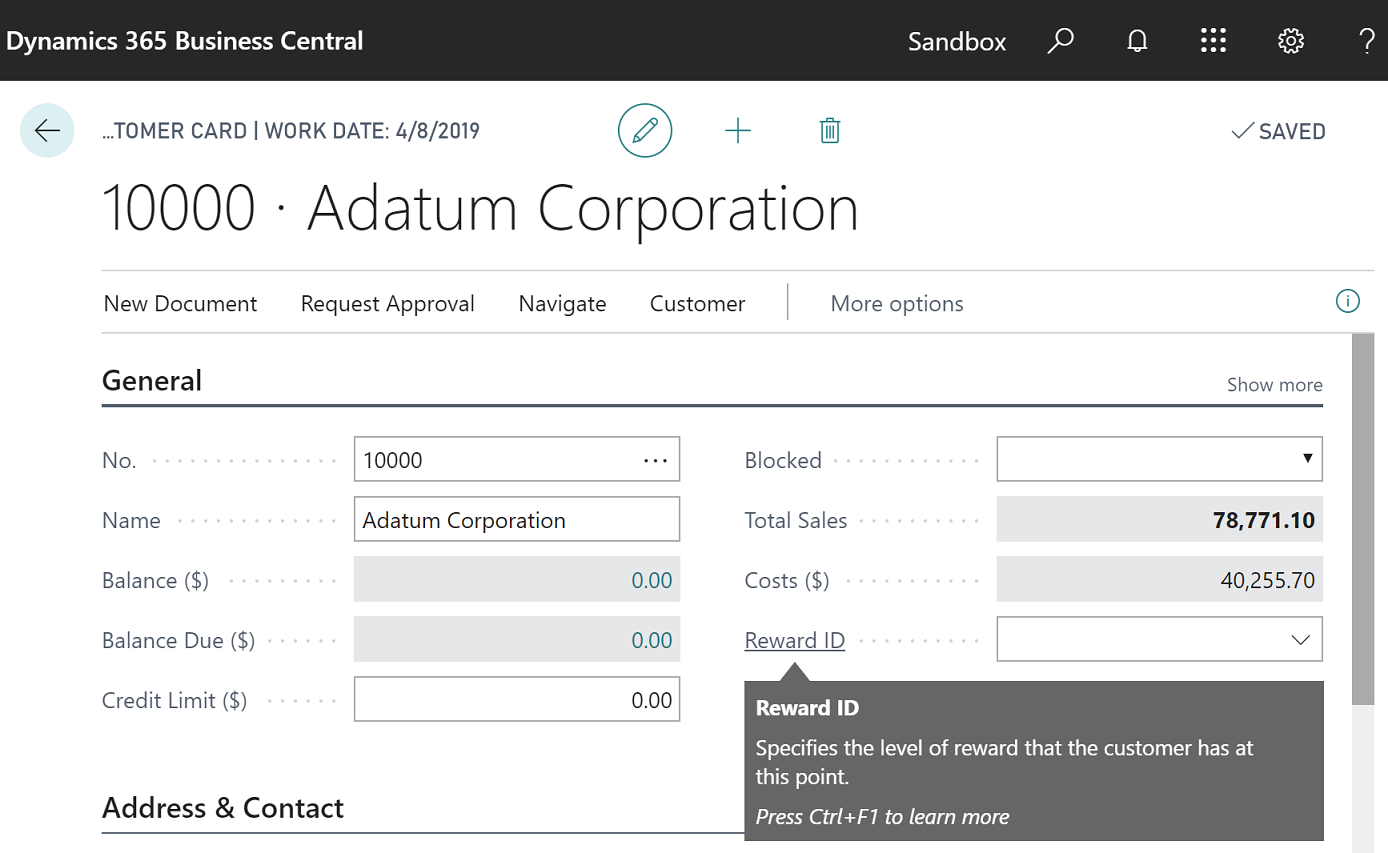
For this walkthrough, you want the following tooltip to appear on all three pages, Reward Card, Reward List, and Customer Card ext.
ToolTip = 'Specifies the level of reward that the customer has at this point.';
Adding tooltips in 2024 release wave 1 or later
Starting in Business Central 2024 release wave 1, you can define tooltips on table fields.
The following example shows how tooltips are defined on the table level:
// In [!INCLUDE[prod_short](../includes/2024-releasewave1-short.md)] or later, add tooltips on the Reward table

field(1;"Reward ID";Code[30])
{
    DataClassification = ToBeClassified;
    ToolTip = 'Specifies the level of reward that the customer has at this point.';
}
Adding tooltips prior to 2024 release wave 1
Prior to Business Central 2024 release wave 1, you need to add the tooltip to the properties of the Reward ID field on all three pages, Reward Card, Reward List, and Customer Card ext.
The following example shows how tooltips are defined on the page level:
field("Reward ID";"Reward ID")
{
    ApplicationArea = All;
    ToolTip = 'Specifies the level of reward that the customer has at this point.';
}
Now, if you deploy the app, you're able to read the tooltip text for the Reward ID field, and if you choose the Learn more link or select Ctrl+F1, a new browser tab opens the equivalent of https://mysite.com/documentation/sales-rewards.
Install code
After you have installed the extension, the Reward List page is empty. This is the result of the fact that the Reward table is also empty. Data can be entered manually into the Reward table by creating new records from the Reward List page. However, this task slows down the process, especially because the Reward table should be initialized with a standard number of reward levels when the extension is installed. To solve this, install codeunits can be used.
A codeunit is an object that can be used to encapsulate a set of related functionality represented by procedures and variables. An install codeunit is a codeunit with the Subtype property set to Install. This codeunit provides a set of triggers that are executed when a particular extension is installed for the first time or when it's reinstalled.
In this example, the following install codeunit initializes the Reward table with three records representing the 'GOLD', 'SILVER', and 'BRONZE' reward levels.
Tip
Use the shortcuts tcodeunit to create the basic structure for the codeunit.
codeunit 50105 RewardsInstallCode
{
    // Set the codeunit to be an install codeunit.
    Subtype = Install;

    // This trigger includes code for company-related operations.
    trigger OnInstallAppPerCompany();
    var
        Reward : Record Reward;
    begin
        // If the "Reward" table is empty, insert the default rewards.
        if Reward.IsEmpty() then begin
            InsertDefaultRewards();
        end;
    end;

    // Insert the GOLD, SILVER, BRONZE reward levels
    procedure InsertDefaultRewards()
    begin
        InsertRewardLevel('GOLD', 'Gold Level', 20);
        InsertRewardLevel('SILVER', 'Silver Level', 10);
        InsertRewardLevel('BRONZE', 'Bronze Level', 5);
    end;

    // Create and insert a reward level in the "Reward" table.
    procedure InsertRewardLevel(ID : Code[30]; Description : Text[250]; Discount : Decimal)
    var
        Reward : Record Reward;
    begin
        Reward.Init();
        Reward."Reward ID" := ID;
        Reward.Description := Description;
        Reward."Discount Percentage" := Discount;
        Reward.Insert();
    end;

}
For more information about install code, see Writing extension install code.
Upgrade code
When you upgrade an extension to a newer version, any modifications, which are required to support the upgrade in the existing data must be written in an upgrade codeunit. In this example, the following upgrade codeunit contains code that changes the BRONZE reward level to ALUMINUM level in customer records. The upgrade codeunit applies the changes when you run the Start-NAVAppDataUpgrade cmdlet in terminal.
Important
Remember to increase the version number of the extension in the app.json file.
codeunit 50106 RewardsUpgradeCode
{
    // An upgrade codeunit includes AL methods for synchronizing changes to a table definition
    // in an application with the business data table in SQL Server and migrating existing
    // data.
    Subtype = Upgrade;

    // "OnUpgradePerCompany" trigger is used to perform the actual upgrade.
    trigger OnUpgradePerCompany();
    var
        Reward : Record Reward;

        // "ModuleInfo" is the current executing module.
        Module : ModuleInfo;
    begin
        // Get information about the current module.
        NavApp.GetCurrentModuleInfo(Module);

        // If the code needs to be upgraded, the BRONZE reward level will be changed into the
        // ALUMINUM reward level.
        if Module.DataVersion.Major = 1 then begin
            Reward.Get('BRONZE');
            Reward.Rename('ALUMINUM');
            Reward.Description := 'Aluminum Level';
            Reward.Modify();
        end;
    end;
}
For more information about writing and running upgrade code, see Upgrading extensions.
Instrument your app with telemetry
Business Central emits telemetry data for several operations that occur when extension code is run. Create an Application Insights resource in Azure if you don't have one. For more information, see Create an Application Insights resource. Now, add the Application Insights connection string to the extension manifest (app.json file):
"applicationInsightsConnectionString": "<connection string>"
Replace <connection string> with your connection string.
You can configure your extension to send this data to a specific Application Insights resource on Microsoft Azure. For more information, see Sending extension telemetry to Azure Application Insights.
Conclusion
This walkthrough showed how an extension can be developed. The main AL objects and extension objects were used to make a structure for reward levels, to store, view, and edit them. The Designer was introduced as an alternative to modify visual components of page objects and to customize them directly from the web interface instead of using code. Up to this point, the table, and the page objects were empty, so, we added install codeunit, which initialized the Reward table with a standard number of reward levels when the extension was installed. We also added an upgrade code section in this exercise to create a complete picture of all processes involved when an extension is built. As a result, a user is enabled to assign one of the three reward levels to a customer and to change this scenario by upgrading the version of the extension.
Tip
To try building a more advanced Customer Rewards sample extension, see Building an advanced sample extension.
Related information
Developing extensions
Get started with AL
How to: publish and install an extension
Configure context-sensitive help
Sending extension telemetry to Azure Application Insights