Note
Access to this page requires authorization. You can try signing in or changing directories.
Access to this page requires authorization. You can try changing directories.
Code signing is a common practice for many applications. It's the process of digitally signing a file to verify the author and that the file hasn't been tampered with since it was signed. The signature of the app package file is verified during the publishing of the extension using the Publish-NAVApp cmdlet. For more technical information on signing, see Authenticode.
Note
If you want to publish an unsigned extension package in your on-premise environment, you need to explicitly state it by using the - SkipVerification parameter on the Publish-NAVApp cmdlet. An extension without a valid signature won't be published on AppSource.
How you sign an app package file depends on when your certificate was issued. On June 1, 2023 the industry standards for storing code signing certificates changed. Certificate Authorities now require code signing certificates to be stored on Hardware Security Modules (HSM) or Hardware Tokens that are certified with FIPS 140-2 Level 2 or equivalent. Code signing certificates issued after this date are therefore only issued via physical USB tokens, into on-premises HSM services, or cloud HSM services such as Azure Key Vault.
If your certificate was issued after June 1, 2023, follow the guide on Sign an app package file with Azure Key Vault. If your certificate was issues before this date, follow the guide on Sign an app package file with a pfx file or upload your certificate to an Azure Key Vault and follow the guide on Sign an app package file with Azure Key Vault.
Sign an app package file with Azure Key Vault
Prerequisites
Before signing your app file, follow the next steps to ensure your key vault is set up for code signing.
(Optional) Setting up a service principal: If the signing operation should be done by a Service Principal, create a Service Principal in Azure.
Azure Key Vault setup: Create an Azure Key Vault for your code signing certificate if you don't already have one
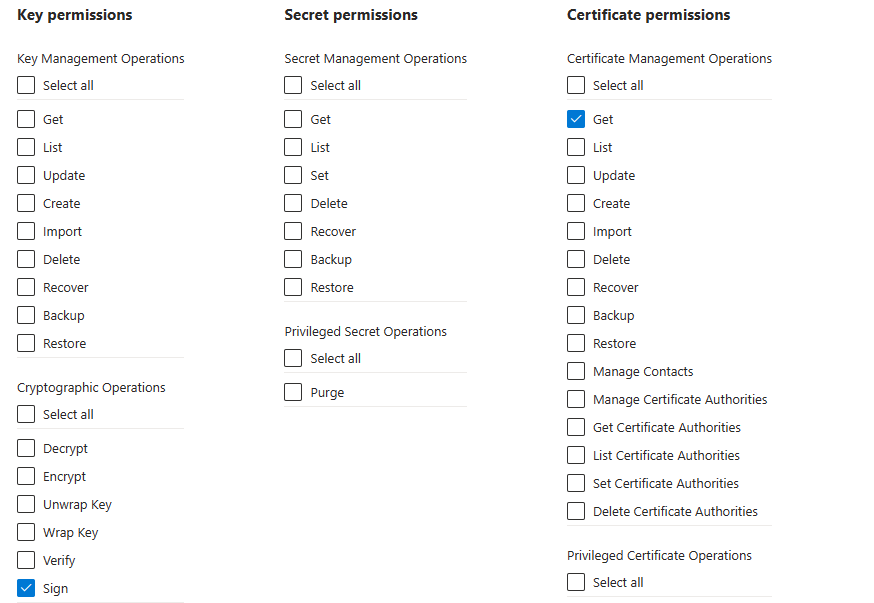
Configure access policies: Configure an Azure Key Vault access policy for the account that will be used for signing. At minimum, the account needs the following permissions:
- Cryptographic Operations: Sign
- Certificate Management Operations: Get
Upload your certificate to the Key Vault: The process on getting your certificate into your Azure Key Vault depends on which Certificate Authority you use. Consult with your certificate authority on how you can get your codesigning certificate into an Azure Key Vault. If you're getting certificates from DigiCert or GlobalSign, you might be able to use Azure Key Vaults Certificate Authority integration to generate certificates directly from Azure Key Vault.
Note
Only the Premium SKU of Azure Key Vault supports Hardware Security Modules. If your certificate is issued after June 1st 2023 you will likely need the Premium SKU Azure Key Vault.
Steps for signing your .app file with Azure Key Vault
- Install .NET SDK
- Install the .NET Signing Tool by running the following command:
dotnet tool install sign --global --prerelease
- Sign your apps by running one of the following commands:
Signing with a managed identity:
sign code azure-key-vault --azure-key-vault-url "https://MyKeyvault.vault.azure.net/" `
                          --azure-key-vault-certificate "NameOfMyCertificate" `
                          --azure-key-vault-managed-identity `
                          --description "Some Description" `
                          --description-url "<Description URL>" `
                          --verbosity Information `
                          "C:/Path/To/File(s)"
Signing with a service principal:
sign code azure-key-vault --azure-key-vault-url "https://MyKeyvault.vault.azure.net/" `
                          --azure-key-vault-certificate "NameOfMyCertificate" `
                          --azure-key-vault-client-id "ClientIdOfServicePrincipal" `
                          --azure-key-vault-client-secret "ClientSecretOfServicePrincipal" `
                          --azure-key-vault-tenant-id "MicrosoftEntraId" `
                          --description "Some Description" `
                          --description-url "<Description URL>" `
                          --verbosity Information `
                          "C:/Path/To/File(s)"
For help with using the signing tool:
sign code azure-key-vault --help
Sign an app package file with a pfx file
The signing of an app package file must be performed on a computer that has Dynamics 365 Business Central installed. If you're running Dynamics 365 Business Central on Docker for your development environment, that environment meets this requirement. You must also have the certificate that is used for signing on the computer. The certificate must include code signing as the intended purpose. It's recommended that you use a certificate purchased from a third-party certificate authority.
To start the Certificate Manager tool, press Win+R to open up the Run dialog box. At the prompt, type Certmgr.msc and then press Enter. This opens the Certificate Manager. Inspect the Trusted Root Certification Authorities folder.
Steps for signing your .app file with a PFX file
- Prepare your computer for signing.
- Make sure that you sign the .app file on a Microsoft Windows computer that has Dynamics 365 Business Central installed.
- Copy the certificate that you purchased from a third-party certificate authority to a folder on the computer. The example uses a pfx version of the certificate. If the certificate you purchased isn't in a pfx format, create a pfx file. There are resources online, which can help you convert a certificate to
.pfxformat. The file path for the sample command isC:\Certificates\MyCert.pfx. (Optionally, create your own certificate for local test or development purposes using the Self-signed certificate information). - Install a signing tool such as SignTool or SignCode to the computer. The sample command will use SignTool.
- Copy your extensions .app file to the computer if it's not already on the computer. The file path for the sample command is
C:\NAV\Proseware.app. - Run the command to sign the .app file.
- The following example signs the Proseware.app file with a time stamp using the certificate in the password-protected MyCert.pfx file. The command is run on the computer that was prepared for the signing. Once the command has been run, the Proseware.app file has been modified with a signature. This file is then used when publishing the extension.
SignTool sign /f C:\Certificates\MyCert.pfx /p MyPassword /t http://timestamp.verisign.com/scripts/timestamp.dll “C:\NAV\Proseware.app”
Important
It's recommended to use a time stamp when signing the app package file. A time stamp allows the signature to be verifiable even after the certificate used for the signature has expired. For more information, see Time Stamping Authenticode Signatures. Depending on the certification authority, you may need to acquire a specific certificate in order to time stamp, an Extended Validation certificate from DigiCert for example.
Note
If you are using the BCContainerHelper PowerShell module to run Dynamics 365 Business Central on Docker, you can use the function Sign-BCContainerApp to perform all the steps above.
Self-signed certificate
For testing purposes and on-premises deployments, it's acceptable to create your own self-signed certificate. You can do so using the New-SelfSignedCertificate cmdlet in PowerShell on Windows 10 or MakeCert.
The following example illustrates how to create a new self-signed certificate for code signing:
New-SelfSignedCertificate –Type CodeSigningCert –Subject “CN=ProsewareTest”
The following (deprecated) MakeCert command is used to create a new self-signed certificate for code signing:
Makecert –sk myNewKey –n “CN=Prosewaretest” –r –ss my
Code signing for AppSource
If you publish the extension as an app on AppSource, the app package file must be signed using a certificate purchased from a Certification Authority (CA); a self-signed certificate won't be accepted by the technical validation. The CA must have its root certificates in Microsoft Windows. You can obtain a certificate from a range of certificate providers, including but not limited to DigiCert and Symantec, see the image below. You don't have to use an EV Code Signing certificate, standard code signing certificates can be used for signing your extensions.
You can check the validity of your code signing by transferring your signed app file to a Windows device, which didn't sign it. Right-click on the file and go to Properties,Digital Signatures, and then choose Details. In this pop-up, choose View Certificate and finally go to Certification Path. If the Certification Path has only one entry, then the file isn't signed correctly and is rejected by AppSource technical validation.
Related information
Get started with AL
Keyboard shortcuts
AL development environment
Questions about code-singing validation