Note
Access to this page requires authorization. You can try signing in or changing directories.
Access to this page requires authorization. You can try changing directories.
APPLIES TO: Business Central online
This article explains how you can set up Business Central online to run Power Automate flows when an event happens in Business Central.
Note
To use Power Automate with Business Central, you must have a valid Power Automate account.
About automated flows
Automated flows are designed to run automatically when an event occurs in Business Central. Unlike instant flows, which require a user to manually run the flow, automated flows run as the user works in Business Central, requiring no extra action on their part.
An automated flow consists of at least one trigger (the event that starts the flow) and one action (does an operation). To support creating flows, the Business Central connector includes several triggers and actions that you can use.
The connector seamlessly connects data and gives you the option to include Dynamic content when you create automated flows. The Business Central triggers return data, like the ID of a record, which actions later in the flow can consume. Business Central actions also return data that can be passed to other actions.
Note
The Business Central connector for Power Automate supports multiple production and sandbox environments. If you haven't created multiple production or sandbox environments, Production is the only available option you can choose.
Prerequisites
- Power Automate premium license or a license that includes premium connectors. For more information, see Power Automate licenses.
Create an automated flow from scratch
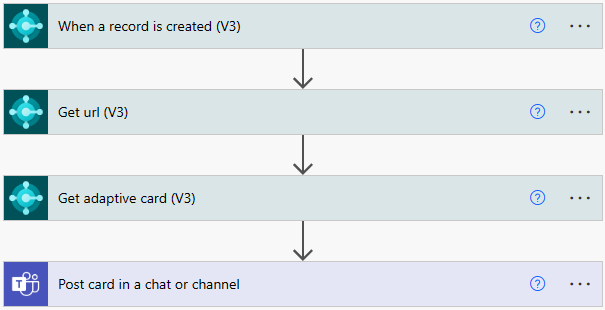
This procedure outlines the steps required to create an automated flow using the Business Central connector. To illustrate the process, it walks you through a basic example of a flow that sends a message to a Teams group chat when a new customer is created or modified in Business Central. The message contains a card that shows some information about the customer and a Details button that opens even more information about the customer. The card is the same as the one displayed in Teams when you manually share a record to Teams from inside Business Central.
The following figure illustrates the flow that you create.
Complete the following steps:
Sign in to Power Automate or, from a page in Business Central, select Automate> Power Automate > Create automated flow or Manage Flows.
On the left side, select Create, then choose to create by starting from blank or starting from connector:
- Under Starting from blank, select Automated cloud flow.
- On the Build an automated cloud flow page, give your flow a name in the Flow name field.
- Under Choose how to trigger this flow, search for the Business Central trigger for starting the flow.
For this example, type business central in the search box, then find and select When a record is created (V3).
Your flow looks similar to the following figure:
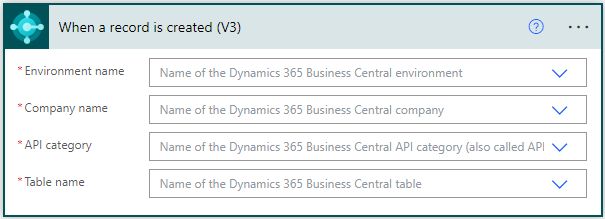
Fill in the parameters to specify what the flow relates to. The parameters and whether they're required depend on the trigger.
Parameter Description Environment name Name of the Business Central environment that the flow runs on. The Business Central connector for Power Automate supports multiple production and sandbox environments. If you haven't created multiple production or sandbox environments, Production is the only available option you can choose. Company name Name of Business Central company that the flow runs on API category Name of the Business Central API category that runs the flow (also called API route) Table name Name of the Business Central table that the flow runs on. Begin designing the flow by adding actions and more triggers. Start by selecting + New step.
Note
Because each step in the flow is independent of the next, you may be required to define the environment and company multiple times.
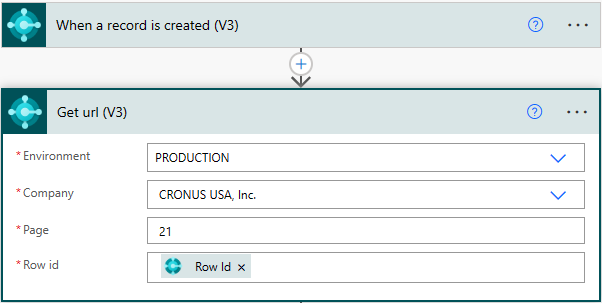
Complete the following steps to add the action called Get url (V3). This action gets the web client page URL for the specified Business Central record, in this case, the customer card page 21.
- In the Choose an operation step, select the Actions tab, then search for and select get url (v3) for the Dynamics 365 Business Central connector.
- On the Get url (v3) step, set the Environment name and Company name to the same values as the When a record is created (V3) the trigger.
- Set the Page to the ID of the page, in this case, 21.
- Select the Row ID field to open the Dynamic content pane, then select RowID.
The flow looks like this:
Important
The Get url (v3) action only works for Business Central version 22.0 and later.
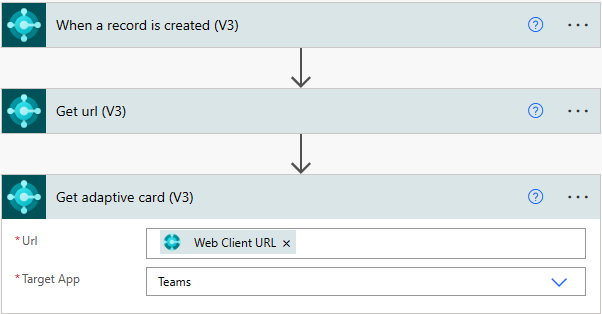
Repeat the previous step, except this time, add the action called Get adaptive card (v3). This action generates an adaptive card for the specified record that acts as a payload for input to Team.
- Select + New step.
- In the Choose an operation step, select the Actions tab, then search for and select get adaptive card (v3) for the Dynamics 365 Business Central connector.
- On the Get adaptive card (v3) action, select the Url field to open the Dynamic content pane. Then, under Get url (V3), select Web Client URL.
- On the Get adaptive card (v3) action, set the Target field to Teams.
The flow looks like this:
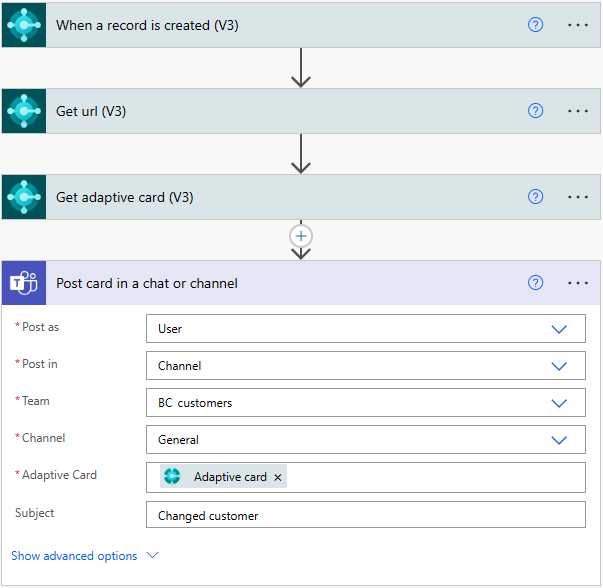
Add the final action that posts the card to a Teams channel.
Select + New step.
In the Choose an operation step, select the Actions tab, then search for and select post a card in a chat or channel for the Microsoft Teams connector.
On the Post a card in a chat or channel action, set the following fields:
Field Value Post as User Post in Channel Team The team in Teams where you want to post the card Channel The team channel in Teams where you want to post the card Adaptive card Use dynamic content to set to Adaptive Card from the Get adaptive card (V3) action. Subject Optional text that appears above the card in Teams
The flow looks like this:
Select Save.
Create a flow from a template
Microsoft also provides automated flow templates that you can use to build your own templates. The templates provide as fast way to create flows, but they're also a good way to learn how to build your own flows. Here's a list of some of the templates:
- When a vendor approval is requested
- When a general journal line approval is requested
- When a record is deleted
- When a record is changed
- When a record is created
- When a record is modified
- When a general journal batch approval is requested
- When a customer approval is requested
- When an item approval is requested
- When a purchase document approval is requested
- When a sales document approval is requested
Get started
Add a new flow from Business Central or Power Automate:
In this way, you work only in Business Central, but you have the option during the setup to open the flow in Power Automate.
Sign in to Business Central.
Open the list, card, or document page.
In the action bar, select Automate > Power Automate > Create automated flow.
The Create a flow page opens and lists all the available Business Central templates related to the page. Select the template you want.
Tip
When you select a template, an introductory page explaining the template appears, letting you continue or go back.
By default, the Create a flow page is filtered to list only those templates that create automated flows. If you want a template that's not shown or want to find out what other templates are available, select Filtered templates > All templates to clear the filter or use the Search templates... box.
Make changes to the flow, for example, by adding or changing steps. There are typically a few parameters that you need to fill in before saving the flow as one of your own.
Note
Because each step in the flow is independent of the next, you may have to define the environment and company multiple times
Select Save when done.
Use the connector for other scenarios
The connectors for Power Platform and Azure Logic Apps also support other scenarios. For example, use the Find records (V3) action to create or edit table data for document headers or lines. You can also build a Power App that creates and posts time sheets, or a Power Automate flow that posts journal lines.
The Find records (V3) action finds records in the same way as filter expressions in OData URIs. But it does so behind the scenes, so all you have to do is add the action as a step in your flow. Learn more at Find records (V3).
Note
All the actions and triggers in the connector (except the ones related to approvals) support Business Central APIs coming from AppSource extensions or from other extensions installed in your Business Central environment, provided that they follow the API best practices. Learn more at Developing a Custom API.
Related information
Manage Power Automate Flows
Set Up Instant Flows
Troubleshoot Your Business Central Automated Workflows
Use Business Central in an Automated Workflow