Note
Access to this page requires authorization. You can try signing in or changing directories.
Access to this page requires authorization. You can try changing directories.
Use this scenario if you have one of the following Business Central versions that use the Microsoft system and base applications.
- 2025 release wave 2 (version 27)
- 2025 release wave 1 (version 26)
- 2024 release wave 2 (version 25)
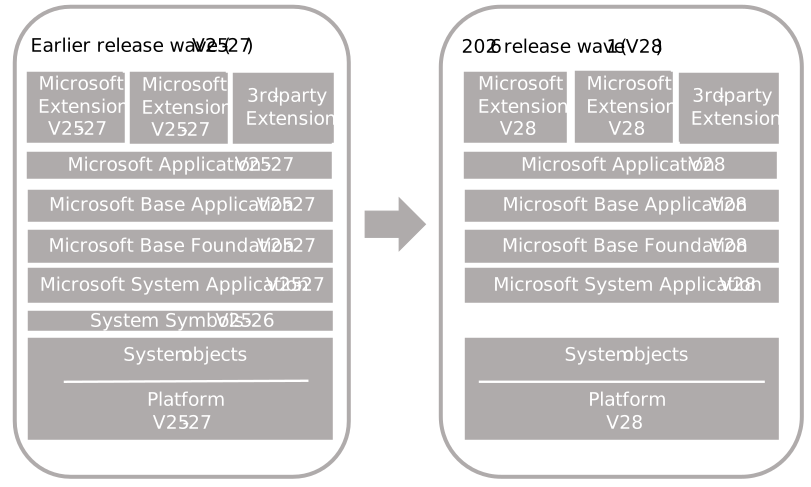
The process for upgrading is similar for a single-tenant and multitenant deployment. However, there are some inherent differences. With a single-tenant deployment, the application code and business data are in the same database. In a multitenant deployment, application code is in a separate database (the application database) than the business data (tenant). In the procedures that follow, for a single-tenant deployment, consider references to the application database and tenant database as the same database. Steps are marked as Single-tenant only or Multitenant only where applicable.
Important
You can't upgrade directly to version 28 from version 24 or earlier because there are several objects in these earlier versions that are ot included in version 28. Upgrade to version 25 first. Learn more about these objects in Deleted objects. To upgrade to version 25, follow the instructions in Upgrading Microsoft system and base application to version 25.
Task 1: Prepare for upgrade to version 28
Review upgrade considerations and known issues for version 28
- Learn about key information and tips to prepare for an upgrade in Business Central upgrade considerations and preparation for v26 and later.
- The Known Issues article explains issues that impact installation, upgrade, and operations of Business Central on-premises. Review the issues related to the Business Central version you're installing or upgrading to. Some issues must be addressed before upgrading, while others can be resolved later.
Prepare new runtime packages
If a deployment uses extensions published as runtime packages, create new versions of the runtime packages for the new platform and application. Running Repair-NAVapp on the extensions, as described later in this article, isn't recommended because it can cause problems with the extensions after an upgrade.
Learn more in Creating Runtime Packages for Business Central On-Premises.
PowerShell variables used in tasks
Many of the steps in this article use PowerShell cmdlets, which require that you provide values for various parameters. To make it easier for copying or scripting in PowerShell, the steps use the following variables for parameter values. Replace the text between the " " with the correct values for your environment.
$OldBcServerInstance = "The name of the Business Central server instance for your previous version, for example: BC270"
$NewBcServerInstance = "The name of the Business Central server instance for version 28, for example: BC280"
$TenantId = "The ID of the tenant to be upgraded. If not using a multitenant server instance, set the variable to default, or omit -Tenant parameter."
$TenantDatabase = "The name of the Business Central tenant database to be upgraded, for example: Demo Database BC (27-0)"
$ApplicationDatabase = "The name of the Business Central application database in a multitenant environment, for example: My BC App DB. In a single-tenant deployment, this is the same as the $TenantDatabase"
$DatabaseServer = "The SQL Server instance that hosts the databases. The value has the format server_name\instance_name, For example: localhost\BCDEMO"
$SystemAppPath = "The file path and name of the System Application extension for the update, for example: C:\DVD\Applications\system application\Source\\Microsoft_System Application.app"
$BusFoundAppPath = "The file path and name of the Business Foundationn extension for the update, for example: C:\DVD\Applications\BusinessFoundation\Source\Microsoft_Business Foundation.app"
$BaseAppPath = "The file path and name of the Base Application extension for the update, for example: C:\DVD\Applications\BaseApp\Source\Microsoft_Base Application.app"
$ApplicationAppPath = "The path and file name to the Application application extension for the update, for example: C:\DVD\Applications\Application\Source\Microsoft_Application.app"
$NewBCVersion = "The version number for the current System, Base, and Application extensions that you'll reinstall, for example: 28.0.24582.0"
$PartnerLicense = "The file path and name of the partner license"
$CustomerLicense = "The file path and name of the customer license"
$AddinsFolder = "The file path to the Add-ins folder of version 28 server installation, for example, C:\Program Files\Microsoft Dynamics 365 Business Central\280\Service\Add-ins."
Task 2: Install version 28
Download the latest available update for Business Central 2025 release wave 2 (version 28) that is compatible with your current version.
Learn more in Dynamics 365 Business Central Upgrade Compatibility Matrix.
Before you install version 28, it can be useful to create a desktop shortcut the Business Central Server Administration tool for the current version. The reason is that the Start menu item for the current version is replaced with item for the Business Central Server Administration tool for version 28.
Install Business Central version 28 components.
You keep the current version installed to complete some steps in the upgrade process. When you install version 28, you must either specify different port numbers for components (like the Business Central Server instance and web services) or stop the current version's Business Central Server instance before you run the installation. Otherwise, you get an error that the Business Central Server failed to install.
Learn more in Installing Business Central Using Setup.
Task 3: Upgrade permission sets
Version 18 introduced AL-based permission sets for the system and extensions. AL-based permission sets are the default in Microsoft and most custom extensions.
- If you already use AL-based permission sets, no action is required in this task.
- If you still use the legacy, data-based model, decide whether to transition now or continue temporarily. Learn more in Upgrading permissions sets and permissions.
Task 4: Prepare the existing databases
Make backup of the databases.
Disable data encryption.
If the current server instance uses data encryption, disable it. You can enable it again after upgrading.
Learn more in Managing Encryption and Encryption Keys.
Instead of disabling encryption, you can export the current encryption key, which you'll then import after upgrade. However, we recommend disabling encryption before upgrading.
Start Business Central Administration Shell for your current version as an administrator.
For more information, see Run Business Central Administration Shell.
(Single-tenant only) Uninstall all extensions from the old tenants.
In this step, you uninstall the Base Application, System Application (if used), and any other extensions that are currently installed on the database.
Get a list of installed extensions.
This step is optional, but it can be useful to the names and versions of the extensions.
To get a list of installed extensions, use the Get-NAVAppInfo cmdlet.
Get-NAVAppInfo -ServerInstance $OldBcServerInstance -Tenant $TenantIdFor a single-tenant deployment, set the
$TenantIdto default.Uninstall the extensions.
To uninstall an extension, you use the Uninstall-NAVApp cmdlet.
Uninstall-NAVApp -ServerInstance $OldBcServerInstance -Name <extensions name> -Tenant $TenantId -Version <extension version> -ForceReplace
<extension name>and<extension version>with the exact name and version the published System Application.For example, together with the Get-NAVApp cmdlet, you can uninstall all extensions with a single command:
Get-NAVAppInfo -ServerInstance $OldBcServerInstance -Tenant $TenantId| % { Uninstall-NAVApp -ServerInstance $OldBcServerInstance -Tenant $TenantId -Name $_.Name -Version $_.Version -Force}
Unpublish all system symbols (version 26 and earlier only).
To unpublish symbols, use the Unpublish-NAVAPP cmdlet with the
-SymbolsOnlyswitch.Get-NAVAppInfo -ServerInstance $OldBcServerInstance -SymbolsOnly | % { Unpublish-NAVApp -ServerInstance $OldBcServerInstance -Name $_.Name -Version $_.Version }The Symbols extension isn't supported in version 27 and later. Symbols are now included with the Business Central server binaries instead of an extension. What are symbols?
(Multitenant only) Dismount the tenants from the application server instance.
To dismount a tenant, use the Dismount-NAVTenant cmdlet:
Dismount-NAVTenant -ServerInstance $OldBcServerInstance -Tenant $TenantIdStop the server instance.
Stop-NAVServerInstance -ServerInstance $OldBcServerInstance
Task 5: Convert application database to version 28
This task runs a technical upgrade on the application database to convert it to the version 28 platform. The conversion updates the system tables of the database to the new schema (data structure). It provides the latest platform features and performance enhancements. It also adds the system symbols for the version to the database.
Start Business Central Administration Shell for version 28 as an administrator.
Run the Invoke-NAVApplicationDatabaseConversion cmdlet to start the conversion:
Invoke-NAVApplicationDatabaseConversion -DatabaseServer $DatabaseServer -DatabaseName $ApplicationDatabaseWhen completed, a message like the following displays in the console:
DatabaseServer      : .\BCDEMO
DatabaseName        : Demo Database BC (27-0)
DatabaseCredentials :
DatabaseLocation    :
Collation           :
Note
When the database is on Azure SQL Database, you may get the following error:
SQL Server: Execution Timeout Expired. The timeout period elapsed prior to completion of the operation or the server is not responding. The statement has been terminated.
If you do, scale up the database resources in Azure SQL, then run the Invoke-NAVApplicationDatabaseConversion cmdlet again. If the conversion is successful, you can then scale it back down to its original setting and continue the upgrade.
Task 6: Configure version 28 server
When you installed version 28 in Task 2, a version 28 Business Central Server instance was created. In this task, you change server configuration settings that are required to complete the upgrade. Some of the changes are only required for upgrade and can be reverted after you complete the upgrade.
Set the server instance to connect to the application database.
Set-NAVServerConfiguration -ServerInstance $NewBcServerInstance -KeyName DatabaseName -KeyValue $ApplicationDatabaseIn a single tenant deployment, this command mounts the tenant automatically. Learn more in Connecting a Server Instance to a Database.
Disable task scheduler on the server instance for purposes of upgrade.
Set-NavServerConfiguration -ServerInstance $NewBcServerInstance -KeyName "EnableTaskScheduler" -KeyValue falseBe sure to re-enable task scheduler after upgrade if needed.
Restart the server instance.
Restart-NAVServerInstance -ServerInstance $NewBcServerInstance
Task 7: Import version 28 license
Use the Import-NAVServerLicense to upload the version 28 license to the database.
Import-NAVServerLicense -ServerInstance $NewBcServerInstance -LicenseFile $PartnerLicenseRestart the server instance.
Restart-NAVServerInstance -ServerInstance $NewBcServerInstance
Task 8: Synchronize tenant
Synchronize the tenant database with the platform changes in the application database to get it ready for the new extension versions. If you have a multitenant deployment, do these steps for each tenant.
(Multitenant only) Mount the tenant to the version 28 server instance.
To mount the tenant, use the Mount-NAVTenant cmdlet:
Mount-NAVTenant -ServerInstance $NewBcServerInstance -DatabaseName $TenantDatabase -DatabaseServer $DatabaseServer -Tenant $TenantId -AllowAppDatabaseWriteImportant
You must use the same tenant ID for the tenant that was used in the old deployment; otherwise you'll get an error when mounting or syncing the tenant. If you want to use a different ID for the tenant, you can either use the
-AlternateIdparameter now or after upgrading, dismount the tenant, then mount it again using the new ID and theOverwriteTenantIdInDatabaseparameter.For upgrade, set the
-AllowAppDatabaseWriteparameter. After upgrade, you can dismount and mount the tenant again without the parameter if needed.At this stage, the tenant state is OperationalWithSyncPending.
Synchronize the tenant with the application database.
Use the Sync-NAVTenant cmdlet:
Sync-NAVTenant -ServerInstance $NewBcServerInstance -Mode Sync -Tenant $TenantIdWith a single-tenant deployment, you can omit the
-Tenantparameter and value.
Task 9: Publish extensions
In this task, you publish the extensions. As minimum, you publish the new base application and system application extensions from the installation media (DVD). You also publish new versions of any Microsoft and non-Microsoft extensions that were used on your old deployment.
Publishing an extension adds the extension to the application database that is mounted on the server instance. Once published, it's available for installing on tenants. This task updates internal tables, compiles the components of the extension behind-the-scenes, and builds the necessary metadata objects that are used at runtime.
The steps in this task continue to use the Business Central Administration Shell for version 28 that you started in the previous task.
Publish the System Application extension (Microsoft_System Application.app).
You find the (Microsoft_System Application.app in the Applications\System Application\Source folder of installation media (DVD).
Publish-NAVApp -ServerInstance $NewBcServerInstance -Path $SystemAppPathPublish the Business Foundation extension (Microsoft_Business Foundation.app).
You find the Microsoft_Business Foundation.app in the Applications\BusinessFoundation\Source folder of installation media (DVD).
Publish-NAVApp -ServerInstance $NewBcServerInstance -Path $BusFoundAppPathPublish the Business Central base application extension (Microsoft_Base Application.app).
The Base Application extension contains the application business objects. You find the (Microsoft_Base Application.app in the Applications\BaseApp\Source folder of installation media (DVD).
Publish-NAVApp -ServerInstance $NewBcServerInstance -Path $BaseAppPathPublish the Microsoft_Application extension.
Publish-NAVApp -ServerInstance $NewBcServerInstance -Path $ApplicationAppPathLearn more about this extension in The Microsoft_Application.app File.
Publish the new versions of Microsoft extensions.
In this step, you publish new versions of Microsoft extensions that were used on your old deployment. You find the extensions in the Applications folder of the installation media (DVD).
Publish-NAVApp -ServerInstance $NewBcServerInstance -Path "<path to Microsoft extension>"For example:
Publish-NAVApp -ServerInstance BC280 -Path "C:\W1DVD\Applications\ReportLayouts\Source\Microsoft__Exclude_ReportLayouts.app"Note
A new extension for report layouts, called _Exclude_ReportLayouts, was added in version 20. If you're coming from a version earlier than version 20, make sure to publish and install this extension to get the latest report layout features described at Get Started Creating Report Layouts.
Publish new versions of non-Microsoft extensions. Be sure to include new extensions that contain custom permission sets as AL objects.
If you have new versions of these extensions, built on the Business Central version 28, then publish the new versions.
Publish-NAVApp -ServerInstance $NewBcServerInstance -Path "<path to extension>"Recompile extensions not built on version 28.
Important
Don't do this step on extensions published as runtime packages. Create new versions of the runtime packages instead. For more information, see Creating Runtime Packages for Business Central On-Premises.
Do this step for any published extension versions that aren't built on version 28, and you want to reinstall on tenants. These extensions must be recompiled to work with version 28. To recompile the extensions, use the Repair-NAVApp cmdlet:
Repair-NAVApp -ServerInstance $NewBcServerInstance -Name <extension name> -Version <extension name>For example, to recompile all non-Microsoft extensions, you can run the following command:
Get-NAVAppInfo -ServerInstance $NewBcServerInstance | Where-Object {$_.Publisher -notlike 'Microsoft'} | Repair-NAVAppRestart the Business Central Server when completed.
Task 10: Synchronize tenant with extensions
Synchronize the tenant's database schema with any schema changes in the new extension versions. If you have a multitenant deployment, do these steps for each tenant.
Synchronize the tenant with the System Application extension.
Use the Sync-NAVApp cmdlet:
Sync-NAVApp -ServerInstance $NewBcServerInstance -Tenant $TenantId -Name "System Application" -Version $NewBCVersionReplace
$NewBCVersionwith the exact version of the published System Application. To get the version, you can use the Get-NAVAppInfo cmdlet.Synchronize the tenant with the Business Foundation extension.
Sync-NAVApp -ServerInstance $NewBcServerInstance -Tenant $TenantId -Name "Business Foundation" -Version $NewBCVersionReplace
$NewBCVersionwith the exact version of the published Base Application.Synchronize the tenant with the Business Central Base Application extension.
Sync-NAVApp -ServerInstance $NewBcServerInstance -Tenant $TenantId -Name "Base Application" -Version $NewBCVersionReplace
$NewBCVersionwith the exact version of the published Base Application.Synchronize the tenant with the Application extension.
Sync-NAVApp -ServerInstance $NewBcServerInstance -Tenant $TenantId -Name "Application" -Version $NewBCVersionSynchronize the tenant with Microsoft and non-Microsoft extensions.
For each extension, run the Sync-NAVApp cmdlet:
Sync-NAVApp -ServerInstance $NewBcServerInstance -Tenant $TenantId -Name "<extension name>" -Version <extension version>Important
If you're upgrading the v25 subscription billing extension, use the
-Mode ForceSyncparameter to force synchronize the base application; otherwise, synchronization errors occur. Learn more in Renamed tables and fields in subscription billing extension cause synch errors on upgrade.
Task 11: Upgrade data
In this task, you run a data upgrade for extensions.
Single tenant
Run the data upgrade/installation on extensions in order of dependency: System Application, Business Foundation, Base Application, Application.
Run the data upgrade for the System Application.
To run the data upgrade, use the Start-NAVAppDataUpgrade cmdlet cmdlet:
Start-NAVAppDataUpgrade -ServerInstance $NewBcServerInstance -Name "System Application" -Version $NewBCVersionThis step automatically installs the new system application on the tenant.
Install the Business Foundation extension. The Base Application has a dependency on this app, so it must be installed before you can upgrade the Base Application.
To install the Business Foundation extension, use the Install-NAVApp cmdlet cmdlet:
Install-NAVApp -ServerInstance $NewBcServerInstance -Name "Business Foundation" -Version $NewBCVersionRun the data upgrade for the Base Application, followed by Application extension.
Start-NAVAppDataUpgrade -ServerInstance $NewBcServerInstance -Name "Base Application" -Version $NewBCVersionStart-NAVAppDataUpgrade -ServerInstance $NewBcServerInstance -Name "Application" -Version $NewBCVersionThis step automatically installs the new versions of these extensions on the tenant.
Upgrade the new versions of Microsoft extensions and non-Microsoft extensions.
Upgrade any Microsoft and non-Microsoft extensions that are used in the old deployment to new versions found on the installation media. The new versions are in the Application folder of the DVD. There's a folder for each extension. The extension package (.app file) is in the Source folder.
For each extension, run Start-NAVAppDataUpgrade cmdlet. First, run the data upgrade for the Application extension, then run it for other Microsoft and non-Microsoft extensions.
This step also automatically installs the new extension version on the tenant.
Multitenant
On each tenant, run the Start-NavDataUpgrade cmdlet as follows:
Start-NAVDataUpgrade -ServerInstance $NewBcServerInstance -Tenant $TenantId -FunctionExecutionMode Serial -SkipAppVersionCheck
This command upgrades and installs the extensions on the tenant.
Task 12: Install new Microsoft or reinstall non-Microsoft extensions
Complete this task to install new first-time Microsoft extensions that you published in task 9 or any non-Microsoft extensions for which a new version wasn't published. For each extension, run the Install-NAVApp cmdlet:
Install-NAVApp -ServerInstance $NewBcServerInstance -Name <extension name> -Version <extension version>
Task 13: Upgrade control add-ins
The Business Central Server installation includes new versions of the Microsoft-provided Javascript-based control add-ins, like Microsoft.Dynamics.Nav.Client.BusinessChart, Microsoft.Dynamics.Nav.Client.VideoPlayer, and more. If your solution uses any of these control add-ins, upgrade them to the latest version.
To upgrade the control add-ins from the client, do the following steps:
Open the Business Central client.
Search for and open the Control Add-ins page.
Choose Actions > Control Add-in Resource > Import.
Locate and select the .zip file for the control add-in and choose Open.
The .zip files are located in the Add-ins folder of the Business Central Server installation. There's a subfolder for each add-in. For example, the default path to the Business Chart control add-in is
C:\Program Files\Microsoft Dynamics 365 Business Central\NNN\Service\Add-ins\BusinessChart\Microsoft.Dynamics.Nav.Client.BusinessChart.zip, whereNNNrepresents the Business Central release version such as 240 and 250.After you've imported all the new control add-in versions, restart Business Central Server instance.
Alternatively, you can use the Set-NAVAddin cmdlet of the Business Central Administration Shell. For example, the following commands update the control add-ins installed by default. Modify the commands to suit:
Set-NAVAddIn -ServerInstance $NewBcServerInstance -AddinName 'Microsoft.Dynamics.Nav.Client.BusinessChart' -PublicKeyToken 31bf3856ad364e35 -ResourceFile ($AppName = Join-Path $AddinsFolder 'BusinessChart\Microsoft.Dynamics.Nav.Client.BusinessChart.zip')
Set-NAVAddIn -ServerInstance $NewBcServerInstance -AddinName 'Microsoft.Dynamics.Nav.Client.FlowIntegration' -PublicKeyToken 31bf3856ad364e35 -ResourceFile ($AppName = Join-Path $AddinsFolder 'FlowIntegration\Microsoft.Dynamics.Nav.Client.FlowIntegration.zip')
Set-NAVAddIn -ServerInstance $NewBcServerInstance -AddinName 'Microsoft.Dynamics.Nav.Client.OAuthIntegration' -PublicKeyToken 31bf3856ad364e35 -ResourceFile ($AppName = Join-Path $AddinsFolder 'OAuthIntegration\Microsoft.Dynamics.Nav.Client.OAuthIntegration.zip')
Set-NAVAddIn -ServerInstance $NewBcServerInstance -AddinName 'Microsoft.Dynamics.Nav.Client.PageReady' -PublicKeyToken 31bf3856ad364e35 -ResourceFile ($AppName = Join-Path $AddinsFolder 'PageReady\Microsoft.Dynamics.Nav.Client.PageReady.zip')
Set-NAVAddIn -ServerInstance $NewBcServerInstance -AddinName 'Microsoft.Dynamics.Nav.Client.PowerBIManagement' -PublicKeyToken 31bf3856ad364e35 -ResourceFile ($AppName = Join-Path $AddinsFolder 'PowerBIManagement\Microsoft.Dynamics.Nav.Client.PowerBIManagement.zip')
Set-NAVAddIn -ServerInstance $NewBcServerInstance -AddinName 'Microsoft.Dynamics.Nav.Client.RoleCenterSelector' -PublicKeyToken 31bf3856ad364e35 -ResourceFile ($AppName = Join-Path $AddinsFolder 'RoleCenterSelector\Microsoft.Dynamics.Nav.Client.RoleCenterSelector.zip')
Set-NAVAddIn -ServerInstance $NewBcServerInstance -AddinName 'Microsoft.Dynamics.Nav.Client.SatisfactionSurvey' -PublicKeyToken 31bf3856ad364e35 -ResourceFile ($AppName = Join-Path $AddinsFolder 'SatisfactionSurvey\Microsoft.Dynamics.Nav.Client.SatisfactionSurvey.zip')
Set-NAVAddIn -ServerInstance $NewBcServerInstance -AddinName 'Microsoft.Dynamics.Nav.Client.VideoPlayer' -PublicKeyToken 31bf3856ad364e35 -ResourceFile ($AppName = Join-Path $AddinsFolder 'VideoPlayer\Microsoft.Dynamics.Nav.Client.VideoPlayer.zip')
Set-NAVAddIn -ServerInstance $NewBcServerInstance -AddinName 'Microsoft.Dynamics.Nav.Client.WebPageViewer' -PublicKeyToken 31bf3856ad364e35 -ResourceFile ($AppName = Join-Path $AddinsFolder 'WebPageViewer\Microsoft.Dynamics.Nav.Client.WebPageViewer.zip')
Set-NAVAddIn -ServerInstance $NewBcServerInstance -AddinName 'Microsoft.Dynamics.Nav.Client.WelcomeWizard' -PublicKeyToken 31bf3856ad364e35 -ResourceFile ($AppName = Join-Path $AddinsFolder 'WelcomeWizard\Microsoft.Dynamics.Nav.Client.WelcomeWizard.zip')
Task 14: Install upgraded permissions sets
This task is only required if you transitioned to permission sets as AL objects or upgraded permission sets as data in task 3.
For permission sets as AL objects
- Publish the extension or extensions that include the permission sets.
- Sync the extensions with the tenant.
- Install the extensions on the tenant.
For permission sets as data in XML
Set the
UserPermissionSetsFromExtensionssetting of the Business Central Server instance tofalse.Set-NavServerConfiguration -ServerInstance $NewBcServerInstance -KeyName "UsePermissionSetsFromExtensions" -KeyValue falseRestart the server instance.
Open the Business Central Web client.
Search for and open the Permission Sets page.
Select Import Permission Sets, and follow the instructions to import the XML file.
Learn more in To export and import a permission set.
Post-upgrade tasks
Update the application version shown on the Help and Support page.
After you upgrade your application, we recommend changing the value of application build number that shows on the Help and Support page to match the new current version. This version isn't updated automatically. Displaying the updated version in Help and Support page is useful for support purposes and helps answer common questions about the application. Learn more about version numbers in Version numbers in Business Central.
The Business Central Server includes a configuration setting called Solution Version Extension (SolutionVersionExtension). This setting lets you specify an extension whose version number displays as the Application Version on the client's Help and Support page. Typically, you'd use the extension considered to be your solution's base application. You set Solution Version Extension to ID of the extension. For example, if your solution uses the Microsoft Base Application, set the value to
437dbf0e-84ff-417a-965d-ed2bb9650972.To set Solution Version Extension, use Set-NAVServerConfiguration cmdlet of the Business Central Administration Shell.
The following example uses the Set-NAVServerConfiguration cmdlet to set the Solution Version Extension to the Microsoft Base Application:
Set-NAVServerConfiguration -ServerInstance $NewBcServerInstance -KeyName SolutionVersionExtension -KeyValue "437dbf0e-84ff-417a-965d-ed2bb9650972" -ApplyTo All-
IMPORTANT If you have a two- or three-tiered deployment and the Business Central Web Server and Business Central Server are on different computers, reconfigure delegation according to Configuring Delegation for Business Central Web Server.
Enable task scheduler on the server instance.
(Multitenant only) For tenants other than the tenant that you use for administration purposes, if you mounted the tenants using the
-AllowAppDatabaseWriteparameter, dismount the tenants, then mount them again without using the-AllowAppDatabaseWriteparameter.If you want to use data encryption as before, enable it.
Learn more in Managing Encryption and Encryption Keys.
Optionally, if you exported the encryption key instead of disabling encryption earlier, import the encryption key file to enable encryption.
Import the customer license.
Import the customer license by using the Import-NAVServerLicense cmdlet, as you did with the partner license. You have to restart the server instance afterwards.
Import-NAVServerLicense -ServerInstance $NewBcServerInstance -LicenseFile $CustomerLicense
Restart-NAVServerInstance -ServerInstance $NewBcServerInstance