Note
Access to this page requires authorization. You can try signing in or changing directories.
Access to this page requires authorization. You can try changing directories.
How you pick components for production, projects, or assembly orders depends on how your warehouse is set up as a location. Learn more at Setting Up Warehouse Management.
In a basic warehouse configuration for the outbound flow (pick), on the Location Card page for the location, activate following settings:
- Production, select Inventory Pick/Movement in the Prod. Consumption Whse. Handling field.
- Assembly, select Inventory Movement in the Asm. Consumption Whse. Handling field.
- Project management, select Inventory Pick in the Project Consumption Whse. Handling field.
Use the following documents for internal operations:
- Inventory pick
- Inventory movement
Inventory picks
When you register an inventory pick for an internal operation, such as production or a project, the consumption of the picked components is posted at the same time.
The Bin Mandatory toggle on the Location Card page is optional.
When you use inventory picks, the Bin Code field on a production order component line or project planning lines defines the take bin. Components are decreased in the take bin when you post consumption.
Inventory movements
- Inventory movements require that you turn on the Bin Mandatory toggle on the Location Card page for the location.
- Inventory movements only work with production order component lines and assembly order lines.
- When you register an inventory movement for an internal operation, you only record the physical movement of the components to a bin in the operation area. You don't post consumption.
- When you use inventory movements, the Bin Code field on production order component lines defines the place bin in the operation area. The place bin is where warehouse employees must place the components.
- Register the consumption of the picked components separately by posting a consumption journal or assembly order.
Production
Use Inventory Pick documents for picking production components in the flow to production.
For a location that uses bins, you can extend the flow to production by using Inventory Movement documents. Inventory movements are especially useful for component flushing. To learn more about how component consumption is flushed from the To-Production or Open Shop Floor Bins, go to Flushing Production Components in a Basic Warehouse Configuration.
Over-picking in production
You can pick more raw materials for a production order than it initially required, which can be useful in several cases. For example, overpicking might let you pick an entire pallet, use what you need, and then return the excess to inventory. You can also post consumption of the over-picked components.
To allow over-picks for an item in production, turn on the Allow Whse. Overpick toggle on the Item Card page. You can also use the same setting on an item template to allow over-picks for all items that you create based on the template. Afterward, you can adjust the value in the Quantity field for the Take line on the warehouse pick you create for a production order.
To return excess items to the warehouse, use the Movement worksheet and the Get Bin Content action.
To post more consumption, you can either increase the value in the Quantity Per field on the Production Order Components page, or enter the required quantity on the Consumption Journal or Production Journal pages directly. If the new quantity in the journal is less than or equal to the quantity picked, you can post consumption.
Note
This feature applies to warehouse picks for production orders only. Inventory picks and movements aren't supported. Also, warehouse picks for other source documents aren't supported.
Assembly
Use Inventory Movement documents to move assembly components to the assembly area.
Note
Inventory Movement documents require bins.
Business Central supports assemble-to-stock and assemble-to-order types of assembly flows. To learn more about assemble-to-order in the outbound warehouse flow, go to Handling Assemble-to-Order Items with Inventory Picks.
Project management
Use Inventory Pick documents to pick project components in the flow to project management.
For locations that use bins, you can extend the flow to project with Inventory Movement documents.
Note
Business Central uses the value in the Remaining Quantity field on the project planning line when it creates inventory picks. To use inventory picks for projects, you must turn on the Apply Usage Link toggle on the Project Card page for the projects. This setting lets you track usage against your plan. If you don't turn on the toggle, the remaining quantity stays at 0 and the inventory pick isn't created. To learn more, go to To set up project usage tracking.
Pick or move for production, assembly, and projects in a basic warehouse configuration
You can create an inventory pick or inventory movement in three ways:
- From the source document itself.
- For several source documents at the same time by using a batch job.
- In two steps. Release the source document to make the source document ready for picking. Create the inventory pick or movement from the Inventory Pick or Inventory Movement documents. The inventory pick or movement are based on the source document.
To create an inventory pick from the source document
- On the source document, which can be a production order or project, choose the Create Inventory Put-away/Pick action.
- Select the Create Invt. Pick checkbox.
- Choose the OK button.
To create an inventory movement from the source document
- On the source document, which can be a production order, assembly order, or project, choose the Create Inventory Put-away/Pick action.
- Select the Create Invt. Movement checkbox.
- Choose the OK button.
To create multiple inventory picks or movements with a batch job
- Choose the
 icon, enter Create Inventory Put-away/Pick/Movement, and then choose the related link.
 - On the Warehouse Request FastTab, use the Source Document and Source No. fields to filter on types of documents or ranges of document numbers. For example, you might create picks only for productions orders.
- On the Options FastTab, turn on the Create Invt. Pick or Create Invt. Movement toggles.
- Choose the OK button.
To create inventory picks or movements in two steps
To pick or move components for source documents in two steps, you must release the source document to make it ready for picking. Release source documents for internal operations in the following ways.
| Source Document | Release Method |
|---|---|
| Production Order | On the Planned Production Order page, change the status of an order to Released, or use the Released Production Order page to create a released production order. |
| Assembly Order | Change status of an assembly order to Released. |
| Projects | Change a project's status to Open, or create project with status Open right away. |
A warehouse employee assigned to picking items can create an inventory put-away document for the source document.
Choose the
icon, enter Inventory Picks or Inventory Movement, and then choose the related link.Choose the New action.
In the Source Document field, select the type of source document that the put-away is for.
Note
You can't use Inventory Pick documents for picking assembly components.
In the Source No. field, select the source document.
Alternatively, choose the Get Source Document action to select the document from a list of inbound source documents that are ready for picking at the location.
Choose the OK button to fill the pick or movement lines according to the selected source document.
To record the inventory pick
On the Inventory Pick page, open the document to record a pick for.
In the Bin Code field on the pick lines, the bin where the items must be picked from the bin where the item is available. You can change the bin if needed.
Perform the pick, and then enter the pick quantity in the Qty. to Handle field.
If you must pick the items for a line from more than one bin, for example because a bin doesn't contain the full quantity, use the Split Line action on the Lines FastTab. The action creates a line for the remaining quantity to handle.
Choose the Post action.
The following things happen during the posting process:
- Post the consumption of the source document lines that were picked.
- If the location uses bins, posting creates warehouse entries to post the changes to the bin quantity.
Tip
To avoid mistakes, use the Preview Posting action to review the entries that posting will create. However, the preview won't show entries for inventory picks and put-aways that will post non-inventory lines from source documents. For example, lines that have the G/L Account type or items of the type Service.
To record the inventory movement
On the Inventory Movement page, open the document to record a movement for.
In the Bin Code field on the movement lines, the bin to pick from is suggested based on the item's default bin and availability. You can change the bin if needed.
Perform the move, and then enter the moved quantity in the Qty. to Handle field. The value on the Take and the Place lines must be the same. Otherwise, you can't register the movement.
If you must take the items for a line from more than one bin, for example because a bin doesn't contain the full quantity, use the Split Line action on the Lines FastTab. The action creates a line for the remaining quantity to handle.
Choose the Register Invt. Movement action.
The following things happen during the posting process:
- Warehouse entries now indicate that the components are in the bins specified on the source document order lines. For example, the assembly order, production component, or project planning line.
Note
Unlike when you move components with inventory picks, consumption isn't posted when you register an inventory movement. You register consumption as a separate step by posting the source document.
Flushing production components in a basic warehouse configuration
Flushing methods affect the flow of components in production. Learn more at Flush Components According to Operation Output. Depending on the flushing method you select, you can pick components for production in the following ways:
- Use an Inventory Pick document to record the pick for items that use the Pick + Manual flushing method. When you register an inventory pick, the consumption of the picked components is posted.
- Use an Inventory Movement document without a reference to a source document or other ways to record the movement of components that use the Manual flushing method. You must register consumption separately. Learn more at Batch Post Production Consumption.
Example
You have a production order for 15 PCS of item SP-SCM1004. Some of the items on the component list must be flushed manually in a consumption journal, and other items can be picked and flushed automatically using the Pick + Backward flushing method.
The following steps provide an example of the actions that different people take and the related responses:
- The shop floor supervisor releases the production order. Items with Forward flushing method and no routing link are deducted from the open shop floor bin.
- The shop floor supervisor chooses the Create Inventory Put-away/Pick action on the production order and turns on the Create Invt. Pick and Create Invt. Movement toggles. An inventory pick document is created for items with Manual flushing method, and an inventory movement is created for items with Pick + Backward and Pick + Forward flushing methods.
- The warehouse manager assigns the picks and movements to a warehouse employee.
- The warehouse employee picks the items from the appropriate bins and places them in the To-Production bin or in the bin specified on the inventory movement. The bin can be a work center or machine center bin.
- The warehouse employee posts the pick. The quantity is deducted from the bins.
- The warehouse employee posts the movement. The quantity is deducted from the pick bins and added to the consumption bin. The Qty. Picked field on the component list for all picked items is updated.
- The machine operator informs the production manager that the end items are finished.
- The shop floor supervisor uses the output journal or production journal to post the output. The quantity of component items that use Pick + Forward or Pick + Backward flushing methods with routing links is deducted from the To-Production bin.
- The production manager changes the status of the production order to Finished. The quantity of component items that use Backward flushing method is deducted from the open shop floor bin, and the quantity of component items that use Pick + Backward flushing method and no routing link is deducted from the To-Production bin.
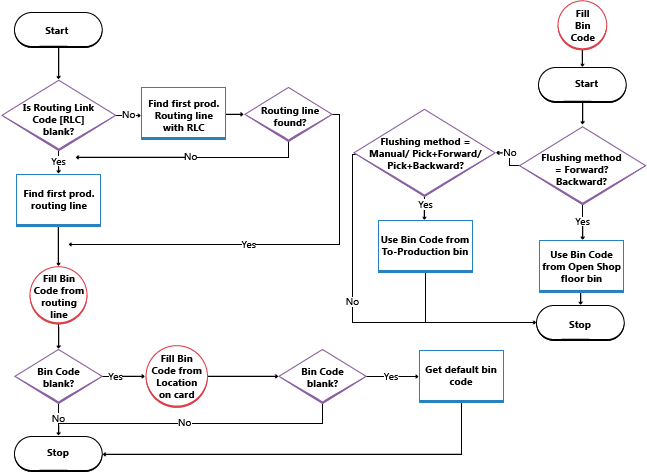
The following illustration shows when the Bin Code field on the component list is filled according to your location or machine/work center setup.
Related information
Inventory
Setting Up Warehouse Management
Assembly Management
Warehouse Management Overview
Work with Business Central