Note
Access to this page requires authorization. You can try signing in or changing directories.
Access to this page requires authorization. You can try changing directories.
Download softphone integration sample for Microsoft Dynamics 365 Channel Integration Framework version 2.0.
Note
The sample code isn't supported in Internet Explorer and browsers that do not have webRTC support. Learn more in WebRTC
Prerequisites
Omnichannel for Dynamics 365 Customer Service.
A valid Azure subscription is required to publish the sample app to Azure.
Note
If you don't have an Azure subscription, you can create a free account.
Publish a sample app to Azure
Open SampleInteg.sln using Visual Studio 2017.
In Solution Explorer, right-click on the solution and build the complete solution.
In Solution Explorer, right-click on the project SampleInteg and select Publish.
Select Start to launch the Publish wizard.
Choose App Service as the publish target.
Select Create New and then select Publish.
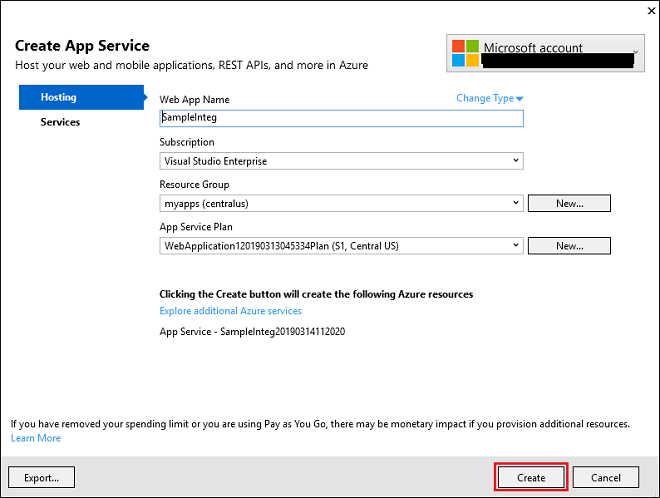
Provide an app name. For example, SampleInteg.
Provide valid subscription, resource group, and hosting plan details.
Select Create to create the Azure app service, and save the app service URL for future use.
For example,
https://sampleinteg.azurewebsites.net.
Create function to use with the app service
Create sample code for the client-voice function.
Refer to the function from the readme file packaged with the sample softphone integration in the Dynamics 365 Insider Portal.Use the sample code for the capability-token function.
Refer to the function from the readme file packaged with the sample softphone integration in the Dynamics 365 Insider Portal.
Note
Save the URL for the capability-token function you obtain from the sample code. For example, the URL is https://sampleinteg.sample/capability-token.
Configure sample app in Dynamics 365
Note the base URL of the Dynamics 365 organization from where all web resources are stored. For an online org, the URL should be in the format,
https://<orgname>.crmXX.dynamics.com. For example:https://sampleorg.crm10.dynamics.comGet the Dynamics 365 Channel Integration Framework solution. For more information, see Get Dynamics 365 Channel Integration Framework.
Configure the channel provider by providing the detail as shown in the matrix. For more information, see Configure the channel provider.
Field Description Name Name of the channel provider.
Example: ContosoUnique Name A unique identifier in the <prefix>_<name> format.
IMPORTANT: The following are required for the unique name:- The prefix can only be alphanumeric and its length must be between 3 to 8 characters.
- An underscore must be there between the prefix and name
Label The label is displayed as the title on the widget.
Example: ContosoChannel URL The channel URL is in the format: <azure_app_service_url>?base=<crm_base_url>
Note: For this sample, the URL ishttps://sampleinteg.azurewebsites.net?base=https://sampleorg.crm10.dynamics.com.Enable Outbound Communication Yes Channel Order 0 API Version 2.0 Trusted Domains The domain (URL) that can access the Channel Integration Framework APIs. Select the Unified Interface Apps for the Channel The list of Unified Interface apps where the channel is displayed for the customer service representatives. Select Roles for the Channel The security roles that are present in Dynamics 365.
Note: If you don't assign any role, the channel provider is shown to all users assigned for the Dynamics 365 Unified Interface app.Launch the Unified Interface app to see the communication widget on the left side.
Important
- All URLs must be HTTPS.
- If you use a self-signed certificate for the Azure app or the Dynamics 365 org, certain browsers might reject the connection and fail to load the sample phone. As a workaround, open the Azure app in a separate tab and accept the certificate once.
- Ensure microphone and speaker access is not blocked by browser policy.
Import configuration data
Download the Configuration Migration tool. The Configuration Migration tool is available as a NuGet package.
Start the Configuration Migration tool. Double-click DataMigrationUtility.exe in the folder:
[your folder]\Tools\ConfigurationMigration\.On the main screen, select Import data, and then select Continue.
On the sign-in screen, provide authentication details to connect to your Dynamics 365 instance from where you want to import data. If you have multiple organizations on the Dynamics 365 server, and want to select the organization to which to import the configuration data, select the Always display list of available orgs check box. Select Login.
If you have multiple organizations, and you select the Always display list of available orgs check box, the next screen lets you choose the organization that you want to connect to. Select a Dynamics 365 apps organization.
Provide the data file (data.zip) to be imported. Browse to the data file and select it. Select Import Data.
This step is applicable only if the data that you're importing contains the user information of the source system. Enter mapping user information on the target system. You can either map all of them to the user who is running the import process or map to individual users by using a user map file (.xml). If you choose the latter, you have to either specify an existing user map file or the tool can generate it for you. If you generate a new file, fill in the mapping user name in the New parameter for every user on the source server. Select the user map file in the tool when you're done, and select OK.
The next screen displays the import status of your records. The data import is done in multiple passes to first import the foundation data while queuing up the dependent data, and then import the dependent data in the subsequent passes to handle any data dependencies or linkages. This ensures clean and consistent data import.
Select Finish to close the tool.