Note
Access to this page requires authorization. You can try signing in or changing directories.
Access to this page requires authorization. You can try changing directories.
Note
The Retail Interest Group by Dynamics 365 Commerce has moved from Yammer to Viva Engage. If you don't have access to the new Viva Engage community, fill out this form (https://aka.ms/JoinD365commerceVivaEngageCommunity) to be added and stay engaged in the latest discussions.
This article provides an overview of the cash management capabilities in Microsoft Dynamics 365 Commerce point of sale (POS). It also provides guidance about setting up the cash traceability capability for two-sided transactions.
Note
For background information about the cash management capabilities in Commerce, see Shift and cash drawer management.
Cash management is a key function for retailers in physical stores. Retailers want their stores to have systems that help provide complete traceability and accountability of cash and its movement across the different registers and cashiers in a store. They must be able to reconcile any differences and determine accountability.
Dynamics 365 Commerce provides cash management capabilities in its POS application. Retailers have two cash management options:
- One-sided cash transactions – This option lets retailers reconcile the cash for a store, but it doesn't let them precisely determine accountability in the event of a cash discrepancy. After a one-sided cash transaction runs, it requires no further action because it's considered completed.
- Two-sided cash transactions – This option enables the cash traceability capability, which enforces two-sided cash transactions and helps determine accountability for all cash movements. When a cashier performs an operation (for example, Tender removal), the other cashier who receives the money must reconcile this action to ensure that the amount of the transaction is correct.
Set up cash traceability functionality
To set up cash traceability functionality by configuring the functionality profile for stores, follow these steps:
- In Commerce headquarters, go to Retail and Commerce > Channel setup > POS setup > POS profiles > Functionality profiles.
- Select a functionality profile linked to the stores that you want to set up cash traceability functionality for.
- In the Functions section of the functionality profile, under Advanced cash management, set the Enable cash traceability option to Yes.
Note
To use the cash traceability functionality, you must first set up one or more safes for the store. This setup is required because the system expects a safe to be selected for the Declare start amount and Safe drop operations.
Set up a safe
You can define and maintain multiple safes for a store.
To set up a safe in Commerce headquarters, follow these steps:
- Go to Retail and Commerce > Channels > Stores > All stores.
- In the Retail Channel ID field, select the retail channel ID of the store that you want to set up a safe for.
- On the Action Pane, on the Set up tab, in the Set up group, select Safes.
- On the Safe declaration page, select New.
- In the Name field, enter a name for the safe.
- Repeat steps 4 and 5 for each additional safe that you want to add.
- Run the 1070 Channel configuration distribution schedule job to sync the safe configurations to the channel database.
How cash management is handled when the cash traceability feature is enabled
Cash management is handled in the following ways when the cash traceability feature is enabled:
- A user who runs a Declare start amount operation must enter the source of cash. The user can search for the available safes that are defined in the store. They can then select the safe that the cash is coming from so that it goes into the register.
- A user who runs a Tender removal operation is prompted to select from a list of open float entry transactions. If the corresponding float entry doesn't exist in the system, the user can create a nonlinked tender removal transaction.
- A user who runs a Float entry operation is prompted to select from a list of open tender removal transactions. If the corresponding tender removal doesn't exist in the system, the user can create a non-linked float entry transaction.
- A user who runs a Safe drop operation is prompted to select the safe where the cash is being dropped.
Transaction reconciliation
When a user chooses to close a shift, the system validates that there are no unreconciled cash management transactions in the shift. A shift can't be closed if there are unreconciled transactions.
Transactions can be reconciled either automatically by the system or manually by the user.
Automatic transaction reconciliation
Automatic transaction reconciliation happens when the system automatically reconciles transactions after specific actions.
For example, a user performs a cash management operation (such as Tender removal) in shift A to send $20 to shift B. When the user in shift B performs a Float entry operation and selects the transaction, the two transactions reconcile automatically.
Manual transaction reconciliation
You need manual transaction reconciliation when automatic transaction reconciliation doesn't happen.
In the previous example, if the user in shift B doesn't perform a Float entry operation or doesn't select the correct transaction during the Float entry operation, the tender removal action stays unreconciled and needs manual reconciliation.
To manually reconcile within a shift or across shifts, users with the necessary permissions can perform the Manage shifts operation. The Manage shifts view makes it easy to view shifts that have unreconciled transactions. The user can select a shift and then select Reconcile to view a list of reconciled and unreconciled transactions on separate tabs. The user can then either select unreconciled transactions and reconcile them, or select previously reconciled transactions and unreconcile them. During reconciliation, if a selected transaction doesn't balance, the user must enter a description of the reason for the unbalanced reconciliation. The user can continue to reconcile and unreconcile transactions until the shift is closed. However, transactions can't be unreconciled after a shift is closed.
Safe management
In Dynamics 365 Commerce, you can do cash reconciliation only at the shift level. To manage cash in a safe, you must manage the safe through a shift.
Important
Safe management requires a dedicated register that isn't used for any sales transactions.
Example business process for cash management using a safe
The following example outlines the business process for cash management that uses a safe.
At the start of the day, the store manager declares the start amount in the safe. Here are the steps that the store manager must follow.
- Open a shift on the dedicated register for the safe.
- Go to the Manage safe operation, select a safe, and then select Declare start amount.
- Enter the amount, and then select Save.
When the cashier is ready to start the day, they open the shift and get the starting amount from the safe via the store manager. Here are the steps that the cashier and the store manager must follow.
- The cashier opens the shift on a register (for example, shift A).
- The store manager goes to the Manage safe operation on the dedicated register for the safe, performs the Tender removal operation, and selects the correct amount and shift for the removal. The shift must be opened on the register that the money from the safe is being transferred to.
- The cashier takes the money, performs a Declare start amount operation on their register, and selects the transaction that was created earlier to reflect the start amount. These actions trigger the automatic reconciliation of the two transactions.
The cashier then runs regular sale transactions throughout the day.
When the cash in the cash drawer is above the defined limit, the cashier is notified about the excess cash and performs a safe drop. Here are the steps that the cashier and the store manager must follow.
- The cashier hands the money to the store manager. Alternatively, the cashier drops the money into the safe by selecting Safe drop, entering the amount, and selecting the safe to drop the money into.
- The store manager counts the money and then goes to the Manage safe operation on the dedicated register for the safe.
- The store manager selects the safe, selects Float entry, and then selects the transaction that was created earlier. These actions trigger the automatic reconciliation of the two transactions.
At the end of the day, the cashier drops the whole amount of cash in the cash drawer into the safe, declares the tender, and blind-closes the shift. Here are the steps that the cashier must follow.
- Select Safe drop, enter the amount, and select the safe to drop the money into.
- Select Tender declaration, and then select 0 (zero) as the amount.
- Select Blind close to blind-close the shift.
- Hand the money to the store manager, or drop it into the safe.
The manager reconciles the last safe drop transaction, performs a bank drop, and closes both shifts (the cashier's shift and the shift for the safe). Here are the steps that the store manager must follow.
- Go to the Manage safe operation on the dedicated register for the safe.
- Select a safe, select Float entry, and then select the transaction that was created earlier. These actions trigger the automatic reconciliation of the two transactions.
- For the selected safe, select Bank drop, and then select the money that must be dropped into the bank.
- Exit the Manage safe operation, and then select Tender declaration to declare the balance in the safe.
- Go to the Manage shifts operation, select the blind-closed shift for the cashier, and then close the shift. The shift on the dedicated register for the safe shows one unreconciled transaction (Declare start amount) that you performed for the safe. Because the money is expected to be added from an external source (such as a bank), this transaction can't be automatically reconciled. It must be manually reconciled. The store manager selects the unreconciled transaction and then closes the shift.
Important notes about safe management
- Money that remains in the safe at the end of the day isn't automatically carried over to the next day. The store manager must declare the start amount in the safe on the next day.
- For all safe-related actions, the user must use the Manage safe operation. There's no other way to select the safe that the cash transactions are recorded for. The Declare start amount, Float entry, Tender removal, and Bank drop operations must be performed in the context of the Manage safe operation.
- Before the shift associated with the safe can be closed, the user must perform the Tender declaration operation on the dedicated register for the safe. This operation is the only one that doesn't occur in the context of a safe. Therefore, it isn't available in the Manage safe operation. If the same register is used to manage multiple safes, the tender declaration should be the sum of the money in all those safes.
- The Declare start amount operation on the safe isn't automatically reconciled. It must be manually reconciled.
- The Declare start amount operation is available at two levels in the Manage safe operation: the shift level and the safe level. To declare the start amount for a safe on the dedicated register for that safe, the user must run the Declare start amount operation in the Manage safe operation. The Declare start amount operation at the shift level can be used if there's any additional money in the cash drawer associated with that register.
- To transfer money in either direction between a safe and a shift, the shift must be opened on the register sending or receiving the money. In the preceding example for safe management, shift A must be open before the money can be transferred from the safe to that shift.
- If the cash traceability feature is enabled, the user can do a safe drop by selecting a single tender type in one transaction. If the cash drawer includes multiple tenders (for example, cash in US dollars [USD], cash in Canadian dollars [CAD], and check), the user must perform one safe drop per tender type.
- The system supports posting the safe drops and bank drops into the appropriate general ledger (GL) accounts, as defined on the Tender page in Commerce headquarters (Store > Payment methods > Tender). When the Bank drop operation is used to move money from the safe to the bank, the money is reduced from the safe drop GL and increased in the bank drop GL. Although amounts that are dropped into the safe are recorded in the safe drop GL, money moved out of the safe doesn't update this GL. Other cash management transactions (for example, Float entry and Tender removal) aren't recorded in any specific GL.
Financial reconciliation in store
When cash management transactions are processed in headquarters, the system uses the parameters that you define in the Statement/closing section of the All stores page to validate those transactions. However, if you enable the financial reconciliation functionality in headquarters, the POS user sees the result of these validations in POS when they try to close the shift.
To set up the financial reconciliation functionality in headquarters, follow these steps:
- In the Feature management workspace, turn on the Retail statements - Trickle feed feature.
- In the POS functionality profile for the appropriate store, set the Enable financial reconciliation in store option to Yes.
For more information about the financial reconciliation functionality, see Financial reconciliation in store.
Cash management for multiple currencies
Retailers can configure POS to accept multiple currencies as payment for a transaction, but normally the change returned can only be provided in the store's default currency.
For example, a retailer configures their U.S. store with United States dollars (USD) as the default currency, but a customer pays for a transaction using euros (EUR). The retailer can only return change for the transaction in the store's default currency of USD. In this scenario, at the start of the business day the cash drawer contains only USD, but at the end of the business day the cash drawer contains multiple currencies (USD and EUR).
Some retailers opt to enhance their POS to enable cashiers to return change in the tendered currency, but to do so requires cash management operations such as Declare start amount, Float tender, and Remove tender to also support foreign currencies so the retailers can account for currency movements across various transactions.
With Commerce version 10.0.38, all cash management operations support foreign currencies in addition to a store's default currency.
To configure cash management across multiple currencies to track currency movements across various transactions, follow these steps:
- In Commerce headquarters, go to Retail and Commerce > Channels > Stores > All stores.
- Select the store for which you want to allow cash management across multiple currencies.
- Select the Set up tab, and then select Cash declaration to open the supported denominations across various currencies for the store, as shown in the following example image.
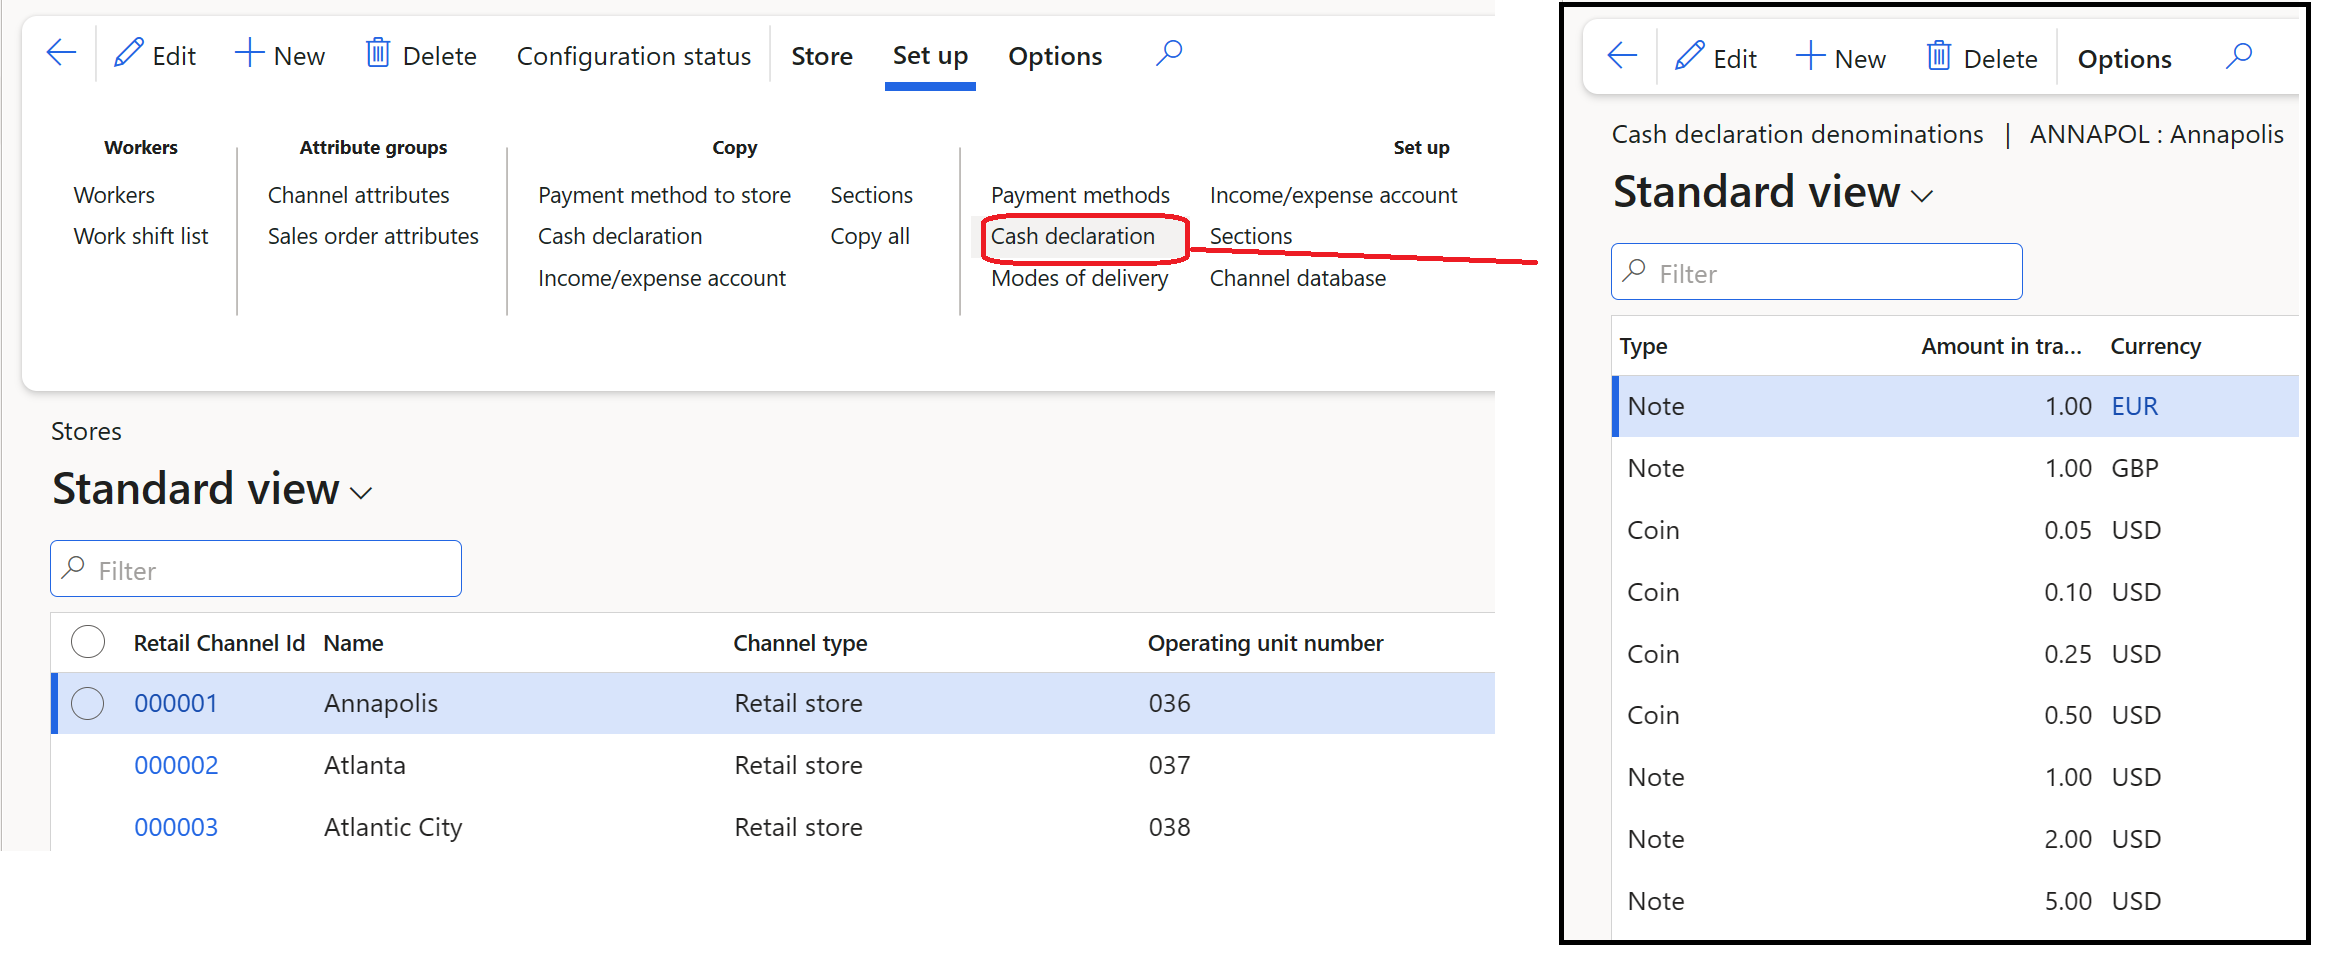
- Add the required denominations for the currencies to be tracked along with the store's default currency.
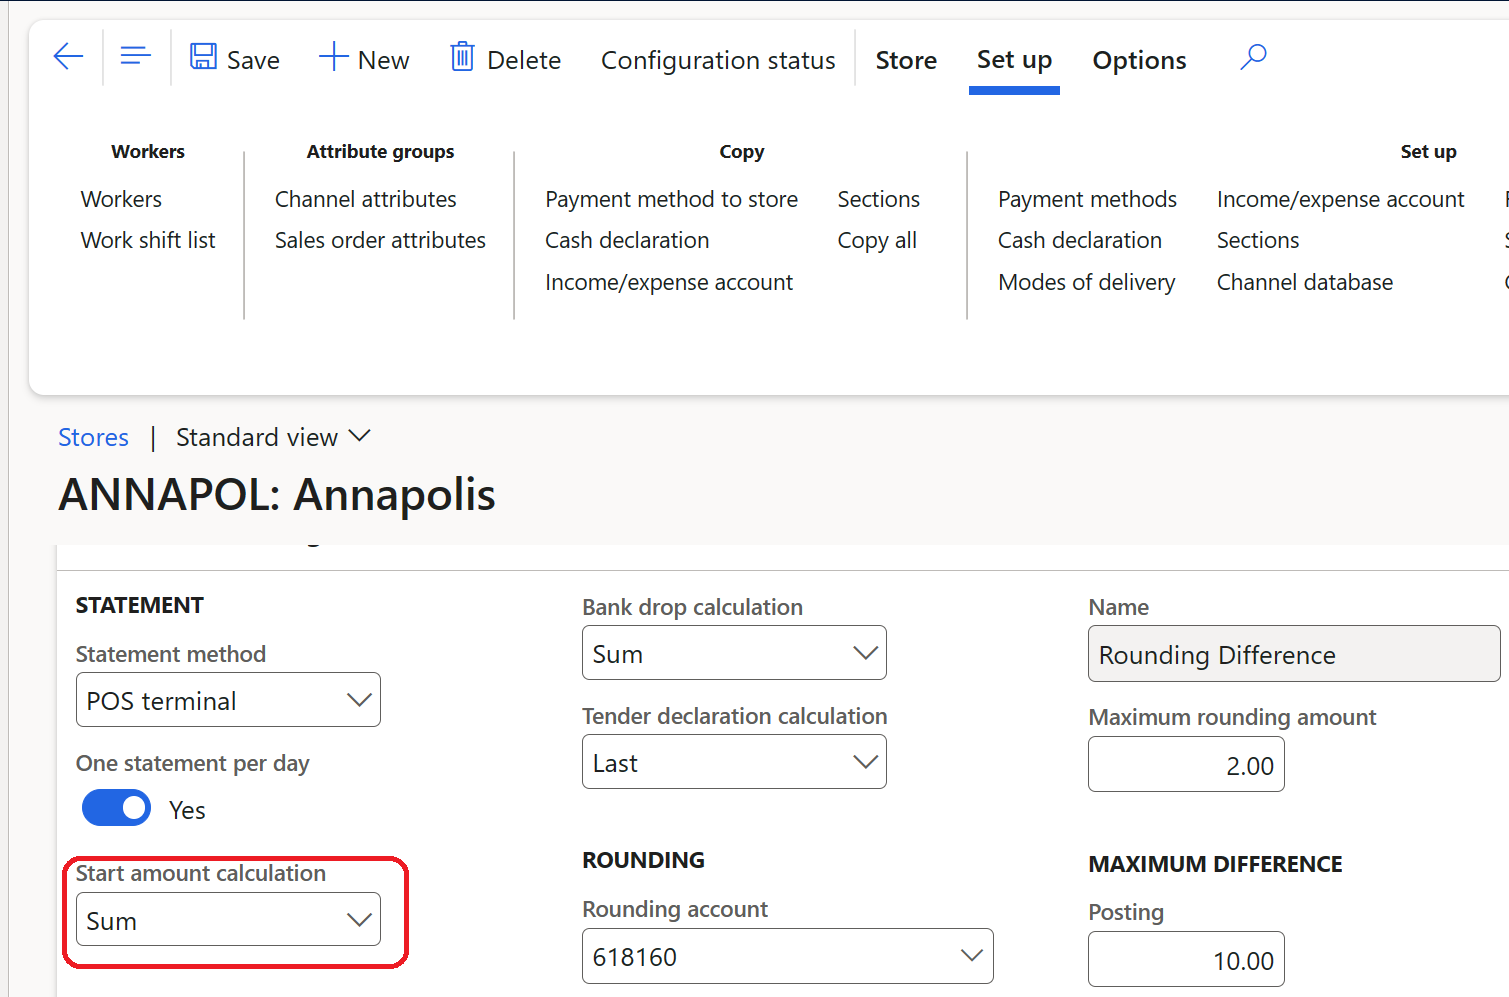
- Go to the store details form and set the Start amount calculation configuration to Sum, as shown in the following example image.
- Run the 1070 - Channel configuration job.
- Go to POS for the store where you want to allow cash management across multiple currencies.
- Run the Declare start amount operation.
- Select Count to open the supported denominations.
- Select the filter symbol, select the desired currency, enter the start amount, and then select Save.
- Repeat the preceding process to add the start amount for all desired currencies. The configuration described in step 5 ensures that the various amounts across multiple currencies are added to calculate the start amount. Only one currency amount can be added per transaction, so attempting to add start amounts for multiple currencies in a single transaction results in an error. Similar experiences are applicable to the Float tender and Remove tender operations.
- During the business day, you can remove the currency balance from the cash drawers by using the Safe drop and Bank drop operations.
- At the end of the business day, you can use the Tender declare operation to record the totals across all currencies. The Tender declare operation supports recording the data across multiple currencies in a single transaction, so it isn't necessary to record the totals one currency at a time.