Note
Access to this page requires authorization. You can try signing in or changing directories.
Access to this page requires authorization. You can try changing directories.
Note
The Retail Interest Group by Dynamics 365 Commerce has moved from Yammer to Viva Engage. If you don't have access to the new Viva Engage community, fill out this form (https://aka.ms/JoinD365commerceVivaEngageCommunity) to be added and stay engaged in the latest discussions.
This article describes customer search capabilities in Microsoft Dynamics 365 Commerce.
Use customer search to find customers for various purposes. For example, cashiers might want to view a customer's wish list or purchase history, or add the customer to a transaction. Employees can search for customers who are associated with the current store or any other store in the company. Employees can also search for customers who are associated with a different company in the parent organization.
The search algorithm matches the search terms against the values that are present in the following customer properties:
- Name
- Email address
- Phone number
- Loyalty card number
- Address
- Account number
Among these properties, the name provides the most flexibility for multiple-keyword searches, because the algorithm returns all customers that match any of the searched keywords. The customers that match the most keywords appear at the top of the results. This behavior helps cashiers in situations where they search by typing the full name, but family name and first name were swapped during the initial data entry. However, for performance reasons, all the other properties preserve the order of the search keywords. Therefore, if the order of the search keywords doesn't match the order that the data is stored in, no results are returned.
By default, a customer search is done on the customer address books that are associated with the store. This type of search is known as a local customer search. However, employees can also search for customers globally. In other words, they can search across the stores of the company and across all other legal entities. This type of search is known as a remote customer search.
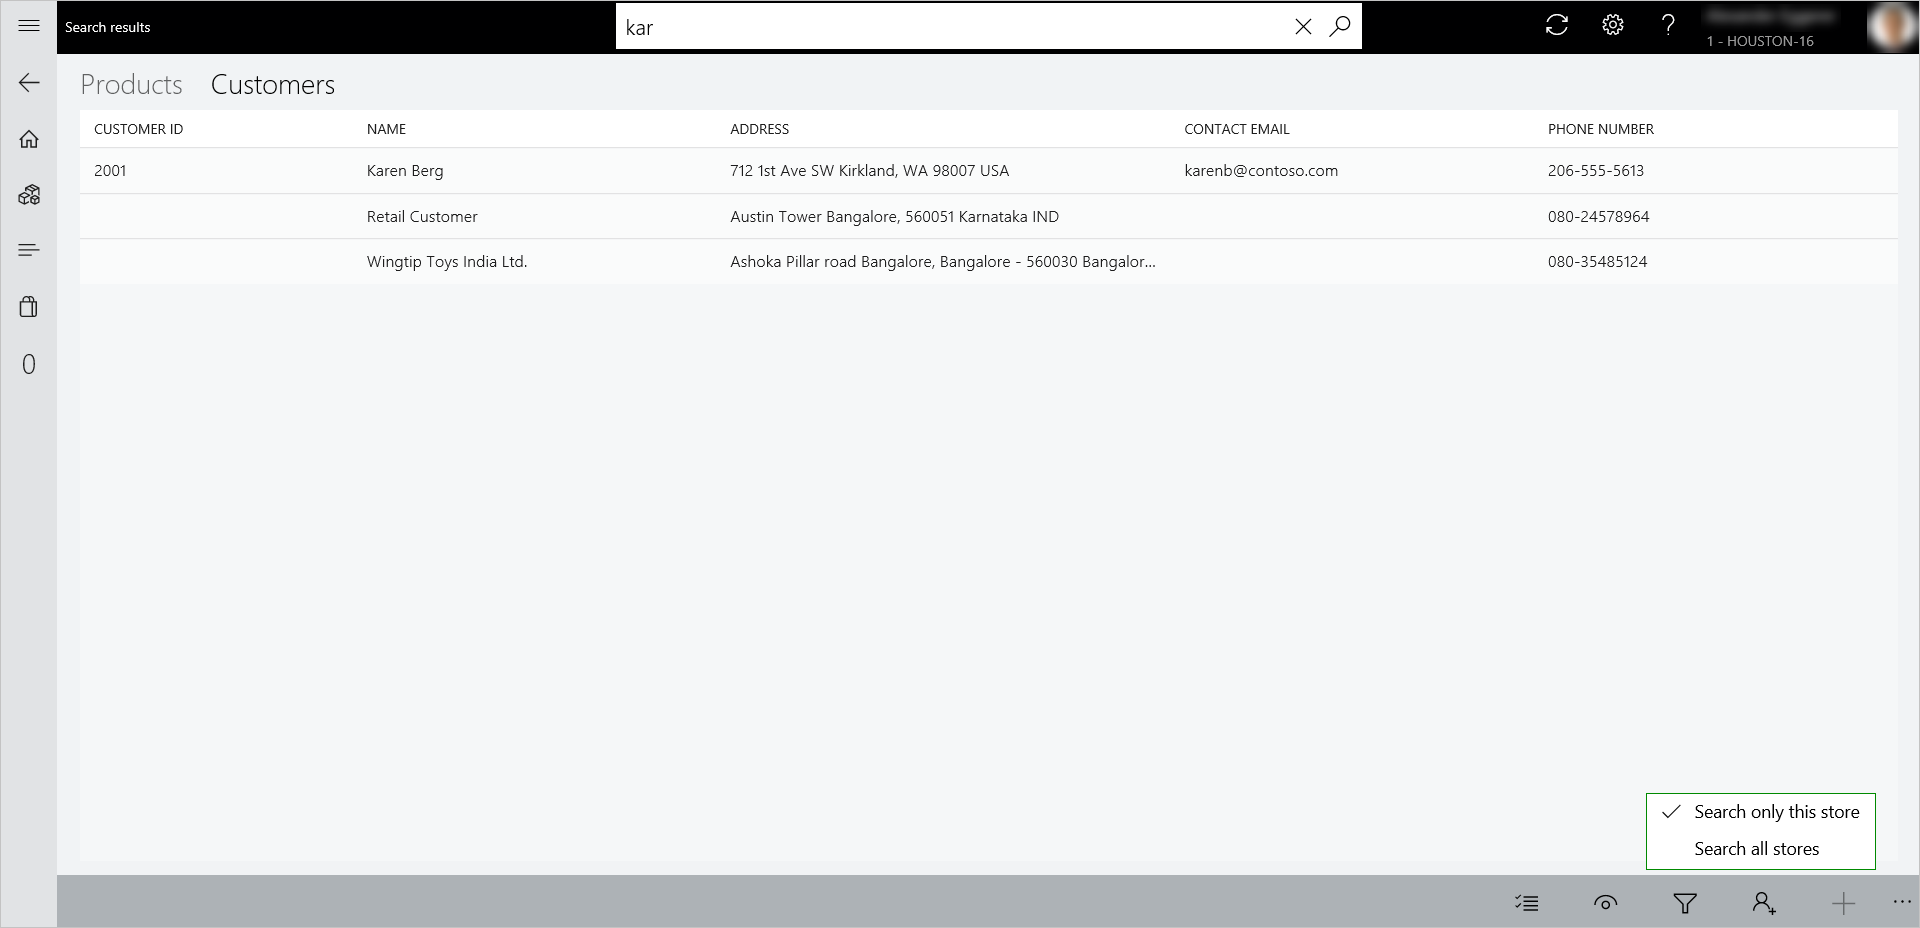
To search globally, employees can select the Filter results button at the bottom of the page and then select the Search all stores option, as shown in the following illustration. In this case, the search returns not only customers but also all types of parties that are part of any address book in the headquarters. These parties include workers, vendors, contacts, and competitors.
Note
Enter at least four characters for a remote customer search to return results.
The customer ID isn't shown for customers queried from other legal entities, because those parties don't have a customer ID in the current company. However, if an employee opens the customer details page, the system automatically generates a customer ID for the party and also associates the store's customer address books with the customer. Therefore, the customer is visible in local store searches that are done later.
Additional local customer search capabilities
When the user searches for a phone number, the system ignores special characters (such as spaces, hyphens, and brackets) that you might add when creating the customer. Therefore, cashiers don't need to worry about the phone number format when they search. For example, if a customer's phone number is entered as 123-456-7890, a cashier can search for the customer by typing 1234567890, or by entering the first few numbers of the phone number.
Note
A customer can have multiple phone numbers and multiple emails. The customer search algorithm also searches through these secondary emails and phone numbers, but the customer search results page only displays the primary email and phone number. This limitation might cause some confusion, as the returned customer results don't show the searched email or phone number.
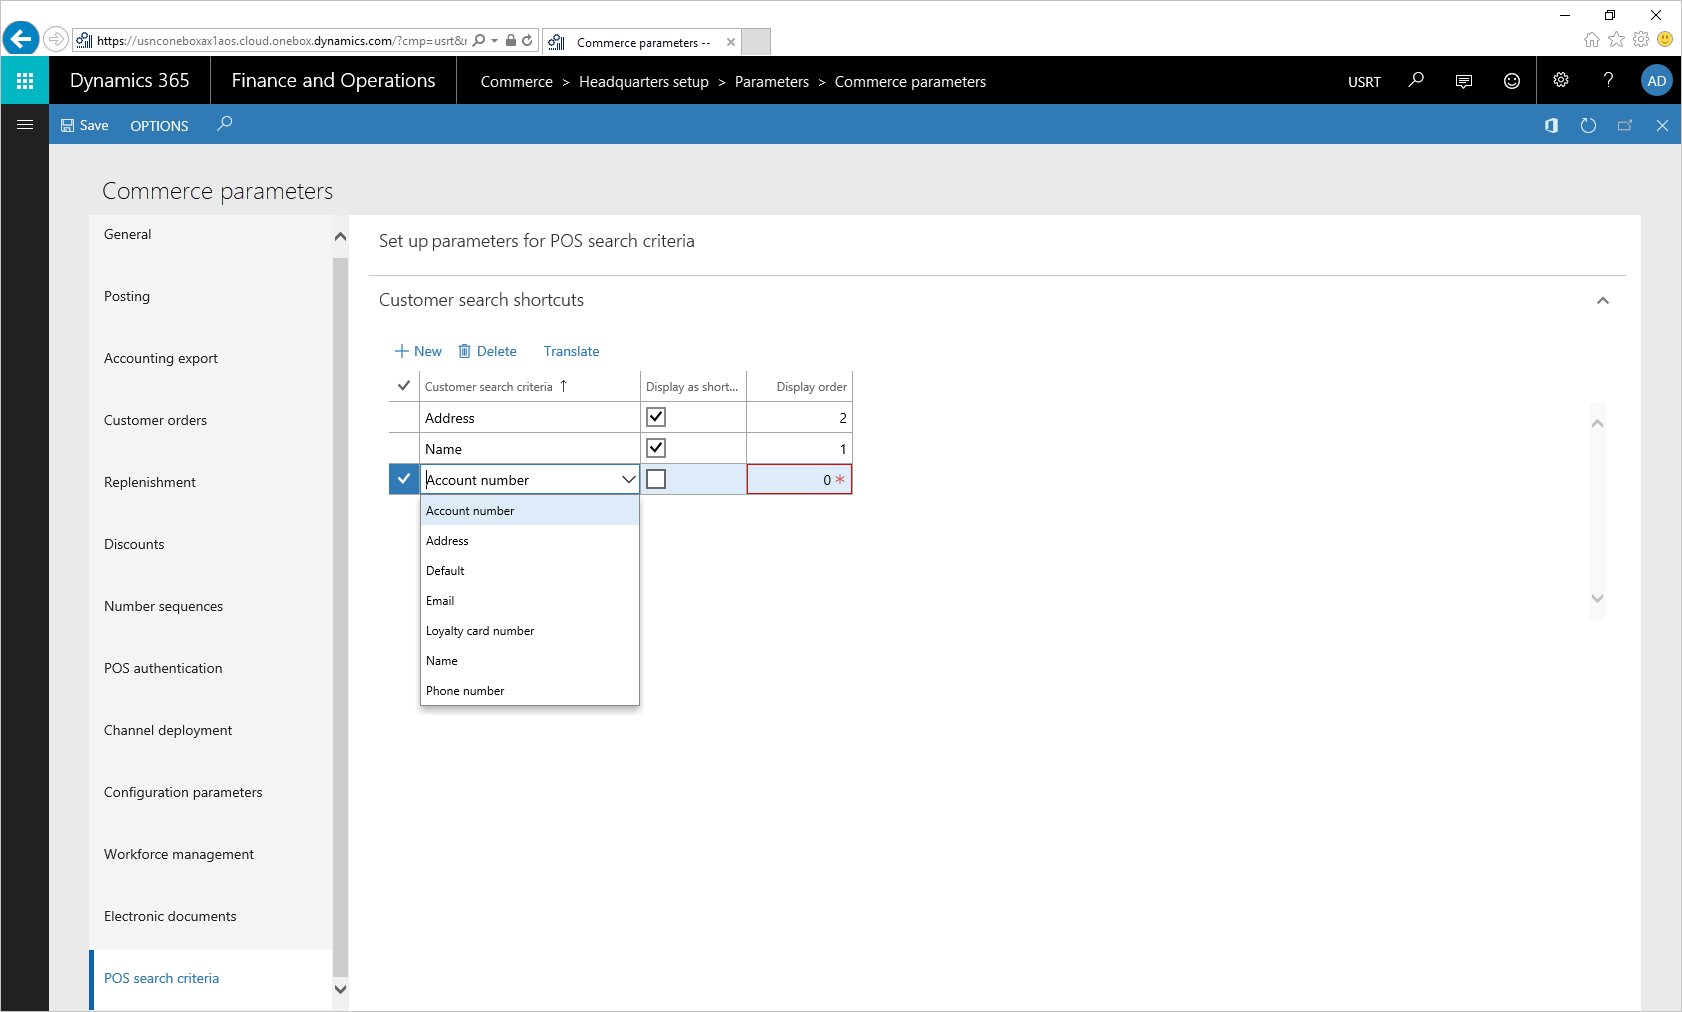
The traditional customer search can be time-consuming, because it searches across multiple fields. Instead, cashiers can search in a single customer property, such as name, email address, or phone number. The properties that the customer search algorithm uses are collectively known as the customer search criteria. The system admin can easily configure one or more criteria as shortcuts that appear in POS. Because the search is limited to a single criterion, only the relevant search results are shown, and the performance is better than the performance of a standard customer search. The following illustration shows the customer search shortcuts in POS.

To set search criteria as shortcuts, the admin must open the Commerce parameters page in Commerce, and then, on the POS search criteria tab, select all the criteria that should be shown as shortcuts.
Note
If you add too many shortcuts, the drop-down menu on the search bar in POS becomes cluttered, and the employee's search experience can be affected. Add only as many shortcuts as you require.
The Display order field determines the order in which shortcuts are shown in POS. The criteria that are shown are the out-of-box properties that the customer search algorithm uses to search customers. However, partners can add custom properties as search shortcuts. To add custom properties as search shortcuts, the system admin must extend the extensible enumeration (enum) that is used for the customer search criteria and then mark the partner's custom properties as shortcuts. Partners are responsible for writing the code to find results when their custom shortcuts are used for searches.
Translations for shortcuts are required if you want shortcuts to be rendered on the POS. If your channel language is different from the system default language, you must define the translation for each shortcut in the expected language. You can define translations by selecting Translate for each shortcut.
Note
A custom property that you add to the enum doesn't affect the standard customer search algorithm. In other words, the customer search algorithm doesn't search in the custom property. Users can use a custom property for searches only if that custom property is added as a shortcut, or if the default search algorithm is overridden.
Retailers can also set the default customer search mode in POS to Search all stores. This configuration can be helpful in scenarios where customers that are created outside POS must be searched immediately (for example, even before the distribution job runs). To do so, the retailer must turn on the Default customer search mode option in the POS functionality profile. Once it's set to Yes, every customer search attempt makes a real-time call to headquarters.
To help prevent unexpected performance issues, this configuration is hidden behind a flighting flag that is named CUSTOMERSEARCH_ENABLE_DEFAULTSEARCH_FLIGHTING. To show the Default customer search mode setting in the user interface (UI), the retailer should create a support ticket for its user acceptance testing (UAT) and production environments. After the ticket is received, the engineering team works with the retailer to make sure that the retailer does testing in its nonproduction environments to assess the performance and implement any optimizations that are required.
Cloud-powered customer search
Public preview of the customer search capability using the Azure Cognitive Search service was released as part of the Commerce 10.0.18 release. In addition to performance improvements, users of the service also benefit from rich refinement and improved relevance capabilities. The performance improvements are especially evident when the global search feature ("Search all stores") of the POS is used, because search results are fetched from the Azure search index instead of queried from the data in Commerce headquarters.
Enable the cloud-powered search feature
Note
Both Commerce headquarters and Commerce Scale Unit must be updated to version 10.0.18. Updating the POS isn't required.
To enable the cloud-powered search feature in Commerce headquarters, follow these steps:
- Go to System administration > Workspaces > Feature management.
- Find and select the (Preview) Cloud powered customer search feature, and then select Enable now.
- Go to Retail and Commerce > Headquarters setup > Commerce scheduler > Initialize commerce scheduler and select OK to display the new 1010_CustomerSearch job on the Distribution schedule form.
- Go to Retail and Commerce > Retail and Commerce IT > Distribution schedule.
- Run the 1010_CustomerSearch job. This job publishes the date to the Azure search index. When publishing of the index is completed, the status of the job is set to Applied.
- After the 1010_CustomerSearch job status is Applied, run the 1110 - Global configuration job to update the POS channels of the newly enabled feature in Feature management.
- Afterwards, run the 1010_CustomerSearch job at regular intervals to send customer updates to the search index.
Note
For the initial index publish, the 1010_CustomerSearch job might take a few hours to complete as it sends all the customer records to the Azure search index. Subsequent updates take a few minutes. When you enable the cloud-powered search feature but the index publishing isn't yet completed, the customer search from POS defaults to the existing SQL-based search. This default ensures that there are no interruptions to store operations.
Functional differences from the existing search
The following list shows how the cloud-powered customer search functionality differs from the existing search functionality.
- When you run the 1010_CustomerSearch job, it sends customers created and edited in Commerce headquarters to the Azure search index. These updates take 15 to 20 minutes to update the index. About 15 to 20 minutes after the updates occur in Commerce headquarters, POS users can search for new customers (or search based on updated information). If your business process requires that customers created in Commerce headquarters are immediately searchable in POS, this service might not be the right choice for you.
- When you create new customers in POS, Commerce Scale Unit sends them to the Azure search index, so they're immediately searchable across any store. However, if you turn on the Async customer creation feature, new customer records aren't published to the Azure search index from the Commerce Scale Unit and aren't searchable from POS until the customer information syncs with Commerce headquarters and customer IDs are generated for Async customers. The 1010_CustomerSearch job can then send the Async customer records to the Azure search index. On average, it takes around 30 minutes before newly created Async customers can be searched on POS. This estimate assumes that the 1010_CustomerSearch, P-job, and Synchronize customers and business partners from async mode jobs are scheduled to run every 15 minutes.
- Cloud-powered search also searches for the secondary emails and phone numbers of customers, but currently customer search results only display the primary phone number and primary email address of customers. At first glance it might seem that irrelevant search results are returned, but checking the secondary email and phone number of a customer in search results can help verify if the searched-for keyword resulted in a customer match. To avoid such confusion, there are plans to improve the search results page to make it easy for users to understand why a search result was returned.
- The requirement of searching by using at least four characters in a global search ("Search all stores") doesn't apply to this service.
- The 1010_CustomerSearch job isn't automatically executed for customer records that you import from an external system. You must run the 1010_CustomerSearch job so that the imported customer records can be searched.
Note
The customer search capability using the Azure Cognitive Search service is available in limited regions for preview. The customer search capability isn't available in the following regions:
- Brazil
- India
Additional resources
Product search and customer search in the point of sale (POS)