Note
Access to this page requires authorization. You can try signing in or changing directories.
Access to this page requires authorization. You can try changing directories.
This article explains how to package a payment connector for finance and operations deployment in Microsoft Dynamics 365 Commerce.
In releases earlier than 10.0.10, use the Commerce software development kit (SDK) to create a payment connector package. (The Commerce SDK was previously known as the Retail SDK.) In the 10.0.10 release and later, you can use only Visual Studio to create an Application Object Server (AOS) payment connector package. You can deploy packages that you create by using this approach for both earlier deployments and self-service deployments by using all-in-one packages.
Note
In releases earlier than 10.0.10, you can create a single payment package and use it both for Application Explorer and for the commerce channel and cloud components (Commerce Scale unit). In the 10.0.10 release, you must create two packages. One package is for Application Explorer, and you create it by using the Dynamics 365 packaging model. The other package is for the commerce channel and cloud components, and you create it by using the Commerce SDK. The previous approach, where the Commerce SDK is used to create Application Explorer payment packaging, is obsolete (deprecated) as of the 10.0.10 release.
To create a payment package that you can deploy, follow the steps in the next section.
Note
The steps for using the Commerce SDK to create the package for the commerce channel and cloud components haven't changed. For more information, see Create and deploy connector.
Create an AOS payment package in the 10.0.10 release
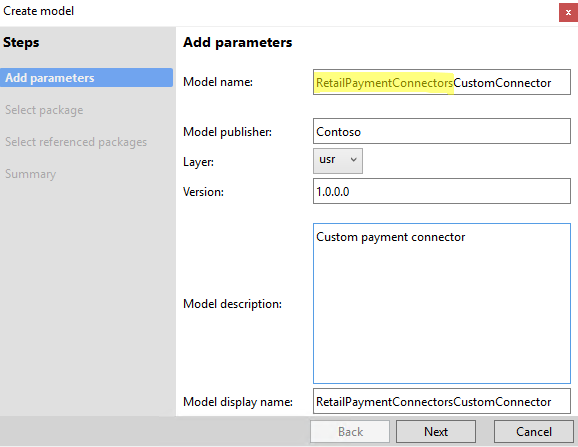
In Visual Studio, on the Dynamics 365 menu, select Model Management > Create model.
Enter the model name, the model publisher, and other required details. Then select Next.
The model name must start with the prefix RetailPaymentConnectors. After this prefix, add information about the custom model name. For example, the model that you create might be named RetailPaymentConnectorsCustomConnector. Only model names that begin with the RetailPaymentConnectors prefix appear in the Commerce payment connector options.
Select the Create new package option, and then select Next.
Select the required referenced package, and then select Next.
Select Finish to finish creating the model.
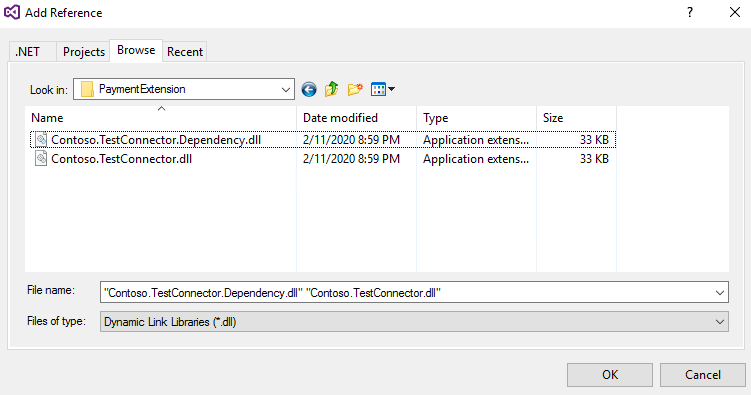
In Solution Explorer, select the project, right-click References, and then select Add Reference.
Add all the payment connector assemblies and their dependencies to the project as references.
Note
All payment connector DLLs must be portable. Having both portable and nonportable payment connector DLLs causes problems when loading the connector.
If your extension needs an HTML and CSS file for the implementation, add them as resource files to your project. During deployment, the HTML files are copied to the
AosService\WebRoot\Resources\Htmlfolder. The CSS files are copied to theAosService\WebRoot\Resources\Stylesfolder. You can access them by using the following URL format.Example: If necessary, update the
GetPaymentAcceptPointimplementation to return this URL.https://AOSUrl/resources/html/Myhtml.html https://AOSUrl/resources/styles/Mycss.cssNote
Only HTML and CSS file formats added as resources to the project are copied to the
AosService\WebRoot\. Other file formats aren't copied to theAosService\WebRoot\. If you need the file in theAosService\WebRoot\folder, migrate it to an HTML file format or host the nonsupported file formats externally. If hosted externally, hosting must be managed by the customer or partner.If you don't have any other payment X++ extensions that are related to the payment connector, build the solution.
Note
If there are no other extensions packages, continue with these steps. If you have more extensions packages, combine them into one all-in-one deployable package. If you don't combine them, this package overrides other packages. For more information, see All-in-one deployable packages.
To create the deployable package, on the Dynamics 365 menu, select Deploy > Create Deployment Package.
Select the model that you created earlier, specify the location of the package file, and then select Create.
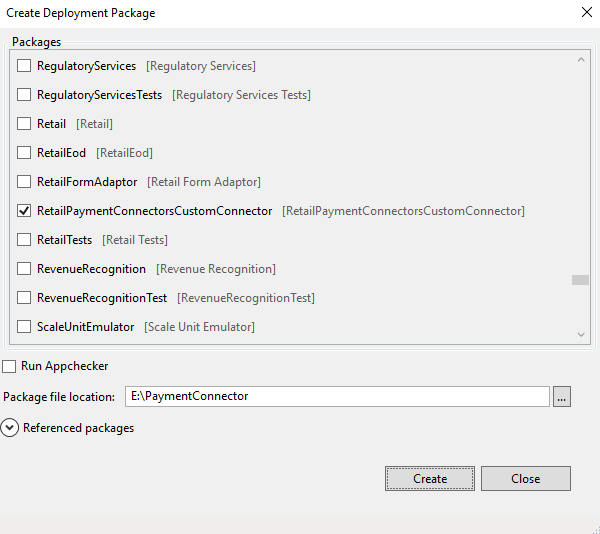
Visual Studio builds the model and creates the deployable package.
After the deployable package is created, sign in to Microsoft Dynamics Lifecycle Services (LCS), and then, in your LCS project, select the Asset Library tile.
Upload the deployable package that you created.
Apply a deployable package
For information about how to apply a deployable package to an environment, see Apply updates to cloud environments.
Remove a deployable package
For information about how to uninstall or remove a deployable package from an environment, see Uninstall a package.