Create an .appx file for a Modern POS extension package
Important
Support for the Retail SDK will end in October 2023. Please use or migrate to the Commerce SDK, which provides several benefits including a simplified development and update experience, and improved performance.
This article explains how to create a Modern Point of Sale (MPOS) packaging project by using Visual Studio 2017. These steps are required only if you're developing extensions for MPOS. The MPOS extension packaging project generates the MSIX Windows app package that will extend the MPOS app.
Create a new JavaScript Universal Windows Platform (UWP) app project:
- In Solution Explorer, select and hold (or right-click) the solution, select Add, and then select New Project.
- Find Windows JavaScript, and select Blank App (Universal Windows).
- Name the project ModernPos.
- Set the Target version field to Windows 10, version 1809 (10.0; Build 17763).
- Set the Minimum version field to Windows 10, version 1809 (10.0; Build 17763).
Delete the following source folders and files that are generated:
- js folder
- css folder
- index.html file
- package.appxmanifest file
Note
Don't delete the image file that is used as the logo for the app package (images\StoreLogo.png), unless you include a replacement logo.
Edit the project, and import the properties (.props) file that was created for the customization package.
Note
Generation of the package.appxmanifest file depends on the properties from the customization package's .props file. Make sure that you import the .props file into the project.
Add a reference to the POS SDK NuGet package:
- In Solution Explorer, select and hold (or right-click) the project, and then select Manage NuGet packages.
- In the NuGet Package Manager window, on the Browse tab, search for Microsoft.Dynamics.Commerce.Sdk.Pos.
- Select the package, and then select Install.
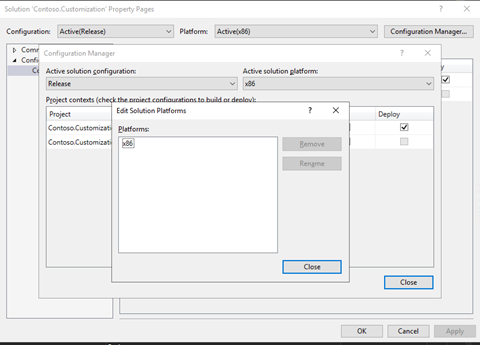
Update the solution configuration so that it targets only x86 platforms:
- In Solution Explorer, select and hold (or right-click) the project, and then select Properties.
- Open Configuration Manager.
- On the Active solution platform menu, select Edit.
- Remove all platforms except x86.
Edit the JavaScript project file (.jsproj file) file to remove unsupported platform configurations:
Save the project file.
Unload the project by using Solution Explorer.
In Solution Explorer, select and hold (or right-click) the project, and then select Edit.
Delete the ProjectConfiguration includes for all platforms except x86. When you've finished, the ProjectConfiguration elements should resemble the following example.
<ItemGroup Label="ProjectConfigurations">
    <ProjectConfiguration Include="Debug|x86">
        <Configuration>Debug</Configuration>
        <Platform>x86</Platform>
    </ProjectConfiguration>
    <ProjectConfiguration Include="Release|x86">
        <Configuration>Release</Configuration>
        <Platform>x86</Platform>
        <UseDotNetNativeToolchain>true</UseDotNetNativeToolchain>
    </ProjectConfiguration>
</ItemGroup>
Reload the project.
Add a reference from the MPOS .jsproj file to the POS.Extension Package project that you created earlier:
- In Solution Explorer, select and hold (or right-click) the MPOS project, select Add, and then select Reference.
- On the Projects tab on the left side of Reference Manager, select the POS Extension Package project that you created earlier.
- When you're prompted to confirm the unsupported reference, select Yes.
If your solution contains Commerce runtime (CRT) extension projects, add project references to each CRT extension project in the solution:
- In Solution Explorer, select and hold (or right-click) the MPOS project, select Add, and then select Reference.
- On the Projects tab on the left side of Reference Manager, select the CRT extension projects.
If your solution contains Hardware Station extension projects, add project references to each Hardware Station extension project in the solution:
- In Solution Explorer, select and hold (or right-click) the MPOS project, select Add, and then select Reference.
- On the Projects tab on the left side of Reference Manager, select the Hardware Station extension projects.
Feedback
Coming soon: Throughout 2024 we will be phasing out GitHub Issues as the feedback mechanism for content and replacing it with a new feedback system. For more information see: https://aka.ms/ContentUserFeedback.
Submit and view feedback for