Note
Access to this page requires authorization. You can try signing in or changing directories.
Access to this page requires authorization. You can try changing directories.
Note
The Retail Interest Group by Dynamics 365 Commerce has moved from Yammer to Viva Engage. If you don't have access to the new Viva Engage community, fill out this form (https://aka.ms/JoinD365commerceVivaEngageCommunity) to be added and stay engaged in the latest discussions.
This article describes some best practices to follow when developing Microsoft Dynamics 365 Commerce customizations.
The Dynamics 365 Commerce platform provides a rich online software development kit (SDK) for developer extensibility. You can create custom modules, data actions, and themes, or extend modules from the Commerce module library. Consider website performance when building Commerce customizations. Standard best practices for website development apply, such as minimizing HTML, JavaScript, and CSS files, and optimizing images.
Infrastructure setup
The Dynamics 365 Commerce ecosystem comprises various subsystems, including Commerce headquarters, Commerce Scale Unit, the web storefront that includes the Node rendering service, Commerce site builder, and the product recommendations services. For best performance, deploy all components to the same region. Make the specific region decision in accordance with the customer's regional location.
Note
Commerce Scale Unit allows you to select a specific region during setup.
Minimize HTML, CSS, and JavaScript file sizes
The Dynamics 365 Commerce online SDK provides development extensions that use TypeScript and Sassy Cascading Style Sheets (SCSS) files. When you build a configuration package by using the yarn msdyn365 pack command, or when you start the Node server in a local development environment by using the yarn start command, the TypeScript files compile down to JavaScript files, and the SCSS files compile down to Cascading Style Sheets (CSS) files. These files are also minified to help reduce network bandwidth. Make sure your extension package doesn't include extra, unused JavaScript and CSS files.
Reduce JavaScript by excluding unused modules
Dynamics 365 Commerce comes with a large set of modules referred to as the Commerce module library. If there are modules that you don't use on an e-commerce site, exclude them to reduce the JavaScript chunk size. The excluded modules aren't rendered on the live e-commerce site or available within Commerce site builder when authoring pages.
Add the module name to the excludeModules property in the SDK's "/src/settings/platform.settings.json" file to exclude modules, as shown in the following example.
{
    "excludedModules": ["<EXCLUDED_MODULE_NAME1>","<EXCLUDED_MODULE_NAME2>"]
}
You can verify that the module was successfully excluded by comparing the chunk size displayed after a build, or by testing the module in a development environment. For the latter method, you can confirm that the excluded module isn't rendered by using the URL http://localhost:4000/modules?type=<your-module-name> (after running the Node server by using the "yarn start" command).
Optimize images
One of the biggest performance hits to a web page is downloading images. Use CSS whenever possible to generate images for items such as buttons. For marketing or product images, upload images to the Commerce site builder Media Library. Upload high-quality, high-resolution images to the Media Library to cover all web site usage scenarios. The image resizer service automatically resizes images served from the Media Library.
Image resizer service
When rendered inside a module, the image resizer service included in the Commerce rendering engine processes served images. This feature is important for responsive design because as the screen size gets smaller, images automatically scale down to the optimum size for each particular module.
Follow some guidelines to ensure that images are resized correctly. Modules can specify image sizes for particular view ports in the theme.settings.json file. For more information, see Configure theme settings.
When building modules with images, always include the width and height parameters in the HTML. If you don't provide the width and height, the image resizer can't optimize image caching.
Image types and file sizes
Three aspects are important when determining the file size of an image:
- The resolution of the image (width and height).
- How the image is encoded (JPEG, GIF, or PNG).
- The quality parameter (JPEG only).
JPEG uses lossy compression that decreases the file size by discarding image detail. The quality parameter controls the amount of detail discarded. It's a number between 0 and 100, with 100 being the best quality. A lower quality parameter number results in a lower-quality image, but also a smaller file size.
PNG is a lossless format, so no image detail is lost but the image file size is larger. For images with text, sharp lines, or color gradients, PNG might be a better choice because the JPEG format might show undesirable artifacts as a result of the lossy compression.
GIF is also a lossless format, but it only supports 256 colors in a single image. For images with text or sharp lines that also don't have many colors, GIF might be a better format choice over PNG or JPEG. GIF also supports simple animations.
Ultimately, find the right balance to maintain image quality while keeping the image size as small as possible.
Lazy load images and modules
Lazy loading defers the initialization of resources until they're needed and can make web pages load faster. Most module library modules that display images or video have a configuration property to enable or disable lazy loading. A good practice is to ensure that images needing to appear immediately when loading a web page have lazy loading disabled so that they appear quickly. Images such as those appearing lower on a page should have lazy loading enabled.
Disable lazy loading for images
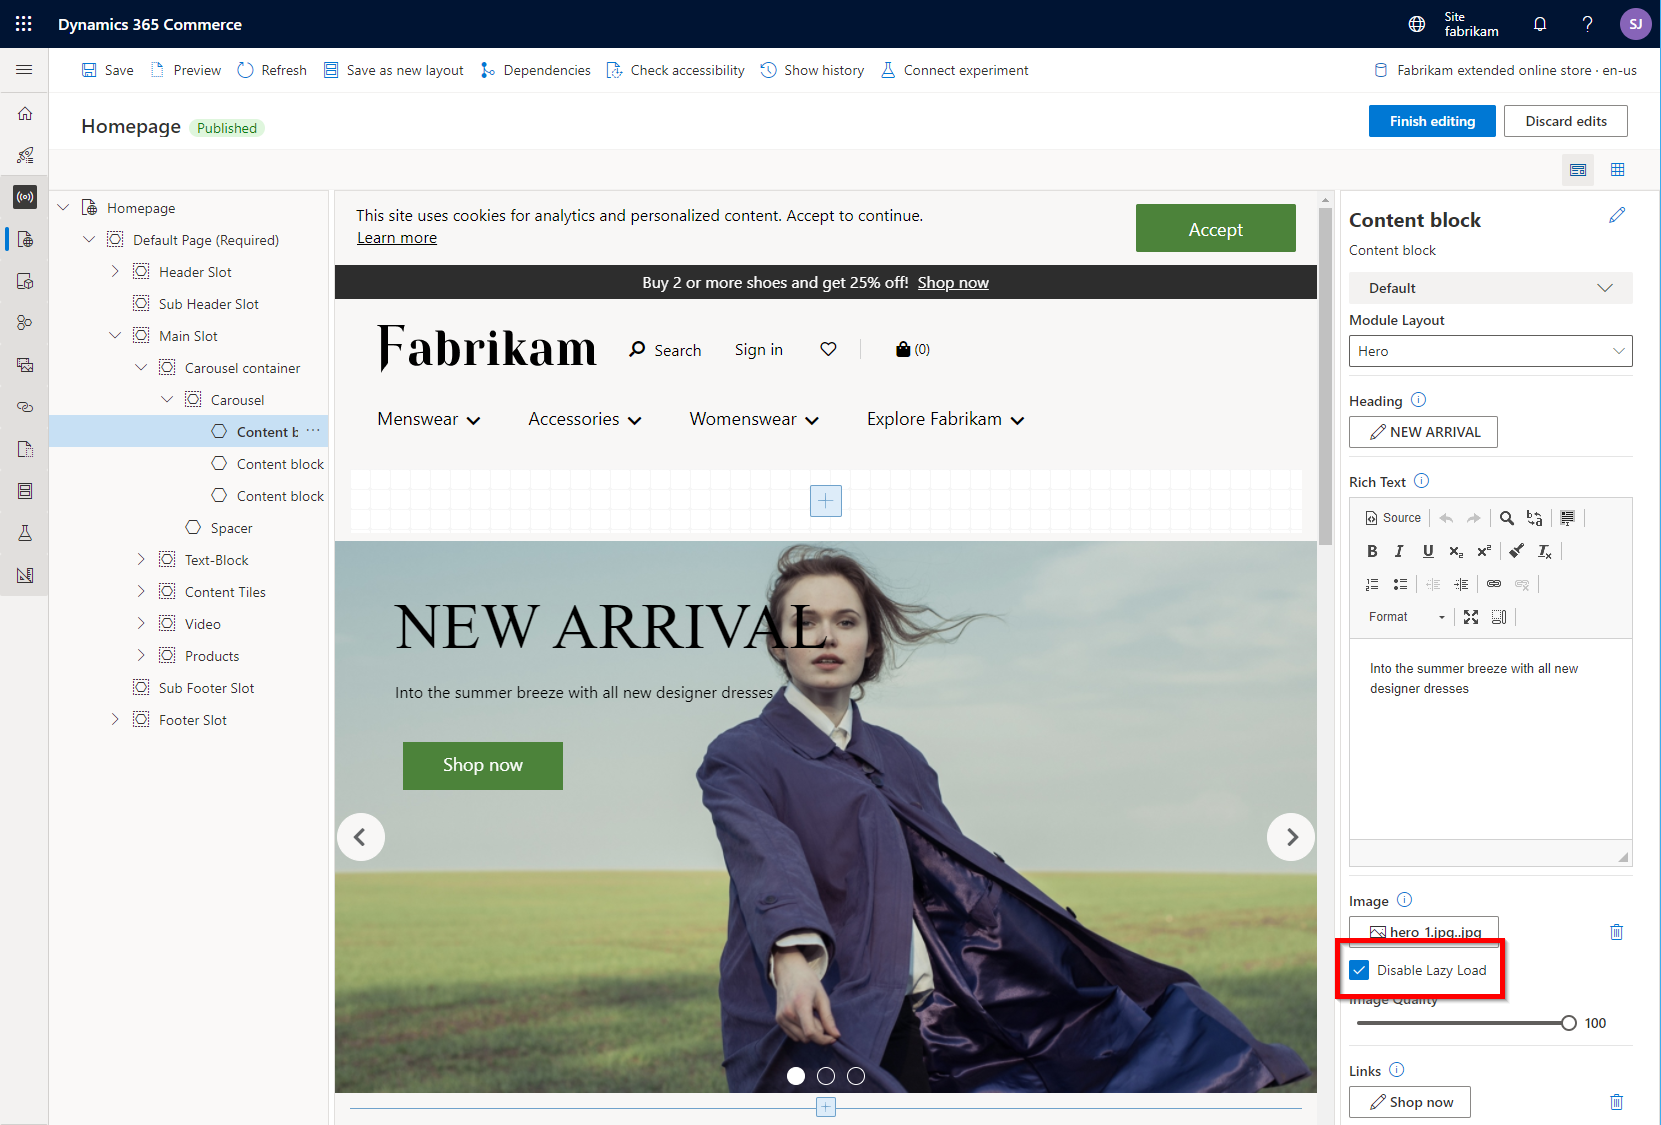
Modules that show images, such as the content block module, generally don't load the images until they're needed. This "lazy loading" behavior might cause a perception of performance problems, because an image isn't loaded when the user is ready to view it. For example, when a user selects the "next" arrow in a carousel module, the next image might take a second or two to load if lazy loading is enabled. Therefore, these types of modules that show images have a configuration setting that lets you disable lazy loading. Images are then loaded before they're needed, and users might perceive improved performance in some scenarios.
The following illustration image shows an example where the Disable Lazy Load option is enabled for a content block module in Commerce site builder.
Enable lazy loading for modules
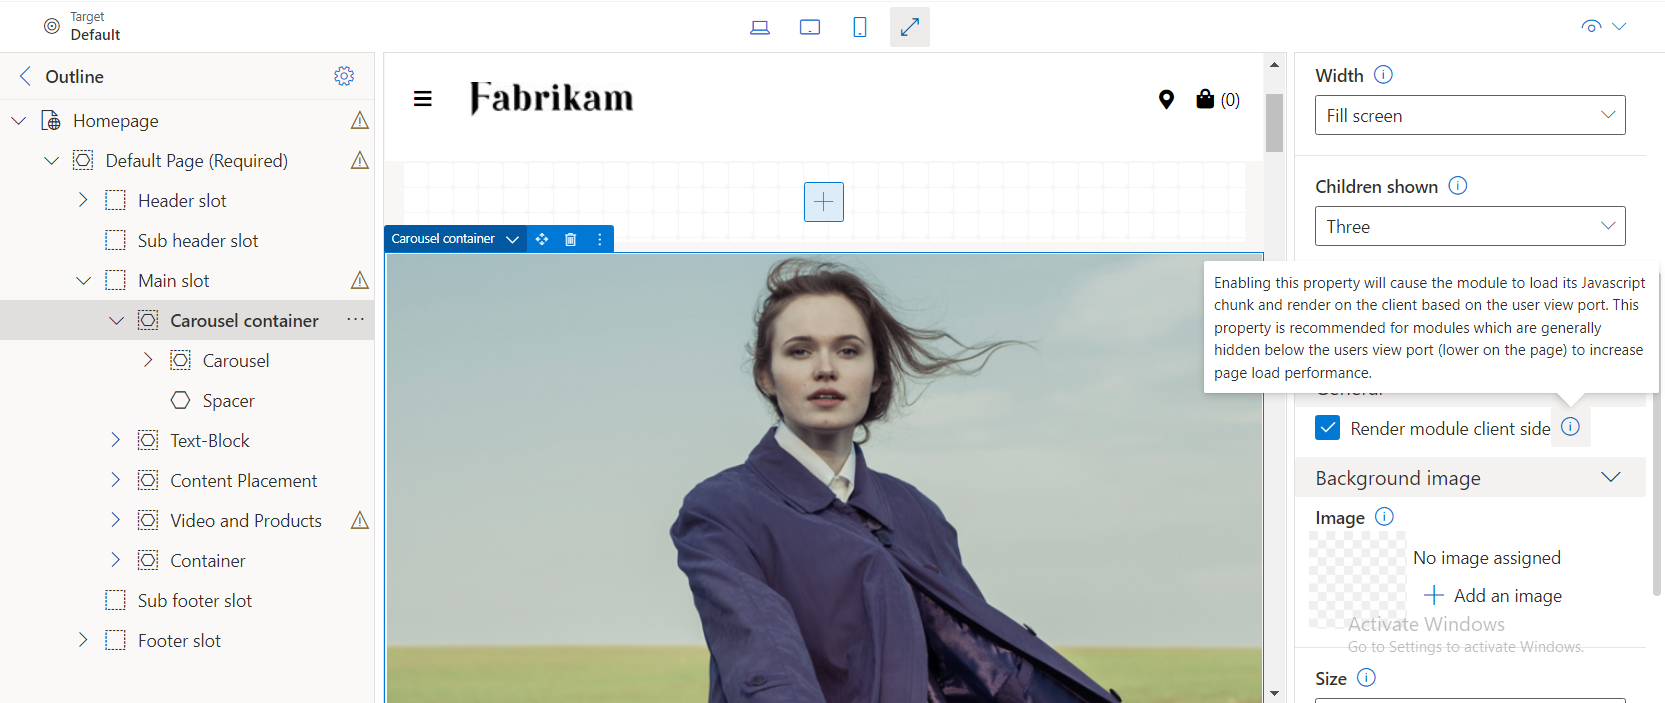
You can configure a module that's below the fold (in other words, only visible when a user scrolls down the page) to load JavaScript and render on demand as a user scrolls down the page. The visible part of the page then loads faster since the modules above the fold render before the modules below the fold.
The lazy loading for modules feature requires JavaScript bundles to be generated per module. To enable the feature, add the "enableModuleEntryPoints": true platform setting to the src/settings/platform.settings.json file.
To enable lazy loading for a module, in site builder ensure that the Render module client side option is enabled in the module's properties pane, as shown in the following example illustration.
Note
Lazy loading for product collection modules is handled differently, see the next section for details.
Enable lazy loading for a product collection module
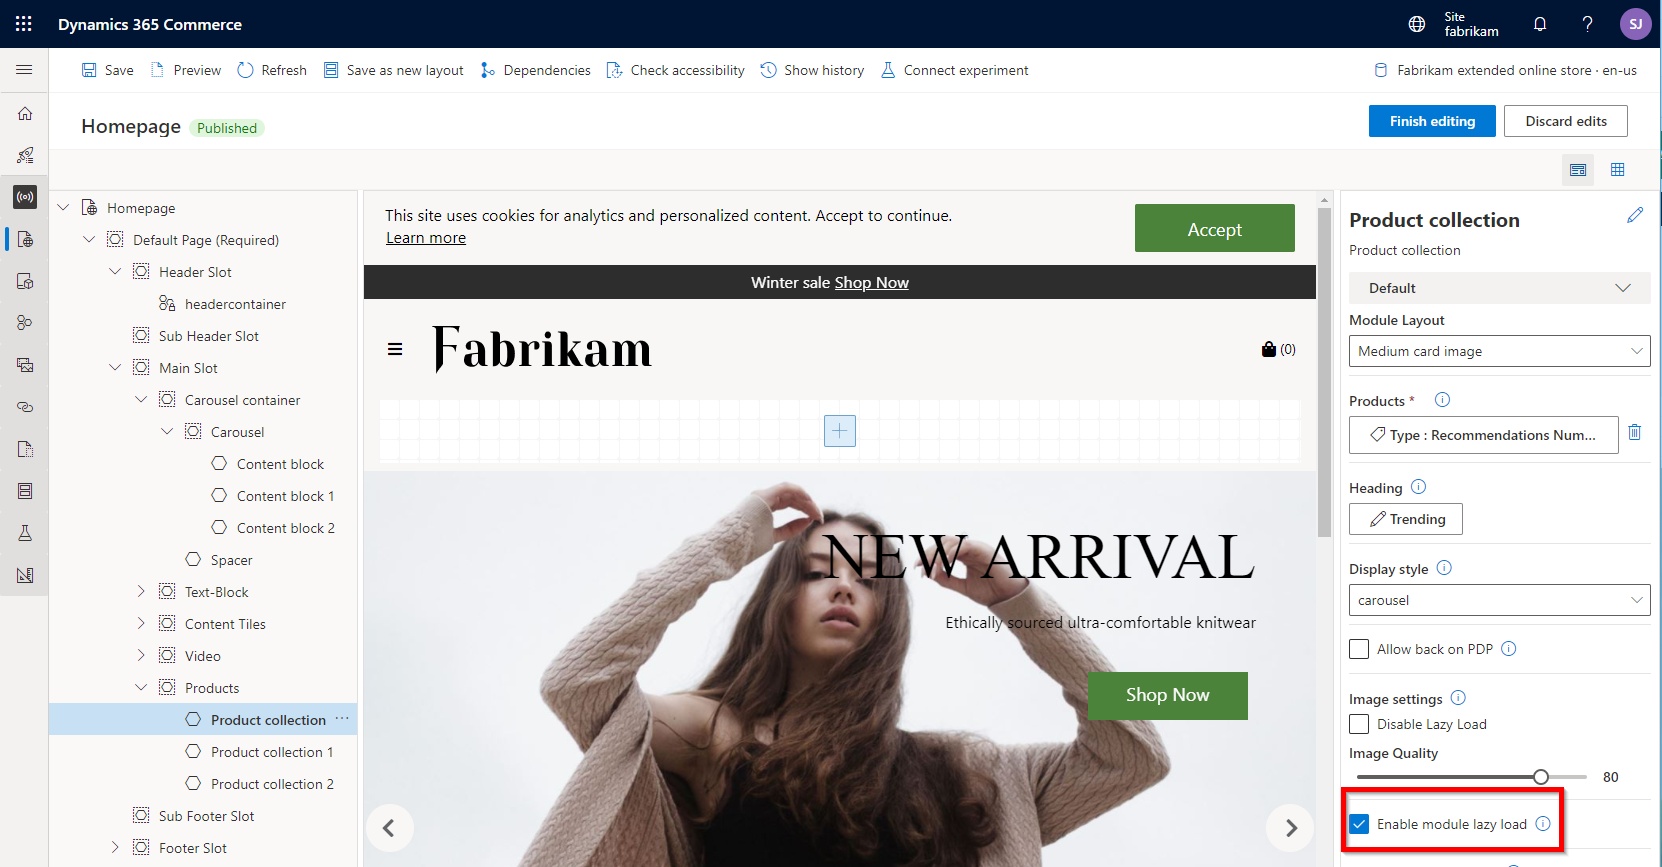
The data action that calls the product collection module can cause a small increase in page load times. To address this problem, the product collection module has an Enable module lazy load configuration setting. This setting enables the module to render on the client side after the page renders. By using this approach, the page is available for user interaction sooner. However, if you place a product collection module near the top of the page, disable lazy loading so that the images appear immediately when the web page loads. The enableModuleEntryPoints platform setting doesn't need to be added to the src/settings/platform.settings.json file for this feature to work.
The following illustration shows an example where the Enable module lazy load option is selected for a product collection module in Commerce site builder.
Modules that require user context should load on the client side
For custom modules that require user context (for example, custom cookie compliance modules), ensure that the modules render on the client side.
Cache configuration
Caching is often used on static content that doesn't often change, such as images, product content, and JavaScript and CSS files. Some scenarios might require custom cache settings to achieve the best performance results.
Image caching
The default content delivery network (CDN) cache time for images is set to five minutes. This setting means that after five minutes, the next request to get a specific image needs to retrieve the image from the origin, which makes the request slower. You can increase the cache time setting, but you must open a support ticket to make this change.
Data caching
The Commerce rendering Node layer caches product-specific data. Each entity type has different caching times. You can configure these times inside the cache.settings.json file in the SDK "/src/settings/" directory. For more information, see Data cache settings.
Page caching
Page caching enables e-commerce site pages to cache on the server. The server then serves the cached pages to site users, which significantly improves performance time. You can enable and configure page caching and caching duration in Commerce site builder for site pages. Alternatively, you can configure these settings for templates that apply across multiple site pages. For more information, see Configure page caching.
Browser hint meta tags
Use browser hint meta tags such as preconnect and dns-prefetch to tell browsers what resources are needed ahead of time to render a page. These tags prompt a browser to initiate network connections earlier than usual, so you make time-expensive network calls sooner. This approach is useful for adding additional rendering of image, font, or file endpoints used within a page.
Use the preconnect browser hint meta tag if a page relies on resources coming from external origins or domains. The meta tag initiates a TCP connection. The DNS lookup, TCP handshake, and TLS negotiation happen before the reference in the HTML document.
The following example shows a preconnect meta tag hint used in HTML.
<link rel="preconnect" href="https://<DOMAIN_TO_PRECONNECT>">
Use the dns-prefetch browser hint meta tag if a resource is likely to be navigated to or used on a page. DNS prefetching resolves a domain's address earlier than usual to avoid this time-expensive step later.
The following example shows a dns-prefetch browser hint meta tag used in HTML.
<link rel="dns-prefetch" href="https://<DOMAIN_TO_PREFETCH>">
In Commerce site builder, add meta tags to a page by using the Metatags module. Add the Metatags module to a page template's "HTML Head" section. For more information, see Work with templates.
Performance analysis
It's important that you performance test e-commerce site pages before they go live. Use a wide range of existing webpage performance testing tools for this purpose. At a minimum, use your web browser's F12 Developer Tools to examine the network loads for individual parts of a page. This approach can help you identify any performance bottlenecks so that you can investigate them further.
Restrict your e-commerce website from loading inside external website HTML iframe elements
Use the frame-ancestors directive to restrict the loading of your e-commerce site inside external website HTML iframe elements. For more information on how to configure this feature in Commerce site builder, see Manage Content Security Policy.
Optimize data action API calls to Retail APIs by specifying Top(N) pagination parameters
For modules that use Retail data actions to return search, list, or other paginated results, make sure that the Top(N) parameter is optimized for web performance. Native library modules that call these data actions (for example, the Search Result Container module that is used for list pages) include an authoring control that you can use to set the Items per page property. The module's Retail API data actions receive this property as the Top(N) parameter.
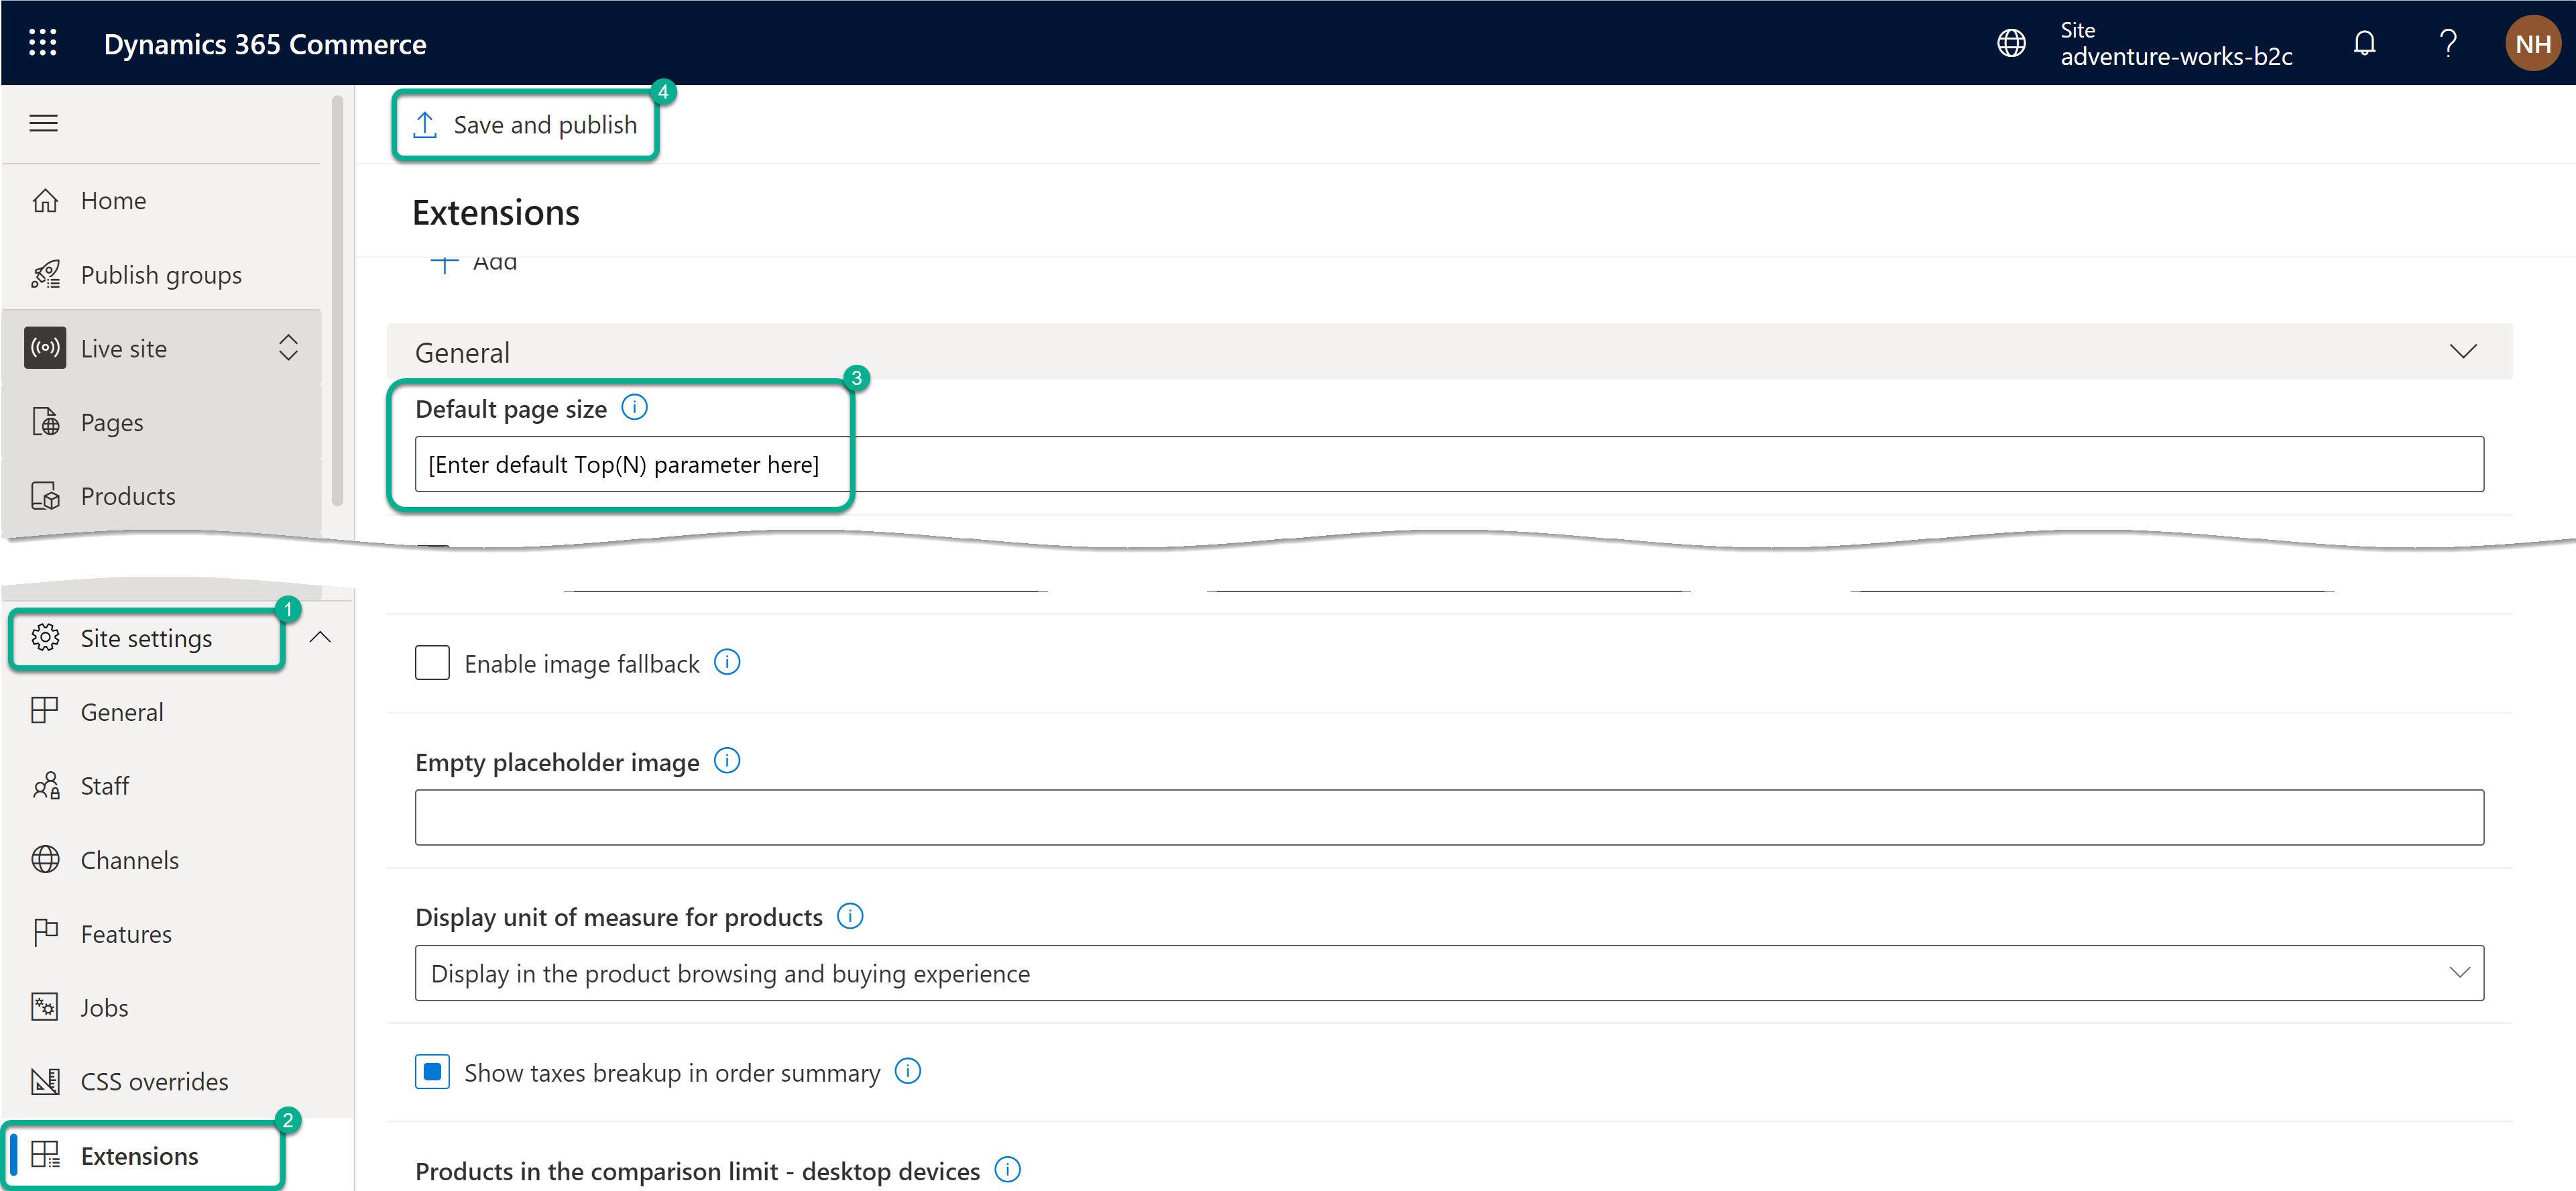
If you don't set the Top(N) parameter for a module, the data action falls back to the Default page size app setting that you define at Site Builder > [your website] > Site settings > Extensions > General. If you don't configure that setting, the fallback is the default value that the Retail API sets.
For most paginated Retail APIs, the default value of the Top(N) parameter is 1,000, which can cause performance problems for many web scenarios. Therefore, as a best practice, make sure that you configure the Default page size setting appropriately for the performance and user experience requirements of the site.
The following illustration shows the Default page size setting in Commerce site builder.
The following illustration shows an example of a data action (Top(N) paging parameter for Retail APIs).

Additional resources
Dynamics 365 Commerce architecture overview
Online channel extensibility overview
Set up a development environment