Note
Access to this page requires authorization. You can try signing in or changing directories.
Access to this page requires authorization. You can try changing directories.
Note
The Retail Interest Group by Dynamics 365 Commerce has moved from Yammer to Viva Engage. If you don't have access to the new Viva Engage community, fill out this form (https://aka.ms/JoinD365commerceVivaEngageCommunity) to be added and stay engaged in the latest discussions.
This article describes how to enable order notifications in the point of sale and the notification framework in Microsoft Dynamics 365 Commerce.
Store associates can have various tasks in their store, such as fulfilling orders or performing inventory receiving or stock counts. The point of sale (POS) client provides a single application where associates can be notified of these tasks. The notification framework in the POS helps by letting retailers configure role-based notifications. Starting in Dynamics 365 Retail with application update 5, you can configure these notifications for POS operations.
The system can show notifications for the order fulfillment operation, and starting in Commerce version 10.0.18, notifications can also be shown for the recall order operation. However, because the framework is designed to be extensible, developers can write a notification handler for any operation and show the notifications for that operation in the POS.
Enable notifications for order fulfillment or recall order operations
To enable notifications for the order fulfillment or recall order operations, follow these steps:
Go to Retail and Commerce > Channel setup > POS setup > POS > Operations.
Search for either the Order fulfillment operation or the Recall order operation. Select Enable notifications for the operation to specify that the notification framework should listen to the handler for this operation. If the handler is implemented, the system shows notifications for this operation in the POS.
Go to Retail and Commerce > Employees > Workers.
Select the Commerce tab, select a worker row, and then select POS permissions. Select the Notifications FastTab to expand it, and then add the operations you enabled notifications for. If you're configuring a single notification for a worker, set the Display order value to 1. If you're configuring more than one operation, set the Display order values to indicate the order in which the notifications should be displayed.
The system shows notifications only for operations that you add on the Notifications FastTab. You can add operations there only if you select the Enable notifications check boxes for those operations on the POS operations page. Additionally, the system shows notifications for an operation only to workers if you add the operation to the POS permissions for those workers.
Note
You can override notifications at the user level. To do this, open the worker's record, select POS permissions, and then edit the user's notification subscription.
Go to Retail and Commerce > Channel setup > POS setup > POS profiles > Functionality profiles. In the Notification interval field, specify how often the system should pull notifications. For some notifications, the POS must make real-time calls to the back-office application. These calls consume the compute capacity of your back-office application. Therefore, when you set the notification interval, consider both your business requirements and the impact of real-time calls to the back-office application. A value of 0 (zero) turns off notifications.
Go to Retail and Commerce > Retail and Commerce IT > Distribution schedule. Select the 1060 (Staff) schedule to synchronize notification subscription settings, and then select Run now. Next, select the 1070 (Channel configuration) schedule to synchronize the permission interval, and then select Run now.
View notifications in the POS
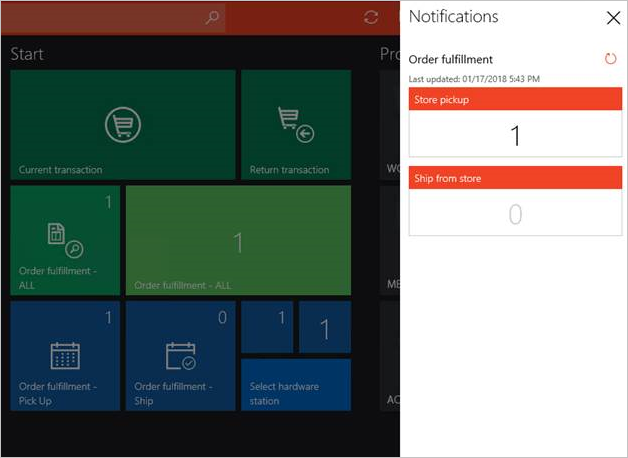
After you complete the preceding steps, the workers can view the notifications in the POS. To view notifications, select the notification icon in the upper-right corner of the POS. A notification panel appears and shows notifications for the operations configured for the worker.
For the order fulfillment operation, the notification panel shows the following groups:
- Store pickup – This group shows the count of individual order lines that are scheduled for pickup from the current store. You can select the number on the group to open the Order fulfillment operation with a filter so that it shows only the active order lines that are set up for pickup from the current store.
- Ship from store – This group shows the count of individual order lines that are configured to ship from the user's current store. You can select the number on the group to open the Order fulfillment operation with a filtered view that only shows the active order lines that are set up for shipment from the current store.
For the recall order operation, the notification panel shows the following groups:
- Orders to fulfill – This group shows the count of orders that are configured either for pickup or shipping fulfillment for the user's current store. You can select the number on the group to open the Recall order operation with a filtered view that only shows the open orders that need to be fulfilled by the user's current store for either pick up in store or ship from store scenarios.
- Orders to pick up – This group shows the count of orders that are scheduled for pickup from the current store. You can select the number on the group to open the Recall order operation with a filtered view that only shows open orders that need to be fulfilled for customer pickup from the user's current store.
- Orders to ship – This group shows the count of orders to be shipped from the user's current store. You can select the number on the group to open the Recall order operation with a filtered view that only shows open orders that need to be fulfilled for shipment from the user's current store.
For both the order fulfillment and recall order notifications, as new orders are picked up by the process, the notification icon changes to indicate that there are new notifications, and the count for the appropriate groups is updated. Even though the groups refresh at regular intervals, POS users can manually refresh the groups at any time by selecting Refresh next to the group. If a group has a new item that the current worker hasn't viewed, the group shows a burst symbol to indicate new content.
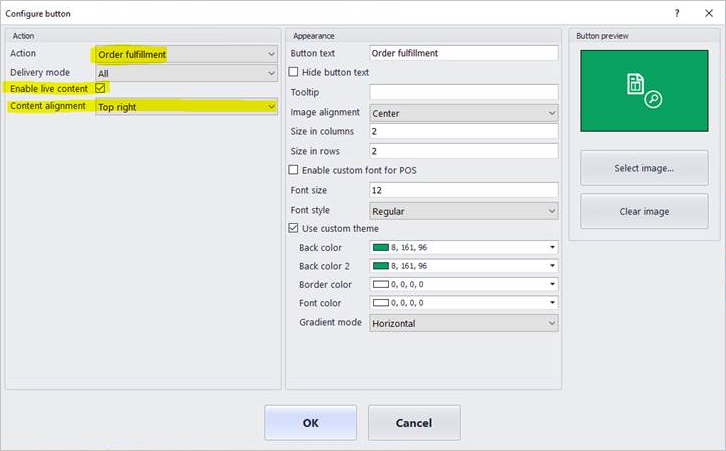
Enable live content on POS buttons
POS buttons can now show a count to help workers easily determine which tasks require their immediate attention. To show this number on a POS button, complete the notification setup that is described earlier in this article (that is, enable notifications for an operation, set up a notification interval, and update the POS permission group for the worker). Additionally, open the button grid designer, view the button's properties, and select the Enable live content check box. In the Content alignment field, select whether the count appears in the upper-right corner of the button (Top right) or in the center (Center).
Note
You can enable live content for operations only if you select the Enable notifications check box for them on the POS operations page, as described earlier in this article.
The following illustration shows the live content settings in the button grid designer.
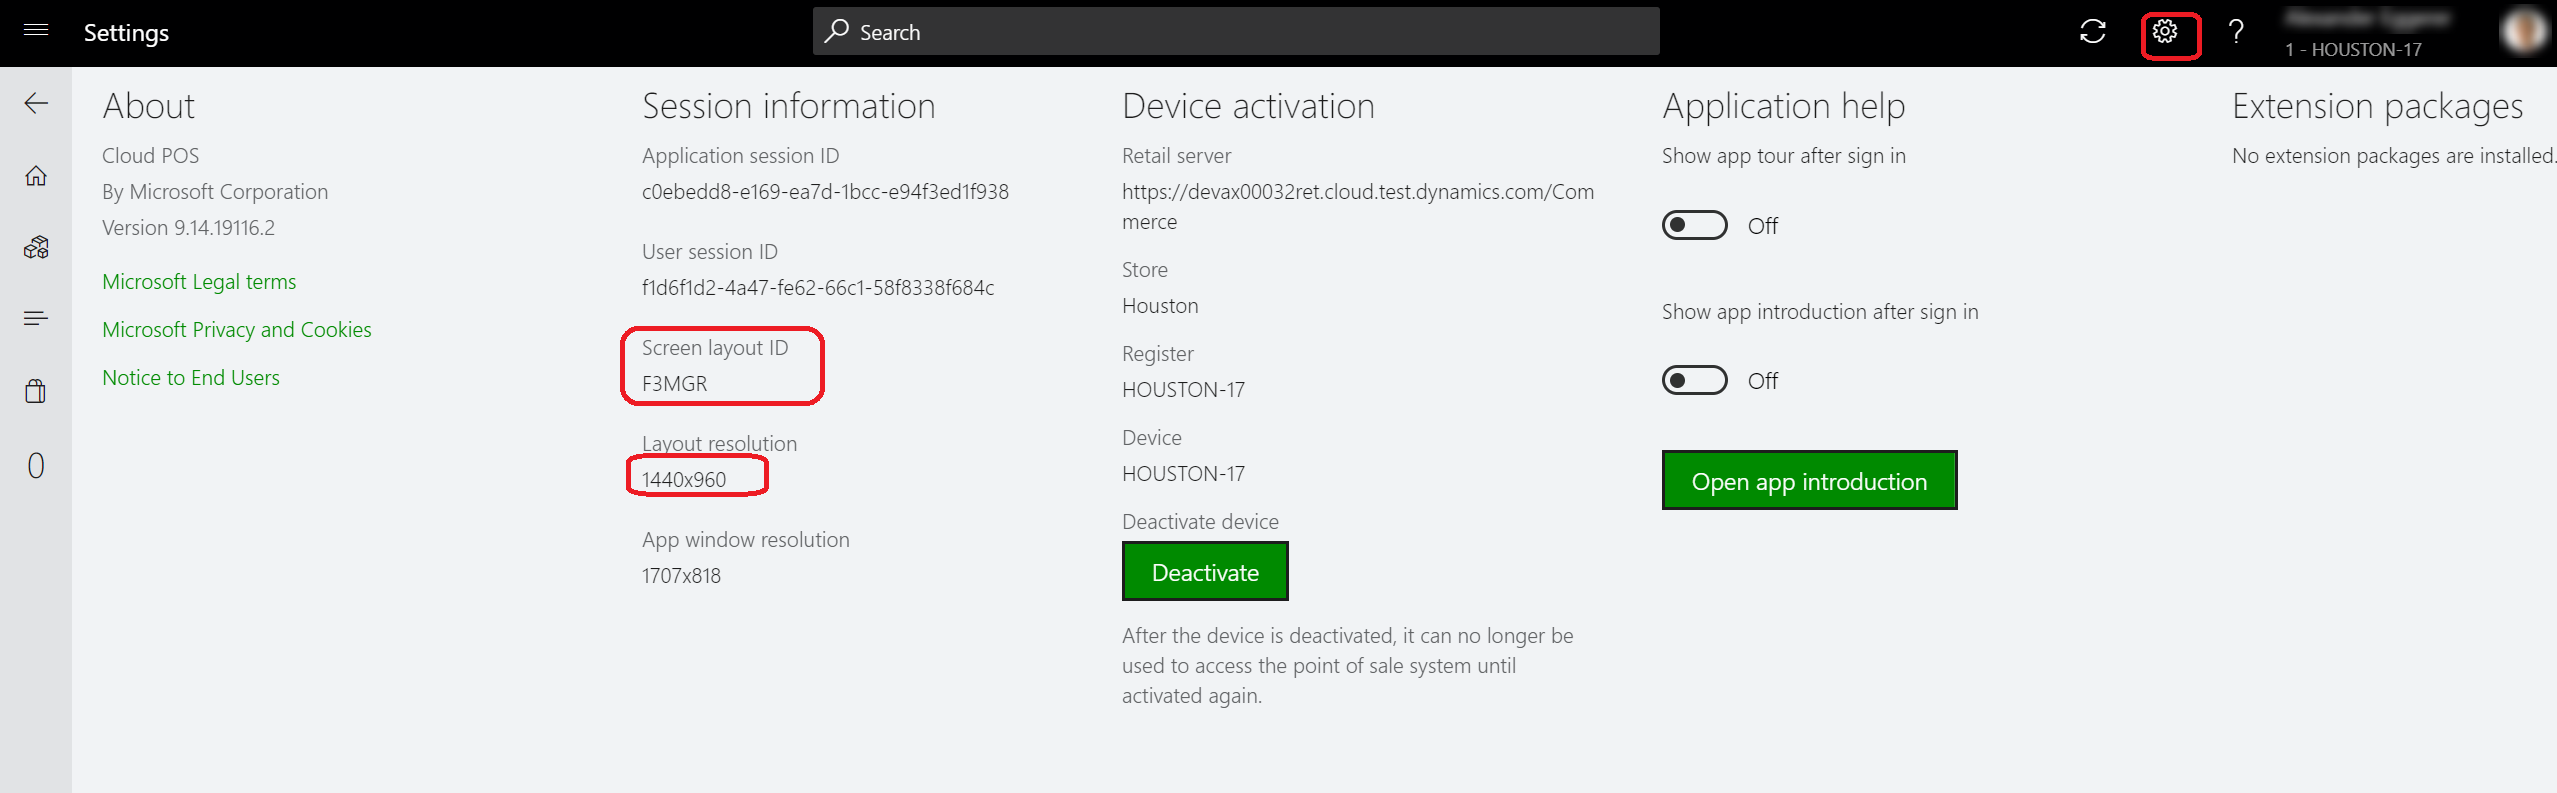
To show the notification count on a button, make sure that you're updating the correct screen layout. To determine the screen layout that the POS uses, select the Settings icon in upper-right corner and note the Screen layout ID and Layout resolution. Now using the Microsoft Edge browser, go to the Screen layout page, find the Screen layout ID and Layout resolution identified earlier and select the Enable live content check box. Go to Retail and Commerce > Retail and Commerce IT > Distribution schedule and run the 1090 (Registers) job to synchronize layout changes.
The following illustration shows the effect of selecting Top right versus Center in the Content alignment field for buttons of various sizes.