Note
Access to this page requires authorization. You can try signing in or changing directories.
Access to this page requires authorization. You can try changing directories.
Applies to: Dynamics 365 Commerce version 10.0.42 and later
The modernized transaction grid replaces the legacy cart view on the Store Commerce transaction page with a React-based, Fluent UI experience. The grid introduces inline cart line interactions, contextual discount visibility, a loyalty upsell prompt, and an extensible notification framework - all without requiring associates to navigate away from the transaction.
This article describes the capabilities of the modernized transaction grid and how to enable them.
Prerequisites
- Store Commerce app version 10.0.42 or later
- Enable the following feature flag in Commerce headquarters: Enable Modern Transaction Grid in POS Transaction View
Note
Individual capabilities within the transaction grid have their own minimum versions, noted in each of the following sections.
Enable the modernized transaction grid
- In Commerce headquarters, go to the Feature management workspace (System administration > Workspaces > Feature management).
- Search for Enable Modern Transaction Grid in POS Transaction View and select Enable now.
- Go to POS visual profiles (Retail and Commerce > Channel setup > POS setup > POS profiles > POS visual profiles).
- For each visual profile, set the Modern transaction grid value to Yes.
- Enable any optional per-capability toggles described in later sections.
- Run the Registers (1090) distribution schedule job to push changes to channels.
- Restart the Store Commerce app.
Tip
The Modern transaction grid toggle in POS visual profiles lets you roll out the change to specific registers before enabling it broadly.
Cart line interactions
Inline line actions
You can perform common cart line operations as inline actions directly on each cart line, so you don't need nested button navigation. Available actions include void product, return item, line discount, price override, coupon, line comment, and change unit of measure.
- Desktop: Hover over a line and select the ellipsis (...) to open the inline actions list.
- Mobile/touch: Long-press a line to open the inline actions list.
To expose a broader set of line operations, enable Enable advanced inline actions in the Feature management workspace.
Configure inline actions per screen layout
Retailers and implementation partners can configure which operations appear as inline actions, their display order, and custom operations per screen layout by using the screen layout designer in headquarters.
Here's what you can configure:
- Which actions appear: Select any eligible out-of-the-box POS operation or custom operation registered in headquarters to include as an inline action on transaction line item.
- Display order: Control the sequence in which inline actions appear so the most relevant operations for a given store format or associate role surface first.
- Custom operations: Add operations built through the POS extension framework as inline actions alongside out-of-the-box operations, giving retailers a unified configuration surface for both standard and customized workflows.
By default, no configuration is required to preserve the current experience. If you don't configure any inline actions for a screen layout, Store Commerce continues to display the existing default set of inline operations for that layout. After you configure inline actions for a specific layout, the configured list replaces the defaults for that layout only. Other layouts remain unaffected.
To configure inline actions, follow these steps:
- In Commerce headquarters, go to Retail and Commerce > Channel setup > POS setup > POS > Screen layouts.
- Open the screen layout to configure and launch Screen layout designer.
- Select the transaction grid component and open the inline actions configuration.
- Add operations from the available list, remove operations that aren't needed, and set the display order.
- Save the layout and run the Channel configuration (1090) distribution schedule job to push changes to stores.
Changes take effect in Store Commerce after the updated layout is downloaded at the register.
Localization
The system automatically localizes out-of-the-box operation names by using existing POS resource strings, so you don't need to provide extra configuration. For custom operations, display names fall back to the operation name configured in headquarters. To provide localized display names for custom operations, use resource files and operation mappings in your extension code.
Security and permissions
Inline actions respect the same POS security roles and permission model as button grid operations. Use role-based access controls to restrict sensitive operations (such as price override or void) line to managers, while presenting a simplified action set to cashiers.
Inline quantity updates
Associates can update the quantity of a cart line by selecting or tapping the quantity value directly within the grid. This feature doesn't require any nested buttons or dialogs.
Product images on cart lines
Product images display on each cart line, helping associates visually confirm items at a glance. Ensure you correctly configure product images in headquarters before enabling this capability. For more information, see Set up and manage images for Store Commerce.
To enable product images on the transaction grid:
- In Feature management, search for Enable product images on modern transaction grid and select Enable now.
- Run the Registers (1090) job.
Contextual discount visibility
Quantity discount captions
An inline caption appears on a cart line when a quantity-based discount is available, giving associates a natural prompt to inform customers about potential savings.
To enable this feature:
- In POS visual profiles, set Show inline quantity discount messages to Yes.
- Run the Registers (1090) job.
Threshold discount bar
A discount bar appears above the cart when the cart total approaches a threshold-based discount tier, giving associates a clear cue to encourage customers to add more items.
To enable this feature:
- In POS visual profiles, set Show threshold discount bar to Yes.
- Run the Registers (1090) job.
Cart suggestions
The cart suggestions panel provides a modernized layout for displaying product recommendation cards with add-to-sale actions directly from the transaction page. Headquarters users curate the default recommendations. The component exposes an extensibility API that allows partners and ISVs to supply their own recommendation logic, including AI-curated suggestions.
To enable this feature:
- In POS visual profiles, set Show product suggestions to Yes.
- Run the Registers (1090) job.
Loyalty upsell prompt
When a customer is attached to the transaction, the loyalty upsell prompt surfaces how close the customer is to their next loyalty tier. This feature gives associates a data-backed moment to encourage more purchases.
For more information, see Loyalty upsell prompt feature in POS.
Notifications
The toast notification framework delivers real-time, nonblocking alerts on the transaction page. Built-in scenarios include policy updates for associates, low-stock item alerts, and kiosk assistance requests.
The framework is fully extensible. Partners and ISVs can implement custom notification types by extending the toast notification model.
For more information, see Offline reliability toast notifications in the Store Commerce app.
Transaction page workflow improvements
Streamlined add-to-cart workflow
When an associate adds a product to the cart from the product details page or search results, the following two workflows are available:
- Confirmation dialog (default): A dialog confirms the item was added and returns the associate to the browser experience. This behavior is suited for assisted-selling scenarios where associates add multiple items before processing.
- Go directly to transaction: The associate is taken immediately to the transaction page after adding an item, with no confirmation dialog. This behavior is suited for single-item transaction scenarios.
To configure this feature:
- In POS visual profiles, under General > Product details page, set Bypass Item added dialog to Yes (go directly to transaction) or No (show confirmation dialog).
- Run the Registers (1090) job after each change.
Reset button grids at end of transaction
When a transaction is completed, suspended, or voided, the default button grid assigned to the first tab automatically restores. This behavior reduces the number of clicks required when associates handle consecutive transactions.
Improvements for faster throughput
In Commerce version 10.0.49 and later, the modernized transaction grid adds focused improvements that help cashiers and business-to-business (B2B) associates work through large carts and repeat transaction tasks more quickly. The improvements include transaction line search, multiselect cart line updates, bulk item add, quick operations, and keyboard shortcuts.
Before you configure these capabilities, enable the modernized transaction grid. For more information, see Enable the modernized transaction grid.
These improvements are optional. Enable them only for the layouts, roles, and store formats that benefit from faster high-volume transaction processing.
Configure transaction line search
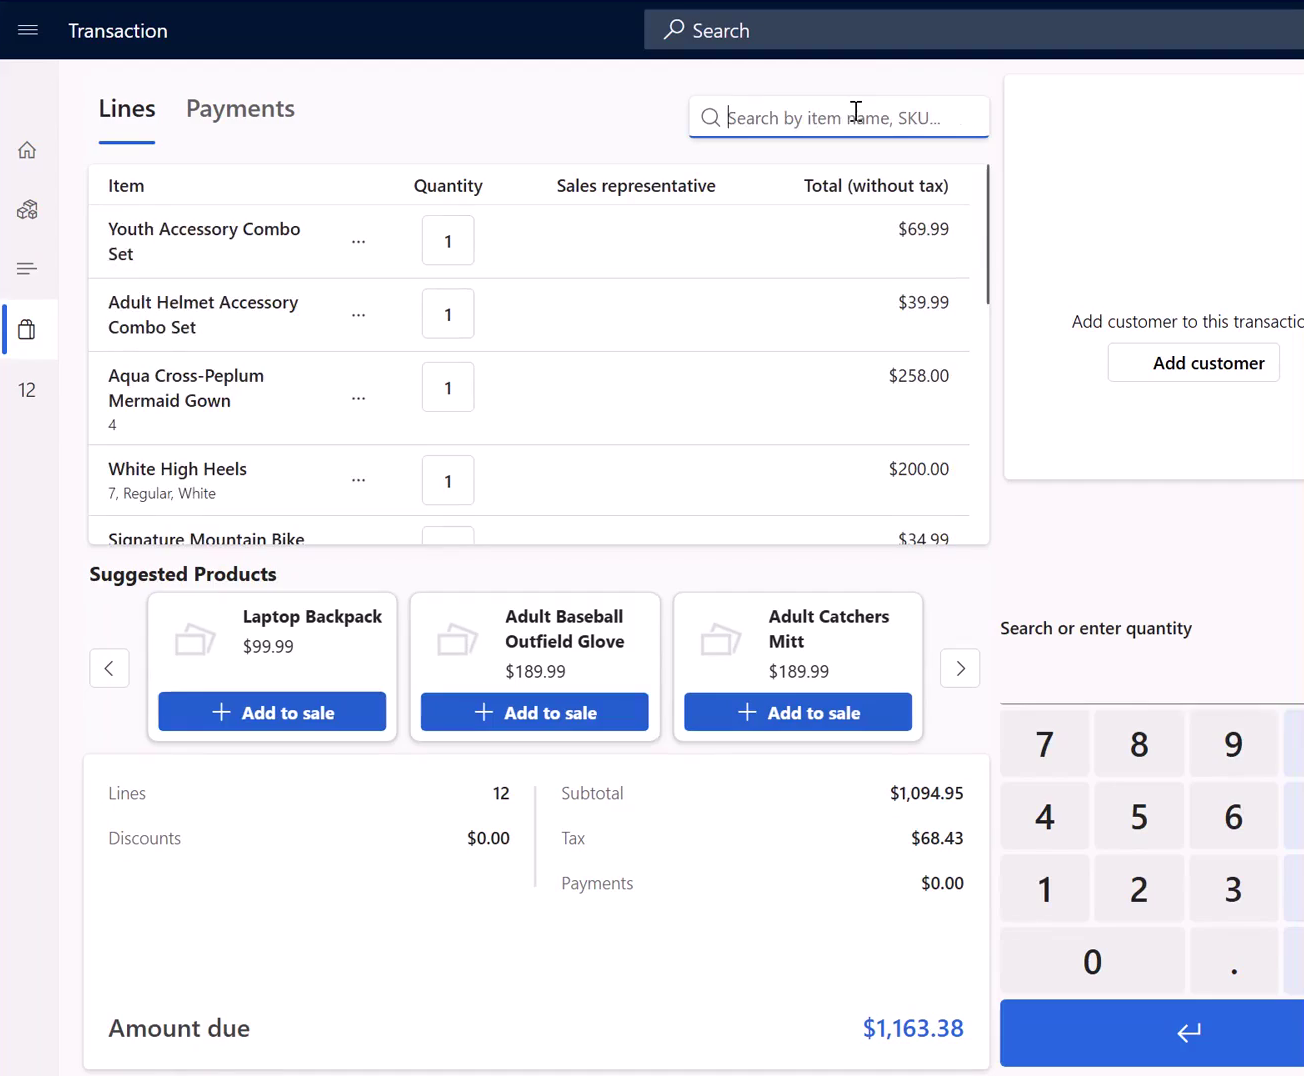
Transaction line search lets associates filter the Lines tab by item name, item number, SKU, or other visible line details. This capability is useful for large carts where associates need to quickly find and update a specific line.
To configure transaction line search:
- In Commerce headquarters, go to Retail and Commerce > Channel setup > POS setup > POS > Screen layouts.
- Open the screen layout to configure, and then launch Screen Layout Designer.
- Select the transaction grid component, and then open the transaction grid customization dialog.
- On the Lines tab, select Show transaction line search.
- Save the layout, and then run the Channel configuration (1090) distribution schedule job.
To use transaction line search, open the transaction page, select the Lines tab, and enter the item name, item number, SKU, or other search text in the search box above the grid. The grid filters to matching lines. Clear the search box to show all lines again.
Configure multiselect cart line updates
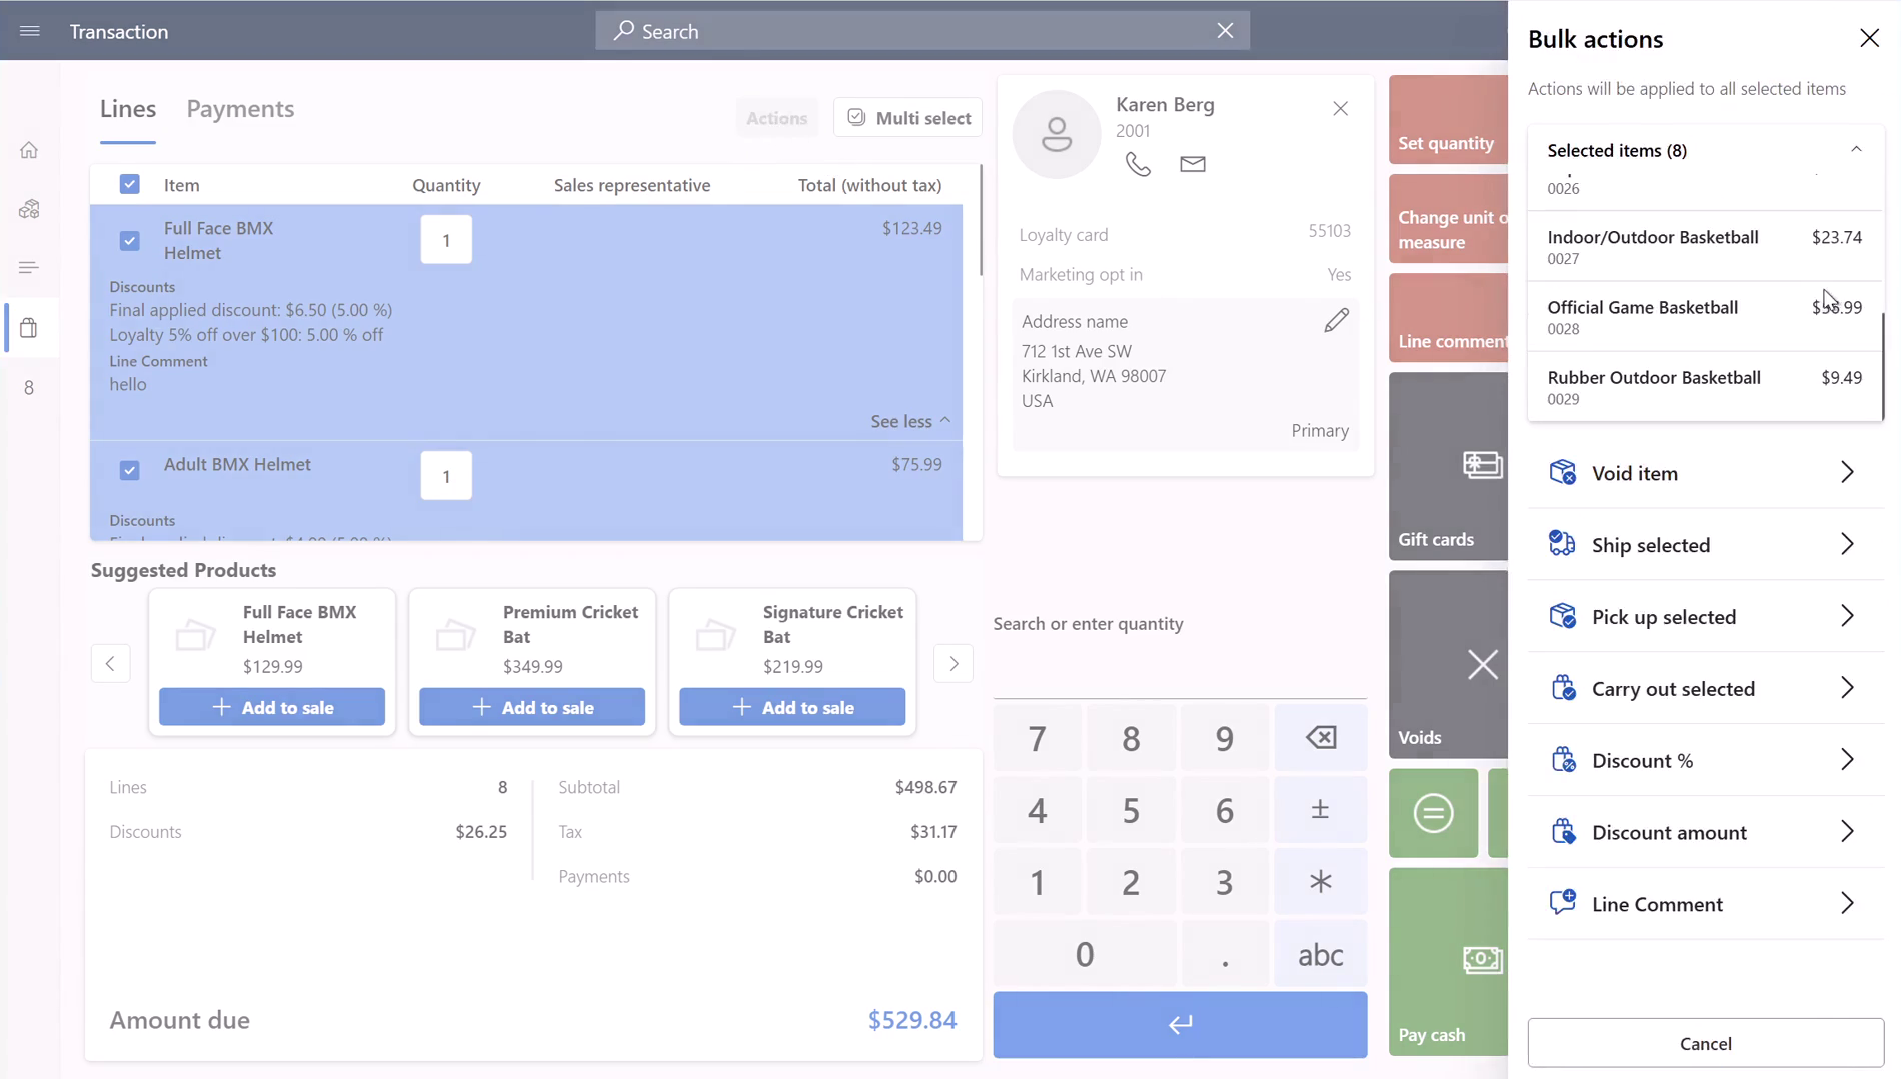
Multiselect cart line updates let associates select multiple transaction lines and apply supported bulk actions together. Supported actions include void item, ship selected products, pick up selected products, carry out selected products, line discount percentage, line discount amount, and line comment. Button grid operations for void, line discount, and price override can also operate on the selected lines when you enable multiselect.
To configure multiselect cart line updates:
- In Commerce headquarters, go to Retail and Commerce > Channel setup > POS setup > POS > Screen layouts.
- Open the screen layout to configure, and then launch Screen Layout Designer.
- Select the transaction grid component, and then open the transaction grid customization dialog.
- On the Lines tab, select Show transaction line multiselect.
- Save the layout, and then run the Channel configuration (1090) distribution schedule job.
To use multiselect cart line updates, select Multi select on the transaction page, select the lines to update, and then select Actions. Choose the bulk action to apply. If the action requires input, such as a discount value, reason code, price, or comment, enter it once for the selected lines. Eligible lines are updated together. Lines that can't be updated are skipped, and a single summary message lists the issues after the operation.
Use bulk item add
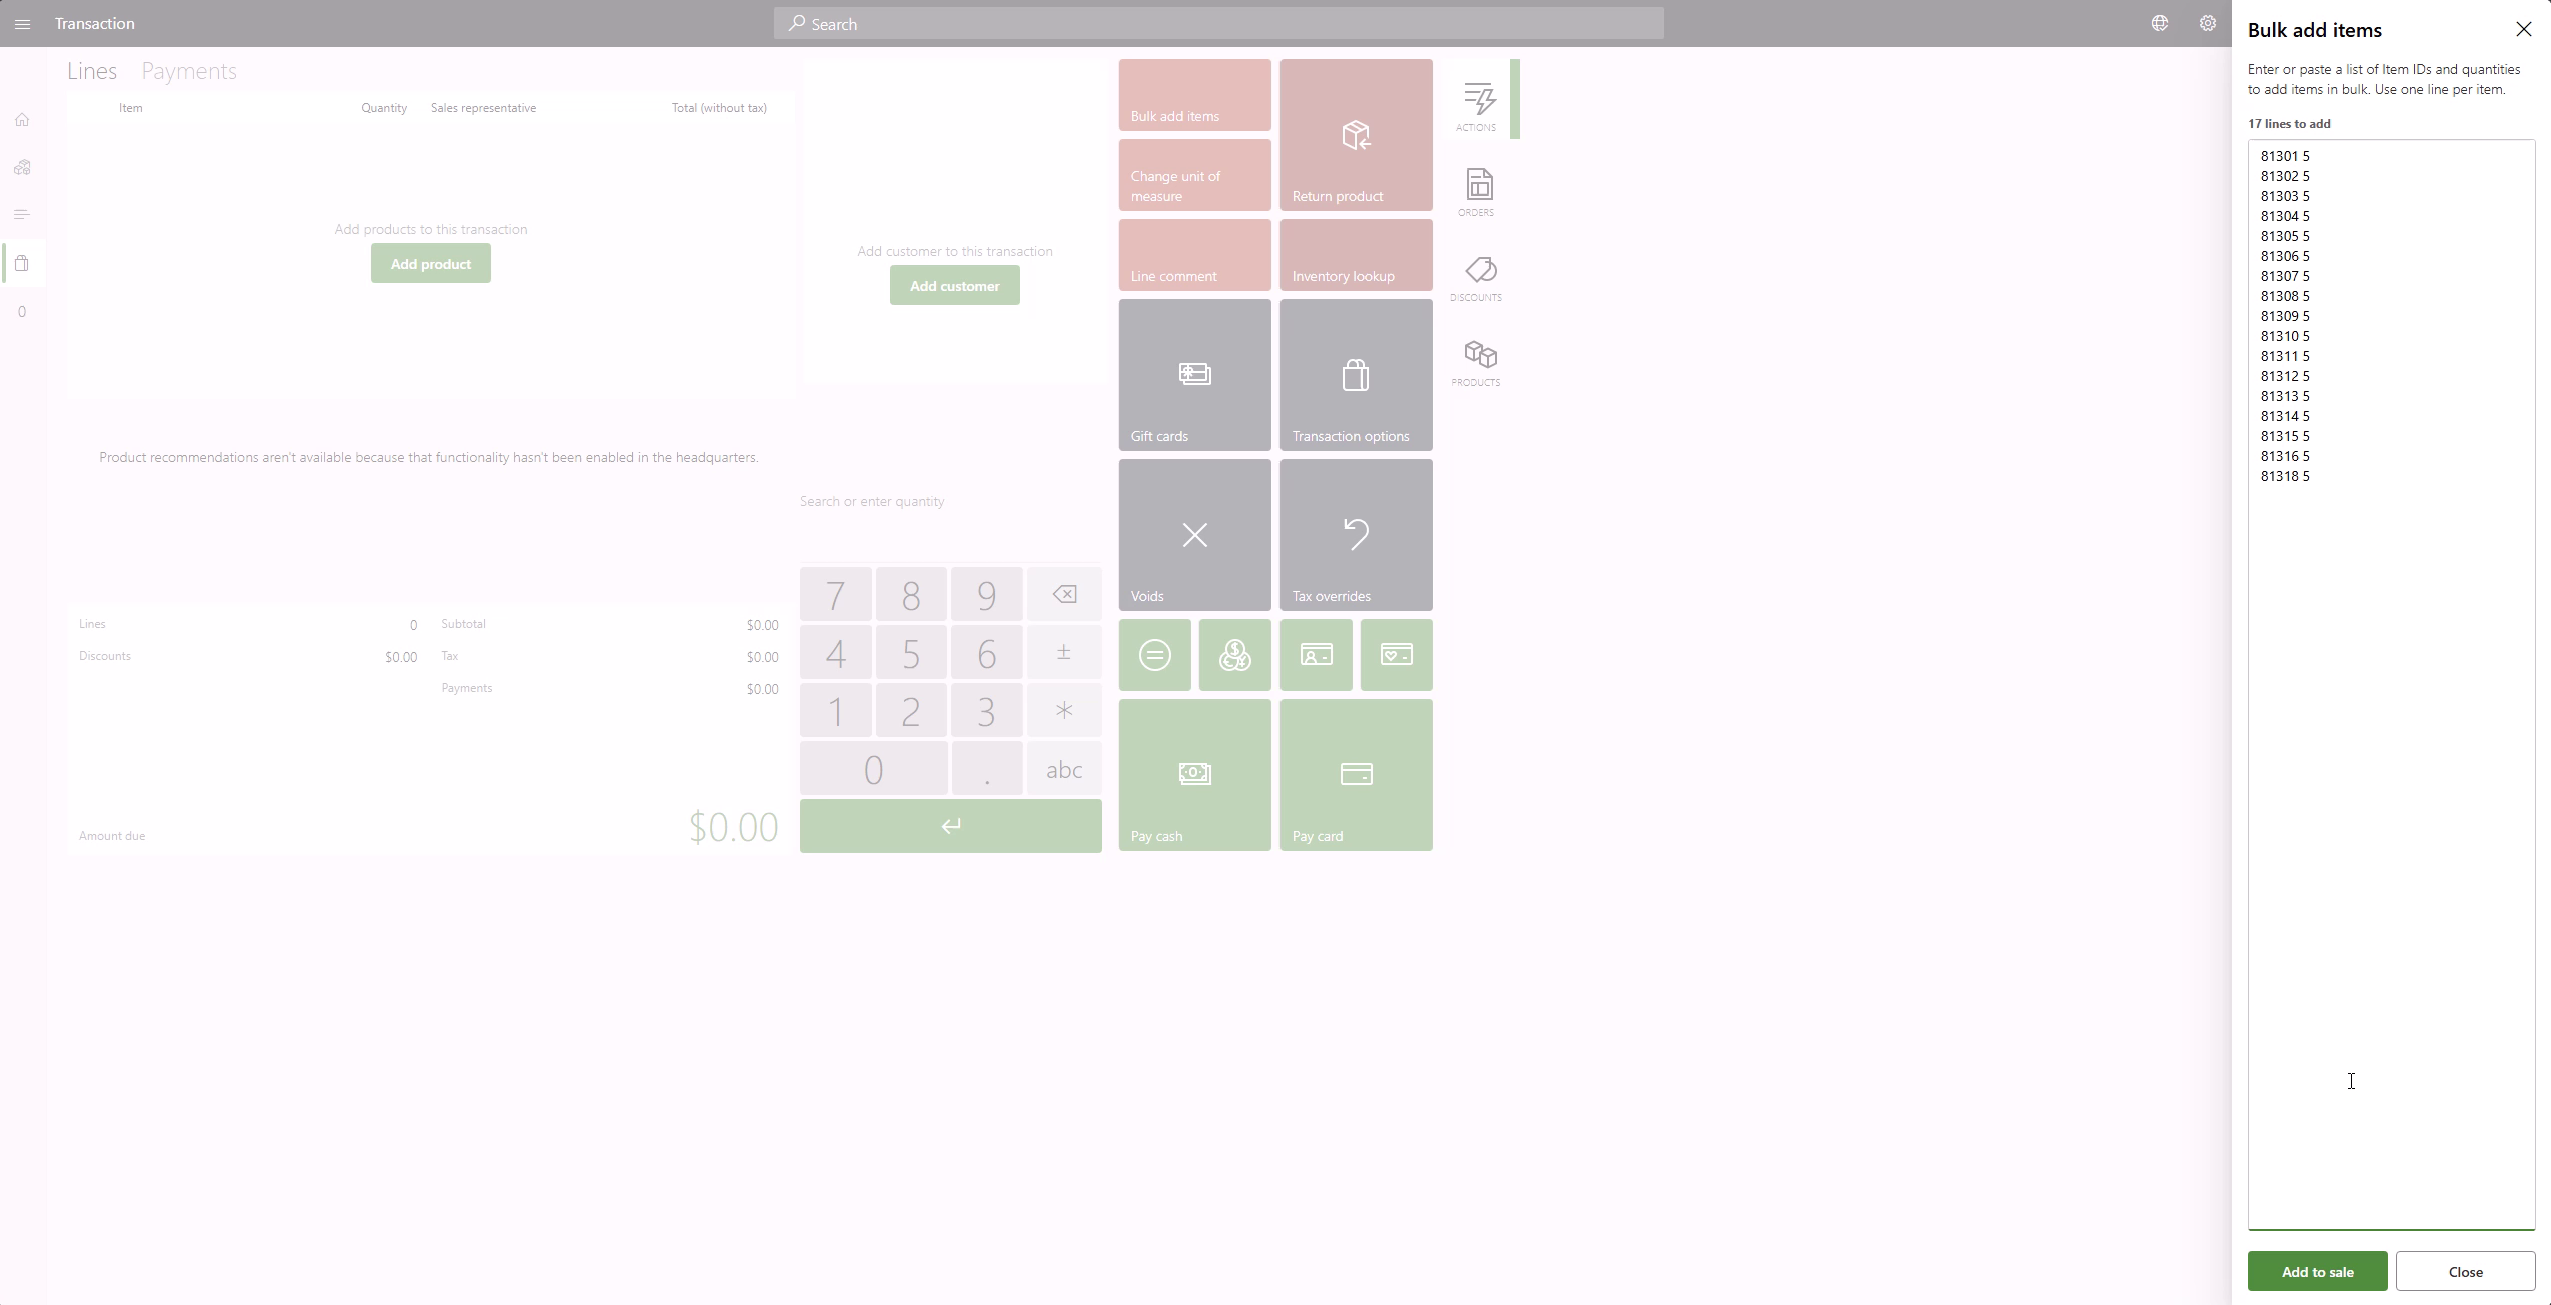
Bulk item add helps associates add many items to a transaction from a single entry panel. This capability is useful for B2B and trade-counter scenarios where associates receive a list of item IDs and quantities.
To configure access to bulk item add, add the bulk item add operation to the appropriate button grid or action panel for the screen layout that associates use.
Bulk item add supports item and quantity entries in either of the following two formats:
<item ID> * <quantity><item ID> <quantity>
To use bulk item add:
- On the transaction page, select Bulk add items.
- In the Bulk add items pane, enter or paste item IDs and quantities, one line per item.
- Review the number of lines to add.
- Select Add to sale to add the items to the transaction.
If an item has variants, the variant selection dialog appears so you can select the variant before the line is added. If some entries can't be added, the valid lines are still added and the dialog shows errors for the entries that need correction.
Configure the Quick Operations panel
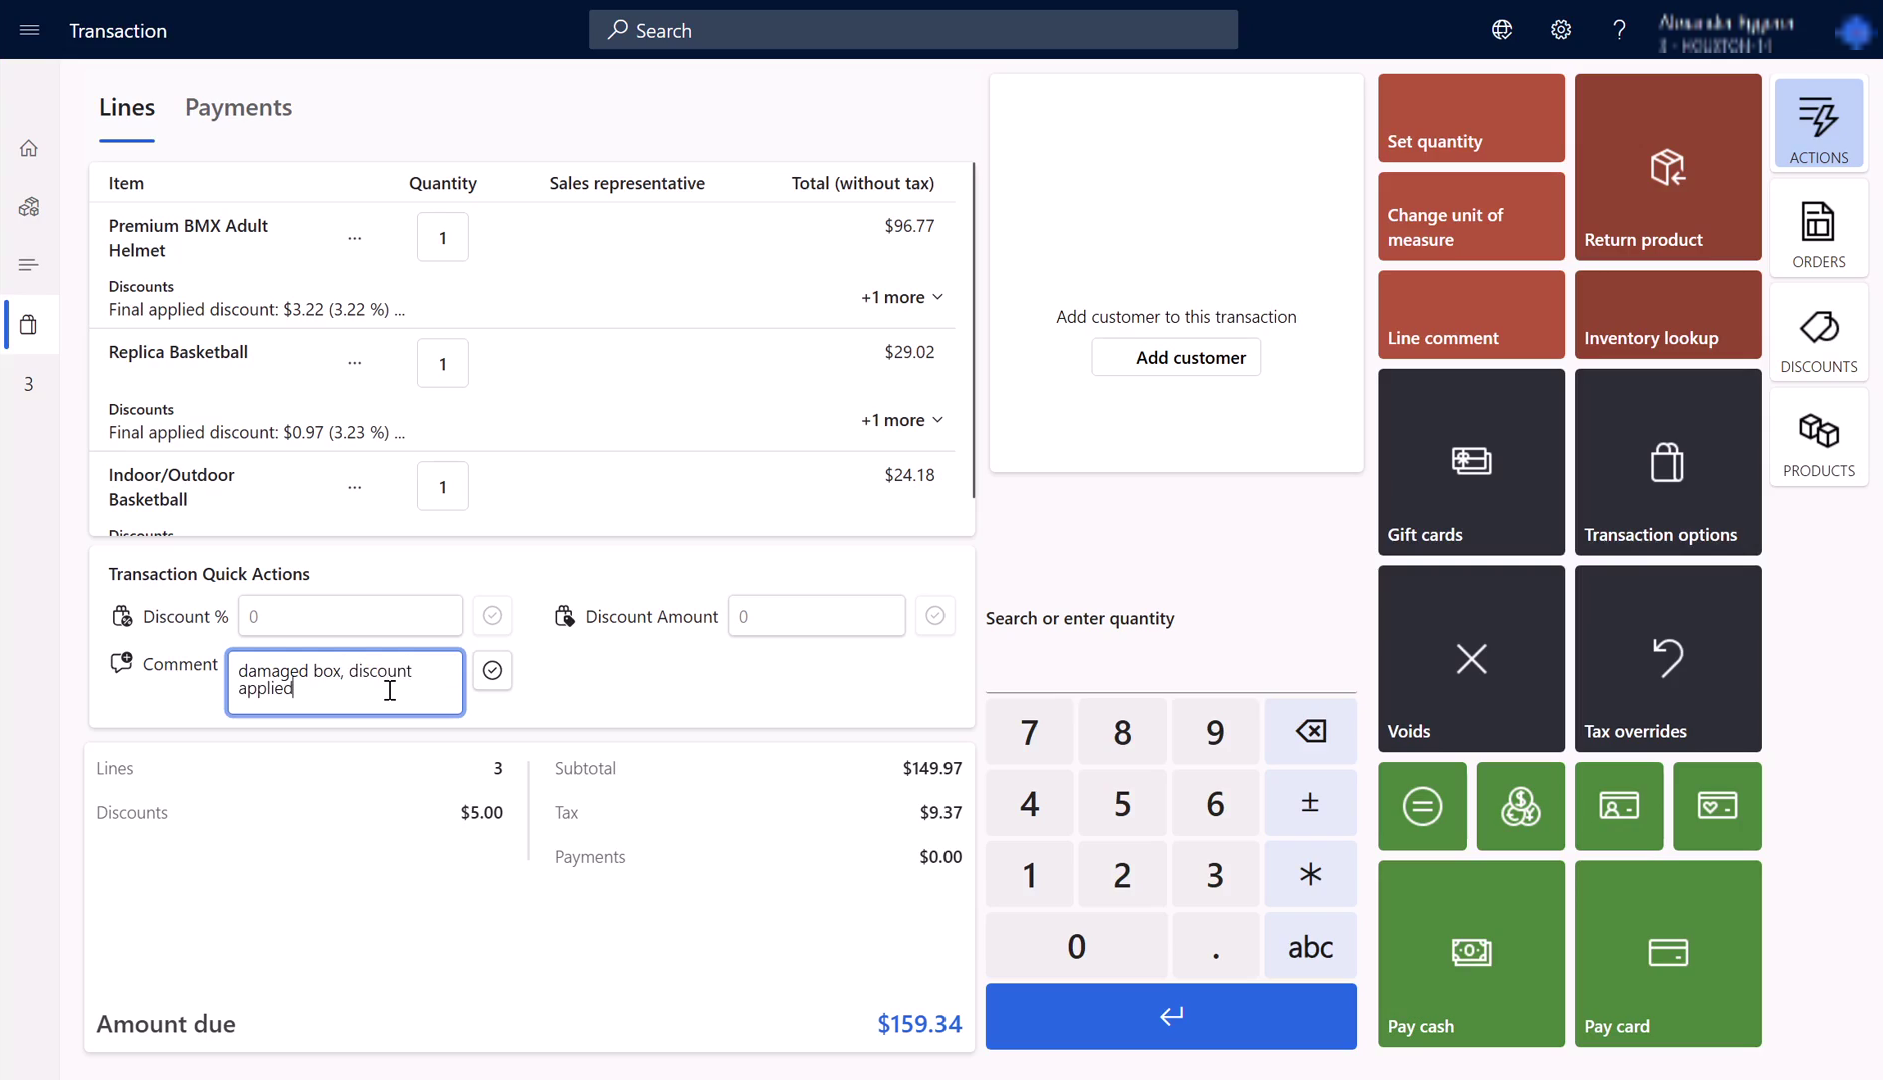
The Quick Operations panel lets associates complete frequently used transaction-level tasks directly on the transaction page. Supported fields include total discount percentage, total discount amount, notes, and customer purchase order (PO) number. Each field uses the same runtime operation and validation as the corresponding button grid operation.
To configure the Quick Operations panel:
- In Commerce headquarters, go to Retail and Commerce > Channel setup > POS setup > POS > Screen layouts.
- Open the screen layout to configure, and then launch Screen Layout Designer.
- Add the Quick Operations control to the transaction page layout.
- Open the Quick Operations customization dialog.
- Select the operations to show in the panel, such as Discount %, Discount amount, Notes, or Customer PO number.
- Save the layout, and then run the Channel configuration (1090) distribution schedule job.
To use Quick Operations, enter or update values directly in the Quick Operations panel. Save is available only when a value is valid and changed. If an operation is canceled or rejected, the entered value is preserved and the standard error message appears.
Configure keyboard shortcuts for button grids
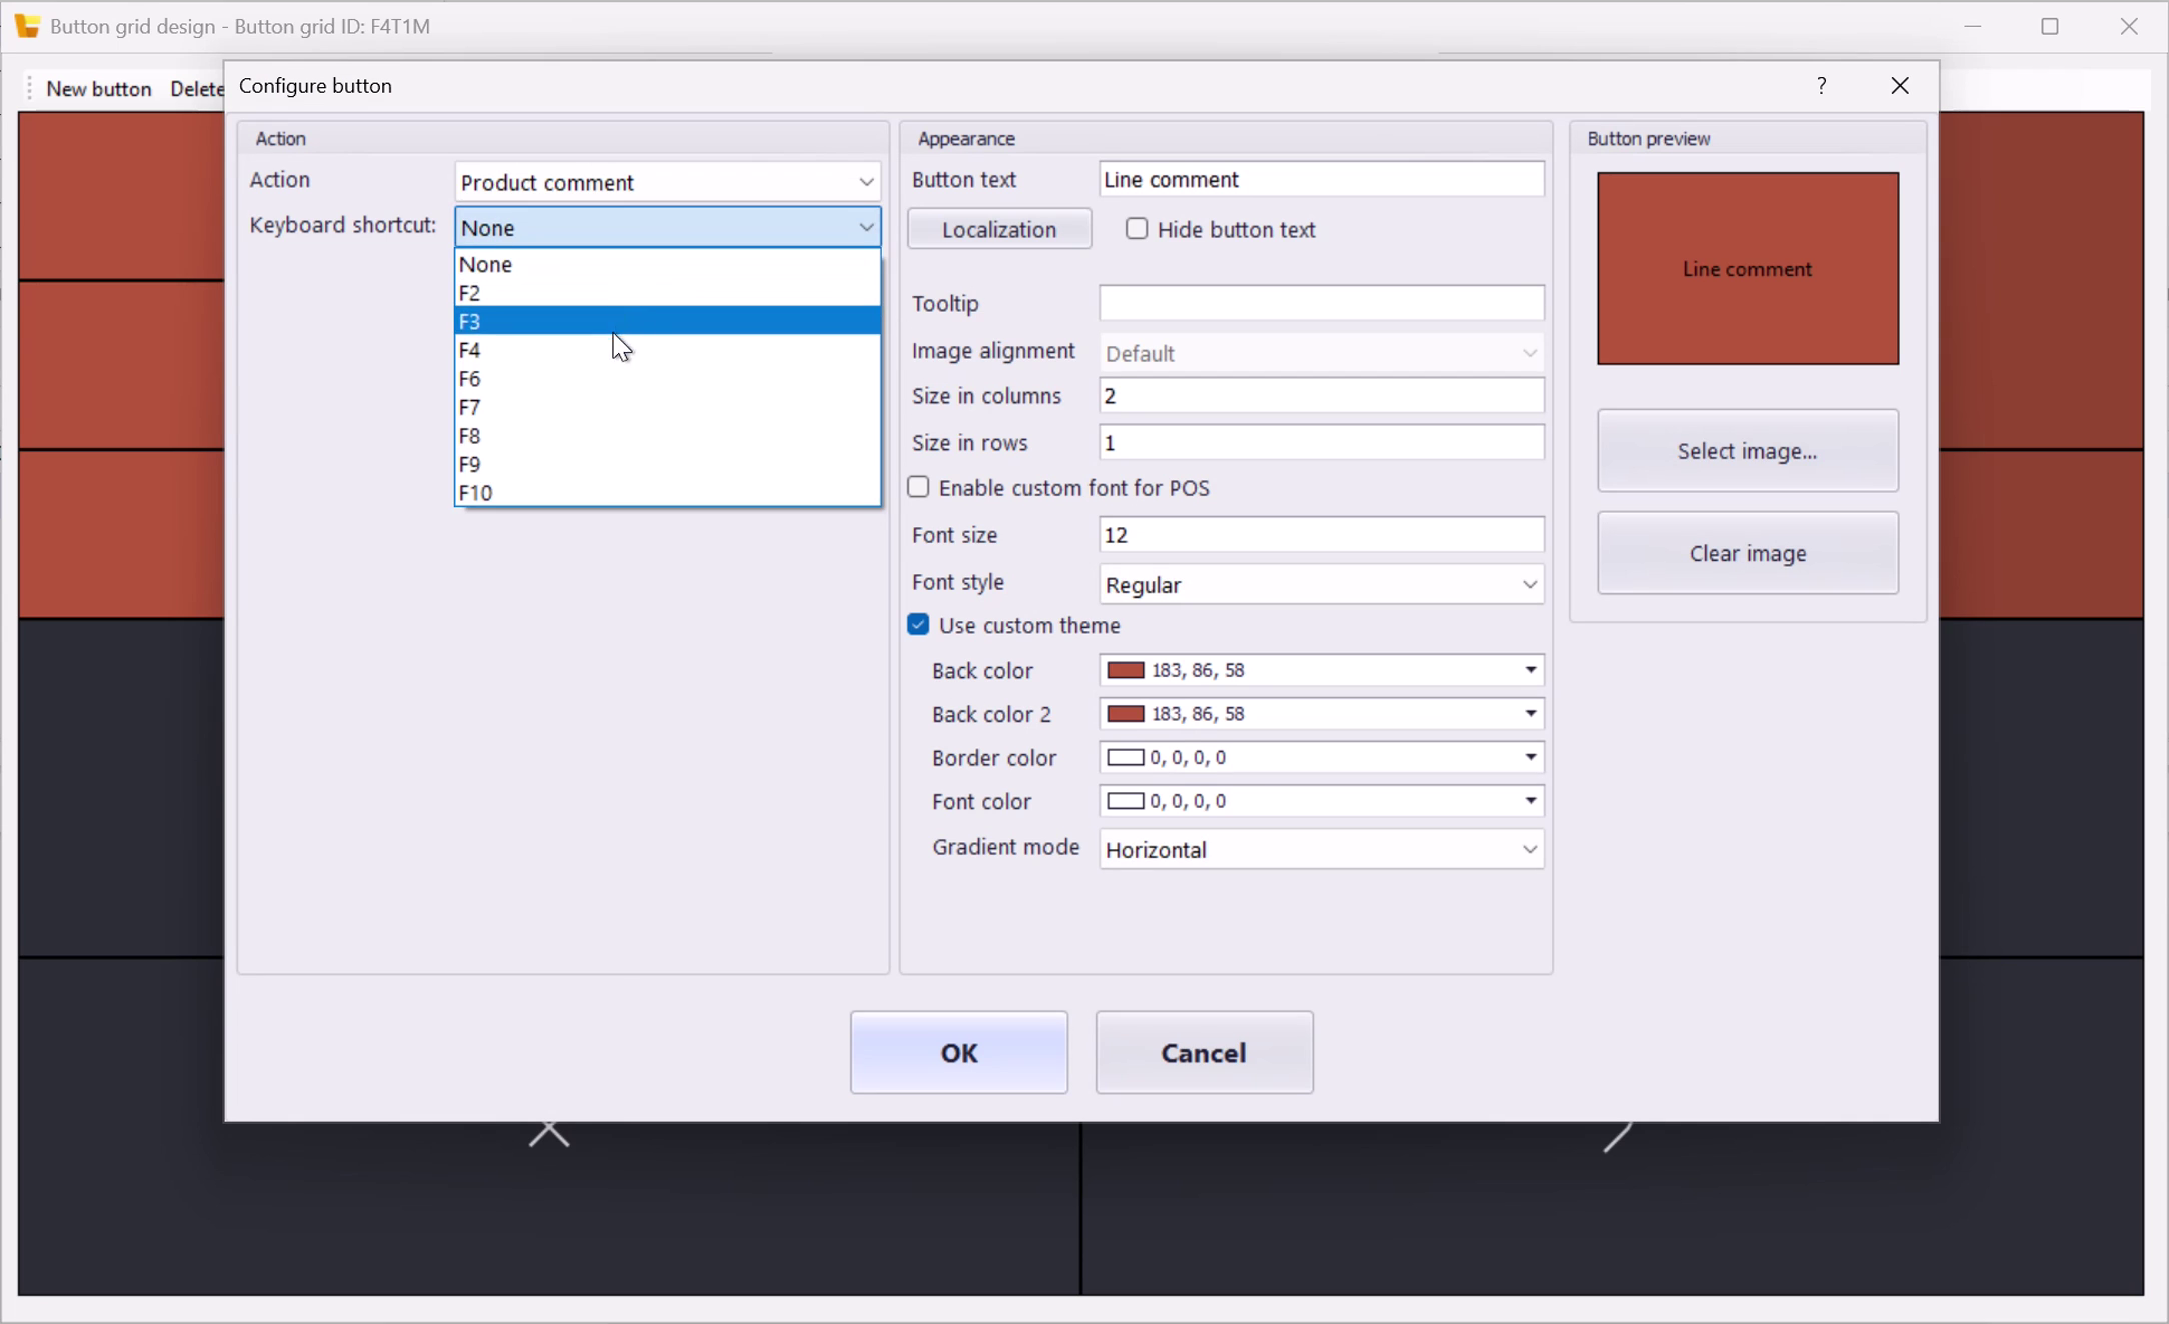
Keyboard shortcuts let associates trigger CartView button grid operations by using configured function keys. Supported keys are F2, F3, F4, F6, F7, F8, F9, and F10. Keys such as F1, F5, F11, and F12 are reserved by the browser or system and aren't supported.
To configure keyboard shortcuts:
- In Commerce headquarters, go to Retail and Commerce > Channel setup > POS setup > POS > Button grids.
- Open a button grid, and then select Designer.
- Right-click the button to configure, and then select Button properties.
- In the Keyboard shortcut field, select a supported function key.
- Select OK, save the button grid, and then run the Channel configuration (1090) distribution schedule job.
The designer validates shortcut conflicts when you save the button grid. It prevents the same function key from being assigned to two buttons in the same grid. It also checks other button grids that share at least one tile layout with the current grid and prevents conflicting assignments that could appear together at runtime.
To use a keyboard shortcut, open the cart view and press the configured function key. If the key maps to one visible enabled button, the operation runs. If the key maps to multiple visible enabled buttons, a selector appears so that associates can select the intended operation.
Version history
| Version | Enhancements |
|---|---|
| 10.0.49 | Transaction line search, multiselect cart line updates, bulk item add, Quick Operations panel improvements, and button grid keyboard shortcut enhancements. |
| 10.0.48 | Inline actions extensibility: Configure operations, display order, and custom operations per screen layout. |
| 10.0.47 | Quantity discount captions, threshold discount bar, refreshed and extensible cart suggestions. |
| 10.0.44 | Inline line actions, inline quantity update, loyalty upsell prompt. |
| 10.0.43 | Toast notification framework. |
| 10.0.42 | Product images on cart lines. |
| 10.0.40 | Streamlined add-to-cart workflow, reset button grids, payment capture improvements. For more information, see Check out faster with optimized payment flows. |
| 10.0.39 | Enhanced date picker, persist zoom level. |