Note
Access to this page requires authorization. You can try signing in or changing directories.
Access to this page requires authorization. You can try changing directories.
Note
The Retail Interest Group by Dynamics 365 Commerce has moved from Yammer to Viva Engage. If you don't have access to the new Viva Engage community, fill out this form (https://aka.ms/JoinD365commerceVivaEngageCommunity) to be added and stay engaged in the latest discussions.
This article explains how to set up a returns and refunds policy for a channel in Microsoft Dynamics 365 Commerce.
The channel return policy in Dynamics 365 Commerce enables retailers to set enforcements on which payment tenders are allowed for processing a return on a point of sale (POS) device.
The scope of the policy currently limits to setting the payment tenders that are allowed for a channel. The "allowed" list is based on the payment methods used to make the purchase. For example:
- If a purchase uses a gift card, the store policy processes refunds only to a new gift card or gives store credit.
- If a sale uses cash, the options allowed for refund are cash, gift card, and customer account, but not credit card.
Enable return policy
This feature is turned on by default. You can find it in the Feature Management workspace by searching for Enable channel return policies in the list of feature names.
Configure return policy
To configure a return policy for a retail store or online retail channel, follow these steps:
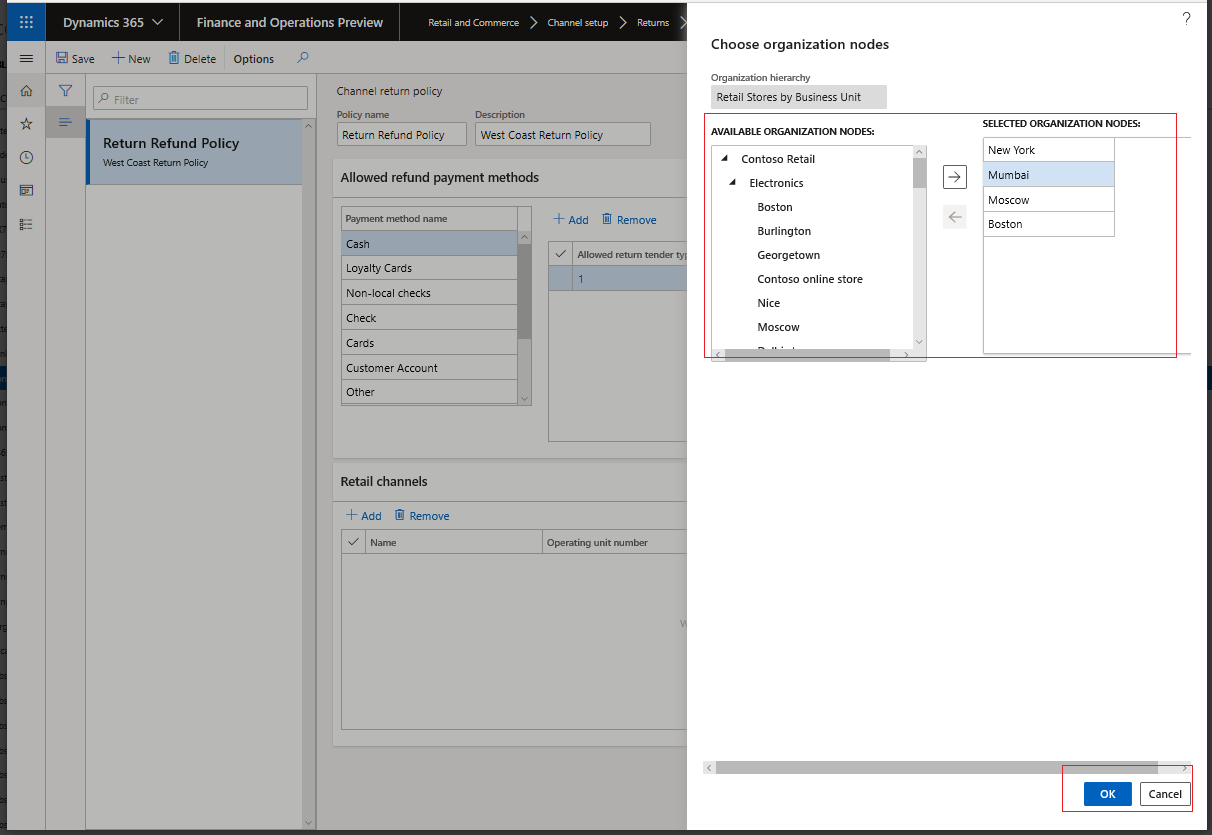
In Commerce headquarters, go to Retail and Commerce > Channel Setup > Returns > Channel return policy.
Select New to create a new return policy template. To use an existing template, select the template in the left pane. For new templates, add a name and description that helps you identify the policy applied to the channel. If you want to allow store managers to select payment methods other than payment methods defined in the channel return policy, set the Can managers override? property to Yes. For more information, see Override allowed payment methods.
In the Allowed refund payment methods section, in the Allowed return tender type drop-down list, select a return tender type for each payment method as shown in the following example image.

Important
- The payment methods come from the payment methods set for the organization.
- Add an allowed return tender type for each listed payment method to ensure that returns can go to the allowed return tender type.
To associate the return policy template with the stores that use it, on the Retail Channels tab, select Add, and then associate the available channels.
- In the Choose organization nodes dialog, select the stores, regions, and organizations that the template should be associated with.
- Each store can have only one return policy template associated with it.
- Use the arrow buttons to select stores, regions, or organizations.
- The effective date on the policy is the date when you apply the policies to the channels and the channel jobs run.
On the Distribution schedule page, run the 1070 job to make the channel return policy available to the POS.
Preview the channel return policy in the POS
To view the allowed return tender types in POS, follow the steps in either of the following examples:
- Sign in to the POS as a cashier or manager.
- Under Shift and Drawer, select Show journal.
- Select the transaction that's part of the return.
- Select Amount Due to display a list of all the allowed return tender types.
- Select the items to refund, and then select the payment method.
- If the payment tender you select is in the allowed list of return tender types, you can complete the transaction.
- If the payment tender you select isn't allowed, an error message is displayed.
-or-
- Sign in to the POS as a cashier or manager.
- Select Return Transaction and enter the receipt ID using a barcode scan or by manual entry.
- Select the transaction that is part of the return.
- Select Amount Due to display a list of all the allowed return tender types.
- Select the items to refund, and choose the payment method.
- If the payment tender you select is in the allowed list of return tender types, you can complete the transaction.
- If the payment tender you select isn't allowed, an error message is displayed.

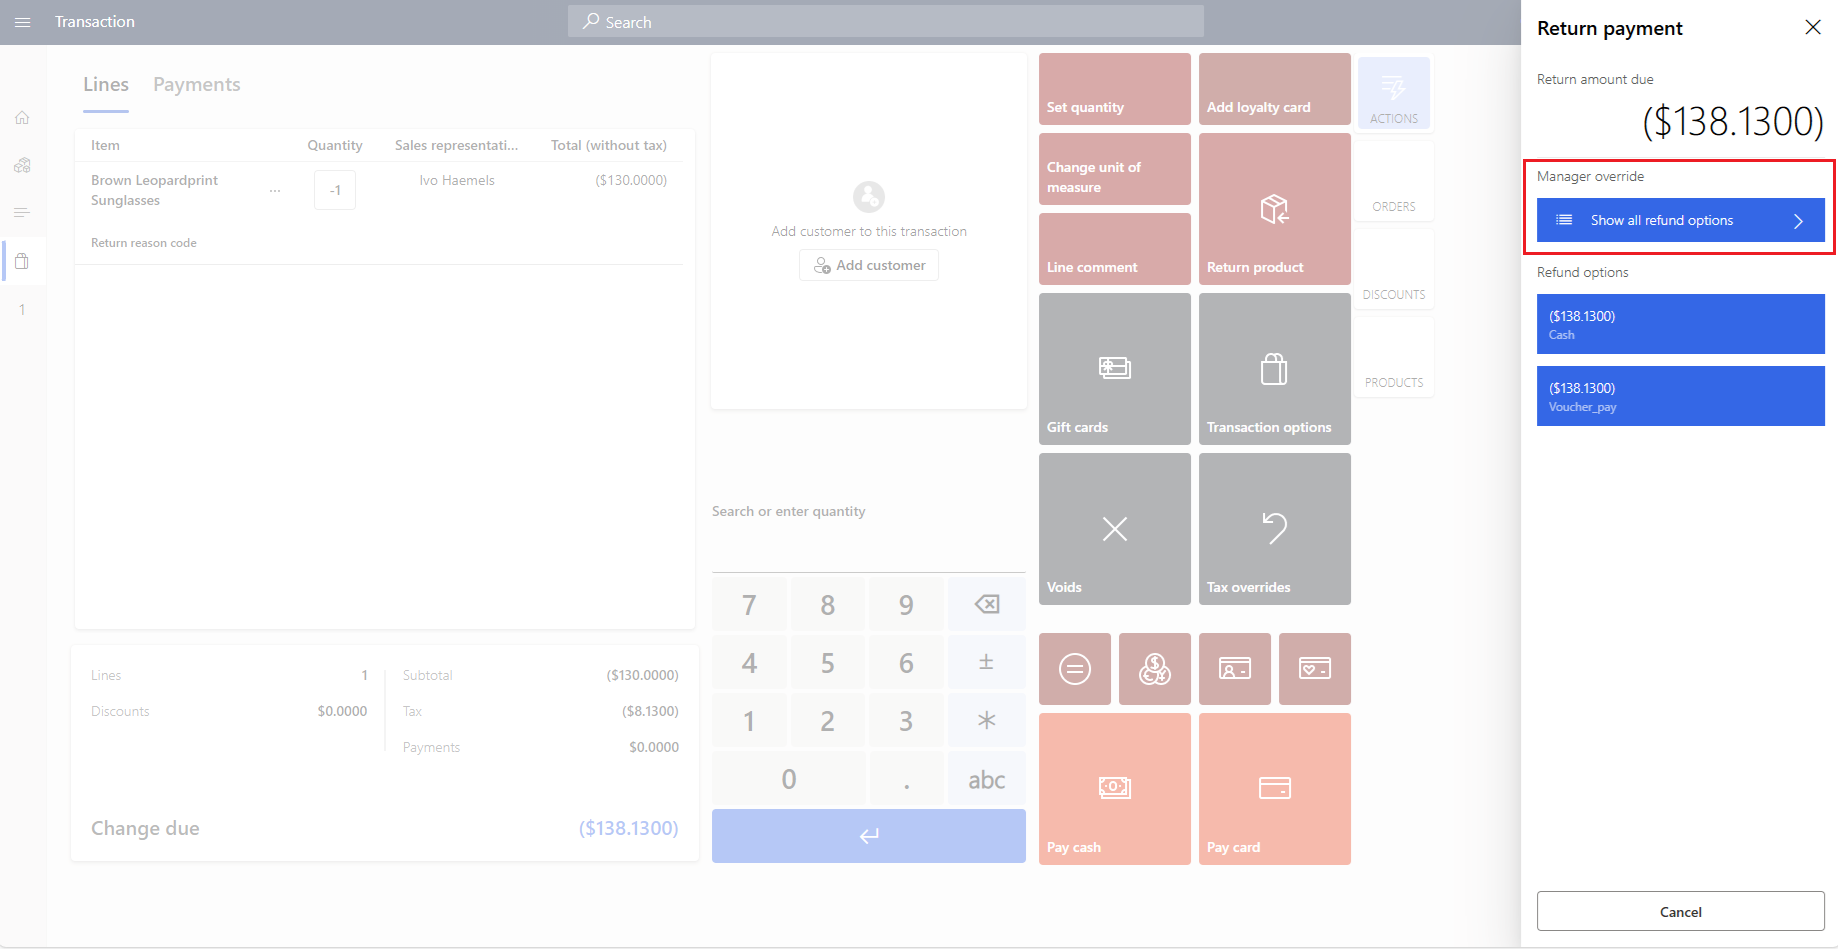
Override allowed payment methods
To handle scenarios where the standard refund payment method can't be applied, the system allows retailers to grant special permissions to designated store associates. These associates can override the return policy and refund customers by using a payment method that isn't permitted otherwise.
To enable this capability, set the channel return policy Can managers override? property to Yes. When you enable this option, all store managers can choose any payment method for the refund. To enable this capability for nonstore managers, the Allow using all payment methods for refund POS permission is introduced starting in Commerce version 10.0.44. If the channel return policy allows the override of the allowed payment methods, all store managers and store associates with the Allow using all payment methods for refund permission can use any payment method for refund.
Note
Store associates who don't have the Allow using all payment methods for refund permission can use only the payment methods defined by the channel return policy. The store manager can't input their credentials for this process. The store manager or associates with the appropriate permissions must initiate such returns on their registers.