Note
Access to this page requires authorization. You can try signing in or changing directories.
Access to this page requires authorization. You can try changing directories.
Note
The Retail Interest Group by Dynamics 365 Commerce has moved from Yammer to Viva Engage. If you don't have access to the new Viva Engage community, fill out this form (https://aka.ms/JoinD365commerceVivaEngageCommunity) to be added and stay engaged in the latest discussions.
This article describes improvements that Microsoft made to the statement posting feature in Microsoft Dynamics 365 Commerce.
Activation
By default, during deployment of finance and operations 7.3.2, the program uses the legacy feature for statement postings. To enable the improved statement posting feature, turn on the configuration key for it.
- Go to System administration > Setup > License configuration. Under the Retail and Commerce node, clear the Statements (legacy) check box, and select the Statements check box.
When you turn on the new Statements configuration key, you get a new menu item named Statements. Use this menu item to manually create, calculate, and post statements. This menu item also shows any statement that causes an error when the batch posting process is used. (When you turn on the Statements (legacy) configuration key, the menu item is named Open statements.)
Commerce includes the following validations that are related to these configuration keys:
- You can't turn on both configuration keys at the same time.
- You must use the same configuration keys for all the operations that you perform on a given statement during its lifecycle (Create, Calculate, Clear, Post, and so on). For example, you can't create and calculate a statement while the Statement (legacy) configuration key is turned on, and then try to post the same statement while the Statement configuration key is turned on.
Note
Use the Statements configuration key for the improved statement posting feature, unless you have compelling reasons to use the Statements (legacy) configuration key instead. Microsoft continues to invest in the new and improved statement posting feature, and it's important that you switch to it at the earliest opportunity to benefit from it. The legacy statement posting feature is deprecated starting in 8.0 release.
Setup
As part of the improvements to the statement posting feature, three new parameters are introduced on the Statement FastTab on the Posting tab of the Commerce parameters page:
Disable clear statement – This option applies only to the legacy statement posting feature. Set this option to No to prevent users from clearing statements that are in a semi-posted state. If statements in a semi-posted state are cleared, data becomes corrupted. Set this option to Yes only in exceptional circumstances.
Reserve inventory during calculation – Use the Post inventory batch job for inventory reservation, and set this option to No. When this option is set to No, the improved statement posting feature doesn't try to create inventory reservation entries at the time of calculation (if entries weren't already created through the Post inventory batch job). Instead, the feature creates inventory reservation entries only at the time of posting. This implementation was a design choice and was based on the fact that the time window between the calculation process and the posting process is typically small. However, if you want to reserve inventory at the time of calculation, you can set this option to Yes.
The legacy statement posting feature always reserves inventory during the statement calculation process (if reservation wasn't already done through the Post inventory batch job), regardless of the setting of this option.
Disable counting required – When this option is set to Yes, the posting process for a statement continues, even if the difference between the counted amount and the transaction amount on the statement is outside the threshold that is defined on the Statement FastTab for stores.
Note
As of the Commerce version 10.0.14 release, when the Retail statements - Trickle feed feature is enabled, the Post inventory batch job is no longer applicable and can't be run.
Processing
You can calculate and post statements in batch by using the menu items Calculate statements in batch and Post statements in batch. Alternatively, you can manually calculate and post statements by using the Statements menu item that the improved statement posting feature provides.
The process and steps for calculating and posting statements in a batch are the same as they were in the legacy statement posting feature. However, significant improvements are made in the core back-end processing of the statements. These improvements make the process more resilient, and provide better visibility into the states and error information. Therefore, users can address the root cause of errors and then continue the posting process without causing data corruption and without causing data fixes to be required.
The following sections describe some of the major improvements for the statement posting feature that appear in the user interface for statements and posted statements.
Status details
The statement posting routine now uses a new state model that works across the calculation and posting processes.
The following table describes the various states and their order during the calculation process.
| State order | State | Description |
|---|---|---|
| 1 | Started | The statement is created and is ready to be calculated. |
| 2 | Marked | The routine identifies transactions that are in scope for the statement based on the statement parameters, and marks them with the statement ID. |
| 3 | Calculated | The routine computes and shows the statement lines. |
The following table describes the various states and their order during the posting process.
| State order | State | Description |
|---|---|---|
| 1 | Checked | The routine performs multiple validations that relate to parameters (for example, the disposition charge), and to the statement and statement lines (for example, the difference between the counted amount and the transaction amount). |
| 2 | Aggregated | The routine aggregates sales transactions for named and unnamed customers based on the configuration. Every aggregated transaction is eventually converted to a sales order. |
| 3 | Customer order created | The routine creates sales orders in the system based on the aggregated transaction. |
| 4 | Customer order invoiced | The routine invoices sales orders. |
| 5 | Discounts posted | The routine posts periodic discount journals based on the configuration. |
| 6 | Income/expense posted | The routine posts income/expense transactions as vouchers. |
| 7 | Vouchers linked | The routine creates payment journals and links them to the corresponding invoice. |
| 8 | Payments posted | The routine posts payment journals. |
| 9 | Gift cards posted | The routine posts gift card transactions as vouchers. |
| 10 | Posted | The routine marks the statement as posted. |
Each state in the preceding tables is independent, but the states have a hierarchical dependency that flows from top to bottom. If the system encounters any errors while processing a state, it reverts the status of the statement to the previous state. Any subsequent reattempt of the process resumes from the state that failed and continues to move forward. This approach has the following benefits:
The user has complete visibility into the state where the error occurred.
Data corruption is avoided. For example, in the legacy statement posting feature, some sales orders were invoiced but others were left open. Some payment journals didn't have a corresponding invoice to settle, because the invoice posting had an error.
Users can see the current state of a statement by using the Status details button in the Execution details group of the statement. The status details page has three sections:
- The first section shows the current status of the statement, together with the error code and a detailed error message, if an error occurred.
- The second section shows the various states of the calculation process. Visual cues indicate states that the process successfully ran, states that the process couldn't run because of errors, and states that the process hasn't yet run.
- The third section shows the various states of the posting process. Visual cues indicate states that the process successfully ran, states that the process couldn't run because of errors, and states that the process hasn't yet run.
Additionally, the header of the second and third sections shows the overall status of the relevant process.
Event logs
A statement goes through various operations, such as Create, Calculate, Clear, and Post. During the statement's lifecycle, the system might call multiple instances of the same operation. For example, after you create and calculate a statement, you can clear the statement and calculate it again. The Event logs button in the Execution details group of the statement provides a complete audit trail of the various operations that the system calls on a statement. It also shows when the system calls those operations.
Aggregated transactions
During the posting process, the system aggregates cash-and-carry transactions by customer and product. This aggregation reduces the number of sales orders and lines that the system creates. The system stores the aggregated transactions and uses them to create sales orders. Each aggregated transaction creates one corresponding sales order in the system.
If a statement doesn't fully post, you can view aggregated transactions in the statement. On the Action Pane, on the Statement tab, in the Execution details group, select Aggregated transactions.

For posted statements, you can view aggregated transactions on the Posted statements page. On the Action Pane, select Inquiries, and then select Aggregated transactions.

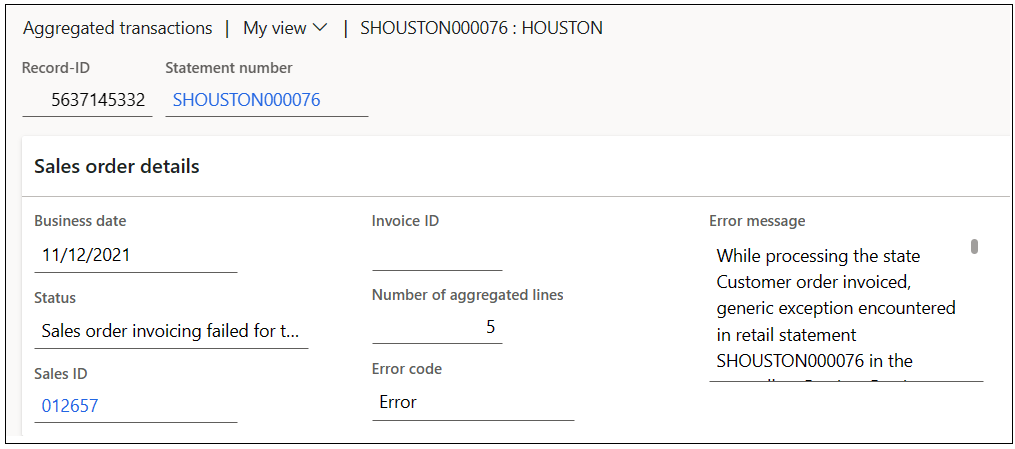
The Sales order details FastTab of an aggregated transaction shows the following information:
- Record ID – The ID of the aggregated transaction.
- Statement number – The statement that the aggregated transaction belongs to.
- Date – The date when the aggregated transaction was created.
- Sales ID – When a sales order is created from the aggregated transaction, the sales order ID. If this field is blank, the corresponding sales order isn't created.
- Number of aggregated lines – The total number of lines for the aggregated transaction and sales order.
- Status – The last status of the aggregated transaction.
- Invoice ID – When the sales order for the aggregated transaction is invoiced, the sales invoice ID. If this field is blank, the invoice for the sales order isn't posted.
- Error code – This field is set if the aggregation is in an error state.
- Error message – This field is set if the aggregation is in an error state. It shows details about what caused the process to fail. You can use the information in the error code to fix the issue, and then manually restart the process. Depending on the type of resolution, aggregated sales might have to be deleted and processed on a new statement.
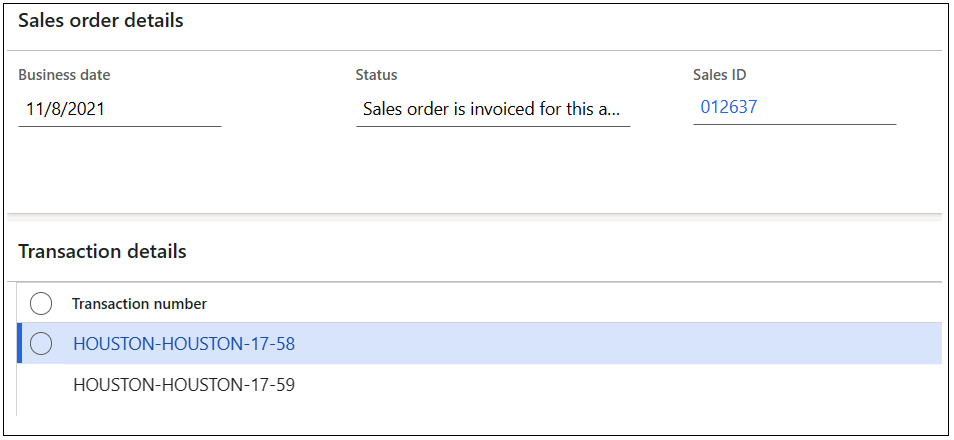
The Transaction details FastTab of an aggregated transaction shows all the transactions that the process pulls into the aggregated transaction. The aggregated lines on the aggregated transaction show all the aggregated records from the transactions. The aggregated lines also show details such as the item, variant, quantity, price, net amount, unit, and warehouse. Each aggregated line corresponds to one sales order line.
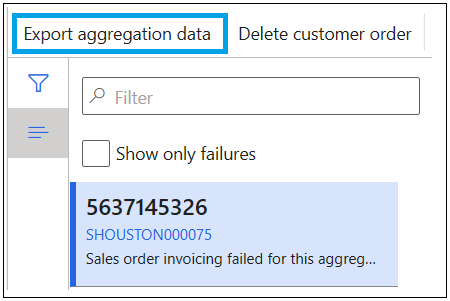
In some situations, aggregated transactions fail to post their consolidated sales order. In these situations, an error code is associated with the statement status. To view only aggregated transactions that have errors, enable the Show only failures filter in the aggregated transactions view by selecting the checkbox. By enabling this filter, you limit the results to aggregated transactions that have errors that require resolution. For information about how to fix these errors, see Edit and audit online order and asynchronous customer order transactions.

On the Aggregated transactions page, you can download the XML for a specific aggregated transaction by selecting Export aggregation data. You can review the XML in any XML formatter to see the actual data details that involve sales order creation and posting. The functionality for downloading the XML for aggregated transactions isn't available for statements that are posted.
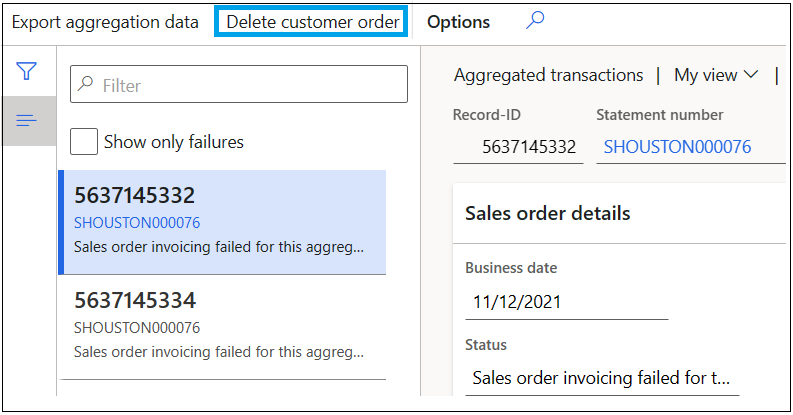
If you can't fix the error by correcting data on the sales order or data that supports the sales order, use the Delete customer order button. To delete an order, select the aggregated transaction that failed, and then select Delete customer order. The system deletes both the aggregated transaction and the corresponding sales order. You can now review the transactions by using the edit and audit functionality. Alternatively, you can reprocess them through a new statement. After you fix all failures, you can resume statement posting by running the post statement function for the relevant statement.
The aggregated transactions view provides the following benefits:
- You have visibility into the aggregated transactions that failed during sales order creation and the sales orders that failed during invoicing.
- You have visibility into how transactions are aggregated.
- You have a complete audit trail, from transactions, to sales orders, to sales invoices. This audit trail wasn't available in the legacy statement posting feature.
- The aggregated XML file makes it easier to identify issues during sales order creation and invoicing.
Note
When the system aggregates transactions, the Top Staff Sales Report no longer includes the staff member assigned to the transaction. The Top Staff Sales Report doesn't show all transactions. Don't use the Top Staff Sales Report with aggregated transactions.
Journal vouchers
The Journal vouchers button in the Execution details group of the statement shows all the various voucher transactions that the system creates for a statement. These transactions relate to discounts, income and expense accounts, gift cards, and other similar items.
Currently, the program shows this data only for posted statements.
Payment journals
The Payment journals button in the Execution details group of the statement shows all the various payment journals that the system creates for a statement.
Currently, the program shows this data only for posted statements.
Other improvements
The development team made other backend improvements to the statement posting feature. Here are some examples:
- The aggregation process doesn't consider the staff, terminal, and shift entities. Because the process has fewer aggregation parameters, it processes fewer sales order lines.
- The occurrence of deadlock on transaction tables is reduced by introducing additional extension tables and by doing insert operations instead of update operations on the transaction tables.
- The number of running batch tasks is parameterized and limited. Therefore, you can fine-tune this number specifically to a customer's environment. In the legacy statement posting feature, an unlimited number of batch tasks was created at the same time. The results were unmanageable loads, overhead, and bottlenecks on the batch server.
- Statements are efficiently queued for processing by prioritizing the statements that have the maximum number of transactions.
- Batch processes such as Calculate statements in batch and Post statements in batch run only in batch mode. In the legacy statement posting feature, users could choose to run these batch processes in an interactive mode, which is a single-threaded operation, unlike batch processes that are multithreaded.
- In the legacy statement posting feature, any failure of a batch task put the whole batch job in an error state. In the improved feature, batch task failures don't put the batch job in an error state if other batch tasks are successfully completed. You should assess the posting status for a batch execution run by using the Statements page, where you can see any statements that weren't posted because of errors.
- In the legacy statement posting feature, the first occurrence of a statement failure causes the whole batch to fail. The remaining statements aren't processed. In the improved feature, the batch process continues to process all statements, even if some of the statements fail. One benefit is that users gain visibility into the exact number of statements that have errors. Therefore, users don't have to be stuck in a continuous loop of fixing the errors and running the post statement process until all statements are posted.
General guidance about the statement posting process
Run the statement posting process as a batch. Batch runs use the batch framework's power for multithreading. You need multithreading to handle the huge volumes of transactions that normally appear in statement postings.
Turn on negative physical inventory in the item model group to get a seamless posting experience. In some scenarios, you can't post negative statements unless there's negative physical inventory. For example, if there's only one unit of an item in inventory, and there's a sales transaction and a return transaction for the item, the transaction should be able to post even if negative inventory isn't turned on. However, because the statement posting process pulls both the sales transaction and the return transaction in a single customer order, there's no guarantee that the sales line posts first, followed by the return line. Therefore, errors can occur. If you turn on negative inventory in this scenario, the transaction posting isn't negatively affected, and the system correctly reflects the inventory.
Use aggregation when you calculate and post statements. Therefore, set the following parameters:
- Go to Retail and Commerce > Headquarters setup > Parameters > Commerce parameters. Then, on the Posting tab, on the Inventory update FastTab, in the Detail level field, select Summary.
- Go to Retail and Commerce > Headquarters setup > Parameters > Commerce parameters. Then, on the Posting tab, on the Aggregation FastTab, set the Voucher transactions option to Yes.