Note
Access to this page requires authorization. You can try signing in or changing directories.
Access to this page requires authorization. You can try changing directories.
Before a plug-in can be used, it must be registered and deployed on the server.
Building your plug-in project results in a plug-in assembly (.dll). This article provides information on how you can register and deploy the plug-in assembly for the two geospatial actions to use your preferred geospatial data provider. For information about writing a plugin, see Create custom plug-in to use your preferred geospatial data provider
Execution order considerations while registering your custom plug-in
When you register multiple plug-ins for the same entity and message, the execution sequence of plug-ins is defined by the Execution Order of individual plug-ins. The one with a lower execution order value executes first followed by the one with a higher execution order value.
The execution order value of the default plug-in in Field Service and Project Service that uses the default service for the geocode and distance matrix actions is set to 1. You can set the execution order of your custom plug-in to execute before (less than 1) or after (greater than 1) the default plug-in.
The following table depicts how you may want your custom plug-in to be treated depending on the execution order specified while plug-in registration and parameter conditions.
| Hierarchy | Description |
|---|---|
| Primary | If you want to treat your custom plug-in as primary and the default plug-in as secondary, set the execution order of your plug-in to 0. This results in your plug-in getting executed before the default plug-in. The default plug-in examines the "latitude" and "longitude" values that your custom plug-in returns, and only proceeds to geocode with the default plug-in if both the returned values are 0. This would be the preferred way if your custom plug-in is expected to provide the most of your geocoding needs. |
| Secondary | If you want to treat your custom plug-in as secondary to the default plug-in by providing the geocoding service only when the default plug-in fails to geocode, set the execution order of your plugin to 2. You would also write your custom plug-in code such that it first examines the "latitude" and "longitude" values that the default plug-in returns, and proceeds only if both the returned values are 0. This would be the preferred execution way if the default plug-in is expected to provide the most of your geocoding needs. |
| Completely override | If you always want your custom plug-in to be the source of geocoding and completely override the default plug-in from geocoding even when your custom plug-in fails to geocode, you need to always return something other than 0,0 for "latitude" and "longitude" values. You may want to decide which exception conditions throw a .NET exception and which ones simply don't return a result. To not return a result and not allow any subsequent plug-in to return a result, your custom plug-in needs to return something like 0.0001, 0.0001. |
Register and deploy your custom plug-in
Register and deploy plug-ins using the Plug-in Registration Tool or by writing registration code with specific SDK classes.
You can register and deploy plug-ins using the Plug-in Registration Tool or programmatically by writing registration code using certain SDK classes. Learn more in Register and Deploy Plug-ins.
The following steps show the Plug-in Registration tool, which provides a graphical user interface to easily register and deploy plug-ins. The assumption is that you're working with the sample custom plug-in and have the sample project to generate the CustomPlugin-FS-Geospatial.dll assembly. If you developed your own custom plug-in, the assembly and plug-in names are different, but follow the same instructions to register the plug-in.
Tip
Learn more in Walkthrough: Register a plug-in using the plug-in registration tool
Get the Plug-in Registration Tool. Learn more in Download tools from NuGet.
Navigate to the
[Your folder]\Tools\PluginRegistrationfolder, and double-click the PluginRegistration.exe file to run the tool.Select CREATE NEW CONNECTION.
In the Login dialog, specify the credentials to connect to your Dynamics 365 instance, and select Login.
If you have access to multiple organizations in the Dynamics 365 instance, a list of organizations appears for you to select. Otherwise, the tool uses your default organization.
A collapsed list of registered plug-in or custom workflow activity assemblies appear. Select Register > Register New Assembly.
Enter the following information:
- Step 1: Select the ellipses (…) and then CustomPlugin-FS-Geospatial.dll
- Step 2: Select both plug-ins.
- Step 3: Select Sandbox.
- Step 4: Select Database.
Select Register Selected Plugins.
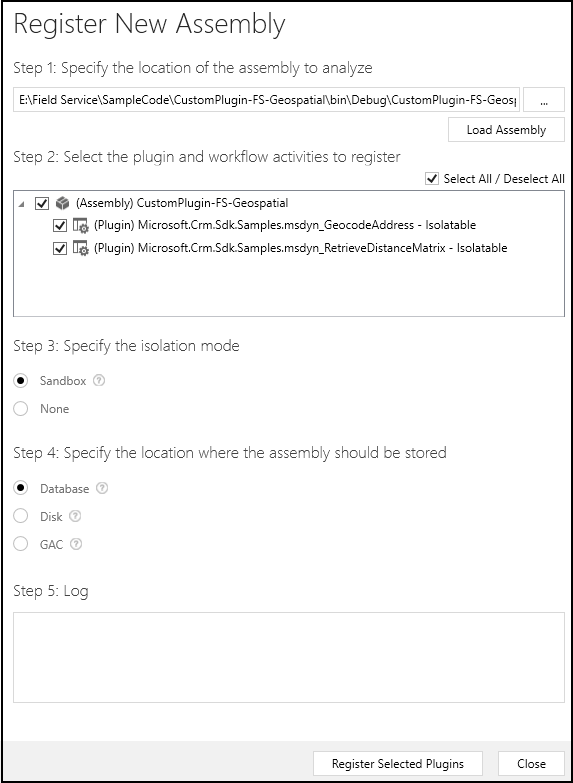
The CustomPlugin-FS-Geospatial.dll assembly and the two plug-ins for the msdyn_GeocodeAddress and msdyn_RetrieveDistanceMatrix are now registered and deployed to the server.
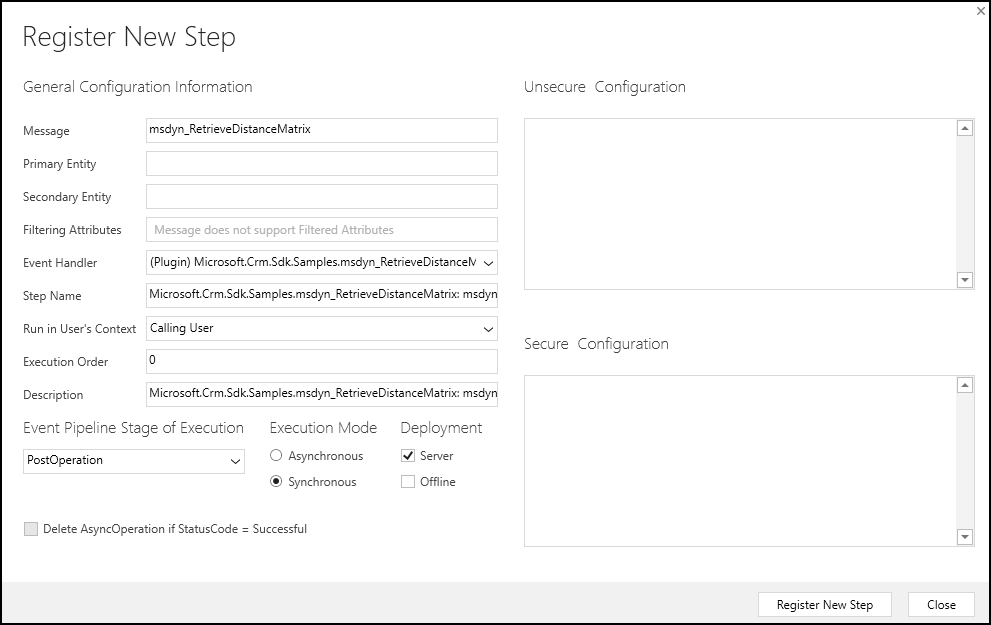
Register a step for each action. A step refers to the SDK message processing step entity that is used to configure when and how the plug-in is to be executed.
In the Registered Plug-ins & Custom Workflow Activities tree view, expand the (Assembly) CustomPlugin-FS-Geospatial node, and select a registered plug-in like Microsoft.Crm.Sdk.Samples.msdyn_RetrieveDistanceMatrix.
Right-click Microsoft.Crm.Sdk.Samples.msdyn_RetrieveDistanceMatrix, and select Register New Step.
Enter the following information:
- Message: msdyn_RetrieveDistanceMatrix
- Execution Order: As required. Learn more in Execution order considerations while registering your custom plug-in.
- Event Pipeline Stage of Execution: PostOperation
- Execution Mode: Synchronous
Leave the rest of the fields with their default values and select Register New Step.
Right-click the Microsoft.Crm.Sdk.Samples.msdyn_GeocodeAddress plug-in, and select Register New Step.
Enter the following information:
- Message: msdyn_GeocodeAddress
- Execution Order: As required. Learn more in Execution order considerations while registering your custom plug-in.
- Event Pipeline Stage of Execution: PostOperation
- Execution Mode: Synchronous
Leave the rest of the fields with their default values and select Register New Step.
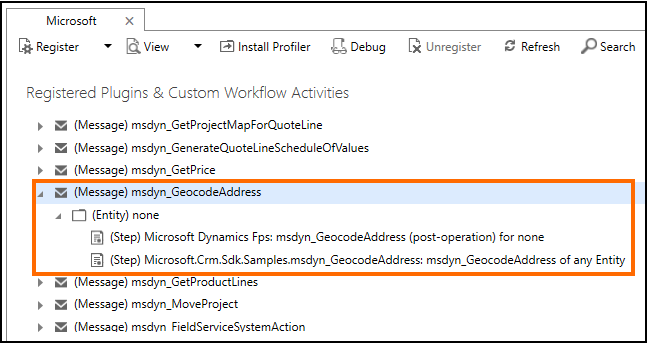
The steps to call your custom plug-in for both the geospatial actions are registered.
If you view any of the Universal Resource Scheduling geospatial actions in the Plug-in Registration tool, you see both the default and your custom plug-in registered for the action. For example, see the plug-ins for the mdyn_GeocodeAddress action.
Additional resources
Sample: Custom plug-in to use Google Maps API as geospatial data provider