Note
Access to this page requires authorization. You can try signing in or changing directories.
Access to this page requires authorization. You can try changing directories.
[This article is prerelease documentation and is subject to change.]
Customer Intent Agent uses generative AI to autonomously discover intents from your customer service instance, analyzing past interactions to create an intent library that enhances dynamic conversations. The customer service representatives (service representatives or representatives) use the information to quickly understand customer needs, guide conversations with follow-up questions, and provide tailored solutions in real time.
The AI agent presents a curated list of questions and suggested solutions in the chat response box, which enhances efficiency by reducing manual typing. For self-service, the agent generates relevant follow-up questions and uses the information to query the knowledge source, leading to higher deflection rates and allowing representatives to focus on cases that require manual intervention.
Important
- This is a preview feature.
- Preview features aren’t meant for production use and might have restricted functionality. These features are subject to supplemental terms of use, and are available before an official release so that customers can get early access and provide feedback.
Use the information in this article to manage the intents in Copilot Service admin center.
Prerequisites
Enable Customer Intent Agent
- In the site map of Copilot Service admin center, select Intent under Customer support.
- On the Customer Intent Agent (preview) page that appears, enable the Turn on Customer Intent Agent toggle.
Manage lines of business
A line of business can be a service, product, product category, or the way your company organizes and supports its business activities. It's used as a partition that represents a specific set of intents and intent groups in a large enterprise. You need to add lines of business if you want to enable intent-based routing for a selective set of workstreams and queues. Otherwise, intent-based routing is enabled for the whole organization. The following entities are associated with a line of business:
- Intents and intent groups
- User groups (A representative can be a part of many user groups that belong to different lines of business)
- Workstreams
- Queues
Add line of business
- In the site map of Copilot Service admin center, go to Intent, and then select Manage for Add Line of business (Optional).
- On the Manage Lines of business page, select Add Line of business.
- Enter the name and description that indicates the line of business.
- Select Add. The line of business is listed in the Lines of business table.
Create rules for cases and conversations
For every line of business that you identify, you can create rules for cases and conversations. You can create one rule only (one each for a case and conversation) per line of business. During runtime, for chat and other channels, Copilot and intent-based suggestions must be enabled to determine the intent.
On the Manage Lines of business page, in Case Rules, select Create rule.
On the dialog that appears, enter the rule name and select a line of business.
In Conditions, define the conditions for the rules to run.
Important
Configure the workstream name in the line of business configuration rules for chat workstreams. Because the chat widget is tightly coupled with the line of business, by specifying the line of business, you can make sure that the chat belongs to the same line of business as its workstream. Otherwise, the chat might end up with a different line of business other than its workstream.
Optionally, select Run backfill. When selected, it’s used to associate past cases with a line of business for intent discovery. The system makes sure that intent discovery works properly by tagging past cases with the appropriate line of business.
Save and close.
Repeat the steps for creating rules and conditions for conversations for the lines of business you’d like to add.
Manage intent discovery setup
You can enable Customer Intent Agent to analyze past conversations within the Customer Service instance to discover new intents to add into the intent library. After you set it up, the first run of intent discovery analyzes historical data for up to two months. After that, the intent discovery runs daily.
You need to run the AI model on data sources like conversations to identify intent groups and related intents.
- On the Customer Intent Agent (preview) page, select Manage for Manage intent discovery setup.
- On the Manage intent discovery setup page, select Add intent discovery setting.
- In Intent discovery settings, enter the following details:
- Name: An intuitive name that meets your business requirement.
- Data source: Available for conversations only and therefore read-only.
- Intent group granularity: Select Low, Medium, or High in the list. If you select low, fewer intent groups are created, and vice versa happens if you select high. If you select Medium, the system creates a balanced number of intent groups between low and high.
- Record status: Select Pending, Approved, or Discarded in the list to indicate the default status that you'd like to set for the newly-discovered intents.
- If you want to simulate the intent discovery, select Test. After the discovery is complete, a simulation of the intent groups is available.
- Select Add into job schedule to run the intent discovery.
- In Test results, select the simulation to view the details. The simulation details, such as as status, data source, and intent group granularity are displayed. Simulation uses the last 1000 records to generate intent and intent groups. The simulation helps administrators evaluate the intents and decide on granularity.
- Select the simulation, and then select Export to Excel option. The Excel file is downloaded to your local computer.
- After you validate and choose the intent group granularity that reflects your business needs, select Set up intent discovery to run the intent discovery.
Note
You can view the simulation for successful runs only. The Excel file is empty for failed simulations.
After the first run of the intent discovery, the intent groups are listed on the All intent groups page.
Manage intents
- On the Customer Intent Agent (preview) page, select Manage for Manage intents.
- Select New, and enter intent details as follows:
- Name: Enter a name for the intent. The name should be intuitive and meet your business requirement.
- Intent group: Select the intent group that you want to associate with the intent.
- Line of business: Select the line of business that you want to associate with the intent.
- Review status: Select Pending, Approved, or Discarded in the list to indicate the default status that you'd like to set for the intent.
- Use in AI Agent: Select Yes if you want to use the intent in the AI agent.
- Save the information.
- On the Attributes tab, add the attributes that you want to associate with the intent. The attributes are used to provide additional information about the intent. You can add multiple attributes for an intent.
- On the Knowledge articles tab, select Add to associate the knowledge articles with the intent. The knowledge articles are used to provide additional information about the intent. You can add multiple knowledge articles for an intent.

You can manage the intents to be used in AI agent in bulk. On the Manage intents page, select the approved intents, and on the command menu, select Use in AI agent. The intents are used in the AI agent.
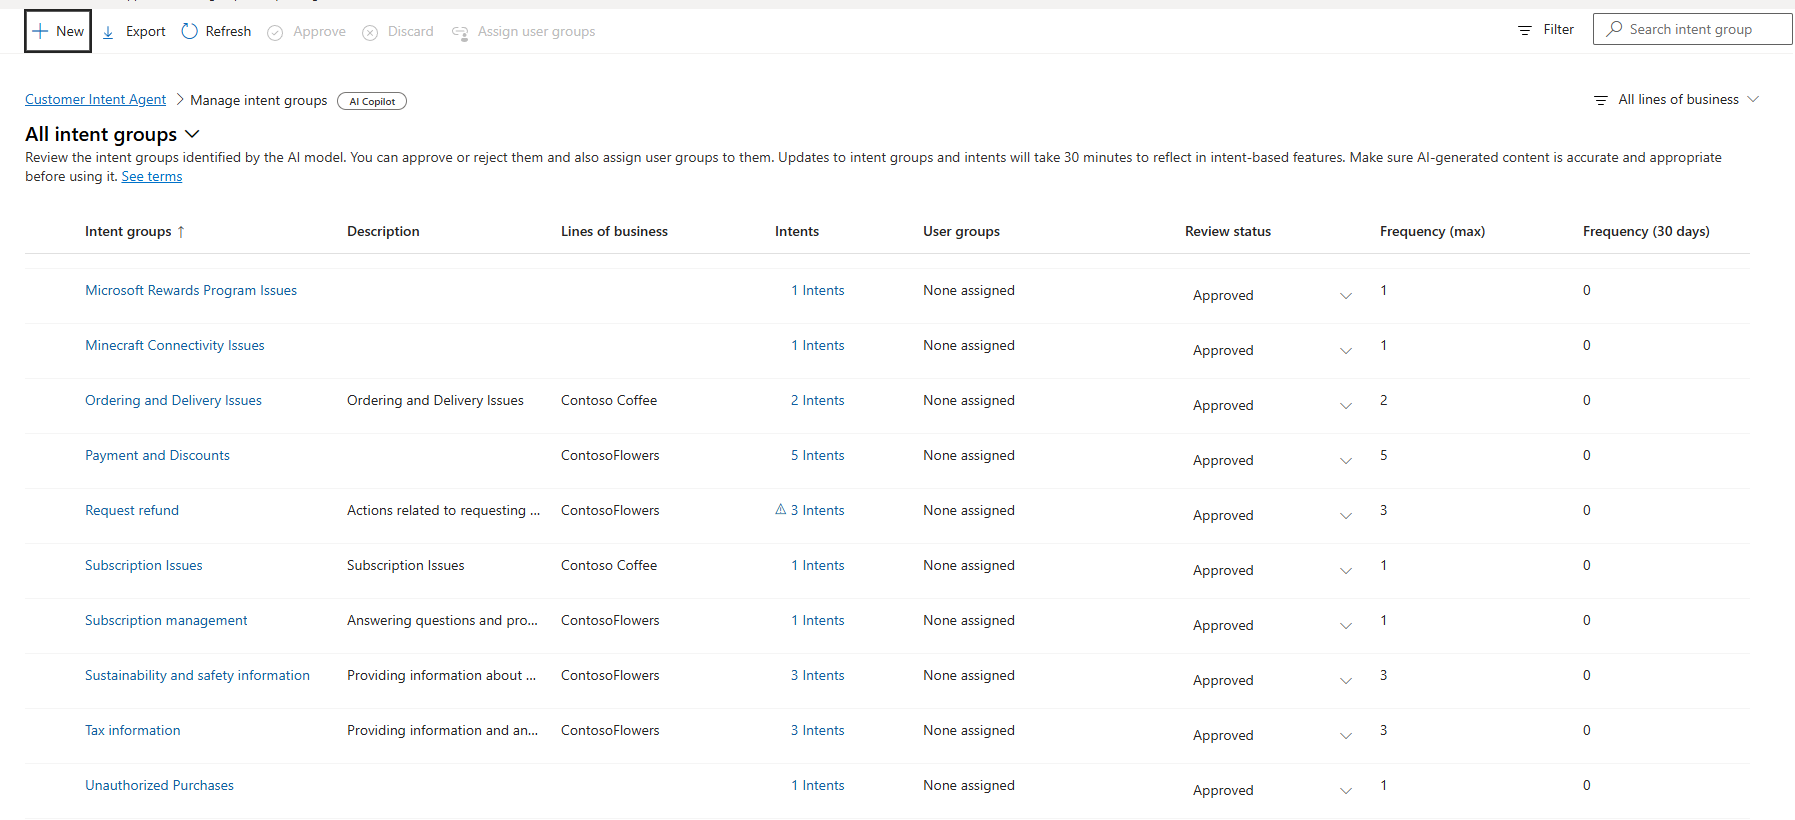
Manage intent groups
You can logically organize the intents into intent groups. The intent group represents the business expertise that's needed to solve the intents belonging to the group. The intent groups that the AI model identifies are displayed on the All intent groups page. You can manage the intent groups by reviewing, approving, or updating the intents in them.
On the Customer Intent Agent (preview) page, select Manage for Manage intent groups and intents. The All intent groups page displays the list of intents that the AI model discovered. If you create a custom intent group, the intent source shows as Admin edited. The Intents column displays the number of intents in each intent group.
Select an intent group to manage its intents. The
<intent_group_name>page displays the details, such as review status and the list of intents in the group.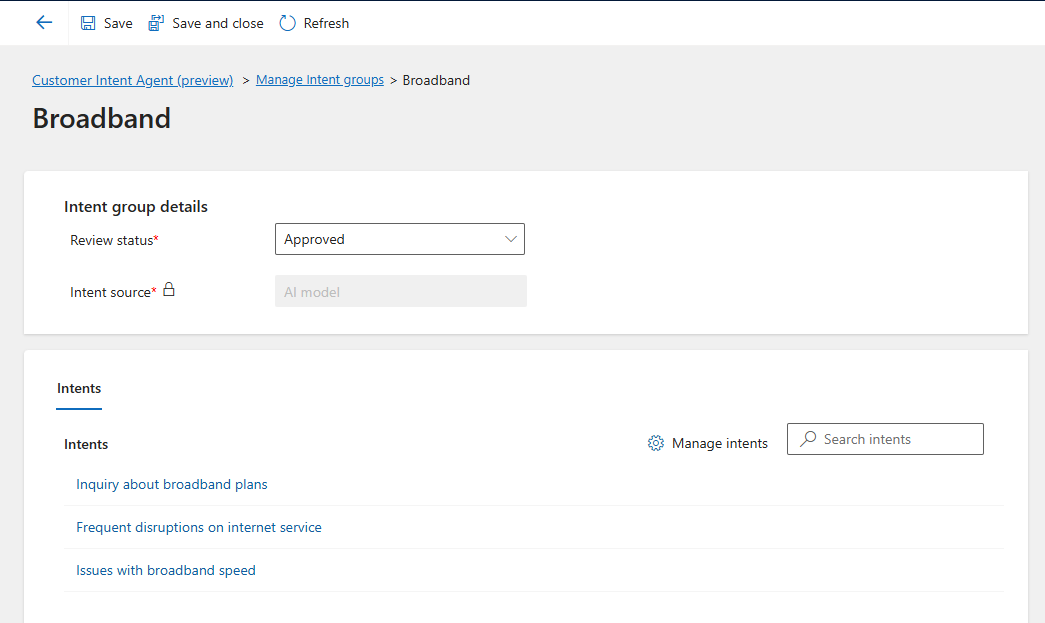
Select Manage intents to add new intents or remove existing ones.
On the Manage intents dialog, you can do the following updates:
- Select Add intents > Add existing, and select the intents that you want to add to the group. A message appears stating that changing the intents might affect other processes.
- Select Add. The intents are added to the list.
- Select an intent and do the following:
- Discard an approved intent. The intent doesn't appear for selection in the Add intents list of any intent group.
- Update the intent name. We recommend to update the name to address typos only. If you change the name, it can affect the accuracy of the AI model.
- Remove an intent from the intent group.
Select Save.


Create a custom intent group
- On the All intent groups page, select New to create a custom intent group.
- On the New intent group dialog, in Define intent group, enter a name and select a review status.
- Select Next.
- On the page that appears, select Add.
- Select the intents in the list that match, and then select Add.
- Select Save. The intent group is displayed in the All intent groups view.