Note
Access to this page requires authorization. You can try signing in or changing directories.
Access to this page requires authorization. You can try changing directories.
The first step in unification is selecting the tables and columns within your datasets that you want to unify and map columns to a descriptive type. Select tables that contain customer-related details such as name, address, phone number, and email. You can select one or more tables.
The following steps and images reflect the first time you go through the unification process. To edit existing unification settings, see Update the unification settings.
Select tables and columns
Go to Data > Unify.
Select Get started.
On the Customer data page, select Select tables and columns. The Select tables and columns pane displays.
Select at least one table.
For each selected table, identify the columns you want to use to match customer records and fields to include in the unified profile. You can select the required columns individually from a table or include all columns from a table by selecting the checkbox on the table level. You can search on keywords across all columns and tables to select the required columns you want to map.
Exclude any columns that aren't used for matching or needed by your downstream business users. Including excessive, unnecessary columns slows down processing and adds unwanted complexity to the customer profile. If you have more than 1,000 columns, look closely at the value of the selected columns against the extra processing time and added complexity.
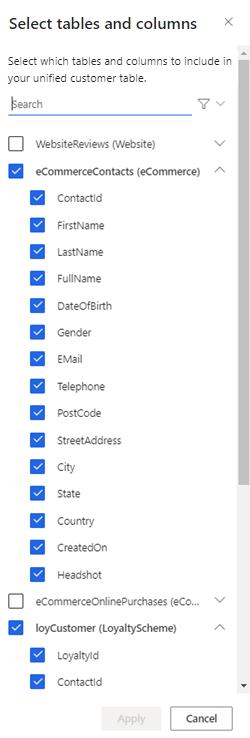
In this example, we're adding the eCommerceContacts and loyCustomer tables. By choosing these tables, you can derive insights on which of the online business customers are loyalty program members.
Select Apply to confirm your selections. The selected tables and columns display.
Select primary key
For each table, perform the following steps.
Choose the Primary key. The primary key value uniquely identifies a row. Primary keys shouldn't have any duplicate, missing, or null values. String, integer, and GUID data type columns are supported as primary keys.
Choose a Type that describes each column, such as Person.FullName, Location.City, or Identity.Service.Email. Mapping columns to types allows Customer Insights - Data to understand what columns represent and recommend rules, merge redundant data, and configure predictive models.
Note
One column should map to the type Person.FullName to populate the customer name in the customer card.
To create a custom type, select the Type field for the column and enter your custom type name.
To display a profile image on the Customer page, select the column that contains the publicly available URL and select Person.ProfileImage.
Review the recommended types to ensure intelligent mapping correctly identified the type for each column.
For columns that aren't automatically mapped to a type, select a type field, enter a custom type, or leave them unmapped. These columns are listed under Define the data in the unmapped columns. You don't need to map every column. However, columns with key demographic data (such as names and addresses) are important to map. Columns without a clear demographic type don't need to be mapped.
After completing the steps for each table, select Save source columns.
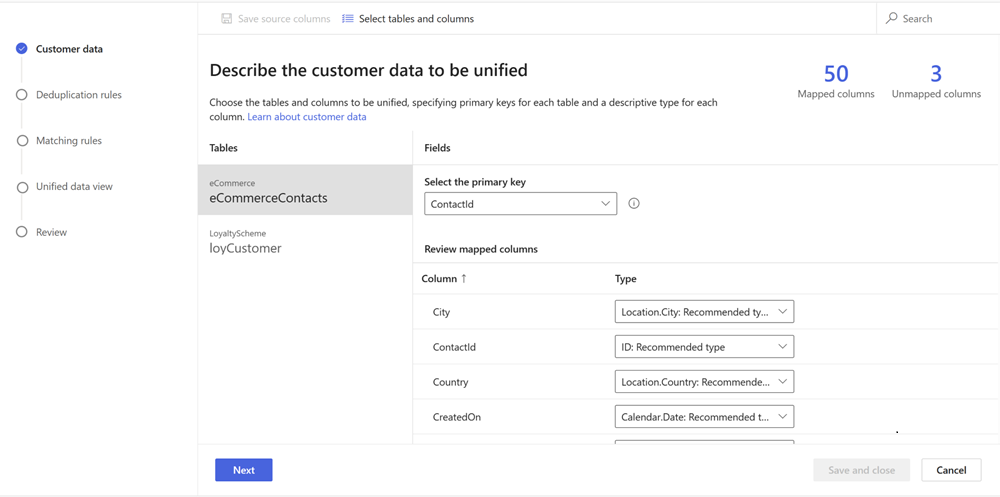
Select Next.