Note
Access to this page requires authorization. You can try signing in or changing directories.
Access to this page requires authorization. You can try changing directories.
Conditional content is an easy way to deliver effective and engaging personalized content. A simple example of conditional content is including different images based on a recipient’s profession, age group, address, interests, or other such factors. Creating this kind of personalized content in Dynamics 365 Customer Insights - Journeys is straightforward, requiring no coding or scripting. Here's a short video that shows conditional content in action:
Conditional content, as the name implies, consists of two parts: condition and content. The combination of these two parts is called a “variation.” You can create as many variations as needed. At the time an email is sent, conditions are evaluated in the order they're present in the email. When a condition is satisfied, the corresponding content is included and the conditional evaluation stops. If none of the conditions are satisfied, the default content is used. If there's no default content, then no content is included.

Conditional content can be a section or an image:
- A conditional section can include text, images, buttons, links, or any other element that is supported by the email editor.
- A conditional image only includes images.
- A conditional section can't include a conditional image.
Note
A conditional image must have default content whereas default content is optional for a conditional section. This prevents delivering emails with misaligned layouts.
When should you use conditional content?
Conditional content is a great way to personalize email content. Here are some ways you can use conditional content:
- Include different images that match the recipient’s interests (for example, sports or hobbies).
- Deliver different content based on the recipient’s demographic information (for example, city or state of residence, gender, or age).
- Use different language content using the recipient’s preferred language or region/country.
- A common usage is within footer where you may need to change some content (for example, social links or legal text) depending on the recipient’s information.
Working with conditional content
This section explains how to create, delete, preview, and test conditional content.
Create
In the email designer, select a section (or an image) and then select the conditional content button.

The section (or the image) frame changes color to indicate it's now a conditional section. The property pane on the right margin shows a new sub-tab called Variation. Select the Variation sub-tab.
Select + New Condition in the property pane. Define the condition.
Add more conditions if needed. At this point, you have the same content associated with each condition.
Select Default on any condition for which you want to change the content.
Update the section (or image) in the designer.
Repeat the previous two steps to update all the content as needed.
Delete
- In the email designer, select a conditional section (or a conditional image) and then select the conditional content button
- This converts the conditional section (or the conditional image) into a normal section (or image) by deleting all conditions and associated content. The default content (or the first condition’s content if there's no default) is retained in the designer.
Preview and test
In the designer, you should always preview and test each variation to make sure there are no unexpected results. To preview and test, follow the steps below.
- Select the Preview and test tab in the email designer and then select Edit sample data.
- In the property pane, expand the Conditional content section.
- Email variation lists all possible variations of the email. Select the variation you want to check. The main designer area will show the preview of that variation.
- By default, variations are named using the names you gave to the conditions. If desired, you can rename the variation by updating its name in Variation name edit box.
When to use conditional content vs conditions (advanced personalization)
As shown above, conditional content is a great way to deliver different images and content to better match a recipient’s interests and preferences. However, there are situations where you only want to change a few words or a sentence. For example, in many languages, initial greetings are different based on the recipient’s gender. In such situations, it's more efficient and convenient to use conditions from advanced personalization than to create a complete duplicate section containing the same set of images and text only to change the greeting.
Conditional content inside content blocks
Conditional content created at the section level can be saved as a content block. This way, multiple conditions and their associated content are all saved inside a single content block for anyone to use. Creating conditions is easy, but does require some knowledge of customer data and, therefore, some users may find it harder to create conditions without errors. Saving conditional content as a content block is a great way to reduce errors and enable everyone on the team to use advanced conditions.
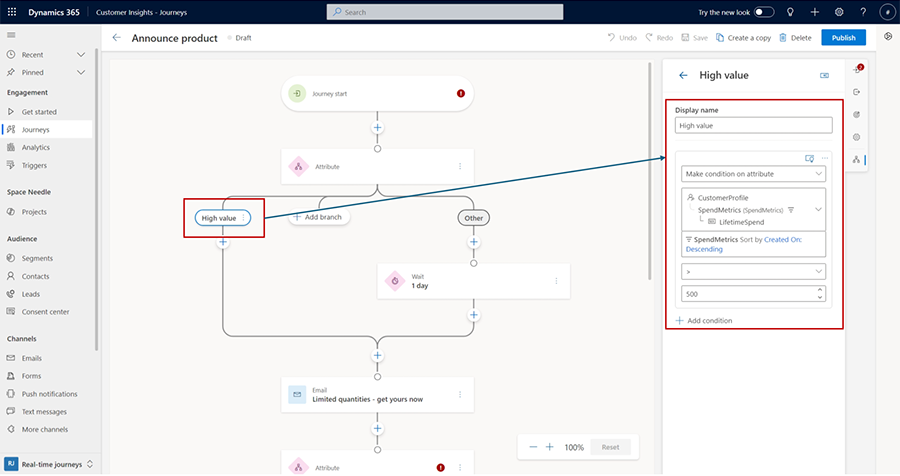
Using content blocks can also help drive consistency. For example, a “high-value customer” may require using multiple conditions. To make interactions more consistent, you can create a “starter” content block that has advanced conditions (tested and verified) with placeholder content. Anyone can then use the starter content block and update the content, so a standard and correct definition of “high value customer” is applied everywhere.
Customer measures (calculated metrics) as data source
When Customer Insights – Data is present and connected, you can use customer measures (calculated metrics) in conditions when using customer profiles as the target audience. This opens up another source of data to further personalize messages and journeys. For example, you can define a calculated metric such as LifeTimeSpend or CurrentYearSpend for each customer. These metrics can then be used to create conditional content (for example, high spend customers get higher discount) or differentiated experiences in journeys (for example, high-spend customers get flash sale notifications ahead of the others).
Creating measures
Watch this video to learn more:
See Use calculated measures in Customer Insights - Journeys and other Dataverse-based applications to learn how to create measures in Customer Insights – Journeys and what types of measures are available for use in the app.
Note
While the user interface presents itself as a one-to-many relationship, the current implementation in Customer Insights – Data only allows single dimension metrics and therefore only one value is returned.
Using measures in conditions, conditional content, and journeys
As shown in the screenshot below, measures can also be used to define conditions that can then be used in inline conditions, conditional content, or attribute branching steps in journeys.