Note
Access to this page requires authorization. You can try signing in or changing directories.
Access to this page requires authorization. You can try changing directories.
Ensuring marketing events are filled to capacity is crucial for success and return on investment. To encourage a high turnout for marketing events, you can now enable waitlist registrations, which ensures that spots are filled when registered attendees cancel. By setting the capacity for events and sessions, prospective attendees are placed on a waitlist when events and sessions are full. If a slot opens, the system automatically registers the next individual on the waitlist. That individual then automatically receives a registration confirmation and personalized event information. This ensures your event is filled to capacity.
How the waitlist works
When new space becomes available, your waitlist works like this:
- The oldest existing waitlist record is identified by checking the registration date and time.
- Depending on whether the contact uses automatic registration, one of the following occurs:
- If the identified waitlist record has Automatically register set to Yes, then an event registration record is generated for the contact.
- If the identified waitlist record has Automatically register set to No, then these contacts should be invited to sign up or confirm their interest in the event. To automate the workflow, create a segment that finds these contacts (where "Automatically-register" = "No" and "Invited" = "Yes"), and then use a customer journey to send an email that invites them to visit the event website to accept the slot.
- All registrations placed on the waitlist have a status reason set as Waitlisted. Once a spot becomes available, the status reason either automatically or manually changes to Registered.
Enable a waitlist
The following sections cover how to enable waitlists for events and sessions, and provide information on how events and sessions work together.
Enable a waitlist for an event
To enable or disable the waitlist for an event:
Open the Events work area. Go to the events list (Events > Event > Events), and then open or create an event.
Open the General tab. Find the Capacity area.
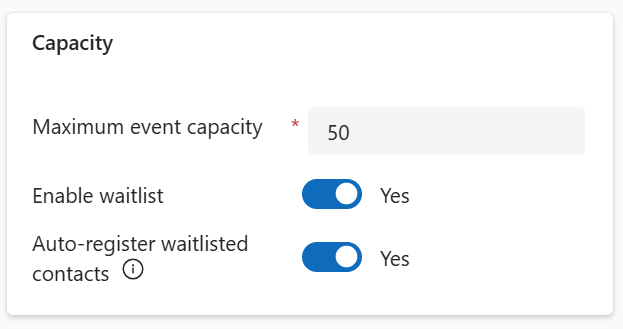
Make these settings:

- Maximum event capacity (for event-level registration only): Enter the maximum number of people who can attend your event. The waitlist only takes effect after the indicated number of contacts have registered. If you're using session-level registrations, you can also set up a waitlist for each session. For more information, see Enable a waitlist for a session.
- Waitlist this event: Set to Yes to enable the waitlist feature for an event.
- Auto-register waitlisted contacts: Set this to Yes to automatically register the next contact when space becomes available. When this is set to No, you have to manually invite waitlisted contacts to confirm their interest. Once they confirm their interest, you can change the status reason of their registration from Waitlisted to Registered.

Enable a waitlist for a session
If you're using session-level registration, you can also use waitlisting for sessions. Waitlisting for sessions can be used together with event waitlisting or just for individual sessions.
To enable or disable the waitlist for a session:
- Open the Events work area, go to the events list (Events > Event > Events), and then open or create an event. Next, create a session under the Agenda tab.
- Open the Summary tab and find the Capacity area.
- Make the following settings:
- Maximum session capacity: Enter the maximum number of people who can attend your session. The waitlist only takes effect after this number of contacts have registered.
- Waitlist this session: Set to Yes to enable the waitlist feature for this session.
- Auto-register waitlisted contacts: Set this to Yes to automatically register the next contact when space becomes available. When this is set to No, you have to manually invite waitlisted contacts to confirm their interest. Once they confirm their interest, you can change the status reason of their registration from Waitlisted to Registered.
How do event and session waitlisting work together?
- Event still has capacity but sessions don't: The event has capacity and attendees can attend talks and networking opportunities. However, there are also many sessions with limited capacity such as roundtables and workshops, registration to sessions is optional.
- Sessions might run out of capacity first. In this case, registrants see a "Join a waitlist" notification for the session that is out of capacity.
- The event still has capacity and allows them to register.
- Once attendees register, they see a summary confirming their event registration and waitlist registration for the sessions they're interested in.
- Event is full but some sessions still have capacity: The event and sessions' capacity is equal and not all session capacity was used when people registered for their events.
- Registrants can register for an event waitlist.
- When registrants register for a waitlist, they can pick the sessions they're interested in.
- For sessions that have capacity, the session registration status is On hold as no attendee can register for a session without having secured a spot in an event.
- Once a spot opens up in an event, the attendee is registered to the event and all respective sessions that were "On hold" for them prior.
- Event is full and sessions are too: The event and session capacity is equal. Therefore, session registration is required.
- Registrants can register for an event and session waitlist.
- Given that neither event nor session capacity is available, both registrations have a Waitlisted status.
- Registrants are only registered once a spot opens up in the event.
Tip
If you used the waitlist functionality in outbound marketing previously, it wasn't possible to use event and session capacity and waitlisting simultaneously. This has changed in real-time journeys. You can now benefit from greater flexibility when setting up multi-session events.
View the waitlist
To see who is currently on the waitlist for any event or session:
- Open the Events work area, go to the events list (Events > Event > Events), and then open the event.
- If you're using session-level registration, go to the Agenda tab for the event and open the session you want to view.
- Open the Registration and attendance tab for your selected event or session.
- In the default system view called "Registration and attendance of real-time events," there's a Status reason column where you can see if the attendee is registered, waitlisted, or if the registration was canceled. Any event check-ins are recorded and listed in the table.
Manual management of waitlist registrations
If you chose to manually register waitlisted attendees, use the new flag accessible from the event registration page. It shows whether the contact is now eligible to be invited.

Send invites for newly available places
When space becomes available for a waitlisted contact using manual registration, you need to inform them so they can sign up. You can automate the messaging using the segmentation and customer journey features of Customer Insights - Journeys.
Manage waitlist-related communication
There are two triggers related to waitlisting that can help optimize your waitlist-related communication:
- Marketing event registration created: Applicable when a new waitlist registration is created.
- Marketing registration created from waitlist: Applicable when registration changes status from "Waitlisted" to "Registered."