Configure routing to preferred agents
Note
The feature availability information is as follows.
| Dynamics 365 Contact Center—embedded | Dynamics 365 Contact Center—standalone | Dynamics 365 Customer Service |
|---|---|---|
| Yes | Yes | Yes |
Note
Case information is applicable to Customer Service only.
For a more personalized experience, Dynamics 365 Customer Service gives you the option to route work items from a specific contact to the customer's preferred agents or relationship managers.
You can configure contacts and their preferred agents in the Customer Service admin center. If a contact isn't configured, then you can't assign a preferred agent to the contact. You can map agents to contacts only.
Prerequisites
You must have one of the following roles to configure preferred agent routing:
- For Customer Service: CSR Manager
- For Omnichannel for Customer Service: Omnichannel Administrator
You must be able to access the Contact entity. More information: Contact
If you have a custom role, you must also have access to the msdyn_preferredagent and msdyn_preferredagentcustomeridentity entities.
Ensure that the agent you want to assign to a contact is a member of the queue to which work items are routed.
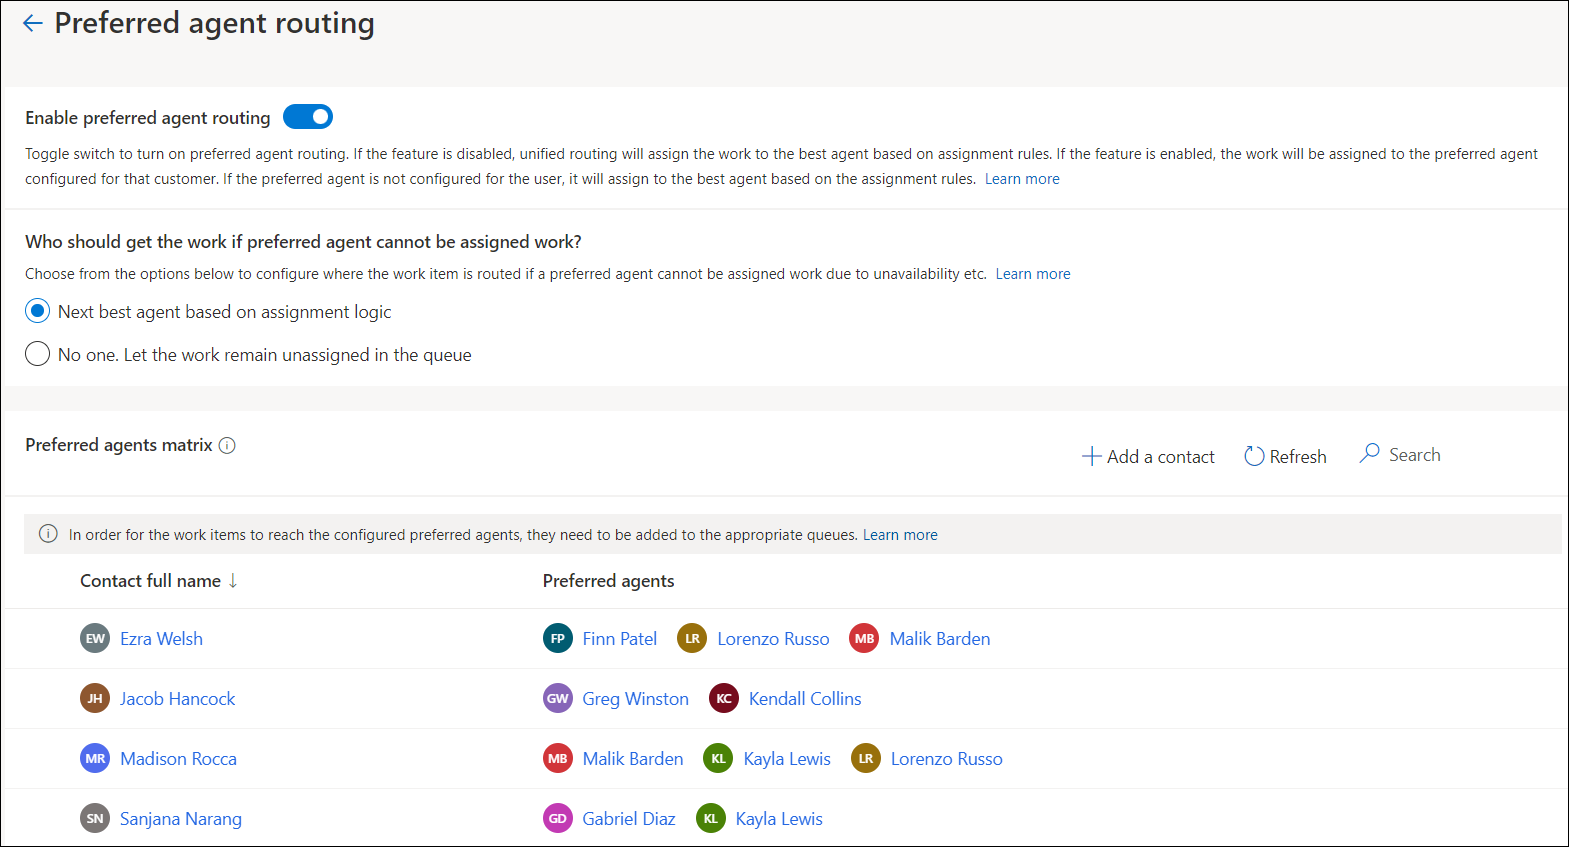
Configure preferred agent for contacts
In the Customer Service admin center site map, select Routing.
On the page that appears, select Manage next to Preferred agent routing.
Turn on Enable preferred agent routing.
Select who should get the work item if preferred agent is unavailable:
Next best agent based on assignment logic: The work item is routed based on the assignment rules. We recommend that you use this option for live chat conversations and voice channel calls.
No one. Let the work remain unassigned in the queue: The work item remains in the queue until an agent picks it up or you manually assign it to another agent. We recommend that you use this option for asynchronous channel conversations.
Select contacts and their preferred agents in the Preferred agents matrix area by doing the following steps:
Select Add a contact to add a contact.
In Contact full name, enter a contact name, and select a value from the dropdown list.
Select Add user to map agents to the contact.
You can map up to three preferred agents to a contact. The order in which the agents are listed is the order in which they'll receive a work item if an agent listed higher in the order isn't available. You can sort the agent order by selecting an agent in the list and using the Move up or Move down option.
Save and close.
How routing to preferred agent works
If a preferred agent exists for a contact, the system tries to automatically assign the conversation to an available preferred agent whose presence matches with one of the allowed presences configured in the workstream. The system skips the check for capacity, skills, and assignment rules. If no preferred agents are available for a contact and Next best agent based on assignment logic is set as the fallback option, then the system tries to find a matching agent according to the configured assignment strategy.
Routing to preferred agents works with conversations that are routed through push-based workstreams only.
Check diagnostics for routing to preferred agents
If you've turned on routing diagnostics, the work item's diagnostics page will include information about preferred agent routing under Agent assignment trace. The Assignment criteria section shows whether the setting is enabled. The Assignment trace section displays the reason information. More information: Diagnostics for unified routing
Update contacts and preferred agents
In the Preferred agents matrix section, use the edit and remove options to modify contacts and their preferred agents.
For each contact, you can map a maximum of three agents, but ensure that you map at least one agent to the contact.
Identify contacts in supported channels
To find the preferred agent for an incoming work item, the contact should be identified. For supported channels, use the information mentioned in the following table to identify customers as contacts.
| Channel | Customer record |
|---|---|
| Record |
|
| Digital messaging: Chat, voice, and other channels |
|
Add multiple preferred agent records
You can add multiple preferred agents to contact records at a time using the createRecord call to update the preferred agent entities, msdyn_preferredagent and msdyn_preferredagentcustomeridentity.
If you want to add multiple preferred agent routing records through the script, ensure that you map only three unique agents to a contact. If you add more than three agents, though the application displays all the mapped agents, work items are routed to the top three agents only. Agents are ordered based on the preference rating. If agents have the same preference rating, the application orders the agents based on the record creation timestamp.
You can also update or delete records using the updateRecord or deleteRecord calls.
Important
We recommend that you add the contact and preferred agent routing through the Preferred agent routing page.
See also
Overview of unified routing
Configure queues
Blog: Use preferred agent routing to create lifelong customer relationships
Feedback
Coming soon: Throughout 2024 we will be phasing out GitHub Issues as the feedback mechanism for content and replacing it with a new feedback system. For more information see: https://aka.ms/ContentUserFeedback.
Submit and view feedback for