Customize knowledge article search filters
Applies to: Dynamics 365 Contact Center—standalone and Dynamics 365 Customer Service only
You can configure standard and custom fields as filters to help your customer service representatives (service representatives or representatives) find the right content through knowledge search and thus improve their productivity.
The fields that are present on the knowledge article entity are the fields that are available as filters. Additionally, filters can be defined on fields that have the following data types:
- Options set
- Multiselect options set
- Lookup
- Two choices
- Date and time
Any filter configurations that you set will be available wherever the knowledge search experience is configured, such as the form-based knowledge control, knowledge search page, productivity pane-based knowledge search control, embedded search control in Unified Service Desk, and the application tab search experience in Customer Service workspace or Contact Center workspace.
The Enable search filters option is set to Yes by default. To disable search filters, you can set it to No on the Filters page.
If you choose to retain the Enable search filters option as Yes, then the filter configurations made in Power Apps will be deactivated. Additionally, the archived and discarded status filters will no longer be supported.
The settings that you've previously configured for your organization, including the default language configured for your organization in the Power Apps filter configurations, will no longer be applicable. You'll need to configure the language as default using the filter configurations.

Customize search filters
You can customize the search filters for knowledge articles in the Customer Service admin center app.
In the site map of Customer Service admin center or Contact Center admin center, select Knowledge in Agent experience. The Knowledge page appears.
On the Knowledge page, go to the Filters section and select Manage. The Filters page appears.
To enable representatives to personalize knowledge article search filters, set the Allow agent to personalize toggle to Yes.
Select the filters you want to make available for knowledge search.
Move through the Filters page to view the filters.
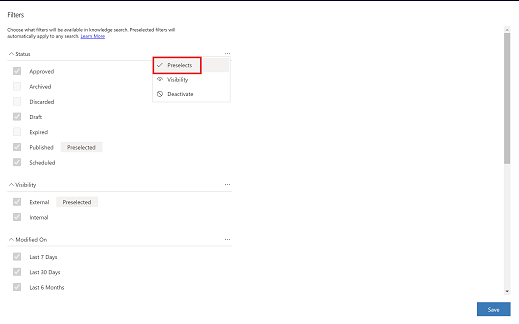
To set predetermined values that will appear for representatives by default, select the ellipsis in the upper-right corner of a filter area, and then select Preselects.

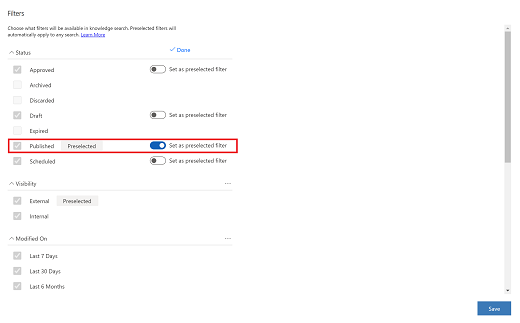
To make a filter value available by default, turn on the Set as preselected filter toggle, so that Preselected appears next to the filter name, and then select Done.
Values that are set as preselected automatically participate in the filtering without requiring the representative to manually select them. Only values made visible can be preselected.

If you want to set the filters that must be shown to the representative, select the ellipsis in the upper-right corner of a filter area, and then select Visibility.
Select the values that you want to show the representative, and then select Done.
When you're finished with configuring the values you want, select Save.
Enable custom fields as search filters
To configure custom fields as search filters for knowledge articles:
Enable the standard search filters.
Add the custom fields to the Quick Find view columns. To add a field to the Quick Find view column, see Configure searchable fields for Relevance Search.
Additional configuration settings
If Dataverse Search is enabled and if you have selected the Archived, Discarded, or Expired values for the Status filter, articles that contain these values aren't displayed.
To view these articles in your Dataverse Search results, you must delete the Archived, Discarded, Expired, and Is Latest Version filters in the Quick Find Knowledge Article > Edit Filter Criteria dialog.
Note
These filters will only work if you have Dataverse Search enabled.
Add a default filter configuration
The following steps apply to these data types:
- Options set
- Multiselect options set
- Two choices
- Date and time
You can add a default filter in the Customer Service admin center or Contact Center admin center app.
In the site map of Customer Service admin center or Contact Center admin center, select Knowledge in Agent experience. The Knowledge page appears.
On the Knowledge page, go to the Filters section and select Manage. The Filters page appears.
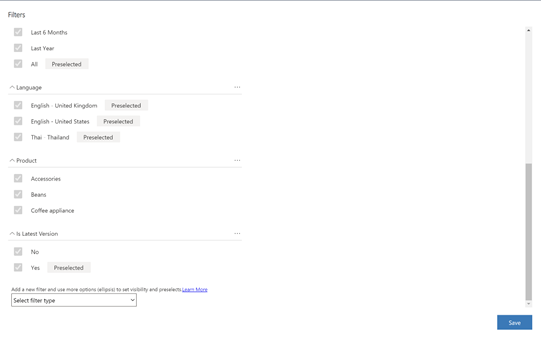
Scroll to the bottom of the page, select the filter type you want from the dropdown list, and then select Add. The filter is added to the page.

Select the values or clear the selection to customize the filter, and then turn on the Set as a preselected filter option to display the filter to the representative by default.
Select Save.
Configure fields with data type as lookup as filters
Some configurable filter values may include lookup types, where there are numerous value options that can be set. Some examples of these filters are Created by, Modified by, and Owner. For these types of values, when you add the filter, you can manually search for and select the records that you want to use.
You can configure a lookup type filter in the Customer Service admin center or Contact Center admin centerapp.
In the site map of Customer Service admin center or Contact Center admin center, select Knowledge in Agent experience. The Knowledge page appears.
On the Knowledge page, go to the Filters section and select Manage. The Filters page appears.
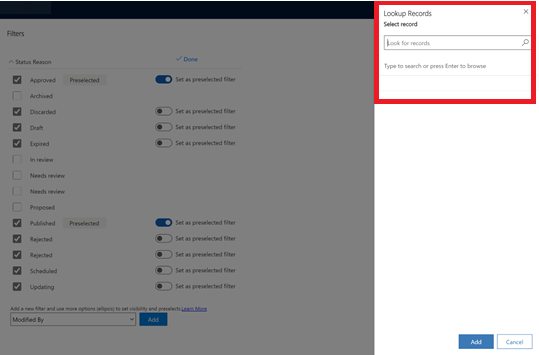
Scroll to the bottom of the page, select the filter type you want from the dropdown list, and then select Add. The Lookup Records flyout menu appears.

To find the values you want, either enter the value details in the field or select the search icon to list the available records.
Select the records that you want in the results, and then select Add.
If you want to set the values as defaults, turn on the preset next to the filter to the right so that Preselected appears next to the filter name.
Select Save.
Deactivate or reactivate a filter configuration
There may be times when you want to temporarily suspend a filter configuration but don’t want to lose the configuration settings. You can deactivate a filter configuration and then reactivate it later on.
Note
If you deactivate or delete all of the filters, then representatives will see the following message on the personalization page: "No filters have been configured. Contact your administrator."
Keep in mind the following:
If you delete a knowledge article field for which a filter has been created, your representatives won't see the filter, and they won't be notified about the change in the UI. You, as the administrator, will see the filter with a message indicating that it has been deleted.
If you deactivate the filter, it will show as deactivated to you as the administrator, but your representatives won't see the filter on the knowledge control. When the filter is activated again, the filter configuration will remain as it was previously configured.
If a representative doesn’t have permission to see a specific field because of field-level security, then a filter created on that field won't be visible to the representative.
Filters that are available in the default, out-of-the-box configuration can't be deleted.
If a representative sets default values, those values will persist and cannot be overwritten by changes made by an administrator.
You can deactivate or reactivate a filter configuration in the Customer Service admin center or Contact Center admin center app.
In the site map of Customer Service admin center or Contact Center admin center, select Knowledge in Agent experience. The Knowledge page appears.
On the Knowledge page, go to the Filters section and select Manage. The Filters page appears.
Select the ellipsis in the upper-right corner for the filter you want to deactivate, and then select Deactivate.
Select Done > Save.
When you're ready to reactivate the filter, go to the Filters page, select the ellipsis next to the value you want to reactivate, and then select Activate. All of the previous configurations are reinstated.
Allow representatives to personalize their knowledge article search filters
You may have scenarios within your organization where representatives are working on different areas and don’t all need the same filter settings. For example, an organization may have representatives working on different product areas. One representative might need to see knowledge articles for Product A, while another representative might only want knowledge articles for Product B, and so forth.
You can allow your representatives to personalize the knowledge article search filters for their areas, from the Customer Service admin center or Contact Center admin center app.
In the site map of Customer Service admin center or Contact Center admin center, select Knowledge in Agent experience. The Knowledge page appears.
In the General settings section, select Manage. The General settings page appears.
Select the values or clear the selection to customize the filter, and then turn on the Set as a preselected filter option to display the filter to the representative by default.
Note
This option is available only if Enable custom filters is set to Yes.
Select Save.
After you've enabled the option, your representatives will be able to view all the configurations that you previously set for them and personalize the knowledge search filters for their areas.