Note
Access to this page requires authorization. You can try signing in or changing directories.
Access to this page requires authorization. You can try changing directories.
Applies to: Dynamics 365 Contact Center—embedded, Dynamics 365 Contact Center—standalone, and Dynamics 365 Customer Service
When a notification is sent to a customer service representative (service representative or representative), it displays certain information, such as the customer from who the conversation request is coming, the timeout period after which the notification disappears, and accept and reject buttons.
As an administrator, system integrator, or partner, you can use the out-of-the-box templates for notifications or create your own. A notification template is a combination of notification-related, reusable information. The template is used to configure what information needs to be displayed to the representatives and supervisors for an incoming conversation, escalation, transfer, or consult.
Desktop notifications
For optimal functioning of desktop notifications, make sure that you're using the latest supported browsers as specified in the system requirements.
Desktop notifications help ensure that representatives won't miss any conversation requests. Based on your configuration, representatives can receive notification alerts on their desktop always or when the Copilot Service workspace app isn't in focus. Some scenarios where the app isn't in focus might include:
- The representative minimizes the app.
- The representative is working in another browser window.
- The representative is working on another tab of the browser.
- The representative is using two screens, and is on the screen that doesn't have either the Copilot Service workspace app.
Note
The legacy version of Microsoft Edge is not supported for desktop notifications.
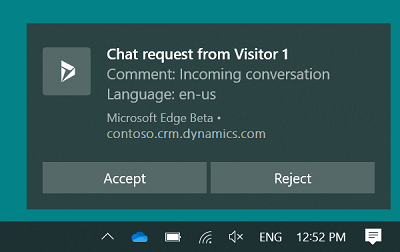
Representatives can accept or reject the conversation request by selecting a button on the desktop notification. When a representative accepts the conversation, the app is made active and displayed to the representative, and a session is started.
If the representative selects the notification message body and not a button, the app is made active and the notification is displayed in the app. Then the representative can choose to accept or reject the conversation by selecting the appropriate button.
You can configure the wait time and the notification is displayed for the representative according to this time, but wait time isn't displayed on the notification. The desktop notification theme is based on the Windows operating system theme and settings.
Note
- Desktop notifications will not work when the browser is opened in incognito mode or if focus assist is turned on in your Windows 10 operating system.
- If the native browser notification option is disabled, the notification will be shown in a different user interface.
Allow a browser to show notifications
To get desktop notifications, representatives need to allow their browser (Microsoft Edge or Google Chrome) to show them. When a representative gets a browser notification, they need to select Allow. Based on your requirements, you can enable or disable notifications in the browser settings.
Also, as an administrator, you can set the browser notification permission by using group policy.
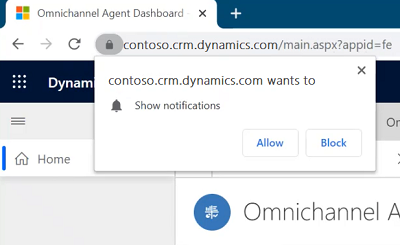
To ensure that representatives receive the notifications, we recommend you enable the following settings:
- Notification settings in Windows is set to On.
- Notifications for your Dynamics 365 instance website are set to on.
- Don't disturb in your Windows setting is set to Off.
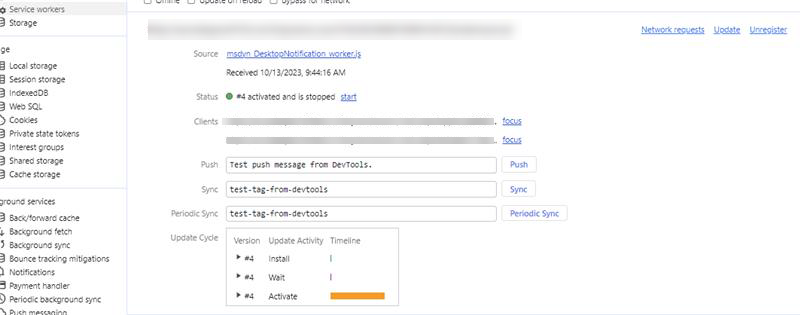
- Enable the service worker in the developer console.
Notification fields
The fields that are shown in the notification are based on the notification template configuration. To learn more, see Slug for notification field header and Create a notification template.
Slugs for notification field header
A slug is a replacement parameter that is populated at runtime based on the context variables.
The notification shows certain fields and values, called Field header and Value respectively.
For example, a customer Kenny Smith initiates a conversation. When the representative sees the notification, it displays Customer Name as Kenny Smith.
Here, Field header is Customer Name and the Value is Kenny Smith.
For the application to identify the name of the customer as Kenny Smith, as an administrator, you must configure slugs as the value. The Omnichannel system replaces the slug with the actual value that is extracted based on the context variables.
The application supports the following slugs.
| Slug | Description |
|---|---|
{customerName} |
Name of the customer who initiates the conversation. |
{caseId} |
GUID of a case. The case ID is displayed only if a case is linked to the conversation. |
{caseTitle} |
Title of the case. The title of the case is displayed only if a case linked to the conversation. |
{queueId} |
GUID of a queue. |
{visitorLanguage} |
The language in which the customer initiates the conversation. |
{visitorDevice} |
The device of the customer who initiates the conversation. |
{entityRoutingLogicalName} |
Name of the entity if the notification is for entity records. |
{customerEntityName} |
Name of the entity (contact or account entity) if the customer is authenticated. |
{customerRecordId} |
GUID of the entity (contact or account entity) if the customer is authenticated. |
{<name of the pre-chat survey question>} |
All the prechat survey questions that are configured for a work stream can be used as the slug. The format is same as the question. |
Manage templates
Out-of-the-box notification templates
For the supported channels, Customer Service provides you with out-of-the-box notification templates that you can use in your environment. When you attach the out-of-the-box notification template, the default settings are used in the notifications. For customers whose record exists in Dynamics 365, the settings in the authenticated template for notifications are used. If the customer details aren't available in Dynamics 365, the settings in the unauthenticated template are used for displaying the notifications. For information on the notifications behavior and what the notifications display for representatives, see notifications for representatives.
The out-of-the-box templates are as follows.
| Channel/Entity | Consult | Authenticated | Unauthenticated | Transfer | Other |
|---|---|---|---|---|---|
| Chat | Chat - consult - default | Chat - incoming authenticated - default | Chat - incoming unauthenticated - default | Chat - transfer - default | |
| Custom messaging | Custom messaging - consult - default | Custom messaging - incoming authenticated - default | Custom messaging - incoming unauthenticated - default | Custom messaging - transfer - default | |
| Facebook - consult - default | Facebook - incoming authenticated - default | Facebook - incoming unauthenticated - default | Facebook - transfer - default | ||
| LINE | LINE - consult - default | LINE - incoming authenticated - default | LINE - incoming unauthenticated - default | LINE - transfer - default | |
| SMS | SMS - consult - default | SMS - incoming authenticated - default | SMS - incoming unauthenticated - default | SMS - transfer - default | |
| Microsoft Teams | Teams - consult - default | Teams - incoming authenticated - default | Teams - incoming unauthenticated - default | Teams - transfer - default | |
| Twitter - consult - default | Twitter - incoming authenticated - default | Twitter - incoming unauthenticated - default | Twitter - transfer - default | ||
| WeChat - consult - default | WeChat - incoming authenticated - default | WeChat - incoming unauthenticated - default | WeChat - transfer - default | ||
| CDS entity | CDS entity - Default assigned | ||||
| Customized | Customized notification template | ||||
| Sentiment | Sentiment threshold alert - supervisor | ||||
| Voice | Voice call - consult - default | Voice call - incoming authenticated - default | Voice call - incoming unauthenticated - default | Voice call - transfer - default | Voice call - supervisor assign - default |
Note
- You can't customize the out-of-the-box notification templates; instead, you'll need to create your own custom templates.
- If you use custom notification templates for record routing, we recommend that you do not add a reject option. By design, the record will be assigned to the routed representative even if you provide the option to the representative to reject the assignment.
Create a notification template
In the site map of Copilot Service admin center, select Workspaces in Support experience.
On the Workspaces page, select Manage for Notifications.
On the Templates tab, select New Notification Template in the Active Notifications Templates area.
Specify the following in the New Notification page.
Tab Name Value, description Example General Name Specify the name for the notification. This name wouldn't be visible for the representatives at the run-time. Authenticated chat notification General Title Provide a title to the notification that you want the representatives to see at the run-time. Incoming chat conversation General Icon Select web resource path to add an icon. /webresources/msdyn_chat_icon_zfp.svg
Note:
- This is the default value. You can change the icon as your requirement.
- If you enable the Show desktop notifications option, and if you use svg icon format, then the svg icon won't be shown in the desktop notifications.General Show Countdown Yes Set Yes to show the timer in the notification, or No to hide the timer in the notification for the representatives.
Note:
- Irrespective of whether you set Yes or No to show or to hide the timeout value for the representative, the timer runs, and after the timeout duration, the notification disappears.
- Yes is the default value for the templates when you get the latest release of Omnichannel for Customer Service.
- When you upgrade from previous to the latest release of Omnichannel for Customer Service, then existing notification templates will show no value for this field in the user interface. However, the notification templates consider the values as Yes, and display the timer to the users at the runtime.
- If you enable the Show desktop notifications option, then the timer won't be shown in the desktop notifications.General Countdown (seconds) Provide a duration in seconds; after this duration elapses, the notification disappears. 120.
Note:
- This is the default value. You can change the duration as per your requirement.
- If the countdown setting is less than 5 seconds, the desktop notification doesn't appear.General Autoassign work items Set to Yes to automatically assign the incoming conversation. The default value is No.
Note: This setting is in preview.
More information: Enable automatic acceptance of conversations.General Autoaccept voice/chat calls This option is displayed only if Auto-assign work items is enabled. Set to Yes for a representative to automatically accept a conversation. The default value is No.
Note: This setting is in preview.
More information: Enable automatic acceptance of conversations.General Accept Button Specify a text for the accept button. This text appears for the representatives to accept a conversation request. The default value is Accept that changes to Open when the Auto-assign work items value is Yes. You can change the text as per your requirement. General Reject Button Set the toggle to yes if you want to show the reject button to representatives.
After you set the toggle to Yes, the default label for the button appears.Reject
Note: This is the default value. You can change the text as per your requirement. The Reject Button is disabled when the Auto-assign work items value is Yes.General Show desktop notifications Specify Always to show notifications always or When app is in background to show notifications only if the Copilot Service workspace isn't in focus. When app is in background
Note:
The default value is Never.
To learn more, see Desktop notifications and Receive notifications when app is in background.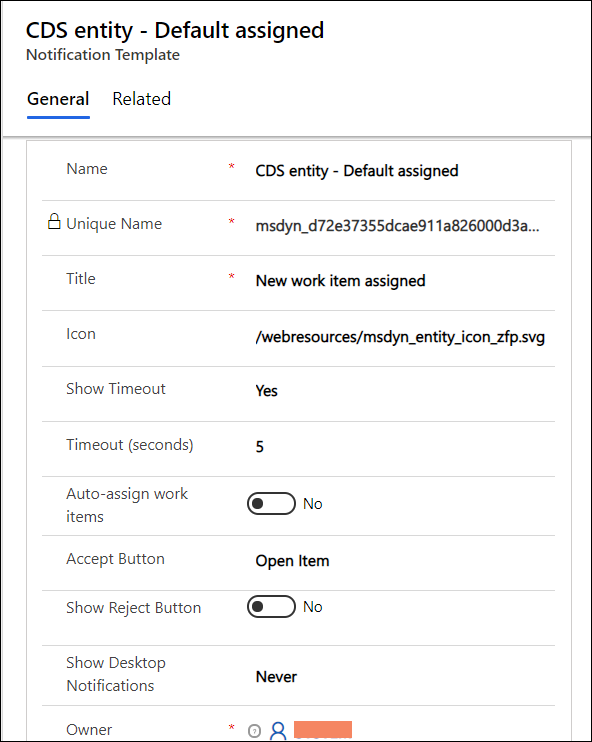
Select Save. The template is saved, and the Notification Fields section appears on the page.
Select Add Existing Notification Field in the Notification Fields section. The Lookup Records pane appears.
Select the search icon in the Look for Records box. If no records are available, a message appears that there are no records found and to create a new record.
Select New to create a notification field. A confirm dialog box appears, asking whether you want to leave the page. Select OK.
Specify the following in the New Notification Field page.
Tab Name Value, description Example General Name Specify the name for the notification. This name isn't visible to the representatives at the runtime. Name of the customer General Field header Provide a name to the field header. This appears in the notification that representatives see at the runtime. Name General Value Provide a slug value that appears against Field header in the notification.
To learn more, see Slug for notification field header.{customerName} 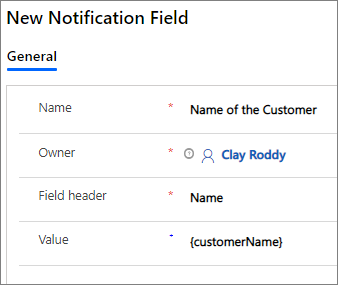
Select the back arrow on the browser to go to the notification template you created. Alternatively, you can select Notifications in the sitemap, and then select the template you created.
Select Add Existing Notification Field in the Notification Fields section. The Lookup Records pane appears.
Select the name of the notification field you created, and then select Add. For example, Name of the customer.
Repeat steps 6 through 11 to add more notification fields.
Select Save.
After you save the notification, sign in to the representative app, and you can view the notification per your configuration when a work item is routed.
To learn more, see View notification.
Edit a notification field
As an administrator, you can edit the value of a notification field header in the grid.
Select the notification you want to edit on the Active Notifications page.
Select a notification field you want to edit and then select the record to edit it.
Select Save.
Customize a notification
Let's see a scenario: In the Contoso Pvt Ltd customer service center, every case notification that is shown to a representative needs to have the following:
Title of the notification: A new case is assigned.
Notification fields:
- Case priority: Priority of the case such high or low.
- Case title: Title of the case.
- Device: Device from which the case was created by the customer.
- Language: Language of the customer.
As an administrator, you need to customize the notification template to show the title and notification fields.
Step 1: Create a notification template with the following values
| Tab | Name | Value |
|---|---|---|
| General | Name | Customized case notification template |
| General | Title | A new case is assigned |
| General | Icon | The default value is /webresources/msdyn_chat_icon_zfp.svg. |
| General | Show timeout | No |
| General | Timeout (seconds) | The default value is 120. |
| General | Autoassign work items | The default setting is No. |
| General | Accept Button | The default value is Accept. |
| General | Reject Button | The default value is No. When you set the toggle to Yes, the Reject label appears. |
| General | Show desktop notifications | The default setting is Never. Set to When app is in background. |
Step 2: Create the notification fields with the following values
Note
You can configure up to four notification fields only.
| Name | Field header | Value |
|---|---|---|
| Case priority | Case priority | {$odata.incident.prioritycode.?$filter=incidentid eq '{caseId}'&$select=prioritycode} |
| Case title | Case title | {$odata.incident.title.?$filter=incidentid eq '{caseId}'&$select=title} |
| Device | Device | {visitorDevice} |
| Language | Language | {visitorLanguage} |
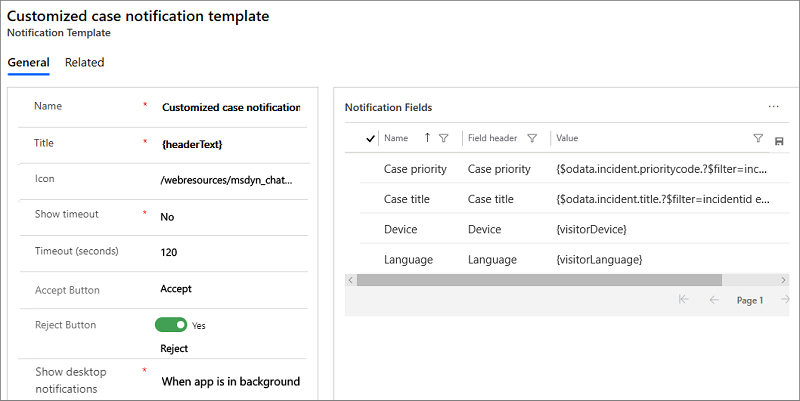
Step 3: Save the changes
Related information
Get started with Copilot Service admin center
Manage session templates
Manage application tab templates
Associate templates with workstreams
