Note
Access to this page requires authorization. You can try signing in or changing directories.
Access to this page requires authorization. You can try changing directories.
Applies to: Dynamics 365 Contact Center—embedded, Dynamics 365 Contact Center—standalone, and Dynamics 365 Customer Service
The presence status indicates a customer service representative's (service representative or representative) availability to take up work items. A presence status consists of two elements:
Base status: The base presence status that indicates a service representative's status. The work distribution system distributes work items to representatives according to the base statuses that you select as allowed presences at the time of creating a workstream. The base statuses are as follows:
- Available
- Busy
- Busy-DND
- Away
- Offline
You can select base statuses only in Allowed Presences when you're creating a workstream.
Presence text: The text that is associated with a specific base status. This is the text that is visible to representatives.
You must specify a default presence to representatives that is set when they sign in for work. If no default presence is defined, the application sets "Available" as the default.
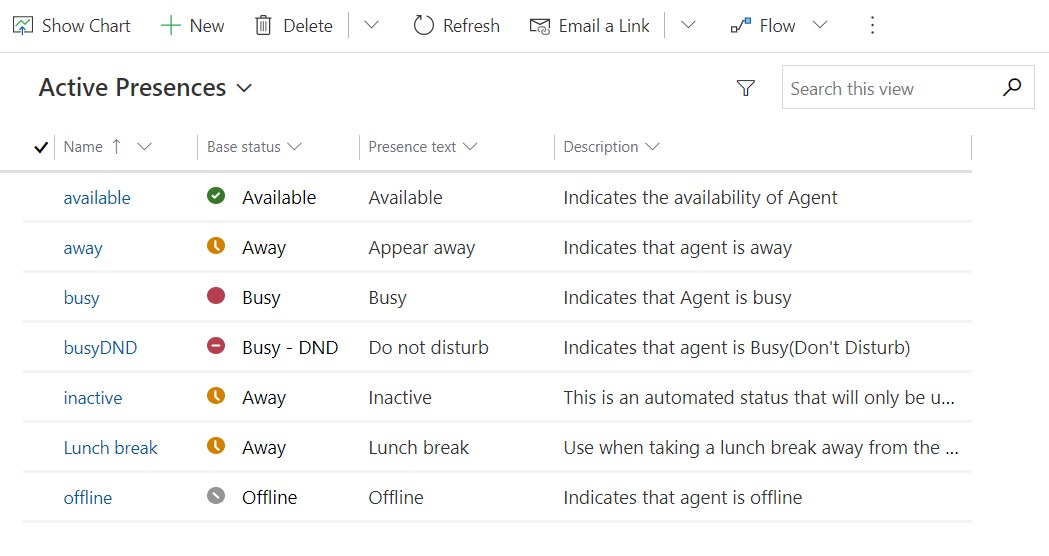
Out-of-the-box presence statuses
Omnichannel for Customer Service provides the following presence statuses out of the box:
- Available
- Away
- Busy
- Busy - DND
- Inactive
- Offline
The inactive presence isn't available for manual selection by the representatives. If the missed notifications feature is enabled, the representatives' status is changed to inactive when they don't respond to the incoming conversation request notification.
Note
You can't edit or delete these out-of-the-box base presence statuses.
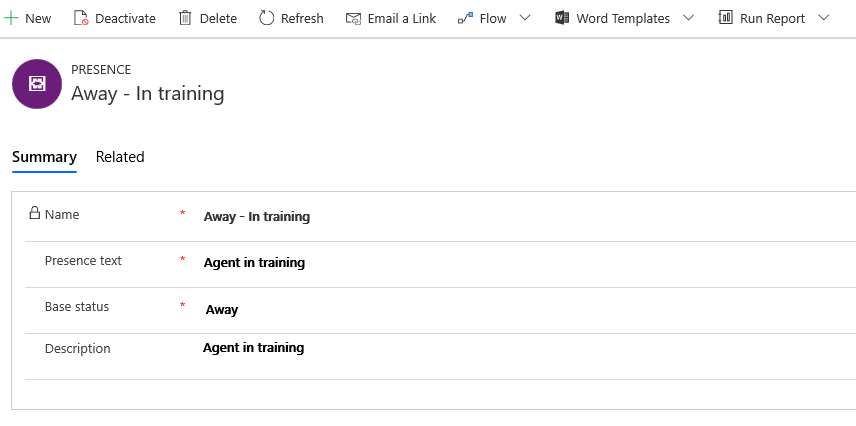
Create custom presence status
In addition to the out-of-box presence statuses, admins can configure custom presence statuses for representatives that must be mapped to a base presence. For example, if the representatives on your team want to attend a training, you can create a custom Away – In Training presence status. When you map a custom presence to a base presence, make sure that the configurations are logically viable. For example, if you map an available custom presence to offline base status, the application treats it as offline while the visual effect would be available.
In the site map of Copilot Service admin center, in Agent experience, select Productivity.
Select Manage for Custom Presence.
On the command bar, select New to create a presence record.
On the Summary tab, provide the following information:
- Name: Enter a name for the custom presence status.
- Presence Text: Enter presence text that should be associated with the new custom entity.
- Base Status: Select the most applicable base status in the list.
- Description: Enter a brief description of the custom presence record.
Select Save.
Related information
Manage presence in Omnichannel for Customer Service
Manage a user in Omnichannel for Customer Service
Understand and create workstreams
Overview of unified routing
Presence API
User presence isn't loading