Note
Access to this page requires authorization. You can try signing in or changing directories.
Access to this page requires authorization. You can try changing directories.
You can use notes on the timeline to record case summary, investigations, or add images and files for reference. You can use Relate note to a table record on the timeline to perform the following actions on case, account, and contact tables without leaving the page that you're on:
- Move a note on the timeline of an existing table record to another table record. For example, you can move a note on the timeline of a contact to an existing case. After you move the note, it'll appear only on the timeline to which you've moved and not on both.
- Create a new table record from the note. For example, you can create a case from an existing note on a contact's timeline.
Understand linking timeline notes
The following sections contain scenarios to describe how linking timeline notes to tables works.
Move note from one table record to another table record
Consider the following scenario, you have taken a note on the timeline of the account Contoso Coffee during an interaction with the customer about an issue with CX300 coffee machine. After the interaction, you want to link the note to an existing case or create.
To link the note on the Contoso Coffee account to the Issue with coffee machine case:
- On the Contoso Coffee account timeline, select the note to link.
- Select Link to record button.
- On the window that appears, search for the case to move the note to. The case is Issue with coffee machine.
- The application displays a message to confirm if the note must be unlinked from the account table. Select OK. The note now appears only on the timeline of the Issue with coffee machine case.
Create a new table record from a note
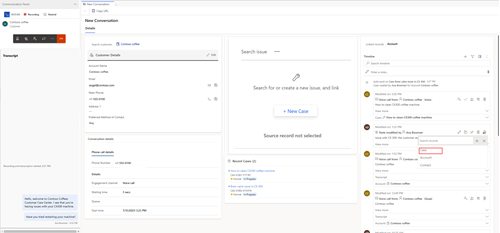
Consider a scenario where you're talking to an customer over a voice call. The customer's account, Contoso Coffee, appears on the Customer Details section of the Active Conversation form. The timeline on the Active Conversation form is either the account or the contact timeline, based on the record you've selected. More information: Take notes specific to conversation.
On the communication panel, you select Notes. After you've saved the note, it's displayed on the timeline.
To create a new case from the note, perform the following steps:
Select the note that you took on the timeline for the Contoso Coffee account.
Select Link to record button.
On the window that appears, select Add a new record. Based on your administrator's configurations, you see Case, Account, and Contact.
Select Case. The case form opens and some of the fields on the case form are populated with the content from note based on your administrator configuration. For example, if your administrator has configured to notes title to be copied as the case title and the notes description to be copied to the case description, Case Title and Description is automatically populated from the note.
Add the information on the quick create case form and save the details. The case is created.
The application then displays a message to confirm if the note must be unlinked from the table. If you select OK, the note appears on the timeline of the new case that you've created.