Note
Access to this page requires authorization. You can try signing in or changing directories.
Access to this page requires authorization. You can try changing directories.
This article explains the actions you can take to configure the schedule board in your environment.
The schedule board is designed to lay the foundation for new capabilities for multi-day scheduling and intelligent interactions.
Performance
The schedule board is designed for fast response when you do the following tasks:
- Load the schedule board
- Select schedule board tabs
- Reschedule bookings

Usability and accessibility
The schedule board is a Power Apps Component Framework (PCF) control that's built on the Unified Client Interface, which helps make it more flexible, supportable, and accessible. The schedule board is designed to work on different screen sizes and across form factors.
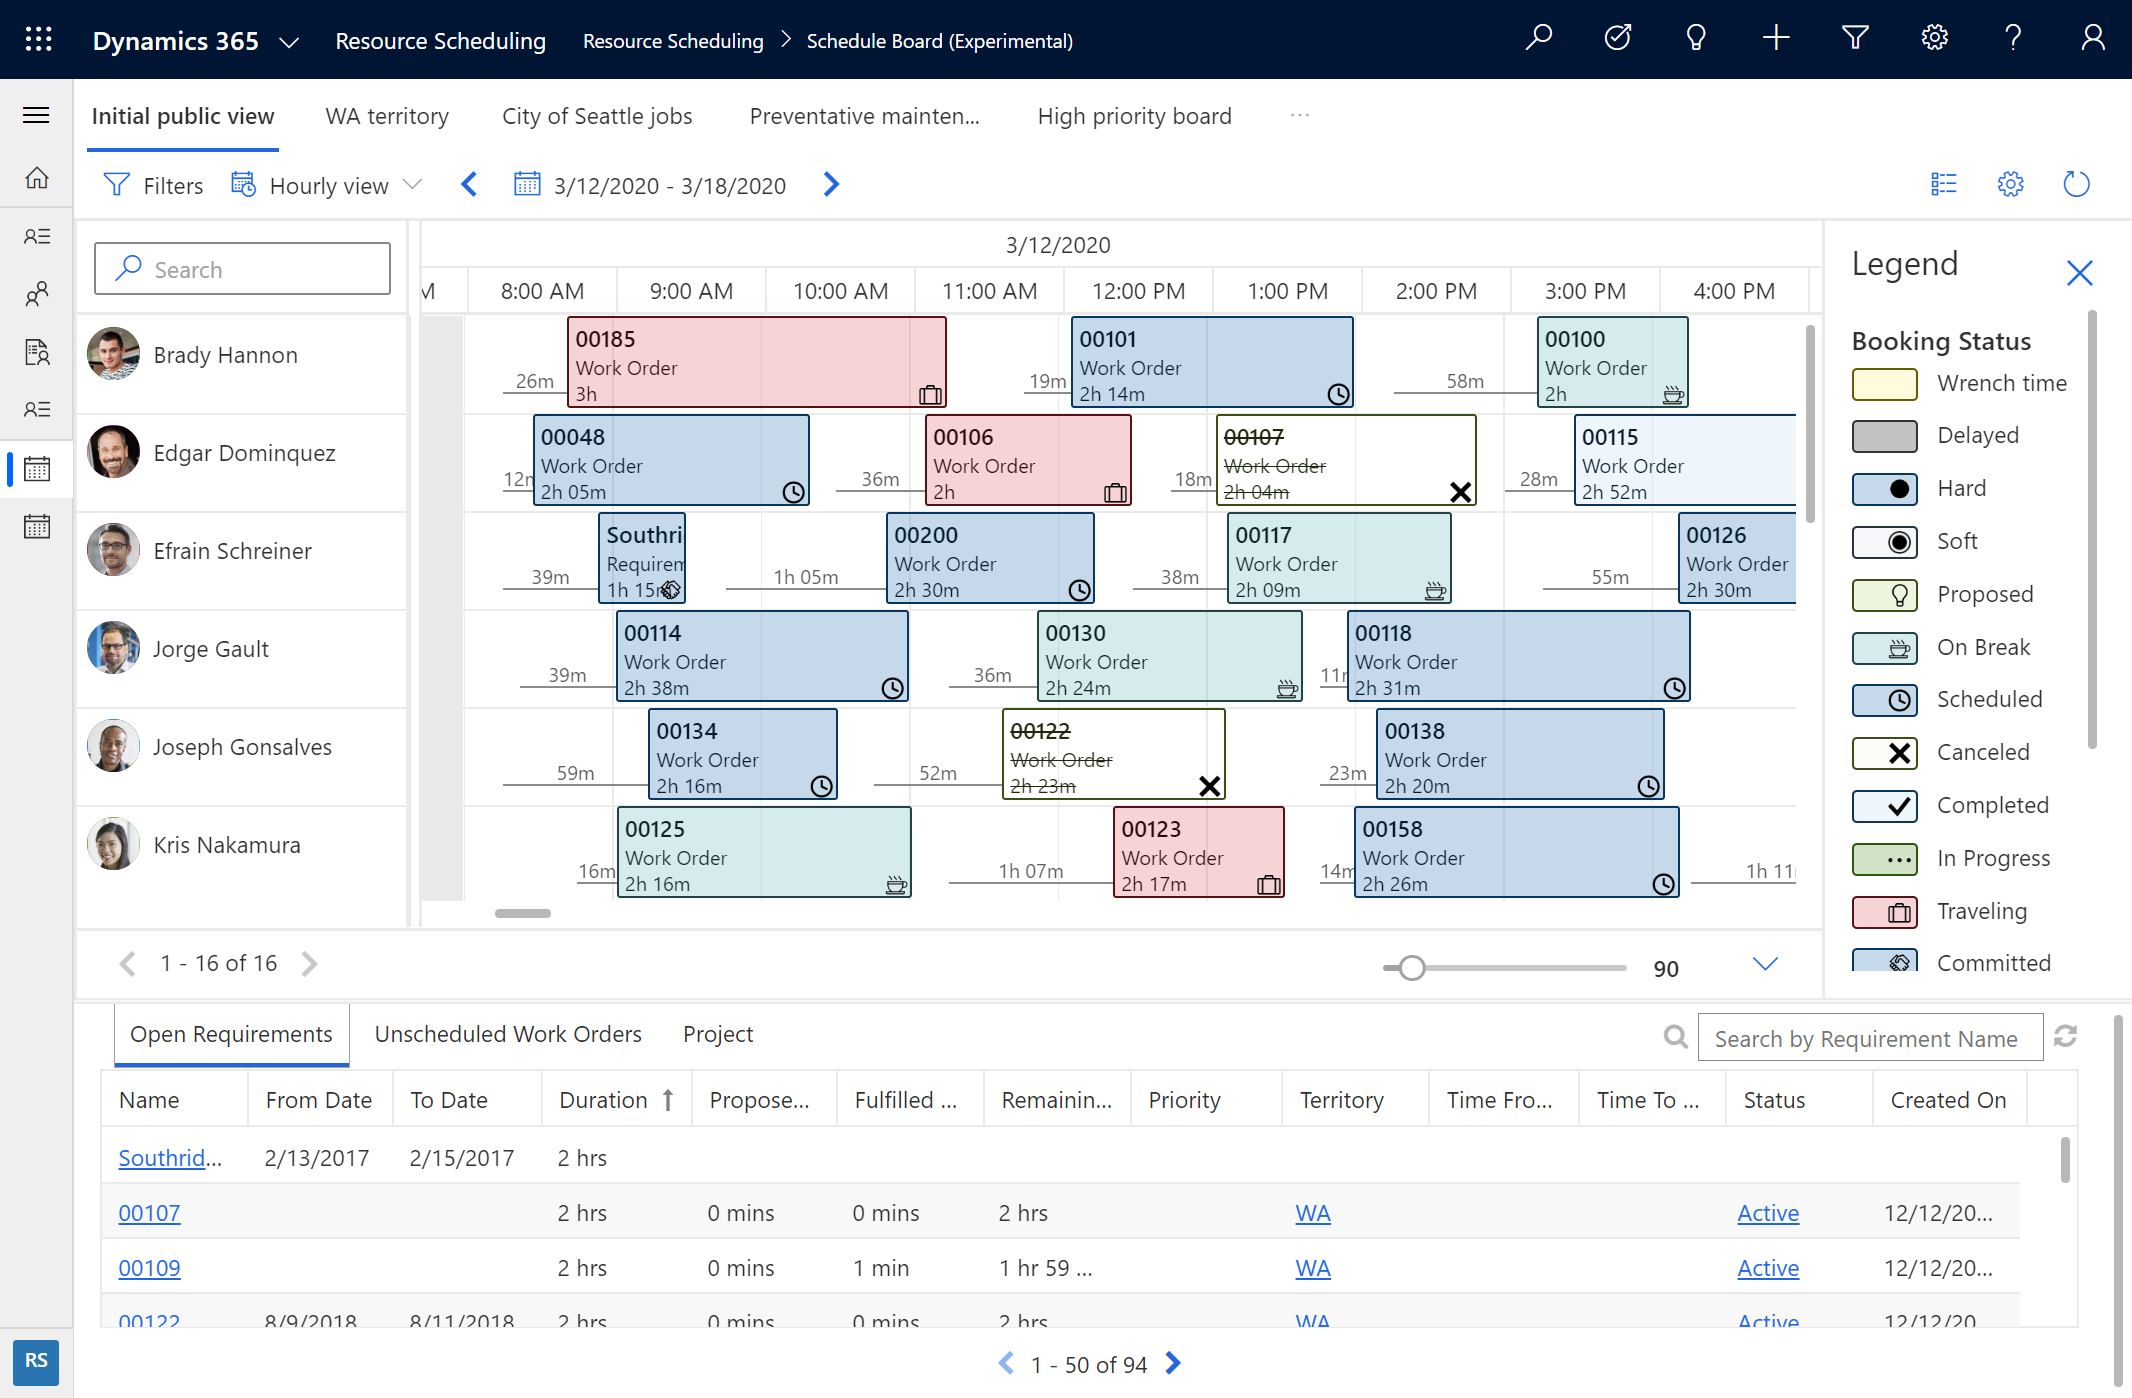
Current color schemes and ways of depicting travel time are intended to help make it easier for schedulers to see statuses and details.

For example, the preceding screenshot shows a "ghost booking" feature that helps schedulers know if a booking fits into a schedule before the booking is scheduled.
Foundation for new capabilities
The schedule board provides the foundation for future releases to help provide schedulers with insights and recommendations for how to improve schedules.
Prerequisites
The next generation schedule board is generally available and requires that you have Dynamics 365 Customer Service.
Select and filter resources
Choose which resources should display on each schedule board tab.
- Expand the filter pane, and then choose Select Resources.

- From the list of available resources on the left, move the ones you want to display on the schedule board to the right, and then select Apply.

Resource cards
Right-click a resource's name and then select View Resource Card to see more options, like the resource's skill set (characteristics) and roles. From here, you can also initiate a message, email, or phone call.

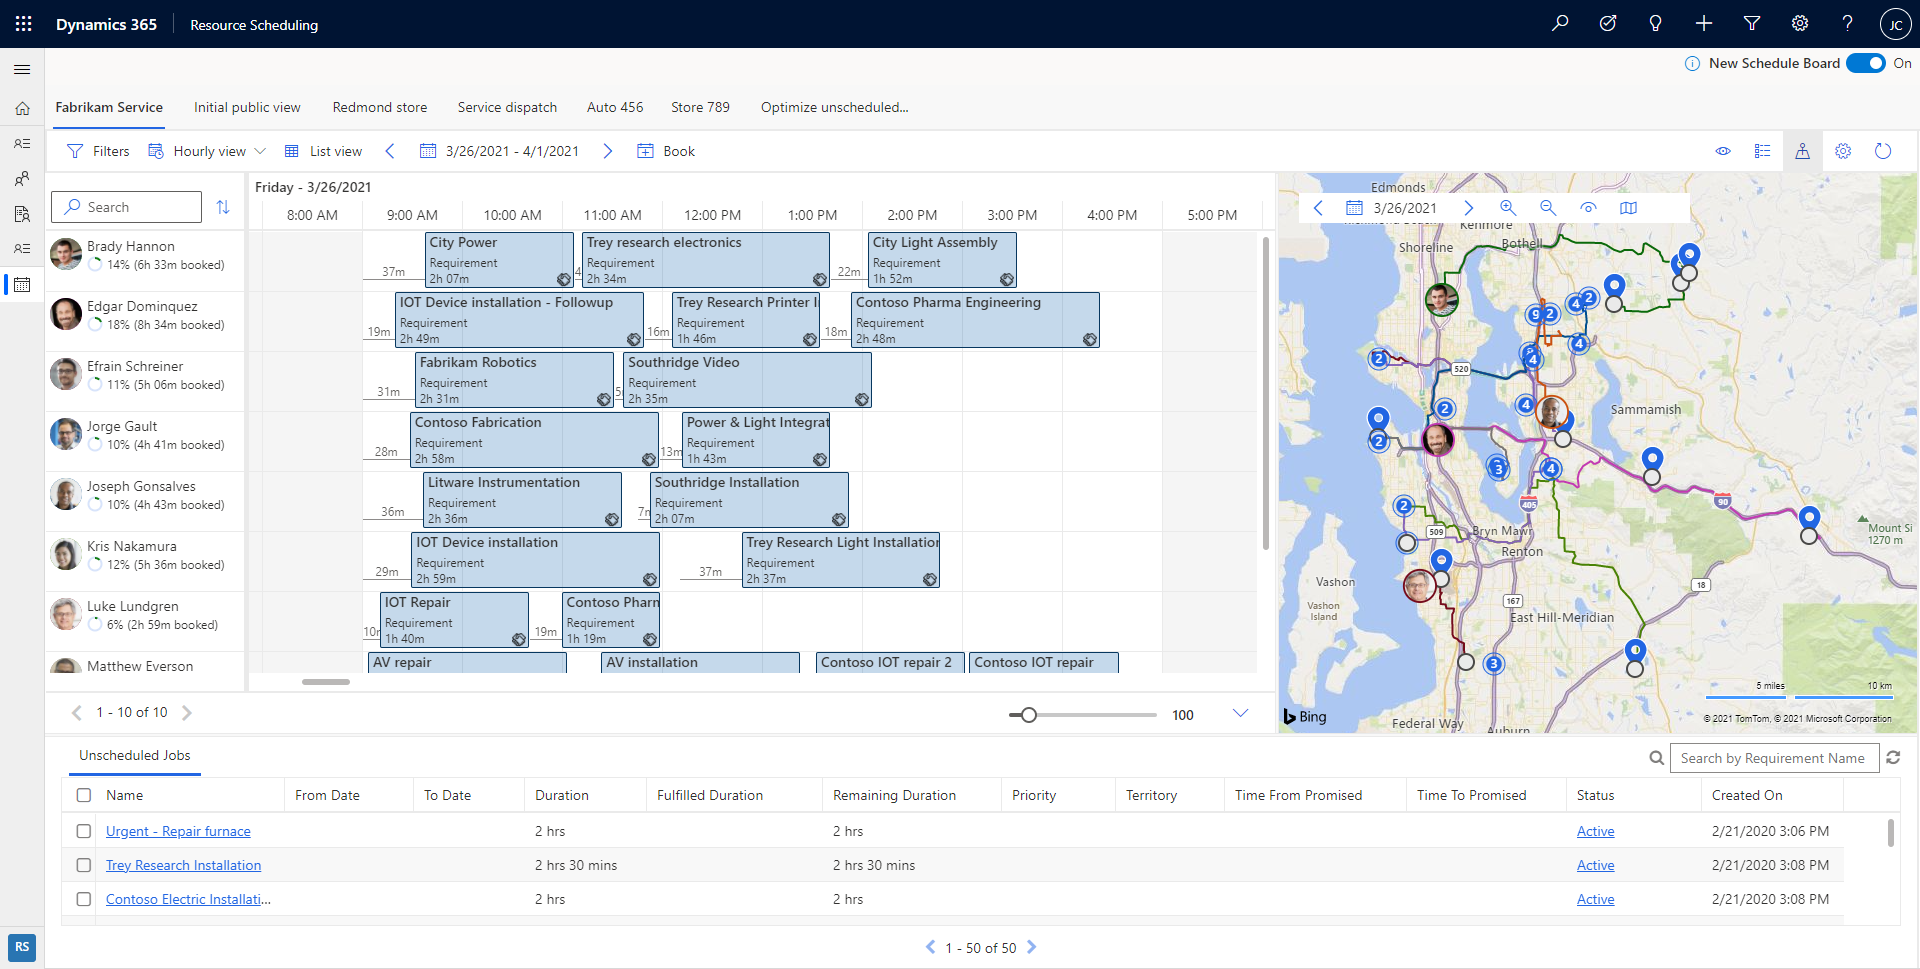
Map view of requirements and resources
To display the resources and requirements on a map, select the map icon on the upper-right side of the schedule board.

After expanding the map view, select a resource's name to see their route. The numbers indicate the order the resource is scheduled to arrive at each job (requirement) location.

On a zoomed-out view of the map, the requirements and resources are grouped together, and you can see a count of requirements and resources. This count helps you quickly identify a geographical area with more unscheduled jobs, and then start scheduling the jobs to nearest resources.

You can drag an unscheduled requirement pin from the map to the resource timeline and schedule it to that resource.


You can also drag the resource route to a nearby unscheduled requirement to schedule it and add it to the resource route.


Daily view
The schedule board supports a daily view of scheduled jobs, and supports dragging and dropping jobs to the schedule.

Scheduled requirements with a short duration display across the entire day to make it easier to view details. Hover over the requirement or double-click it to see the actual duration.

Weekly and monthly views
Switch to the weekly or monthly views to see scheduled jobs at a higher level. To trigger the booking panel, select a resource's time slot and a requirement.

The booking panel helps you schedule a service activity across multiple days and choose how the work should be divided each day.
Schedule resources
Beyond manual drag-and-drop scheduling, organizations that use resource scheduling optimization can select one or more requirements from the schedule board and either have the system Suggest resources or Book resources. This feature is currently in Preview for the organizations that are using Resource Scheduling Optimization.

Select Suggest resources to display recommended resources in the right panel for the scheduler to book.

Select Book resources to find the most optimal resources and book them without requiring further actions from the scheduler.

Suggest resources and Book resource capabilities on the new schedule board are currently only available for organizations using resource scheduling optimization.
Sometimes you might need to optimize only a single resource's schedule rather than a set of available resources. Single resource optimization provides a quick way to reoptimize a resource's schedule and travel route after schedule changes occur during the day. This functionality is available on the schedule board: Right-click a resource from any schedule board view, and then select Optimize Schedule.


Move bookings to a new resource, a new start date and time, or both
In Customer Service, the new schedule board provides an easy way to reassign and reschedule bookings in the same action. You can move bookings to resources on the current schedule board tab, or to resources on other schedule board tabs.
Move a booking to a resource on the current schedule board tab, or change the start date/time, or both
- Right-click a booking, and then select Move to.
- Reassign the booking to any resource on the current schedule board tab, or change the start date and the start time of the booking.
- Select Update to apply the changes.

Move a booking to a resource on a different schedule board tab, or change the start date or time, or both
- Right-click the booking, and then select Move to.
- Select the filter icon in the resource field, and then change the filter from Resources on this tab to All resources. Now, you can reassign this booking to any resource on any tab, and change the start date and start time of the booking.
- Select Update to apply the changes.

Automatic scheduling with optimization goals
The schedule board supports optimization goals. After schedulers select suggested resources, they can edit the optimization goal, which dictates how resources are recommended.

There's a default optimization goal that applies to the entire system and serves as the default for optimization requests. Schedulers can also edit the default optimization goal for each schedule board. Finally, schedulers can edit the optimization goal for a single optimization request by selecting Suggest Resources.
Edit multi-day bookings
After you create a multi-day booking across multiple days, weeks, or months, you can right-click the booking, select Edit, and then change how many hours are assigned for each day, week, or month via the booking panel on the right.

Use the appointments feature in resource scheduling
Organizations often use appointments in Dynamics 365. For example, a customer service representative (service representative or representative) might create a service appointment to help a customer with an issue. Other examples include organizations that create appointments because of integrations with other systems.
You can display Dynamics 365 Appointments (Microsoft Dataverse appointments) on the Customer Service schedule board alongside bookings, and configure them to be considered during scheduling to better understand whether a service representative or bookable resource is available.
For information on how to configure and use appointment scheduling, see Include appointments in scheduling.
Configuration considerations
- The new schedule board is currently supported on Microsoft Edge, Chrome, and Firefox browsers.
Add new schedule board to custom sitemap area
When using a custom sitemap or an app module, you need to update the sitemap to consume the new schedule board preview.
The following snippet is what it looks like before:
<SubArea Id="msdyn_ScheduleBoardSubArea" ResourceId="SitemapDesigner.NewSubArea" VectorIcon="$webresource:msdyn_/Icons/SVG/Calendar.svg" Url="$webresource:msdyn_/fps/ScheduleBoard/ScheduleBoard.html" Client="All,Outlook,OutlookLaptopClient,OutlookWorkstationClient,Web" AvailableOffline="true" PassParams="false" Sku="All,OnPremise,Live,SPLA">

The following snippet is what it looks like after:
<SubArea Id="msdyn_ScheduleBoardSubArea" ResourceId="SitemapDesigner.NewSubArea" VectorIcon="$webresource:msdyn_/Icons/SVG/Calendar.svg" Url="/main.aspx?pagetype=entitylist&etn=msdyn_scheduleboardsetting" Client="All,Outlook,OutlookLaptopClient,OutlookWorkstationClient,Web" AvailableOffline="true" PassParams="false" Sku="All,OnPremise,Live,SPLA">

URL:
/main.aspx?pagetype=entitylist&etn=msdyn_scheduleboardsetting
ID:
msdyn_scheduleboardtoggle
Other notes
- The schedule board is only supported in Unified Interface web, and not on tablets or phones.
- The booking status colors that appear on the schedule board have lower opacity than the defined booking status colors. This behavior is similar to the Outlook calendar. When a booking is selected on the schedule board, the booking color appears with normal opacity.
Uninstall the schedule board
To uninstall the schedule board solution ("Resource Scheduling Controls"), complete the following steps.
- Go to the Schedule Board Settings entity customization form.
- Remove the new schedule board preview control from the grid.
- Save and publish the changes.
- Go to the resource scheduling app, clear the browser's cache, and reload schedule board. The old schedule board loads without the toggle in the top-right side of the screen.
- Once the solution is uninstalled, the new schedule board isn't available for the environment until you upgrade your Customer Service app to the latest available version.