Note
Access to this page requires authorization. You can try signing in or changing directories.
Access to this page requires authorization. You can try changing directories.
Important
To use this feature, it must be turned on and the license terms must be accepted. What are Preview features and how do I enable them?
A preview feature is a feature that is not complete, but is made available before it’s officially in a release so customers can get early access and provide feedback. Preview features aren’t meant for production use and may have limited or restricted functionality.
We expect changes to this feature, so you shouldn’t use it in production. Use it only in test and development environments.
Microsoft doesn't provide support for this preview feature. Microsoft Dynamics 365 Technical Support won’t be able to help you with issues or questions. Preview features aren't meant for production use and are subject to a separate supplemental terms of use.
Applies to: Dynamics 365 Contact Center—standalone and Dynamics 365 Customer Service only
The Teams meeting integration feature provides a unified meeting experience that helps you, as a customer service representative (service representative or representative), to reduce your administrative workload and increase productivity. The Dynamics 365 records are accessible while conducting a meeting over Teams, which you can refer to and have contextually relevant conversations with your customers. You can also take notes to help save time, be more productive, and leverage better data within your organization.
As a representative, you can:
- Create and join Microsoft Teams meetings directly from Dynamics 365.
- Access and update Dynamics 365 records seamlessly within the context of a Microsoft Teams meeting.
- Capture notes and tasks seamlessly during a Microsoft Teams meeting, and have these notes and tasks automatically sync to records in Dynamics 365.
Meeting lifecycle
The lifecycle of a meeting can be divided into the following stages, with each stage catering to specific tasks:
- Pre-meeting: In this stage, you perform the following tasks:
- In-meeting: In this stage, you perform the following tasks:
- Use the side-panel to view and update record information
- Work with notes during a meeting
- Work with tasks during a meeting
- Work with activities during a meeting
- Post-meeting: In this stage, you perform the following tasks:
Create a Teams meeting
You can create a Teams meeting either from Dynamics 365 or Microsoft Outlook. While creating a Teams meeting, ensure that a Dynamics 365 record is linked to the meeting. Linking a record to the meeting enables you to view record details before the meeting, in a side panel during the meeting, and after the meeting.
You can link a Dynamics 365 record by selecting a Regarding record. When a record is linked prior to the meeting, the Dynamics 365 app is added automatically to the meeting, and you can see the details of the linked record in the side panel. If a record is not linked to the meeting, you won't be able to see the details of the linked record. In such a case, you should add the Dynamics 365 app to the meeting before it has been started, for a better experience.
Create Teams meetings in Dynamics 365
You can create a Teams meeting while creating a meeting either from the timeline of a record or from the activities page.
To create a Teams meeting from the Timeline control
On the timeline control of a Dynamics 365 record, select Create a timeline record > Meeting.
In the Quick Create: Meeting panel, enter the meeting information such as attendees, location, time, and description.
Turn on the Teams meeting toggle.
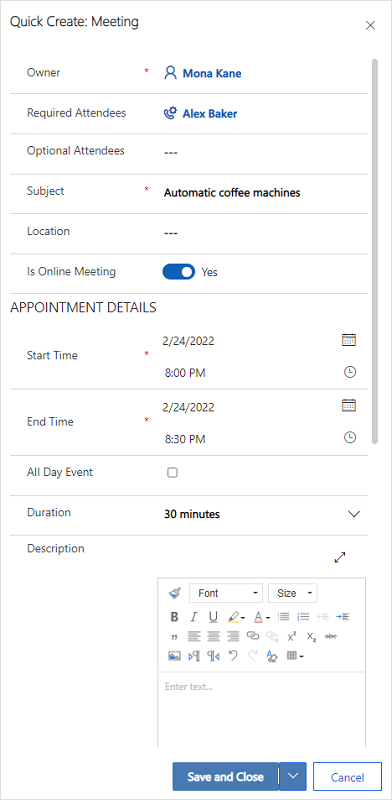
Select Save and Close. The meeting coordinates won’t display until after you save and close the record.
Note
When you create a meeting from the Timeline control of a record, the Regarding field is automatically populated with the record name from which the meeting is being created. This ensures that the Dynamics 365 app is added automatically to the Teams meeting and you can see the related record details during the meeting.
To create a Teams meeting from the Activities page
Sign in to the application.
On the sitemap, select Activities.
On the command bar at the top, select Meeting.
On the New Meeting page, enter the meeting information such as attendees, location, time, and description.
Turn on the Teams meeting toggle.
In the Regarding field, search and select a record that the meeting is related to. This ensures that the Dynamics 365 app is added automatically to the Teams meeting and you can see the related record details during the meeting.
Select Save & Close.
Create Teams meetings in Microsoft Outlook
You can create a Teams meeting in Microsoft Outlook, but the meeting will not be linked to a Dynamics 365 record automatically. You must install the Dynamics 365 app for Outlook to link the meeting to a Dynamics 365 record. After installing the app, open it, and search for the record in the Set Regarding field.
For information on creating a Teams meeting in Microsoft Outlook, see Schedule a Teams meeting from Outlook
For information on using the Dynamics 365 App for Outlook, see Basic navigation in App for Outlook (Dynamics 365 apps).
Add Dynamics 365 app to a Teams meeting
The Dynamics 365 app, when added to a Teams meeting, enables you to view record details before, during, and after a meeting. The Dynamics 365 app can be added either automatically or manually to a Teams meeting.
Automatically add the app
If you link a Dynamics 365 record to a meeting while creating it in Dynamics 365 or Microsoft Outlook, the Dynamics 365 app is added automatically to the meeting. This allows you to view record details before, during, and after a meeting.
Manually add the app
If you don’t link a Dynamics 365 record to a meeting while creating it in Dynamics 365 or Microsoft Outlook, it's recommended that you add the app to the meeting before joining the Teams meeting for a better experience.
To add an app before a meeting, first send the meeting invite, then open the meeting in Teams. Select Add a tab, search for the Dynamics 365 app, and add it.
To add an app during a meeting, after the meeting starts, select Add an app in the meeting controls at the upper-right area of the screen, search for the Dynamics 365 app, and add it.
Work with the Dynamics 365 app
The Dynamics 365 app enables you to view information of a record that is linked with a meeting. The record details can be viewed before the meeting, in the side panel during the meeting, and after the meeting.
View record details before or after a meeting
Open the meeting in Teams, and then select the Dynamics 365 tab. You can perform all actions on the linked record as you would in the application.
View record details during a meeting
Select the Dynamics 365 app icon in the meeting toolbar at the upper-right area of the screen. The record details are displayed in a side panel. You can view and update information such as notes and tasks.
Note
- The record side panel supports only Contact, Opportunity, Lead, Account, and Case tables.
- Case records are supported in the Customer Service Hub and Copilot Service workspace app only.
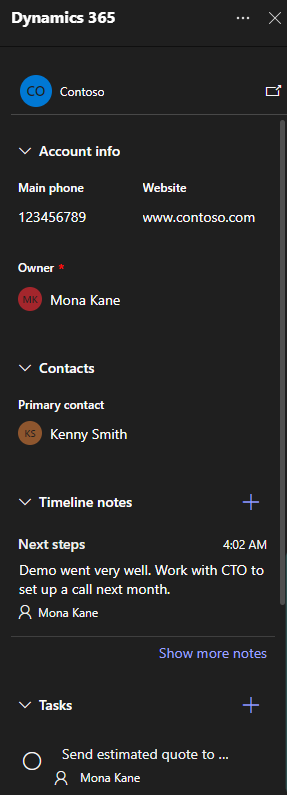
While in Teams, if you want to access a record directly in your Dynamics 365 app, you can open the record by selecting the popout icon on the side panel.
Join a Teams meeting
You can join a Teams meeting from Dynamics 365, Microsoft Outlook, or Microsoft Teams.
Join a Teams meeting from Dynamics 365
Open the meeting record from the Timeline or from the Activities page.
Perform one of the following actions:
- On the command bar at the top, select Join Teams Meeting.
- In the Teams meeting field, select Join Teams Meeting.
- Go to the Description area, hold the Ctrl key, and select Click here to join the meeting.
Join a Teams meeting from Microsoft Outlook
Open the calendar event.
Perform one of the following actions:
- On the Meeting tab in the ribbon, select Join Teams Meeting.
- In the message body, select Click here to join the meeting.
Join a Teams meeting from Microsoft Teams
You have several options. Learn more in Join a meeting in Teams
Work with notes during a meeting
Prerequisites:
- A record must be linked to the meeting and the Dynamics 365 app must be added to the meeting.
- The side panel must be launched by selecting the Dynamics 365 app icon in the meeting controls at the upper-right area of the screen.
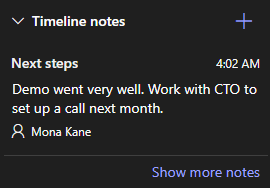
The latest note is displayed under the Notes section in the side panel. You can view all notes in a standalone panel by selecting Show more notes. If you add, edit, or delete notes from the side panel, the changes are synced with the linked Dynamics 365 record.
Add a note
In the Notes section, select
 .
.In the Add note form, enter a title and description of the note.
To attach a file, select Attach file.
Select Save. The note is added to the record and displayed in the side panel.
Edit a note
In the Notes section, hover over the note, and then select the Edit icon
 .
.In the Edit note form, update the title and description of the note as desired.
Select Save.
Delete a note
In the Notes section, hover over the note, and then select the Delete icon
 .
.In the confirmation message, select Delete.
Work with tasks during a meeting
Prerequisites:
- A record must be linked to the meeting and the Dynamics 365 app must be added to the meeting.
- The side panel must be added to the meeting.
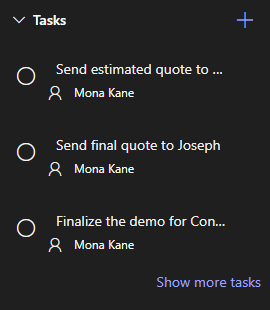
The open tasks are displayed under the Tasks section in the side panel. You can view all tasks in a standalone panel by selecting Show more tasks. If you add, edit, or delete tasks from the side panel, the changes are synced with the linked Dynamics 365 record. The tasks are sorted by their due date, prioritizing the tasks that are due soon or overdue.
Add a task
In the Tasks section, select the Add icon
.Add the task details.
Complete a task
In the Tasks section, select the option button for a task to mark it as complete.
Reopen a task
In the Tasks section, select Show more tasks.
In the Completed tasks section, select the task to reopen it.
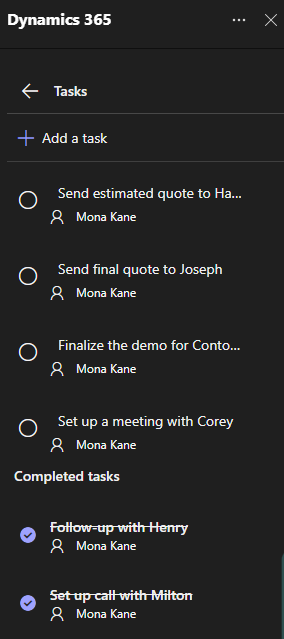
Edit a task
In the Tasks section, hover over the task, and then select the Edit icon
.Edit the task details as desired.
Delete a task
In the Tasks section, hover over the task, and then select the Delete icon
.In the confirmation message, select Delete.
Work with activities during a meeting
Prerequisites:
- A record must be linked to the meeting and the Dynamics 365 app must be added to the meeting.
- The side panel must be launched by selecting the Dynamics 365 app in the meeting controls at the upper-right area of the screen.
Recent activities are displayed under the Activity section in the side panel. To view all activities, select Show more activities.
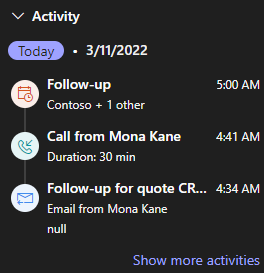
You can view only appointment, email, and phone call activities that are associated with the record. To view other associated activities, go to the customer engagement app. If you want to view details of an activity, in the Activities section, select an activity. The activity record opens in your web browser.