Note
Access to this page requires authorization. You can try signing in or changing directories.
Access to this page requires authorization. You can try changing directories.
Note
Community interest groups have now moved from Yammer to Microsoft Viva Engage. To join a Viva Engage community and take part in the latest discussions, fill out the Request access to Finance and Operations Viva Engage Community form and choose the community you want to join.
This article shows how to expand an existing report data set that uses X++ business logic in a report data provider (RDP) class.
This article focuses on expanding an existing report data set that uses X++ business logic in a report data provider (RDP) class. You use custom delegate handlers and table extensions to include more field data and calculations. You don't have to over-layer the Application Suite. You then create custom designs that replace the standard application solutions and present the data to users. The following illustration shows a typical application customization, as described in this article.

Important considerations
Before you apply this solution, be aware of the following considerations.
You can't directly extend RDP classes. However, the platform provides extension points that enable data set expansion without duplicating business logic in the standard application.
Two methods are available to expand report data sets. Use the strategy that's appropriate for your solution:
- Data processing post-handler – This method is called only one time, after the ProcessReport method completes and before the data set is returned to the report server. Register for this post-handler to perform bulk updates on the temporary data set that the standard application solution produces.
- Temp table inserting event – This method is called for each row that is added to the temporary table. It's more suitable for calculations and inline evaluations. Avoid expensive queries that have many joins and look-up operations.
Use event handlers to redirect menu items to your new report design. You can customize all aspects of an application reporting solution by using event handlers. Add a PostHandler event for the controller class to reroute user navigation to a custom report design.
Expand a report data set
The following walkthrough shows the process of expanding an existing application data set by using a "pure" extension-based solution. The solution includes a custom Rentals list report for the Fleet Management application. The new report includes more rental charge data in the rental details. The application customizations are defined in an extension model. The following illustrations show the standard design and the custom solution.
Before (standard design)

After (custom solution)

Create a new model for your application customizations. For more information about extension models, see Customize through extension and overlayering. For this example, add a custom report to the Fleet Management Extensions model.
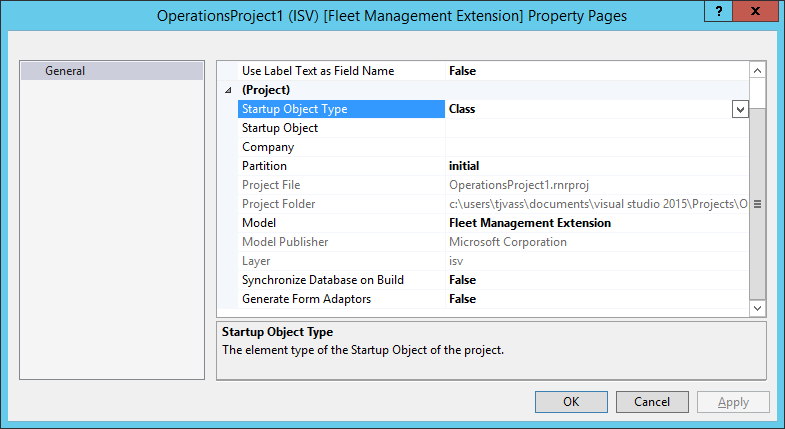
Create a new project in Microsoft Visual Studio. Make sure that the project is associated with your extension model. The following illustration shows the project settings.
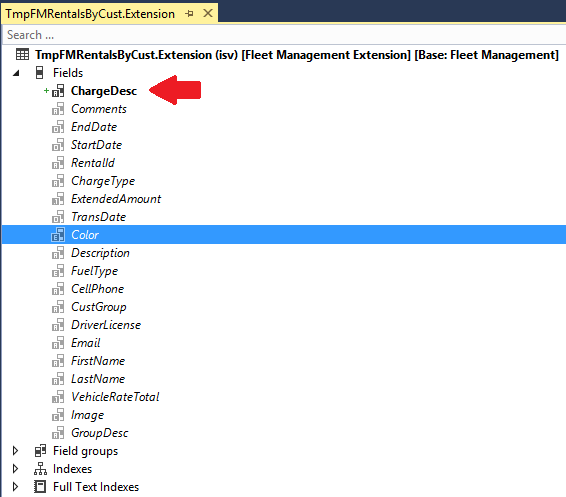
Add a table extension to store the custom report data. Find the temporary cache for the TmpFMRentalsByCust data set that the RDP class populates, and create an extension in your model. Define the fields that store the data for the report server, and then select Save to save your changes. The following illustration shows the table extension that is required for this example.
Add your custom report to the project. The custom design closely resembles the standard solution. Therefore, you can just duplicate the existing application report in the Fleet Management Extension model, and then update the report design so that it includes the custom title and another text box in the Rental Charges container.
Rename the report so that it has a meaningful name. For this example, rename the custom report FERentalsByCustomer to distinguish it from the standard solution.
Restore the report data set references. Open the report designer, expand the Datasets collection, right-click the data set named FMRentalsByCustDS, and then select Restore. The data set expands so that it includes the newly introduced columns. Therefore, these columns are now available in the report designer.
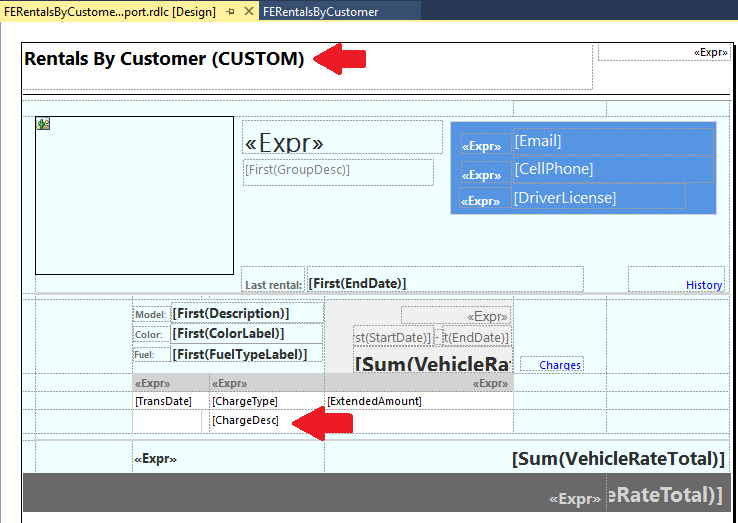
Customize the report design. The designer offers a free-form design surface that you can use to create the custom solution. The following illustration shows the custom design that is used for this example.
Add a new report handler (X++) class to the project. Give the class a name that appropriately describes that it's a handler for an existing application report. For this example, rename the class FERentalsByCustomerHandler to distinguish it from other report handlers.
Add a PostHandler method to begin to use your custom report. In this example, extend the controller class in the standard solution, FMRentalsByCustController, by using the following code.
class FERentalsByCustomerHandler
{
    [PostHandlerFor(classStr(FMRentalsByCustController), staticMethodStr(FMRentalsByCustController, construct))]
    public static void ReportNamePostHandler(XppPrePostArgs arguments)
    {
        FMRentalsByCustController controller = arguments.getReturnValue();
        controller.parmReportName(ssrsreportstr(FERentalsByCustomer, Report));
    }
}
User navigation in the application now reroutes to the custom reporting solution. Take some time to deploy the custom report to the report server and verify that the application is using it. At this point, you just need to add the business logic that populates the custom fields that you introduced in step 3. In the next step, you must select the method of data set expansion that's appropriate for your solution.
Add X++ business logic to populate the custom field data. Select the data processing technique that makes sense for the type of transformation that you require for the solution.
Option 1: Add a data processing post-handler. Apply this technique for bulk insert operations that use a single pass over the result set of the standard solution. Here's the code that expands the data set by using a table lookup.
class FERentalsByCustomerHandler
{
    [PostHandlerFor(classStr(FMRentalsByCustDP), methodstr(FMRentalsByCustDP, processReport))]
    public static void TmpTablePostHandler(XppPrePostArgs arguments)
    {
        FMRentalsByCustDP dpInstance = arguments.getThis() as FMRentalsByCustDP;
        TmpFMRentalsByCust tmpTable = dpInstance.getTmpFMRentalsByCust();
        FMRentalCharge chargeTable;
        ttsbegin;
        while select forUpdate tmpTable
        {
            select * from chargeTable where chargeTable.RentalId == tmpTable.RentalId;
            tmpTable.ChargeDesc = chargeTable.Description;
            tmpTable.update();
        }
        ttscommit;
    }
}
Option 2: Add a temp table Inserting event. Apply this technique for row-by-row calculations. Here's the code that expands the data set by using a table lookup.
class FERentalsByCustomerHandler
{
    [DataEventHandlerAttribute(tableStr(TmpFMRentalsByCust), DataEventType::Inserting)]
    public static void TmpFMRentalsByCustInsertEvent(Common c, DataEventArgs e)
    {
        TmpFMRentalsByCust tempTable = c;
        FMRentalCharge chargeTable;
        // update the value of the 'ChargeDesc' column during 'insert' operation
        select * from chargeTable where chargeTable.RentalId == tempTable.RentalId
        && chargeTable.ChargeType == tempTable.ChargeType;
        tempTable.ChargeDesc = chargeTable.Description;
    }
}
You finished expanding the report data set. After you compile the application, it reroutes user navigation to the new report design by using the custom X++ business logic that you defined in the report class handler that is defined in the extension model.