Note
Access to this page requires authorization. You can try signing in or changing directories.
Access to this page requires authorization. You can try changing directories.
Note
Community interest groups have now moved from Yammer to Microsoft Viva Engage. To join a Viva Engage community and take part in the latest discussions, fill out the Request access to Finance and Operations Viva Engage Community form and choose the community you want to join.
This article describes how to install and configure the Document Routing Agent. The Document Routing Agent is a downloadable application that you can use to enable network printing scenarios. You can enable network printers for specific companies by using in-client administrative pages.
Preparing to install the Document Routing Agent
- Supported on Windows 8.1, Windows 10, Microsoft Windows Server 2012 R2, Microsoft Windows Server 2016, Microsoft Windows Server 2019, or Microsoft Windows Server 2022.
- Access to network printing resources requires Active Directory Domain Services (AD DS) authentication.
- When installing the Document Routing Agent, make sure you're signed in as the Admin user.
- The Microsoft Entra ID (Azure AD) account that you use to configure the Document Routing Agent must share the same domain as the Azure tenant.
- The Document Routing Agent requires .NET 4.7.2 or later and Adobe Acrobat Reader 32-bit or 64-bit on the client.
- Configure Adobe client print settings to prevent document scaling.
- The person installing the Document Routing Agent and configuring printers needs to have the "Document routing client" security role.
Network printers that are registered for applications can be used by all legal entities (also known as companies) that are defined in the environment. Network printer settings are company-specific. Therefore, administrators can restrict access, based on the user's active company. For example, users in the active company might have access to all the network printers that are registered by the Document Routing Agent. However, users in another company don't have access to those printers until access is explicitly enabled for that company.
Key concepts
This article helps you with the following tasks:
- Identify the key components that are involved in the support for network printing in applications.
- Learn about the function of the Document Routing Agent.
- Configure the Document Routing Agent to work against an existing application.
- Use administration pages to manage access to network printers.
Install the Document Routing Agent
Applications use the Document Routing Agent to manage the spooling of documents to network printer devices. You can get the client by using direct links that are embedded in the web application. Use the following procedure to download the application to your local computer. You can then access both local and network printers that are connected to your computer, from a single deployment. Ensure the user installing the agent has the Document routing client security role.
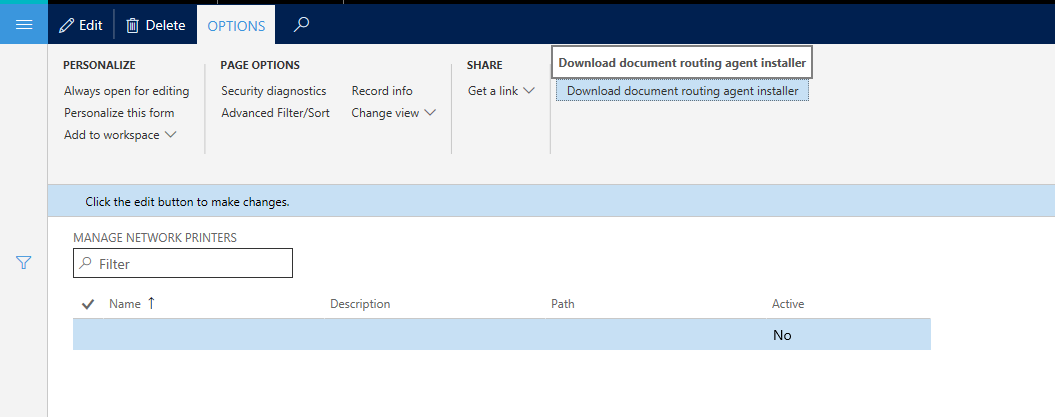
Open the Manage network printers page (Organization administration > Setup > Network printers).
On the Options tab, in the Application group, select Download document routing agent installer.
Run the downloaded file to begin the installation process.
Complete the setup process.

After you install the application, you can register local printers as network printers for the applications.
Note
It's recommended to update the Document Routing Agent to the most current version whenever the application release on the environment has been updated, othgerwise you might experience issues such as:
Observable performance degradation in applications, Document loss that is associated with orphaned print jobs, Inconsistent handling of printed documents that have custom margins
For more information, see Update the Document Routing Agent.
If you don't update existing installations of the DRA the most current version, you might experience issues such as:
Observable performance degradation in applications Document loss that is associated with orphaned print jobs Inconsistent handling of printed documents that have custom margins
Configure the Document Routing Agent
Use the following procedure to configure the client application so that it can communicate with the Azure services that host the documents that are in-flight.
Close all browser instances that are running the application. This action resets the local Azure authentication tokens.
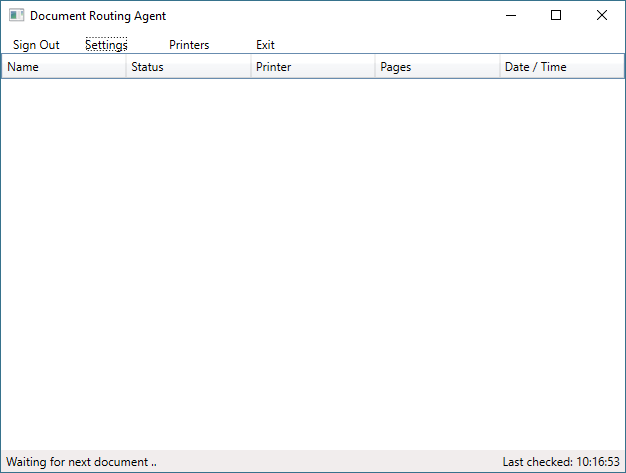
On your desktop, run the Document Routing Agent.
On the toolbar, select Settings.
Add the following settings:
- Application ID – The ID that's unique to the application and should be entered automatically.
- finance and operations URL – The base URL of the application.
- Azure AD tenant – The domain name of the Azure AD.
Select OK.
Select Sign In to sign in to your account.
Note
The account must share the same domain as the Azure AD that is associated with the application. The Document Routing Agent is now ready to process documents.
After you sign in, the Printers button becomes available on the toolbar.
Register network printers
Before you complete this procedure, make sure that you installed all the network printers on the local host computer. All the printer devices that you install are available for service registration. Be sure to select only the printers that you want to expose in the applications.
On the toolbar, select Printers.
Select the printers to make available in the applications.
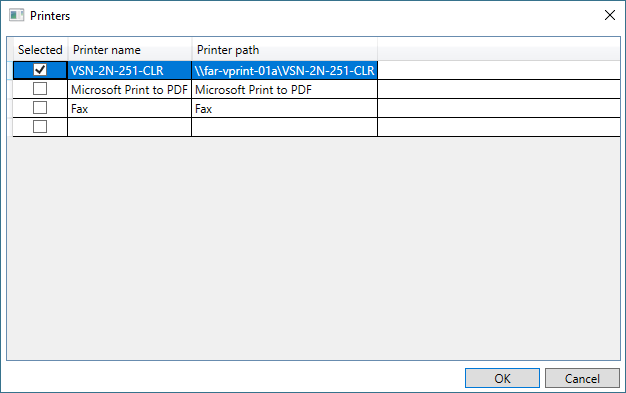
Specify a default name for the printer.
Select OK.
After you complete this procedure, the selected printer devices are registered in the application's network printer catalog. System administrators can now enable the printers for access from within the application.
Administer network printers
Use client pages to manage access to the network printers that one or more Document Routing Agents register. Network printers are uniquely identified by their path. Therefore, printers are listed one time, even if more than one Document Routing Agent registers them. Use the following procedure to activate the Application Object Server (AOS) network printers.
Open the Manage network printers page (Organization administration > Setup > Network printers).
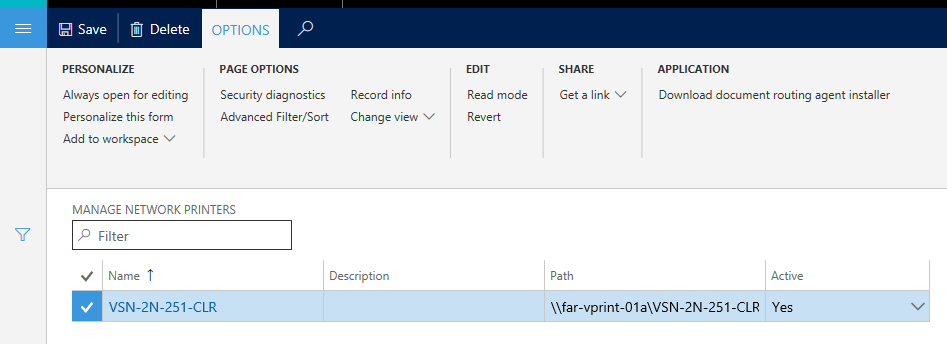
Edit the existing entries that are mapped to each network printer. As part of your changes, edit the connection path.
To include a printer as an option in the Print Destinations field, set the Active field to Yes.
The network printers can now be used in the application.
Note
Ensure that your network printer destinations are kept up to date, and that document routing is properly configured with printers that are registered against Document Routing Agents. If you send documents to a printer that no longer exists, the print queue continues to grow and slow down queries that poll the print queue.
Adjust the document routing history cleanup batch job
A cleanup batch job for document routing history is enabled by default and runs daily. This batch job purges document routing history that's older than seven days. Use this history for troubleshooting or traceability if there are issues with printing. Depending on how you intend to access this historical data, you can reduce the retention period from the default value of seven days, which is considered an upper limit. Having fewer records in this table ensures that printing has optimal performance. You can configure this setting at https://[host_adress]/?mi=DocumentRoutingHistoryCleanupConfig. Set the value for JobHistoryHours (number of hours to retain history).
As part of the Document Routing Agent polling, a query runs against this table. This query should execute quickly, but if there are many records in this table, a large print job can be slow. Ensure that this batch job runs daily, and configure this setting to reduce how much print history you retain.
Excluding printers with stuck print jobs
The Enable excluded printers setting handles problematic printers and drivers. When you enable this setting, if a print job is sent to the printer spool and doesn't return with a Pending status, the Document Routing Agent adds the printer to an excluded list after the time specified in the Abort a stuck print job at field. (The default time is five minutes). The Reset this printer every x minutes field, which has a default value of 30 minutes, adds the printer back after the specified time and attempts sending print jobs.
The administrator can also see any excluded printers in the Network printers section in the Spooler status column. The administrator can reset any excluded printer by selecting the Reset icon in the Reset column. In addition, the administrator can send a test page to the printer by using the Print test page button.
Frequently asked questions
Does the Document Routing Agent need to be installed on each computer where a user connects by using a browser?
No. Individuals who access the provisioned environment can share client installations of the Document Routing Agent. We recommend that you install agents on one or more print servers or other domain-hosted clients that have access to network printers.
If the Document Routing Agent belongs on a network print server, why doesn't the client run as a service?
The Document Routing Agent now supports running in the background as a service. Ensure that you download the latest version of the client. For more information, see Run the Document Routing Agent as a Windows service.
Do I need to update credentials or refresh Microsoft Entra authentication tokens on a recurring basis?
Yes. The Microsoft Entra token must be refreshed every 90 days. If you don't refresh the token, the Document Routing Agent can't authenticate and retrieve printing instructions applications.
Is the Document Routing Agent supported on Microsoft Windows Server 2019?
Yes. Microsoft Windows Server 2019 supports the Document Routing Agent.
Note
If you configure the server to prevent background service, the Document Routing Agent client can't run as a service. For more information, see Run the Document Routing Agent as a Windows service.
Will Microsoft add support for Microsoft Windows Server 2008 servers?
No, not at this time. The Document Routing Agent has several dependencies on Azure capabilities that are available only in Microsoft Windows Server 2012 R2 and Microsoft Windows Server 2016.
Does the user who installs the Document Routing Agent have to be part of a finance and operations apps security group?
Yes. To access the agent installation links, the user must be part of the Document routing client security role.
How many network printers can the Document Routing Agent support?
The number of supported network printers depends on the number of legal entities and the number of network printers deployed. If you have 50 printers and one legal entity, a single Document Routing Agent can handle the load (although you'd want more than one to ensure high availability). If you have a large number of printers and legal entities, you should do some performance testing to determine the number of Document Routing Agents that you need.
How many Document Routing Agents should be configured per printer?
You should configure multiple Document Routing Agents for your printers to ensure high availability. However, limit the number of agents per printer to no more than three agents. Each Document Routing Agent poll needs to query the queue to pick up documents sent to printers registered in that Document Routing Agent client. The more printers that are associated with a Document Routing Agent, the slower the query is. This issue is especially true when there are a large number of pending jobs in the queue. It's better to have a smaller number of printers across two to three Document Routing Agents, than a large number of printers across three or more Document Routing Agents.